Please tell me where the relay for turning on the cooling fan is located on the injection engine nine, I can’t find it written everywhere in the books for the carburetor. The problem is the fact that the antifreeze is bubbling and the vent does not turn on. Our client has already changed more than once the sensor, the brake switch, the reservoir caps, the pipes are old, they were just a pump, the whole vent works, you take off the chip from the sensor, it starts to turn and the check lights up on the panel, all that remains is to find the relay can be found in it It also seems like all the air has been expelled. tell me maksim1991, 3 January 2012, 14:46, #11 car VAZ21093 (low panel) tell me please, I turn on the ignition, the device panel does not light up, that is, the battery charge and coolant temperature indicators do not light up. water, fuel level. sell the entire panel does not work. At first I turned the key back and forth, then it would light up, then it wouldn’t. I thought about a problem in the ignition switch, changed it, the problem remained, I read on one forum that you will like the problem in the mounting block! I started to remove it, a dark-colored wire was screwed to the fastening bolt, as I realized it was a mass! I unscrewed the mounting block and the wire just fell off. Apparently the reason for the non-working panel was specifically that this common rumor did not connect the wire! So, please tell me from which connector this common rumor can come out of the ground wire? wires are small, length cm 20. 25! I will suggest a method for troubleshooting the radiator cooling fan. It often happens, especially in cars with high mileage, that the cooling fan stops turning on. By and large, it’s easy to find the fault why the radiator cooling fan doesn’t turn on, but unfortunately you need to understand in what order to find it. I will find a problem with the fan not turning on on a VAZ 2109, but this common rumor principle of troubleshooting can certainly be applied to any car. When the car started to boil, but the fan did not turn on, the first idea was that there was a problem in the fan, due to a different wiring. Often there is a problem not with the fan in the thermostat; it is jammed, so liquid stops circulating through the radiator, and therefore the radiator sensor does not respond to turn on the fan. You can check if the thermostat is working like this: if the car is seething and the bottom of the radiator is cool, this is 100 percent the thermostat is jammed, but the fan is not. If the bottom of the radiator is hot, the thermostat is working, the cause is the fan, read below. Turn on the ignition in the car. First, check the fuse, it is shown in the photo, if the fuse is intact, look further. Now there is an option to check the fan itself, there are wires with a plug coming from it, disconnect the plug and directly from the battery, carefully connect the wires to the plug (plus or minus there is no difference) if the fan does not spin, then change the fan itself. Next, start with the most common thing, this is the radiator sensor, which will turn on the cooling fan. Remove the plugs from the radiator sensor and connect them to each other as shown in the photo; if the fan starts, it means the radiator sensor is damaged, change it. Photo. Arrow 1 shows the cooling fan fuse, arrow 4 shows the fan relay.
Radiator fan of VAZ 2114 ch1 does not turn on
If it does not start, then connect the wire that goes to the fuse box directly to ground (usually it is snow-white with a dark stripe), if it starts, it means there is a break in the second dark wire, find the break, or connect it perfectly to ground. Then connect these two wires together, if the fan starts working, it means you have perfectly connected the dark wire to ground. What remains for our client to do is repair the cooling fan, if that doesn’t help, then read below. Photo. The arrow shows how to connect the radiator sensor wires. Now it doesn’t hurt to check the fan relay, just replace it with the adjacent relay, they are similar, and connect the wires of the radiator sensor to each other as described above. If the fan starts working, then replace this relay with a new one. If it doesn't help, read below. Photo. The arrow shows the fan sensor on the radiator. Now it doesn’t hurt to check if there is voltage to the fan in the fuse block, take a piece of wire and plug it into the relay connectors, as shown in the photo, if the fan turns on, it means there is voltage going to the fan inside the fuse block. Photo. Checking the fuse box. Now it doesn’t hurt to check if there is voltage to the fan in the fuse block, take a piece of wire and plug it into the relay connectors, as shown in the photo, if the fan turns on, it means there is voltage going to the fan inside the fuse block. If it doesn’t work, it means there is a break in the track inside the block, but because it started spinning, I refused to disassemble it. Photo. Check the voltage in the fuse box, power supply to the fan relay. Check if there is voltage on the fan relay itself, this will be done with a light bulb, as shown in the photo, you can do it without a light bulb, just sharply strike the second end of the wire to ground, when the spark jumps, what remains to be done for our client works. If there is no voltage at this connector, it means there is a broken track in the fuse block. Photo. The arrow shows the ignition switch. After these procedures, we learned that our client still works, except for the textbook, there is no connection to the radiator sensor, in this case you will like a break in the wire itself, or the output paths to the radiator sensor wire. Photo. The arrow shows the wire that goes to the radiator sensor. This means that it remains to check the radiator sensor wire itself; for this purpose, you remove the switch, it is shown in the photo, because, however, it interferes with getting to the fuse block plugs. Remove the connector from the fuse block and check the radiator sensor wire for a break, it is shown in the photo. Of course, check the wire like this: connect the wire to the plus of the battery, and plug the other end into the connector of the chip, remove the plug from the sensor and connect the light bulb, in other words, with a sharp movement, draw a ground, if there is no voltage, then there is a break in this wire. Photo. Broken radiator sensor wire. I was lucky, I found a break, but you will like it in the casing, and you can’t reach it, then it’s easier to stretch a new wire, alas, because there are plugs at the ends of this wire, that is, the option is to cut the plug so that there are pieces of wires left, strip them and connect them to new wire.
Fan connection 2108, 2109, 21099
Until 1998, on vehicles with the old fuse block 17.3722 (finger fuses), the fan circuit included a relay 113.3747. After 1998 there was no such relay.
Also, before 1998, the TM-108 switching sensor was used (the closing temperature of its contacts is 99 ± 3 ° C, the opening temperature is 94 ± 3 ° C), after 1998 the TM-108-10 with similar temperature ranges or its analogues from different manufacturers . The TM-108 sensor only works in conjunction with a relay amplified for high current. TM-108-10 can work with or without relay.
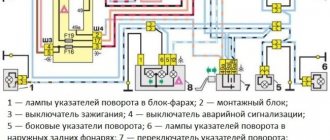
Scheme for switching on the engine cooling fan on a VAZ 2109 with mounting block 17.3722
K9. fan motor start relay. A. To terminal “30” of the generator
Scheme for switching on the engine cooling fan on a VAZ 2109 with mounting block 2114-3722010-60
A. To terminal “30” of the generator
If the cooling fan does not work
To drive the fan, a DC electric motor with permanent magnetic excitation ME-272 or similar is installed. Technical data of the electric fan and fan switch sensor:
The cooling fan may not turn on due to:
Fuse VO is located in the mounting block of the car's engine compartment and is marked F7 (20 A). The test is carried out using self-diagnosis included in the probe mode.
vtulka_0.jpg
How can you get it out yourself? If you were able to notice that the starter sometimes cranks your power unit with tension when the battery is fully charged, then the culprit for the phenomenon is the armature, which touches the stator. A small problem is enough for the starter shaft to become slightly misaligned: the narrow gap disappears completely. But sometimes the reason lies in severe wear of the bearing (front). You can sleep peacefully for a day: this problem can be quickly solved. To eliminate it, you need to prepare a tap of suitable size, find a drill chuck, take a long bolt and an old bushing, a jar of nuts and a box of nails. Now it’s worth disconnecting the battery, the starter, and then removing it from the “coat,” that is, removing the wiring. Happened? Proceed to unscrew the lower bolt of the device and remove the remaining fasteners from the starter.
We take the sword and install it in the chuck of a hand drill: let's try to make a thread in the sleeve
Carefully! Carry out the following actions at low speeds. A shooter is like a girl: the object is fragile
Excessive force or slight misalignment can break it. God forbid this happens: you have to fork out money for a new product. Although you can carry out resuscitation using a long threaded bolt, turning out new grooves. Once they are ready, you need to insert the nails so that their tips protrude no more than a centimeter above the end.
VAZ cooling fan connection diagram
All basic electrical diagrams and modifications for connecting the liquid cooling fan (CO) in VAZ cars of various models are given. What is the essence of VO’s work? The electric motor with an impeller on the shaft is installed in a rectangular metal frame, with which it is attached to the rear of the radiator. When voltage (12V) is applied to the actuator contacts, it begins to work, rotating the blades and creating a directed air flow that actually cools the antifreeze or antifreeze.
Replacing an electric fan in a car
Where is the temperature sensor located?
If the temperature sensor does not show on the instrument panel, there is a high risk of overheating the engine, since the instrument panel does not inform the driver about the heating of the internal combustion engine coolant. Of course, the instrument panel or electrical wiring may be faulty, but most often the temperature sensor (DTOZH) on the engine itself refuses to work.
Where is the temperature sensor located on an injection car 099? Of course, you need to look for it in the engine compartment:
- open the hood;
- we find the wiring that is located between the rear of the engine valve cover and the air filter housing;
- where the DTOZH is located can be seen in more detail in the following photos.
Checking the cooling system
What to do if the VAZ 21099 carburetor cooling fan does not work? As soon as the car owner noticed the first signs of overheating, i.e. the temperature sensor arrow has approached the red zone, but the carburetor has not yet started pouring smoke from under the hood of the VAZ 21099, you need to check the cooling system.
Check all wire connections
Step-by-step instructions for checking the cooling system.
READ How to Install 4 Generation HBO on an Injector
Where is the fuel pump located on the VAZ-21099 injector
Removing and installing a gasoline pump (PG) is not a difficult job and does not require extensive plumbing experience or high qualifications. But if you don’t have to look for a fuel pump on carburetor cars for a long time (it is located on the engine, under the hood), then a beginner may not find it on the injector on the first try. Where is the fuel pump located on the VAZ-21099 sedan injector? Let's figure it out step by step:
- we move the front seats in the car forward as much as possible to free up space in the rear;
- open the rear left door of the car, find a small hinge on the rear sofa, which is located at the junction of the “seats” approximately in the middle of the cabin;
- pull the loop up, thereby raising the back of the lower seat;
- under the carpet we see the gas tank flap;
- unscrew the two fastening screws, remove the hatch and find the fuel pump underneath.
Scheme for switching on the cooling fan of a VAZ 2110 carburetor engine.
The circuit diagram for switching on the VAZ 2110 cooling fan to the carburetor and injection is different. On cars with a carburetor engine, a thermobiometallic sensor TM-108 is used, and on cars with an injection engine, the controller is controlled.
When the fan is controlled by a sensor, the switching temperature depends on the sensor installation temperature, which is indicated on the housing. If the fan does not turn on when the temperature rises to the operating temperature of the sensor, you need to check from the very beginning whether the sensor is working correctly. To check, it is enough to close the contacts on the sensor, and if it is triggered, you must replace the sensor. If the fan does not work after shorting the terminals, check the cooling fan
and fuse integrity.
Fan control
If a VAZ 2109 car is equipped with an engine with distributed injection and an injector , then the sensor-switch familiar to the owners of the carburetor model does not exist. The fan is turned on and off by the ECU controller. This controller receives information from the coolant temperature sensor (CTS), which is installed in the outlet pipe between the thermostat and the cylinder head. The sensor is used to monitor not only the operation of the fan, but also the engine. Including:
To determine the temperature of the VAZ 2109 DTOZH, a thermistor is used in the injector. a resistor whose resistance depends on temperature. VAZ 2109 uses a thermistor with a negative temperature coefficient. This means that as the temperature increases, its resistance decreases.
Where is the Fan Relay for VAZ 2109 Injector?
VAZ 2110 cooling fan switching diagram
To maintain the engine temperature, the VAZ 2110 fan cooling circuit is used. The fan motor turns on and off automatically.
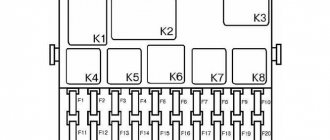
Fuse and relay box
The main block with fuses and relays is located under the hood, in the rear, in the installation compartment on the left, under the protective cover.
Option 1
Photo - example
Scheme
Fuse designation
| 1 | 8A Right fog lamp |
| 2 | 8A Left fog lamp |
| 3 | 8A Headlight cleaners (at the moment of switching on), headlight cleaner switch-on relay (contacts), headlight washer switch-on valve |
| 4 | 16A Coil of the radiator fan relay, electrical circuit of the switch and heater motor |
| 5 | 3A Hazard switch in turn signal mode, turn signal switch, turn signal switch, turn signal indicator light, turn signal indicator light, reverse optics switch, reverse lights, tachometer, voltmeter, gasoline level indicator, gasoline level sensor, gasoline level indicator light , coolant temperature indicator, temperature sensor, warning lamp and emergency oil pressure sensor, brake emergency lamp, brake system hydraulic switch, hand brake switch |
| 6 | 8A Brake light switch and bulbs, interior lighting |
| 7 | 8A Room lighting lamps, indicator lamp for turning on the dimensions, illumination lamp for the heater and cigarette lighter handles, glove box illumination lamp, switch and instrument panel illumination lamp |
| 8 | 16A Signal, signal switch, radiator fan motor |
| 9 | 8A Left side lamp, left rear side lamp |
| 10 | 8A Right side lamp, right rear side lamp, fog light switch, fog light indicator light |
| 11 | 8A Turn signal switch and breaker, turn signal lamps, warning lamp in emergency mode |
| 12 | 16A Cigarette lighter, socket for carrying lamp |
| 13 | 8A High beam right headlight |
| 14 | 8A Main beam of the left headlight, high-range optics warning lamp |
| 15 | 8A Low beam right headlight |
| 16 | 8A Low beam left headlight |
Fuse number 12 at 16A is responsible for the cigarette lighter.
Relay purpose
| K1 | Headlight wiper relay |
| K2 | Relay - turn signal and hazard warning light switch |
| K3 | Windshield wiper relay |
| K4 | Lamp health monitoring relay |
| K5 | High beam relay |
| K6 | Headlight washer relay |
| K7 | Relay for switching on glass lifts |
| K8 | Horn relay |
| K9 | Fan relay |
| K10 | Rear window defroster relay |
| K11 | Low beam relay |
Option 2
Photo - diagram
Description
| 1 | 10A Headlight cleaners (at the moment of switching on) Headlight cleaner switching relay (contacts) Headlight washer switching valve |
| 2 | 10A Direction indicators and hazard warning relay (in hazard mode) Hazard warning lamp |
| 3 | 10A Rear lights (brake lamps) Interior lighting |
| 4 | 20A Rear window heating element Relay (contacts) for turning on the rear window heating Plug socket for a portable lamp Cigarette lighter |
| 5 | 20A Electric motor of the engine cooling system fan and its activation relay (contacts) Sound signal and its activation relay |
| 6 | 30A Electric glass lifts of front doors Relay for turning on electric glass lifts |
| 7 | 30A Headlight cleaners (in operating mode) Relay for turning on the headlight cleaners (winding) Heater fan electric motor Window washer motor Rear window wiper gear motor Rear window washer timing relay Windshield and rear window washer activation valves Relay (winding) turning on the electric fan of the engine cooling system Relay (winding) ) switching on the heated rear window Indicator lamp for heated rear window Glove box lighting lamp |
| 8 | 7.5A Left fog lamp |
| 9 | 7.5A Right fog lamp |
| 10 | 7.5A License plate lights Engine compartment lamp Instrument lighting lamps External lighting control lamp Heater lever illumination panel Cigarette lighter lamp Left headlight (side light) Left rear light (side light) |
| 11 | 7.5A Right headlight (side light) Right rear light (side light) |
| 12 | 7.5A Right headlight (low beam) |
| 13 | 7.5A Left headlight (low beam) |
| 14 | 7.5A Left headlight (high beam) Indicator lamp for turning on the high beam headlights |
| 15 | 7.5A Right headlight (high beam) |
| 16 | 15A Turn indicators and relay-interrupter for direction indicators and hazard warning lights (in turn signal mode) Turn signal indicator lamp Rear lights (reversing lamps) Motor gearbox and windshield wiper activation relay Generator excitation winding (when starting the engine) Brake fluid level indicator lamp Oil pressure warning lamp Carburetor air damper warning lamp Parking brake warning lamp "STOP" indicator lamp Coolant temperature gauge Fuel level gauge with reserve warning lamp Voltmeter |
Fuse number 4 at 20A is responsible for the cigarette lighter.
Relay
| K1 | Headlight wiper relay | |
| K2 | Relay - turn signal and hazard warning light switch | |
| K3 | Windshield wiper relay | |
| K4 | Lamp health monitoring relay | |
| K5 | Relay for switching on glass lifts | |
| K6 | Horn relay | |
| K7 | Heated rear window relay | |
| K8 | High beam relay | |
| K9 | Low beam relay | |
Option 3
Scheme
Purpose
| 1 | 10A Right fog lamp |
| 2 | 10A Left fog lamp |
| 3 | 10A Headlight cleaners (at the moment of switching on) Headlight cleaner switching relay (contacts) Headlight washer switching valve |
| 4 | 20A Headlight wiper motor Headlight cleaner relay (winding) Heater motor Window washer motor Rear window wiper motor Rear window washer time relay Windshield and rear window washer activation valve Relay coil for turning on the electric cooling fan Rear window heating relay winding Rear window heating control lamp Lamp glove compartment lighting |
| 5 | 10A Turn indicators in turn indication mode and the corresponding indicator lamp Rear lights (reversing lamps) Indicator lamp for fuel reserve, oil pressure, parking brake, brake fluid level, carburetor air damper Voltmeter and indicator lamp for charging the battery Gearmotor and windshield wiper switch relay glass Generator excitation winding (at start-up) “STOP” indicator lamp Coolant temperature and fuel level indicators |
| 6 | 10A Rear lights (brake lamps) Interior body lighting lamp Electric windows and power window relay |
| 7 | 10A License plate lights Engine compartment lamp Indicator lamp for turning on side lighting Instrument lighting lamp and cigarette lighter lamp Heater lever illumination panel |
| 8 | 20A Electric motor of the engine cooling system fan and its activation relay (contacts) Sound signal and its activation relay |
| 9 | 10A Left headlight (side light) Left rear light (side light) |
| 10 | 10A Right headlight (side light) Right rear light (side light) |
| 11 | 10A Direction indicators and hazard warning relay (in hazard mode) Hazard warning lamp |
| 12 | 20A Rear window heating element and heating relay lighter Socket for portable lamp |
| 13 | 10A Right headlight (high beam) |
| 14 | 10A Left headlight (high beam) Indicator lamp for turning on the high beam headlights |
| 15 | 10A Left headlight (low beam) |
| 16 | 10A Right headlight (low beam) |
Fuse number 12 at 20A is responsible for the cigarette lighter.
The purpose of the relay is shown in the diagram.
Separately, outside the unit, a starter relay is installed on some models, on the rear wall of the engine compartment.
General characteristics of the model
90s dream car
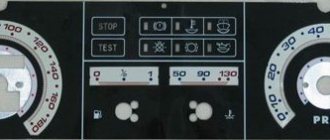
The dimensions of the car have changed slightly due to the lengthening of the wing and enlargement of the hood. In addition, there is a completely new, improved VAZ radiator grille and, of course, an updated instrument panel. The length of the VAZ 21099 compared to other cars in this group has increased by 20 cm.
The VAZ 21099, like other models of this family, has many advantages:
- has excellent controllability when driving;
- Stable on completely different types of roads.
In 2004, production of this car model was discontinued, but production in Ukraine continues.
VAZ 21099 cars come in two types.
The VAZ 21099 has a carburetor, as in the injectors of the VAZ 21099, the layout of the fuel supply system is almost the same.
Quite often, the owners of this car are faced with one problem: the VAZ 21099 carburetor cooling fan does not work.
Location of components and parts on the injection car VAZ-21099
Front-wheel drive VAZ cars are very popular in Russia due to their high maintainability, relatively low cost of spare parts, and simple design. But due to the large number of modifications, it is not easy for the driver to understand even the instructions where this or that unit (part) is located, in particular, on the VAZ-21099 car the injector.
Before repairing a car, some parts have to be searched for a long time and painstakingly, thus wasting a lot of time. In this article we will help you figure out where this or that device is located on the VAZ model 21099, and we hope that the information will be to some extent useful to car owners who have just bought a car, or to novice drivers.
Cooling system VAZ 2109
The liquid cooling system of the injector of the VAZ 2109 automobile engine is a closed-cycle system with forced circulation of coolant (coolant). The system consists of the following blocks:
Fan operation is critical in hot weather when filming in slow motion. Under these conditions, engine overheating is especially likely, and, accordingly, high-quality fan operation is required. The cooling air flow must be directed correctly to the radiator. If the VAZ 2109 injector cooling fan does not work, the cooling system may “boil”.
Fan diagnostics
In order to check the operation of the unit, you will need a one and a half meter wire, preferably with “crocodiles” at the ends. With the engine off, connect the positive terminal of the battery directly to the fan terminal. The working unit should begin to rotate. If not, then this is a malfunction. If the cooling fan does not turn on when the engine overheats, although diagnostics show that they are working, you should check the DTOZH.
During the test, you will need an ohmmeter to measure the resistance of the sensor. An ohmmeter is included in any, even the simplest portable digital multimeter. The procedure is as follows:
READ How to Check the Fan Switch Sensor on a VAZ 2106
If for some reason the sensor resistance is not normal, the part must be replaced. And if this is the case, but the unit does not turn on, something is not working in the electronic engine control unit. You should contact a service station. You will need special equipment to diagnose and flash your computer.
vtulka_0.jpg
How can you get it out yourself? If you were able to notice that the starter sometimes cranks your power unit with tension when the battery is fully charged, then the culprit for the phenomenon is the armature, which touches the stator. A small problem is enough for the starter shaft to become slightly misaligned: the narrow gap disappears completely. But sometimes the reason lies in severe wear of the bearing (front). You can sleep peacefully for a day: this problem can be quickly solved. To eliminate it, you need to prepare a tap of suitable size, find a drill chuck, take a long bolt and an old bushing, a jar of nuts and a box of nails. Now it’s worth disconnecting the battery, the starter, and then removing it from the “coat,” that is, removing the wiring. Happened? Proceed to unscrew the lower bolt of the device and remove the remaining fasteners from the starter.
We take the sword and install it in the chuck of a hand drill: let's try to make a thread in the sleeve
Carefully! Carry out the following actions at low speeds. A shooter is like a girl: the object is fragile
Excessive force or slight misalignment can break it. God forbid this happens: you have to fork out money for a new product. Although you can carry out resuscitation using a long threaded bolt, turning out new grooves. Once they are ready, you need to insert the nails so that their tips protrude no more than a centimeter above the end.
It turned out to be a real masterpiece of futurism! We mount it into the bushing, perform manipulations, trying to pull out the fragment, while doing everything smoothly, without distortions. As soon as we succeed in cutting the revolutions, we pull out the tap, then insert a bolt of a suitable size and pull the sleeve out. This operation can be performed several times. The starter likes to be capricious due to the misalignment of the shaft, so after some time it will again be difficult to hold the bushing. What to do? Definitely don’t wipe the sweat from your face, finish repairing the VAZ 2109 starter, repeating monotonous actions. Get ready for a shopping trip. While you are enjoying the smell of iron, your significant other will buy a magazine where they will read an article about the history of the VAZ 2109 brand and regret that they purchased a non-domestic unit at a lower price.
Causes of fan malfunction
There are times when the radiator cooling fan runs constantly. This is also wrong. What to do in this case? What is the cause of the problem?
The temperature sensor may be damaged. This is indicated by a constantly burning light sensor. In this case, simply replace the temperature sensor or injection system unit. The relay may need to be replaced. Also, the contacts on the radiator switches that trigger the relay may not open. To solve the problem, you will need to replace the thermal relay.
You will need to remove it to determine the cause of the fan failure.
90 degrees and remove it.
Fan motor connection diagram
If your car breaks down, regardless of whether the fan or something else stops working, you should contact a specialized workshop. Experienced technicians will always find the cause of the problem, select the necessary spare parts, sensors and carry out repairs.
Of course, many car owners want to repair their cars themselves; it gives them great pleasure and requires minimal costs. But in this case, there is a risk of making a mistake in choosing parts and making the correct diagnosis. A car enthusiast can spend a lot of time and effort, but as a result do not get the desired result. To prevent this from happening, it is better to contact a specialist.
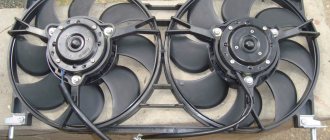
The car is installed on a VAZ-2109. two fans
.
The first, more powerful one, is installed in the engine cooling
to increase air flow through the radiator core.
fan is installed in front of the heater radiator (“furnace”)
, its task is to pump heated or unheated air into the car. Both fans are driven by DC motors.
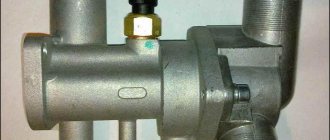
The fan, which is installed in a hole in the housing covering the radiator core, has a sensor for automatically turning on the engine in the electrical connection circuit. This sensor is screwed into a threaded hole located in the right radiator reservoir because the coolant temperature will be at its highest when the thermostat is activated. The fan turns on without a driver. The sensor should operate when the operating temperature of the antifreeze exceeds 90-95 degrees and send a signal to the relay to turn on the engine located in the mounting block. The electrical circuit for turning on the electric motor is protected by fuses No. 4 and No. 8 on mounting blocks of type 17. 3722.
If your VAZ-2109 car has a mounting block of type 2114-3722010-60, then the fan motor is turned on directly from the power sensor, without the participation of a relay. It's just not in the mounting block at all. The electrical circuit is protected by a fuse marked No. 5. If these electrical circuits are faulty, the fan will not turn on. The driver will determine this by reading the coolant temperature gauge. The arrow of this pointer will point to the red area of the scale. In this case, it is necessary to reduce the load on the engine to idle speed, turn on the interior heater fan and open the tap, supply coolant to the stove radiator, start driving until it stops completely, and eliminate the malfunction. reasons for the malfunction.
You should start looking for the causes of malfunctions with the engine start sensor
fan. To do this, open the hood and disconnect the terminal from the sensor. To further test the sensor, you will need a piece of wire to short the two wires going to the terminal. Wrap the jumper with electrical tape to prevent it from touching the weight of the vehicle. Turn the ignition on and if everything else is fine, the fan will start. Moreover, in this case, it will work, it will work continuously as long as the ignition is on.
If the fan on the VAZ 2109 does not work, open the cover of the mounting block and check the serviceability of fuses No. 5 on block 2114-3722010-60 and No. 4, No. 8 on block 17. 3722. Look for the fuse number markings at the top of the cover. After making sure that the fuses are good and the fan is still not working, you need to check its motor.
To do this, you will need two insulated wires to connect the fan motor terminals directly to the battery. If the fan starts to operate, make sure that the air flow is under the hood of the car, and not vice versa. If the connection is incorrect, change the polarity of the wires connected to the battery. This can help you get to the repair site, and you can turn off the fan motor only by disconnecting the wires from the battery. In this case, the reason that the fan does not turn on will be either a faulty relay or faulty wiring.
Prolonged driving on an overheated engine when the VAZ 2109 injector cooling fan is not working is fraught with serious consequences. The engine may knock or jam, and then major repairs will be necessary. Therefore, if the temperature gauge needle moves steadily into the red zone, immediately turn on the heater at full power, stop in a safe place and allow the engine to cool. Do not open the expansion tank cap on a hot engine; overheated antifreeze may spill.
Sources:
https://avtoblokrele.ru/vaz/blok-predohranitelej-vaz-2109-2108-21099.html https://litezona.ru/rele-ventiljatora-vaz-2109-inzhektor-gde/
Symptoms of a failed fuel pump relay
You can suspect a malfunction of this element based on the following signs:
- The engine will not start. Sometimes it may not start at all or start poorly, not the first time. In this case, the battery is known to be in good condition and charged; . The unstable operation of the power unit is easy to hear;
- After a short period of operation, the engine stalls. Even if the car starts, it may stall after a short time. This happens both at idle and while driving;
- After turning the key, a characteristic click is not heard. The sound of the fuel pump is familiar to every driver. It sounds every time the engine starts. Its absence often indicates failure of this part; dropped noticeably. The norm for 1.5-liter engines is considered to be 300 kPa, and for 1.6-liter engines – approximately 380 kPa .