Print this article Font size 16
Initially, CV joints were positioned as elements with a very long service life. Manufacturers even assured that they could last as long as the car itself.
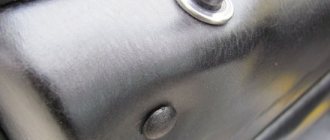
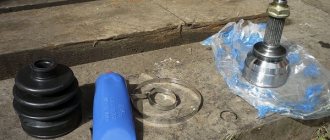
Photo of CV joint for VAZ 2114
But in reality, everything is not as colorful as it is described. A grenade has a life limit. What grenades, you ask. The grenade is the CV joint. People often use the concept of “grenade”. This can be explained very simply - the CV joint looks like a grenade. That's all. Therefore, do not be confused if you hear “grenade” when talking about CV joints. It is the same.
Location
It will be impossible to replace the CV joint on a VAZ 2114 if you do not know where exactly these elements are located. Their location is easy to determine - on both sides of the front suspension at the bottom of the car. They are oblong elements and fit into the hub of each wheel.
CV joint location
That is, getting to the node is not difficult, but this will require certain conditions.
The most important thing is that the replacement procedure is not complicated, which allows you to do the work yourself. But let’s say right away that if you don’t have the time, desire, or are simply not confident in your own skills, it’s better to entrust the repair to specialists. You will spend extra money on this, but you will be sure of the result.
What to do if the boot breaks on the road
The situation is not uncommon: you had to change a tire while on the road and you noticed that the boot was torn. It is highly not recommended to leave “everything as it is” and go to the nearest car service: CV joint is not a cheap part at all, especially if it is on an expensive foreign car. Options:
- Place the car on a jack (if it is not already on it), pull out the old contaminated grease through the hole and fill the boot with grease until it stops, and to prevent it from falling out when driving, wrap the problem area with a plastic bag and tighten it along the corrugation with a rope.
- Wrap the torn case with opaque tape or electrical tape. This “alternative” will last for 500 kilometers until the boot is changed.
On the road, check whether your “winding” is in place: getting dirt under it will sharply reduce the life of the CV joint.
When replacement is required
If while driving your car you hear noise coming from the front of the car, be sure to check the condition of the boot. Quite often, replacing the outer CV joint boot of a VAZ 2114 becomes a daily task for service center employees.
To check, just turn the wheels in any direction and look under it. If cracks or complete damage are detected on the boot, the outer CV joint of the VAZ 2114 will definitely need to be replaced.
The presence of damage indicates that dirt has gotten inside the element. Much or little of it is no longer so important. Contamination leads to disruption of the functionality of the device.
In such situations, when the CV joint is damaged, it is strongly not recommended to continue driving under your own power. This is dangerous for you, your car and other road users. Ignoring this recommendation entails even more expensive repairs, since by the time you get to the garage or car service center, you will damage a number of other components and elements of the car.
Tie rod boot
Anthers are also used in the steering. Their shape, as well as their fastening, are determined by the specific design. The difficulty of replacing the boot directly depends on where they are attached:
- If the boot is located in the place where the steering rods are attached to the rack, as, for example, in the “nine”, then you will have quite a difficult time, since to replace it you need to perform a number of procedures, which include disassembling the steering mechanism.
- In VAZ cars, the anthers are usually located at the ends of the rack. To replace any of them, you will only need to remove the clamps, then unscrew the nut that secures the rod, disconnect it and remove the boot.
- Among the many types of anthers you can find some very interesting ones. For example, in one of the Volkswagen models they are made in the form of elastic caps, which are put on the body and secured with clamps. Such boots protect the steering mechanism from dirt and are quite easy to change.
What to choose?
To replace the inner or outer CV joint on a VAZ 2114, a new element will be required. To be fair, we note that the most suitable and high-quality CV joints for the VAZ 2114 model are produced by the manufacturer, that is, AvtoVAZ.
But here comes the most important disappointment - they are not for sale. The only option is to go to a specialized VAZ official car service center. But from the point of view of financial costs, it is not the most reasonable decision.
In addition, there is now a fairly wide range of analogues on the market. Judging by the reviews of VAZ 2114 owners, special attention should be paid to CV joints produced by such companies as:
- Hola;
- GKN;
- Kraft.
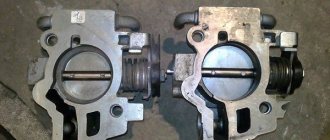
Photo of GKN CV joint for VAZ 2114
How to independently replace the internal grenade on VAZ cars
CV joint (constant velocity joint) is a mechanism that allows you to transmit torque between misaligned shafts. The device is actively used on front-wheel drive vehicles. On each shaft coming out of the gearbox there are two of them - internal and external. Repair is impossible; if the unit breaks down, it is replaced as an assembly.
In what cases is it necessary to replace the inner CV joint?
Replacing the internal CV joint on front-wheel drive VAZ vehicles is required if the following symptoms are present:
- Crunching and knocking noises when driving and accelerating in a straight line;
- Vibration and shock when changing gears;
- Significant play when testing by hand;
- If the “grenade” fails completely, the vehicle cannot move further.
The main reason for the malfunction of the VAZ grenade is the entry of water and dirt through the hole in the torn boot. The second possible cause of failure is a sharp press on the gas with the wheels fully turned, although in this case you risk killing the external rather than the internal grenade.
Be sure to read
In addition to the above, replacing the internal CV joint on VAZ-2110 and other models may be necessary if the quality of the previously installed joint is poor.
Replacing the inner CV joint with your own hands
The procedure for replacing a “grenade” is the same for the entire front-wheel drive VAZ line, starting with 2108 and ending with VAZ-2115, “Kalina”, “Priora”, “Grant”. Before removing the inner CV joint, the oil is drained from the gearbox. Then proceed according to the following algorithm:
- Unlock and unscrew the hub nut. To make the work easier, a piece of pipe about 1 meter long should be put on the key.
- The desired side of the car is hung on a jack or lift.
- Remove the wheel.
- Remove the washer located under the hub nut installation site.
- Disconnect the steering tip.
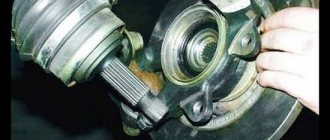
- The CV joint is removed from the hub.
- Using a pry bar, remove the drive and internal joint from the gearbox.
Note: when removing both drives at the same time, a suitable mandrel should be installed in their place.
How to change the “grenade” with the drive removed? To do this, clamp the shaft in a vice, loosen the clamps and remove the boot. After this, the hinge is knocked off the splines with hammer blows.
The new CV joint should be hammered by applying light blows to its end with a hammer. For this it is better to use a wooden mallet. The “grenade” is first filled with a special lubricant.
Before installing a new constant velocity joint, it is necessary to clean its seat from old grease and install a new boot. Assembly is carried out in reverse order.
The repair is considered complete after successful sea trials. In this case, there should be no extraneous sounds from the drive side in all modes of vehicle movement.
Boot replacement and repair
The boot can be changed without removing the grenade if you have special equipment. His work is demonstrated on video.
If you do not have such a device, to remove and replace it, you must perform the above procedure for removing the drive and dismantling the hinge. The procedure is necessary if there is even minor through damage on the boot.
Temporary repairs to the CV joint boot can be made without removing it from the vehicle. To do this, you need to thoroughly clean and degrease the damage, then seal it with a piece of rubber and cyanoacrylate-based glue (superglue).
Note: express repair is a temporary measure. Replacing the inner joint boot may be delayed for a short time, but not completely cancelled. Typically, these types of repair methods are used to get to the point of repair.
CV joint repair
As mentioned above, the hinge cannot be repaired. Conventionally, one of the repair measures includes washing the “grenade” after driving with a damaged boot.
Washing is carried out at the same time when the damaged boot on the pomegranate is replaced. The hinge is carefully knocked off the shaft, inspected for damage and thoroughly washed to remove any dirt and grease in gasoline or kerosene.
After washing, the assembly is filled with lubricant and mounted in place, having previously installed the boot. The procedure makes sense only if there are no obvious signs of a joint malfunction.
A crunchy or knocking part definitely needs to be replaced, since wear forms on the working surfaces of the inner race, and it is no longer possible to stop the destruction. Continued operation of the vehicle may be dangerous for the driver and other road users.
Replacement
Armed with new CV joints, also collect a set of necessary tools and materials. It will include:
- Set of heads;
- Spanners;
- Shoes;
- Dry rags;
- Grease for CV joints;
- Jack;
- Anthers.
CV joint arrangement diagram
Now let's get down to work on replacing the CV joints:
- Determine the location where the repairs will be carried out. This could be an overpass, a garage with an inspection hole, or a room with a car lift.
- Stop the engine and apply the handbrake. Use chocks to block the wheels.
- Using a wheel wrench, remove the wheel bolts.
- Raise the required part of the car with a jack.
- Loosen the nut in the center of the CV joint. Keep an eye on the puck so you don't lose it. It is not included with the new CV joint.
- Armed with 13mm wrenches, unscrew the fasteners of the upper part of the ball joint. It is not necessary to perform a similar procedure with the lower part, since it will not interfere with the repair process.
- Using a pry bar, slightly rip the grooves off the support and move them aside.
- Knock the hub off the CV joint splines. To do this you will need a hammer and some kind of wooden stand.
- Remove the old damaged CV joint.
- Check for damage to the stem.
- Remove any remaining lubricant from the rod using a dry rag.
- Place a new grenade in the new location. This assembly should include a CV joint, boot, clamps, nuts, and retaining rings.
- When assembling the unit, do not forget to use high-quality lubricants. There shouldn’t be too much of it, but you shouldn’t feel too sorry either.
- Reassemble the parts in reverse order.
- By changing the CV joints, you can simultaneously check the condition of the brake pads. If they are in a sufficiently worn condition, it is advised to replace them at the same time. Anyway, you have already dismantled the knot.
- After completing the repair, check the car in action.
- It’s not uncommon for craftsmen without much experience to leave behind supposedly unnecessary parts after reassembly. Please note that everything that remains after assembly, and that is not the released elements that you replaced with new ones, has its place in the design of the car. Therefore, check where exactly these “extra” elements come from and install them in their rightful place.
Replacing the outer CV joint boot of a VAZ 2114
Yesterday late at night I came from the garage, as in that song “Tired, hungry and angry, but very pleased with myself!” Anthers have been replaced. And it was like this.
So for work we need:
- CV boots - 2 pcs.;
- Anther clamps - 4 pcs;
- Hub nuts - 2 pcs;
- CV joint grease - 1 tube;
- Head for 30 (I took it with touch control using a crowbar) - 1 piece;
- Well, and a bunch of other tools (wrench, tweezers, chisel, hammer, vocabulary of obscenities, etc.)
Work plan
So, let's begin. We remove the cap from the wheel (those who don’t have it have less work), remove the hub nut cap. Unscrew the nut, I used a dowel, take a 30mm socket and loosen the hub nut. Then loosen the wheel bolts.
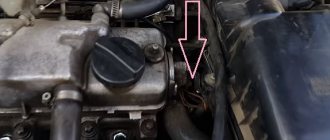
All this needs to be unscrewed
We jack up the car and remove the wheel, immediately put it under the car (just in case), and unscrew the hub nut.
Unscrewed
We unscrew the bolts securing the ball joint to the steering knuckle (I unscrewed it with a balloon)
Those that are higher
We press the lever down using a crowbar, hold it in this position with your knee, and at this time we move the steering knuckle and pull the drive out of the hub (after turning the steering wheel to the left). Cutting off the old boot
Drive pulled
Well, then it’s time to remove the CV joint from the shaft. I read that it can be removed by lightly tapping the inside. It wasn't like that. I remembered all my swear words, but it didn’t do any good. It was too late to go to the store for a puller, so I took out a welding tool and invented a puller. With his help, the CV joint was removed within five minutes. But I couldn’t do anything with a hammer in two hours.
Here's a simple helper
After that, we take gasoline and thoroughly wash the CV joint, at least to this condition
It’s clean, and most importantly, it can be easily tossed and turned in all directions.
Well, then we apply grease inside, put the boot on the shaft and put the CV joint in place. To do this, we screw on the old nut and, with a short but sharp blow of a hammer, drive it until the thrust washer. We put the boot on the CV joint and secure it on both sides with clamps. We put the drive in the hub and attach a new nut.
Collected.
Next, install the wheel, lower the car and tighten the hub nut with the same force as it was unscrewed. And don’t forget to seal it
Energized. I used a dull chisel for this.
We repeat the same procedure on the right wheel. That's basically it, the boots have been replaced, the car is running, I now have a puller for CV joints and invaluable experience in removing them.
Cost of outer CV joint
If you are faced with the task of choosing a new part, it is best to choose a product from the manufacturer, that is, choose a genuine spare part. Most often, they have a price slightly higher than analogue ones, but are distinguished by excellent product quality.
But check the article number, as some auto stores may sell you a Chinese part with a box that is very similar to the original. The part should go under the number 21080-2215012-86. The price of the set will be about 1400 rubles .
If you want to purchase analog parts, then after reading the reviews, you can identify three quality companies:
- HOLA – 1200 rubles;
- GKN – 1600 rubles;
- KRAFT – 1150 rubles.
Before purchasing, it is best to study the reviews of the store where you want to purchase the part. This way you will be completely sure that you are buying a quality spare part. And in this article we presented prices for internal grenades of the VAZ 2114 from 10 manufacturers.
How to unscrew the CV joint nut if a fixing collar is used
It is this method of fixation that most often leads to “licking” of the thread. VAZ drivers know what they are talking about. An inexperienced master, delighted at the easy movement of the nut, will ruin your grenade in 2-3 turns of the key.
For proper release, you need a special punch that exactly matches the size of the spline collar. You won’t find them during the day with a fire, so it’s wise to make a useful tool yourself. For example, from an old file. With its help, you can unscrew the nut while maintaining the threads on the axle shaft.
After disassembly, it is necessary to slightly grind the shoulder to remove burrs.
Removing the drive shaft
Next they move to the wheel arch and from there they take out the drive shaft, which already has an internal and external hinge. Using pliers, remove the clamps holding the boot from the parts. If the latter is destroyed, then it is torn apart.
Otherwise, you can just move it to the center. If the boot is torn, the inner CV joint boot will need to be replaced. These parts are sold separately and are included with the spare part. To remove the joint from the drive shaft, you need to hit the inside with a hammer. After a few blows, the part will fly off the shaft. The same operation must be done on the other side.
How to unscrew the hub nut without ruining the threaded connection
First of all, stock up on quality tools. An ordinary wrench is not suitable for plumbing work, although many car owners stubbornly use them to repair CV joints (the size is the same, but the cost of the tool is lower). An open-end wrench can only be used to unscrew an already “undermined” nut, this is really more convenient.
For the hub (CV joint), only a union head is used. The end cap can be cast or stamped (the second option is cheaper), and exactly match the size of the nut. If you “lick” the edges using a tool with backlash, you will be working with an angle grinder, and you will have to say goodbye to the CV joint.
Important! Reuse of nuts is not permitted. Before unscrewing the old nut, make sure you have a new one.
- Thoroughly clean the surface from corrosion and dirt. If a spline-shoulder pair is used, you need to pick out everything that is in the holes;
- Treat the joint with a penetrating compound for soured threads. For example, WD-40 liquid, or regular kerosene. You may need to "soak" the thread for several hours;
- Remove all fixing devices;
- Place the socket on the nut and try to turn it using the lever. At this stage, it is better not to use handles with ratchets, as the mechanism may be damaged;
- After “undermining”, the nut can be unscrewed with any wrench that is more convenient.
Throw away the old nut and stud. Clean the threaded connection from rust and traces of fixing compounds.
Signs of failure of the outer grenade (CV joint).
There are two options here:
- signs that your grenade has already broken
- signs that the grenade will soon come out and break .
How to understand that a grenade will soon break.
Of course, the first sign of a malfunction of the external grenade is a crackling sound . If you hear a crackling noise while driving with the steering wheel turned, it is definitely a CV joint. The greater the angle of rotation of the wheel and the harder you press on the gas, the louder the clicks. Another sign that does not always appear is vibration on the steering wheel at speeds greater than 80 km/h. The vibration is only slightly similar to the vibration from an unbalanced wheel. It usually manifests itself as a slight twitching of the steering wheel.
How to understand that the outer CV joint has broken.
If the CV joint breaks, the car will stop moving. In any gear engaged, press the gas, the speed increases, but the car does not move.
How to understand that it is the outer CV joint that has broken, and not the internal one or the clutch in general (the first signs of failure are similar to the signs of a clutch failure)? First of all, start the car and put it in any gear. Next, open the hood and look in turn at each of the shafts going from the box to the wheels (one short, the other long). If any shaft is spinning, it means that the CV joint has broken on this side.
I recommend not just visually looking at the shaft, but touching it with some long, hard object, such as a stick. The main thing is that there is nothing on it that could wrap around the shaft . When you touch the shaft with a stick, if it is spinning, you will feel a slight vibration. This is usually done in the dark, because it is difficult to understand whether a cylindrical object is spinning, especially in the dark.