04 July 2016 Lada.Online 143 830 42
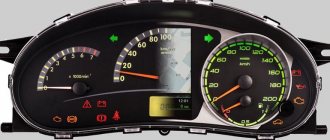
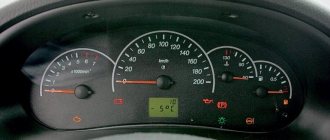
After the next update, the Priora began installing a restyled dashboard in the car’s interior. A large display has become located in the center, which can display not only on-board computer information, but also navigation. We'll tell you how to change the old instrument cluster on a Priora or Kalina to a new instrument panel.
Description of the instrument panel Lada Priora and Kalina
The Lada Priora/Kalina instrument cluster is designed to display driving characteristics, the current state of vehicle systems that ensure traffic safety, as well as the correct operation of the entire vehicle as a whole. If you are a novice driver, then this description of the dashboard will help you understand the readings of instruments and indicators.
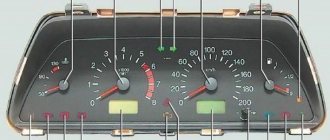
- Tachometer. Shows engine speed in real time. The red scale zone indicates a dangerous operating mode for the engine;
- Malfunction lamp of the electronic brake force distributor. To check, the lamp lights up red for a few seconds when the ignition is turned on. The burning of the lamp in other cases indicates a malfunction; when driving with a burning lamp, increased safety measures must be observed;
- Battery charge lamp. To check, the lamp lights up red when the ignition is turned on and goes out after the engine starts. If the lamp is lit in other cases, it indicates a lack of battery charge;
- Left turn signal lamp. Flashes when the turn signal or hazard lights are on;
- Speedometer. Shows at what speed the car is currently moving;
- Engine oil pressure warning lamp. To check, the lamp lights up when the ignition is turned on and goes out after the engine starts. In other cases, the lamp is lit indicating low pressure in the engine lubrication system. It is not recommended to operate the engine in such conditions;
- Right turn signal lamp. Flashes when the turn signal or hazard lights are on;
- Handbrake lamp. Lights up red when the parking brake is applied;
- Coolant temperature gauge. Engine operating temperature is 90 degrees and above to the red zone. It is prohibited to operate the vehicle if it overheats. When the arrow reaches the red zone, a buzzer will sound. To extend engine life, it is recommended not to operate the engine at high speeds until the coolant temperature reaches operating temperature;
- Gasoline level indicator in the tank. The arrow shows the fuel level. Lack of gasoline can damage the fuel pump;
- Fuel reserve lamp. Lights up with an accompanying buzzer signal when there is less than 10 liters of fuel left in the tank;
- Button for switching display modes and resetting daily mileage readings. A short press switches between daily and total mileage. When you hold the button, the daily mileage is reset, accompanied by a sound;
- Hazard warning light. Flashes red when the emergency lights are turned on simultaneously with the turn signals.
- Electric power steering (EPS) malfunction lamp. To check, the lamp lights up yellow when the ignition is turned on for a few seconds. Lighting of the lamp in other cases indicates a malfunction of the EUR;
- Headlight high beam lamp. Lights up when the high beam headlights are turned on;
- Lamp for turning on external lighting. Lights up when the headlights are turned on or the headlights are low beam;
- Airbag system malfunction lamp. To check, the lamp lights up yellow when the ignition is turned on for a few seconds. In other cases, if the lamp is illuminated, it indicates a malfunction in the airbag system. In this case, in the event of an accident, the airbags will not deploy;
- Immobilizer lamp. If the system is working properly and the engine is allowed to start, when the ignition is turned on, the lamp flashes once and goes out. If the lamp flashes constantly (accompanied by short beeps), then the system is faulty. If, after turning on the ignition, the lamp lights up for 15 seconds and goes out, then the anti-theft system is not activated;
- Liquid crystal display of the on-board computer (BC). Displays daily and total mileage, as well as information from the BC;
- Seat belt warning light (optional). The lamp lights up when the driver's seat belt is not fastened, accompanied by buzzer signals for 1.5 minutes;
- Brake system emergency lamp. To check, the lamp lights up red when the ignition is turned on for 4 seconds. In other cases, the lamp is lit indicating an insufficient level of brake fluid, or another malfunction of the brake system;
- Front passenger airbag lamp (optional). Passenger airbag deactivation lamp;
- Anti-lock braking system fault lamp (optional). To check, the lamp lights up when the ignition is turned on and goes out after a few seconds or after the engine starts. When the lamp is lit, there is a malfunction in the ABS system, but the brakes remain fully operational;
- Engine management system malfunction lamp (Check Engine). To check, it lights up when the ignition is turned on and goes out after the engine starts. In other cases, the lamp is lit indicating a malfunction in the system. See the error code.
Required
The Itelma instrument panel with navigation can be of two types (externally they are no different):
They are not interchangeable, so before purchasing, you should determine whether your vehicle uses a CAN bus or not.
- until 06.2012, cars were produced without a CAN bus;
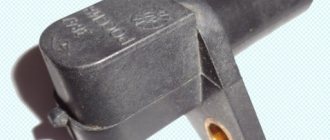
- remove the instrument cluster and look at the article number or at the block with wires (see pinout of connectors below).
For Kalina (VAZ 1117, 1118, 1119) - all cars without a CAN bus.
- Right steering column switch with joystick (catalog number: 1118-3709340-20);
- Antenna (for roof installation): 1118-7903074.
You can also buy ready-made kits (device + antenna + switch):
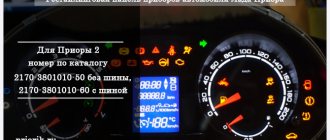
- for Lada Priora - 2170-3801010-55;
- for Lada Kalina 1 - 1118-3801010-55.
What the instrument panel looks like on the Lada Kalina: overview of icons
The control and ergonomics of the domestic VAZ model are at a fairly high level relative to the cost of the car. The instrument panel of the Lada Kalina is located behind the steering wheel and has a number of indicators that display the actual state of the vehicle systems.
The appearance of the panel is distinguished by its individual design. It combines practicality and good design. The dashboard contains the main symbols and icons, arranged in a sequence convenient for the driver to understand.
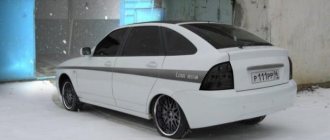
Tuned instrument panels for Lada Priora
Owners of Lada Priora cars are not always satisfied with the functionality of the standard dashboard. Therefore, they come to the decision to replace the shield with a tuned one. This shield provides the following capabilities:
- on-board computer;
- built-in ECU diagnostics with description of error codes;
- more pleasant lighting;
- electronic indication of speed and tachometer parameters.
The leading manufacturers of such instrument panels are Flash, Itelma and Gamma.
The most functional and pleasant is the instrument panel from the Flash company, while Itelma is the official supplier of electronics to the Lada conveyor.
It is worth considering that a tuned instrument panel is quite expensive. Some samples can cost up to 35-40 thousand rubles.
What do the icons on Kalina's dashboard mean?
- 1 – standard tachometer. The dial indicator is divided up to 7000 rpm with a threshold of 500 rpm;
- 2 – Check the engine. A standard lamp found on all modern cars. Indicates a serious engine breakdown and the need for urgent repairs;
- 3/9 – indicators indicate the turn signals are turned on;
- 4 – the oil pressure in the engine has greatly decreased;
- 5 – ABC is faulty and usually goes out when you turn the key;
- 6 – immobilizer operation indicator;
- 7 – the indicator has a simple meaning, it indicates that the motor is overheating;
- 8 – parking brake status indicator;
- 10 – the battery symbol shows the battery charge status;
- 11 – odometer;
- 12 – indicator of the state of the exchange rate stability system;
- 13 – the need to shift to a higher gear is not established in most versions;
- 14 – high beam indicator lamp;
- 15/17 – indicator of normal operation of stern/front fog lights;
- 16 – low beam indicator;
- 18 – daily mileage reset key;
- 19 – standard display;
- 20 – icon indicating that the doors are closed correctly;
- 21 – critical drop in fuel level in the gas tank;
- 22 – an exclamation mark inscribed in the tire profile indicates a punctured wheel;
- 23 – if the lamp goes out after starting the engine, the power steering is working normally;
- 24 – requirement to fasten seat belts;
- 25 – exclamation mark is used only in some vehicle configurations;
- 26 – airbag operation indicator.
The badges are only relevant for hatchback and sedan versions of certain versions. Depending on the year of manufacture and configuration, the symbol designation may differ from the nominal value.
FakeHeader
Comments 13
The shield you choose is sold in two versions, for cars with a CAN bus and without a CAN bus. Read more carefully when purchasing.
This dashboard doesn't exist without the tires.
First, take your eyes out of the butt, and look and read for yourself.
You are reading this with a chocolate eye. Or you don’t understand what we’re talking about at all. And he managed to tear the vest on his chest
For the woodpecker I explain: There is a dashboard, like the person in the photo above, i.e. Priora 2 dashboard. It is WITHOUT navigation and has never had it. And it is produced ONLY with a CAN bus.
There is a dashboard from a TRANSITIONAL Priora 2012-2013 with NAVIGATION. And it is NOT the dashboard from Priora 2. It was produced in two versions - with and WITHOUT CAN bus
The person asks EXACTLY about the first dashboard, i.e. about the Priora 2 panel with CAN bus
Set the gamma, it works without the channel bus and the functionality is good
You can completely change the wiring for the bus then it will be possible, but it will be very expensive
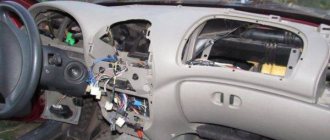
Hi all! Recently I presented my choice of “Set of parts for the Priora 2 instrument panel for the conversion of Priora 1 to Priora 2.” In the general photo there was a little more than what is included in the package.
Let's look at it in detail.
I will indicate serial numbers on the parts.
I remember that before purchasing, I really wanted to know them) True, they are of little use; only a part of them makes it into stores. 1) The main part is the cover of the Priora 2 torpedo.
There are two numbers here because the part is soldered from several parts (inner 2172-5325188-00, outer 2172-5325182-00)
2) Instrument panel shield (screen visor (BC)).
On the reverse side it has several guides and six places for latches. Number: 2172-5325125-00. Landing:
In addition, there are a couple of fixation points for the standard MMS or BC screen.
3) Hazard alarm button and metal visor clips.
The new hazard warning switch now has a horizontal location on the console and a changed shape. Number: 2172-3710010-00.
The latches are designed for installation on special protrusions on the back side of the shield.
5) Console trim (black glossy plastic, without varnish).
6) Central deflector.
The photo shows the deflector itself and its extension to the right (to the panel air duct), there used to be one part!
I couldn’t find the number on the deflector; it may be located under the seal. Number: 21720-8104200-00 The wording is also found: “Console cover 2172-5326014-00 in sat with nozzle”
Spacer number (extension): 2172-8104202-00 21720-8104200-00 The assembly is as follows:
7) Glove box screen or glove box body.
A completely new part, it didn’t exist before.
It was really not enough to close the mess when opening the glove box. My photo is from a VAZ 2110, the situation is similar on the Priora.
 Lower air duct (tree).
The part has again been changed, with different fasteners below in the area where it interfaces with the restyled floor tunnel of Prior 2.
10) Console trim plug.
Behind it there are two attachment points for the console trim. It is suspicious to make such a thing for the sake of simply hiding two self-tapping screws. Perhaps in the future we will find a more useful device in this place. 03/21/2016: there is an option to install a cover under a pair of buttons.
Soft-look.
And finally, a decorative coating that has caused a lot of controversy and discussion. The plant used a soft-look material for the decoration of the instrument panel. There is the following description online: “This is a plastic that looks like soft, well-made leather, but at the same time it has increased scratch resistance.” I don’t know how it is with scratch resistance, but I really liked the look of it))) Below are a few close-up shots.
Instrument panel Lada Kalina: description of lamps and indicators
The description of each element should be considered separately:
- 2 – the lamp indicates to the driver that there is a serious breakdown in the engine that requires urgent intervention;
- 3/9 – green lamps; if the indicator is blinking, the corresponding turn signal is on;
- 4 – the indicator lights up red, warning of a serious decrease in the oil level in the engine crankcase;
- 5 – the ABS system is faulty and requires driver intervention;
- 6 – if the icon lights up, the immobilizer is enabled;
- 7 – light indicator of engine overheating;
- 8 – the handbrake is raised, movement is impossible;
- 10 – red battery icon indicates a critical drop in charge;
- 12 – the exchange rate stability system does not work, the car can continue to move only with the help of mechanical stabilizers;
- 14 – light elements operate in high beam mode;
- 15/17 – fog lights are turned on for the front and rear of the car, respectively;
- 16 – low beam is on;
- 20 – one or more doors may not be closed;
- 21 – fuel runs out – the car is in storage;
- 22 – the ABS system triggered due to a tire breakdown;
- 23 – electric power steering fault indicator;
- 24 – seat belts are not fastened;
- 26 – the airbag is disabled or does not work.
Light indicators on the tidy are divided into three groups based on color.
- Green/blue – notification type indicators. The lights indicate that the on-board lighting or other devices are turned on and are not responsible for errors or malfunctions.
- Yellow/orange - icons warn the driver about the need for increased attention. There may be minor problems or the need for service.
- Red – the indicators flash only in the event of a breakdown or the need for urgent driver intervention in the vehicle’s on-board systems.
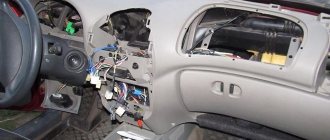
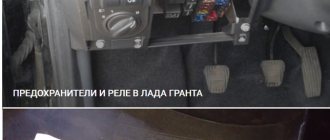
Installation
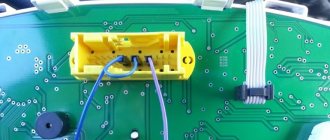
Replacing the old instrument panel without CAN with a dashboard with navigation without CAN (2170-3801010-50) is carried out without modifications. We remove the old panel and install a new one in its place, insert the connector with wires, connect the antenna (we fix it on the roof) and, if necessary, change the right steering column switch.
If the old instrument cluster without navigation, but with CAN, and instead of it it is planned to install a new dashboard with navigation with CAN (2170-3801010-60), then you need to rearrange contacts 10-11 to 28-29 (if after connecting it still does not work, change 28 and 29 places). See instrument cluster pinout.
After installing the new instrument panel, the mileage will be reset to zero.
Navigation in the instrument panel runs on Windows CE 6.0 along with Navitel software. It is possible to update the software and download navigation maps from a USB card via a special USB input. Operating the car will become much more pleasant, the only drawback is the high price.
Error codes
Self-diagnosis mode displays certain codes. Due to the simplicity of the design of the diagnostic unit, digital values only indicate the area where the fault occurs. The most popular encodings:
- 2 – there is a short circuit in the on-board network with a critical increase in voltage;
- 3 – open circuit or malfunction of the float in the gas tank;
- 4-5 – error or breakdown of the antifreeze or ambient temperature sensor, respectively;
- 6 – the motor is very overheated;
- 7 – too low oil pressure in the engine boat;
- 8 – the brake system is not working properly;
- 9 – the battery is faulty or severely discharged;
- E – standard error of the firmware data package;
- 0 – no errors – all on-board systems are operational.
Specialization : Graduated from the State Automobile University, worked for 20 years at GAZ-56, now I drive a Zhiguli.
Source
When do you need dashboard repair or replacement?
The Priora tidy does not have a large number of parts that are subject to frequent breakdowns. Typically, repair of the indicator unit comes down to replacing light bulbs and individual elements of the device. Users resort to replacing the board only when there is a malfunction of the contact group, connectors, or the board is damaged.
In case of serious damage (major short circuit leading to burnout of the main structural elements), repair may not be cost-effective. The cost of labor and materials often exceeds the price of a new module.
Possible malfunctions and ways to eliminate them
When operating a vehicle, individual components of the instrument panel may fail. Among the most common breakdowns are factors.
- Burnt out contact of one of the indicator lamps. Usually resolved by replacing the light bulb.
- Failure of the contact group can be eliminated by completely replacing the module - resoldering the part is not economically profitable.
- Malfunction of arrow indicators. It can be fixed by replacing the block.