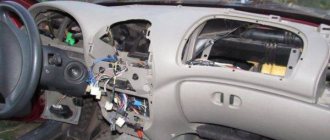
Many owners of the practical domestic small car Lada Kalina eventually face the nagging question of how to remove the instrument panel?
Over the years of operation, the car we are considering has revealed some shortcomings, among which the dashboard is hidden. This interior component annoys the owners of Lada Kalina with squeaks and other noises while driving, and even “does” this with enviable consistency, so many often ask the question: how to remove the instrument panel. Assemblers and manufacturer inspectors make it a priority during the production run to ensure correct clearances. Here it seems that few people are interested in the quality of the panel’s fit and the reliability of its fixation.
This does not stop stubborn owners, and they independently remove the dashboard in order to eliminate these annoying “participants of the interior orchestra”; the main thing is to know how to remove the instrument panel. Removing this product is quite difficult, so we recommend that the subject who dares to undertake such an experiment study the manuals, including the material presented here.
The work itself involves following several mandatory steps, and the removal of each of the structural elements, including the removal of the torpedo, must be performed with extreme caution.
Removing the instrument cluster Lada Kalina
Tools required: Phillips and flathead screws.
- Use a Phillips screwdriver to unscrew the two screws.
- Remove the instrument cluster trim.
- We disengage the two spring clips.
- Remove the two screws securing the instrument panel.
- Move the device towards you.
- Turn the pad retainer by prying it with a flat screwdriver.
- Remove the Kalina dashboard by disconnecting the block with wires.
- To remove the instrument panel glass, you need to unclip the 6 plastic clips.
Replacing dashboard lamps Kalina
Location of instrument cluster lamps:
- instrument lighting lamps;
- LCD backlight lamp.
The LED indicators installed in the Kalina instrument cluster are soldered into the circuit board and cannot be replaced. If the indicator fails, the instrument panel should be replaced with a new one.
To replace the dashboard backlight lamps, turn the lamp socket counterclockwise and remove it together with the lamp. Install the new lamp together with the socket in the reverse order. Installing the Kalina tidy is done in the reverse order.
Source
autoruk.ru
Mitsubishi Lancer has a striking sporty appearance, stylish interior design and a variety of performance options. The model is produced in Japan. Like all Mitsubishi cars supplied to Russia, the new product is fully adapted for operation in Russian conditions.
The Lancer X represents a new family of Mitsubishi vehicles created on the basis of the first global platform “Project Global”. This platform underpins several new Mitsubishi models, including the new Outlander XL mid-size SUV and the new generation Lancer Evolution sports car.
The use of “Project Global” made it possible to increase the overall dimensions and space of the vehicle interior, as well as body rigidity while maintaining the maneuverability characteristic of the previous generation of the model. The new suspension design improves handling and ride comfort.
The new range of 16-valve 4-cylinder DOHC engines with an aluminum cylinder block and proprietary MIVEC electronic valve timing control system provides high dynamic performance while meeting the most stringent environmental standards. Mitsubishi Lancer is obedient and perfectly controlled.
Engines 11186 and 21116 differ from model 11183 in a lightweight connecting rod and piston group.
Pistons with a short skirt.
All piston rings are thinner than on previous engine models, which is designed to reduce internal engine friction losses.
Source: https://autoruk.ru/index.php?option=com_content&view=article&id=4069&catid=829&Itemid=846
Detailed description of how to remove the instrument panel on a Lada Kalina
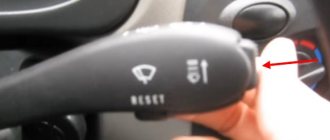
- The first step is to lower the steering wheel all the way down using the position adjustment located under the steering column. We lower the lever down and, accordingly, the steering wheel too.
- Then, take a short Phillips screwdriver (I used Ombra brand) and unscrew the two bolts securing the instrument panel trim, as shown in the photo below:
- After this step has been completed, carefully pull this pad towards you and remove it, overcoming the obstacle of the metal clamps. It will not be easy to get it out; you will have to twist it a little from side to side. I managed to do this and take it out to the right side of the steering wheel.
- When we have dealt with it, we can now begin to unscrew the two bolts securing the center console itself, which are located at the edges of the dashboard body. For this task you will already need a regular Phillips screwdriver, although this can be done with a short one, but it is not so convenient. Be careful to hold the bolts so you don't have to look for them inside the panel later.
- We tilt the shield forward to gain access to the plug. Now the only thing that holds the shield is the plug with the power wires. To remove it, you must first move the black plastic fastener to the right, prying it from above by the hook with a screwdriver:
- Move the lock all the way to the right and easily remove the plug from the device. Now the shield does not hold anything and you can begin to remove it from the panel. You will also have to twist a little, and the easiest way to remove it turned out to be through the left side:
That's it, I hope I explained everything clearly. As for the installation, we carry it out in the reverse order; the replacement will not take more than half an hour.
Source
Dismantling the console containing the stove control unit
As you know, some trim levels of the Kalina-2 car do not have climate control. Here the driver can only control the operation of the stove. The stove control panel is held in place by 4 clips. In general, the mount used here is the same as in versions with climate control, but you won’t be able to remove the control unit panel unless you first remove the three control knobs.
Let's say we managed to dismantle the stove control unit panel. Then, all that remains is to remove the top flap, which is adjacent to the air ducts. This part itself needs to be pulled towards you from below, but first you need to unscrew two screws (they are circled in the figure). You won’t be able to simply grab and pull out the panel; you need to tighten the side clips with a screwdriver. In fact, the entire process is shown in the video we've posted below.
Any device of standard size 1 DIN can be installed in the compartment intended for the radio. You don't need to dismantle anything to do this. It is difficult to imagine a situation in which it is really necessary to remove the center console panels, if we consider the “Normal” or “Standard” equipment. However, you can use the information provided here. Remember that the owner performs all actions at his own peril and risk.
Removing the dashboard of Lada Kalina 2 and Granta
Before tuning a car or modifying anything, you must first dismantle the part. The instrument panel is also subject to changes, for example, replacing the backlight, installing wells or overlays. A large number of technical solutions from the Lada Granta migrated to the 2nd generation Lada Kalina, for example, the process of removing the instrument cluster of Kalina 2 and Granta is the same.
Required : Phillips screwdriver.
- Remove the fuse box cover (Lada Kalina 2, Lada Granta).
- Unscrew the screw securing the plastic cover on the instrument panel (in Fig. No. 3), which is located under the cover of the mounting block.
- Remove the instrument panel trim (in Fig. No. 3) by pulling it towards you, having previously unscrewed two more fastening screws (in Fig. No. 1 and No. 2).
- Unscrew the two lower and two side screws securing the instrument panel.
- Remove the instrument panel of Lada Granta/Kalina 2, having first disconnected the block with wires from its rear side (press on the upper part and move the black lever to the side).
Operation algorithm
Started:
The front door seal will need to be bent and pulled towards you very carefully; The decorated plastic casing must be removed from the front roof pillar. This is easy to do - just remove the 3 clips that secure the cover; Now you will need to find two screws securing the air vent grilles, as well as the trim in front of the glass. The screws are on both sides, and to unscrew them you will need a shaped screwdriver (preferably with a short handle); In front of the glass we also see a plastic cover (it is black). We remove it by gently pulling it towards ourselves.
Note that the overlay is attached using iron buttons;
During dismantling, if you act carelessly, the clips may fall under the panel. It's okay, they can be replaced with new ones; We dismantle the side nozzles on the air vents by unscrewing the screws; We take out the “beard”; It's time to open the ashtray, behind which there are 4 screws; We turn them inside out and take out the ashtray; After that, putting your hand under the ashtray, use a screwdriver to pry off the two side plugs. They are located on both sides of the emergency system key;
They are located on both sides of the emergency system key;
This is done due to the fact that under the plugs there are two screws that are responsible for fixing the “beard” from below. We pull the lower part towards ourselves, but very carefully. You will also need to turn off all the chips, not forgetting where they were; We also remove the cover on the steering wheel and dashboard. The latter is held by 2 black self-tapping screws; We also unscrew the panel from above, using a 10-piece head. The panel is also secured with 7 or 9 screws, depending on the specific machine; At the windshield, the heater air duct sits on lock washers. It is better not to remove them, as the plastic rods will simply come off. For this reason, we tear them ourselves, and instead of them we use self-tapping screws during assembly; You don’t have to remove the steering wheel at all, although the panel comes out with some effort. But in order to reduce time, you can take such an adventure; The time has come to completely remove the torpedo, but we’re in no hurry yet
We carefully check all areas where the screws holding the panel could remain and unscrew them. We pay special attention to the side parts and niches; Carefully pull out the torpedo. It can be easily removed if there is nothing holding it
Let us note right away that it is easier to remove the panel through the passenger door. As for the method of draining the coolant and removing the stove, everything is done almost the same, except with some nuances. After the sound insulation has been carried out, we install the panel in place. Don't forget to first pass the block with wires for the switch. We also insert the glove compartment light in advance, using the appropriate holes. Thus, the operation can be considered complete. Having learned how to remove a torpedo on Kalina, you can safely take on this work, even without the help of an assistant. On the other hand, an extra pair of hands certainly won't hurt.
How to remove the instrument panel on Lada Kalina
In order to change the backlight bulbs or to remove the instrument panel trim, and for other repair work, you need to remove the instrument panel.
First of all, disconnect the negative terminal from the battery.
Release the steering column position adjustment lever and move the steering wheel as far down as possible.
Using a short Phillips screwdriver, unscrew the two self-tapping screws securing the instrument panel trim.
There are spring clips on the lower protrusions of the cladding, so you need to apply a little force to remove the cladding
We remove the trim from the instrument panel opening.
Using a Phillips screwdriver, unscrew the two screws securing the instrument panel
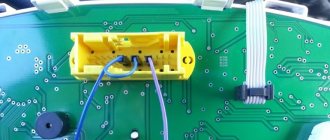
Removing the shield from the instrument panel
Move the wire block clamp
disconnect the wiring harness block from the panel.
To remove the glass, use a screwdriver or hand to press the six plastic latches one by one and remove the glass.
To replace instrument backlight bulbs, use pliers to turn the protruding part of the faulty lamp socket counterclockwise and remove the socket with the light bulb from the instrument panel.
To replace the display backlight lamp, turn the lamp socket with an 8 mm socket wrench.
We install the socket with the lamp in the shield and turn it clockwise until it is completely fixed.
LED indicators installed in the instrument cluster are soldered into the circuit board and cannot be replaced. Therefore, if the signaling device fails, you should replace the instrument cluster with a new one.
Source
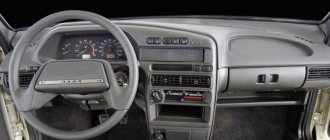
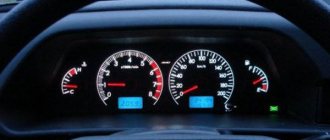
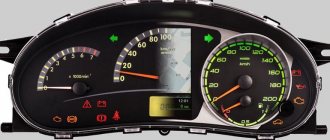
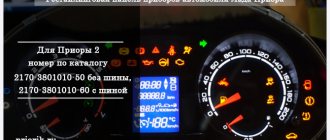
Description and location of indicators and instruments on the panel
Thanks to the tidy, the driver receives information about the condition of the car and the speed of movement.
Tidy Lada Kalina 2
A novice car enthusiast should know about the purpose of warning lights from the very first days.
Below is a description of the device:
1 - tachometer - a device showing at what frequency the crankshaft rotates; 2, 4 — direction indicators, left and right, respectively; 3 — speedometer, displays the actual speed of the vehicle; 5 — coolant temperature indicator; 6 - indicator showing the fuel level in the tank; 7 — fuel reserve warning light; 8 - button with which the daily mileage readings are reset; 9 - a lamp indicating that the emergency lights are on, during which the side lights and turn signals flash, indicating a car malfunction; 10 — electric power steering lamp. Goes off when the ignition is turned on. If it continues to light, then the EUR is faulty; 11 — high beam indicator. The light is on if the high beam is on; 12 — indicator of the applied hand brake; 13 — external lighting indicator; 14 — airbag malfunction indicator; 15 — emergency oil pressure indicator in the car system; 16 — immobilizer warning light; 17 - liquid crystal screen displaying information from the on-board computer; 18 — seat belt malfunction indicator; 19 — battery charging lamp; 20 — emergency brake fluid level indicator; 21 - electronic brake force distribution light, red light indicates a malfunction; 22 — brake pad warning light; 23 — anti-lock braking system (ABS) indicator; 24 - a constantly burning orange light indicates problems with the engine.
After the engine starts, the indicators light up orange. If everything in the system works normally, then they go out after 1-2 seconds.
Tidy Lada Kalina
Possible faults
The following malfunctions are possible with the dashboard:
- Fuel level or temperature gauges do not work. The reason may be faulty sensors or damaged wiring.
- When the tank is full, the fuel level needle drops to the zero position.
- The arrow on the fuel level indicator moves abruptly and often drops to the zero position.
- The fuel reserve indicator does not go out.
- If any indicators on the device do not light up, the reason may be burnt out light bulbs, insufficient contact between the light bulb socket and the printed circuit board, oxidation of contacts, broken wires, or a malfunction of the indicator sensor.
- If the speedometer is not working, the reason may be in the flexible drive shaft of the device: the nuts are poorly tightened, a break, mechanical damage, etc. (video author - RasH19).
Instructions for dismantling and repair
Dismantling the tidy may be required to perform tuning, replacing backlight bulbs or repair work. You can find out how to remove the instrument panel on a Lada Kalina from the car's operating instructions.
LED instrument lighting
Tools and materials
Before disassembling the Kalina 2 instrument panel, you need to prepare the following materials and tools:
- a set of keys;
- Phillips and flat screwdriver;
- replacement parts and bulbs.
Before carrying out work, turn off the power to the vehicle by removing the negative terminal from the battery.
Removing the Kalina torpedo
Algorithm of actions
The disassembly procedure consists of the following steps:
- Using a Phillips screwdriver, you need to unscrew two self-tapping screws.
- Next, you need to remove the trim from the instrument panel.
- At the next stage, the spring clips are removed from the clutch.
- After unscrewing two screws, you need to slide the panel towards you.
- The latch holding the block must be pryed up using a flat-head screwdriver and turned.
- Next, you need to disconnect the connectors with the wires and you can safely remove the tidy.
- To remove the glass from the instrument panel, unclip the plastic clips.
After dismantling, you can replace faulty parts and lighting tabs. If the LED warning lights on the Lada Kalina have burned out, it is impossible to replace them, since they are soldered in. In this case, you need to change the entire instrument panel of the Lada Kalina 2. The Kalina instrument panel is assembled in the reverse order.
Thus, knowing how to disassemble the panel on Kalina, you can repair it yourself if the backlight or signal lights do not light up.
Dismantling the console containing the stove control unit
As you know, some trim levels of the Kalina-2 car do not have climate control. Here the driver can only control the operation of the stove. The stove control panel is held in place by 4 clips. In general, the mount used here is the same as in versions with climate control, but you won’t be able to remove the control unit panel unless you first remove the three control knobs.
Central console of Kalina-2, Standard equipment
Let's say we managed to dismantle the stove control unit panel. Then, all that remains is to remove the top flap, which is adjacent to the air ducts. This part itself needs to be pulled towards you from below, but first you need to unscrew two screws (they are circled in the figure). You won’t be able to simply grab and pull out the panel; you need to tighten the side clips with a screwdriver. In fact, the entire process is shown in the video we've posted below.
Any device of standard size 1 DIN can be installed in the compartment intended for the radio. You don't need to dismantle anything to do this. It is difficult to imagine a situation in which it is really necessary to remove the center console panels, if we consider the “Normal” or “Standard” equipment. However, you can use the information provided here. Remember that the owner performs all actions at his own peril and risk.
Video “Replacing light bulbs on Lada Kalina”
This video demonstrates how to replace the dash light bulbs (video created by IB Channel).
The instrument cluster, or otherwise the dashboard, as many call it, must be removed on Kalina in different cases, and the main ones will be listed below:
- Faulty internal mechanisms or light bulbs requiring repair or replacement
- Failure of the entire combination - usually does not happen so often (extremely rare with VDO panels)
- The owner's desire to change the standard trim to another
- Replacing the shield with another one (for example, Gamma)
To perform this work, the tools we need are a regular shaped screwdriver and a short one to unscrew the bolts securing the lining, however, I’ll tell you about everything in order below:
Removing and installing the instrument panel on Kalina
1. First of all, you need to lower the steering wheel all the way down using the position adjustment, which is located under the steering column. We lower the lever down and, accordingly, the steering wheel too.
2. Then, take a short Phillips screwdriver (I used Ombra brand) and unscrew the two bolts securing the instrument panel trim, as shown in the photo below:
3. After this step has been completed, carefully pull this pad towards you and remove it, overcoming the obstacle of the metal clamps. It will not be easy to get it out; you will have to turn it a little from side to side. I managed to do this and take it out to the right side of the steering wheel.
4. When we have dealt with it, we can now begin to unscrew the two bolts securing the center console itself, which are located at the edges of the dashboard body. For this task you will already need a regular Phillips screwdriver, although this can be done with a short one, but it is not so convenient. Be careful to hold the bolts so you don't have to look for them inside the panel later.
5. Tilt the shield forward to gain access to the plug. Now the only thing that holds the shield is the plug with the power wires. To remove it, you must first move the black plastic fastener to the right, prying it from above by the hook with a screwdriver:
Dismantling the console containing the stove control unit
As you know, some trim levels of the Kalina-2 car do not have climate control. Here the driver can only control the operation of the stove. The stove control panel is held in place by 4 clips. In general, the mount used here is the same as in versions with climate control, but you won’t be able to remove the control unit panel unless you first remove the three control knobs.
Central console of Kalina-2, Standard equipment
Let's say we managed to dismantle the stove control unit panel. Then, all that remains is to remove the top flap, which is adjacent to the air ducts. This part itself needs to be pulled towards you from below, but first you need to unscrew two screws (they are circled in the figure). You won’t be able to simply grab and pull out the panel; you need to tighten the side clips with a screwdriver. In fact, the entire process is shown in the video we've posted below.
Any device of standard size 1 DIN can be installed in the compartment intended for the radio. You don't need to dismantle anything to do this. It is difficult to imagine a situation in which it is really necessary to remove the center console panels, if we consider the “Normal” or “Standard” equipment. However, you can use the information provided here. Remember that the owner performs all actions at his own peril and risk.