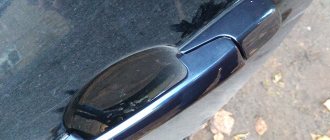
Door handles are not so much a matter of aesthetics in the appearance of the car, but rather a matter of pleasant tactile sensations and reliability. For convenience in the dark, some people go to collective farms. For example, illumination of interior handles. As for me, it’s not really needed. But the door handles on the Priora car are not of quality. I would say this is a sore spot of the car. In the cold they break easily. Some people simply do not know how to open them correctly, they pull at random - especially women. The price of the part is from 1000 rubles for a Euro model, pre-restyling ones are cheaper about 200 rubles. The door handles on the Priora were changed only with restyling - to new “Euro” types. Before this, the VAZ-2170 pleased everyone with the handles that remained with the “ten” - black. They were clumsier, but more reliable than the euro.
Until 2013, they matched the color of the rear-view mirrors, highlighting the design elements against the background of the sides of the car. Since 2013, restyling has changed a lot - the Priora’s handles began to be painted in body color, the same thing happened with the rear-view mirrors, and a few more “little things” were changed.
Car owners of different generations of Priora can easily change Priora door handles instead of the set of their generation. For some, the aesthetic component is more important - when the handles match the color of the body, but for others, reliability is important - such a person prefers the classics. Trying to meet the needs of car enthusiasts, spare parts stores willingly place on their shelves a set of Euro door handles for Lada Priora.
Priora gear knob - what is it used for and how to replace it
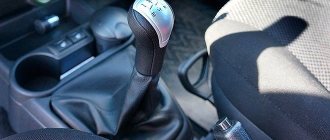
Lada Priora is equipped with a gearbox, which is located under the bottom of the car, so the driver cannot directly change the operating mode of this unit. This is what the handle is designed for, because it provides the driver with communication with the transmission and transmits the last command.
The Lada Priora is a relatively modern Russian-made car designed for driving on good roads. One of the controls for this car is the gearshift knob, located between the driver and front passenger seats. Priora gearshift knob - what is it used for and how to replace it? Despite the simplicity and naivety of the question, it is quite important, especially if for some reason this control does not seem very convenient to the driver.
Description
produces some of the best European handles for Lada Priora and VAZ 2110, 2111, 2112. Durable coating and high-quality mechanism will ensure a long service life of door handles.
The scope of delivery includes:
- Euro pens - 4 pcs;
- Rubber gaskets - 4 pcs;
- Package.
The following colors are available to order:
- 125 “Antares” (dark cherry; not metallic);
- 190 “Califfnia poppy” (golden red; metallic);
- 257 “Stardust” (beige-lilac; metallic);
- 308 “Sedge” (silver-gray-green; metallic);
- 310 “Currency” (gray-green; metallic);
- 311 “Iguana” (silver-bright green; metallic);
- 317 "Meridian" (green);
- 513 “Black Pearl” (silver-brown; metallic);
- 615 “Peace Pole” (gray-beige; metallic);
- 630 “Quartz” (medium gray-green; metallic);
- 637 “Dark Chocolate” (dark brown; metallic);
- 655 “Viking” (gray; metallic);
- 660 “Altair” (silver-light gray; metallic);
- 665 “Space” (blue-black; metallic);
- 690 “Snow Queen” (light gray; metallic);
- 483 "Sirius" (light blue);
- 495 “Moonlight” (light blue; metallic);
- 499 “Riviera” (silver-dark blue; metallic);
- 381 "Centaur" (green);
- 606 “Milky Way” (graphite; metallic);
- 281 “Crystal” (silver-yellow-blue; metallic);
- 412 “Regatta” (silver-dark blue; metallic);
- 360 “Sochi” (gray-blue-green; metallic);
- 363 "Tsunami";
- 391 "Robin Hood" (dark green; metallic);
- 280 “Mirage” (silver-yellow-green; metallic);
- 240 “White Cloud” (white; metallic);
- "Muscari";
- 347 “Inca Gold” (golden-dark green; metallic);
- 270 “Nefertiti” (silver beige; metallic);
- 206 “Melt water” (white-green; metallic);
- "Port wine";
- "Opal";
- "Amulet".
Set:
4 euro handles, 4 rubber gaskets, fasteners
Applicability:
- Lada Priora sedan (VAZ 2170)
- Lada Priora hatchback (VAZ 2172)
- Lada Priora station wagon (VAZ 2171)
- Lada Priora 2 sedan (VAZ 21704)
- Lada Priora 2 hatchback (VAZ 21724)
- VAZ 2110
- VAZ 2111
- VAZ 2112
| Purpose: | Tuning detail |
| Applicability: | Weight, kg: |
| Manufacturer: | Lynx (Russia) |
| Dimensions, cm: | Volume, m3: |
Agree, we are surrounded by many things, the value of which we realize only when we are left without them. This includes some parts of the car, namely door handles. This is how we get into the car and what prevents other people from getting there.
But what if the handle has already seen wear and tear or is broken? This is a wonderful reason to please your VAZ 2110, 2111, 2112 or Lada Priora with new Euro handles from RYS.
This brand has been on the market for more than 10 years and has proven itself very well, producing high-quality and elegant European pens. All products are produced on new equipment and meet the requirements for quality and accuracy, which ensures long and reliable service.
Euro handles LYNX are ideal for transforming the appearance of a car in a short time and little money for such advantages.
Why remove doors on Priora
Before you begin the actual process of removing the doors on a Lada Priora car, it is recommended to understand one of the main questions, namely, why do this need to be done? There are many reasons why a car owner may need to remove doors, so let’s look at them in more detail.
- Damage to doors in case of an accident. This is one of the most common reasons why there is a need to dismantle products. After removing them, you can perform straightening work and paint the products. If the damage is serious, and you cannot do without using a large amount of soil materials, then it is easier to buy a new door and replace it. This will cost less than straightening, painting, etc.
- Removing rust - the sore spot of almost all cars is the ventilation holes at the bottom of the door, which are designed to ensure that water that gets inside the door does not accumulate, but drains away. However, sometimes they fail to fulfill their purpose, and therefore corrosion processes occur inside the products. This is usually caused by dust accumulated inside or an incorrectly performed noise reduction procedure. To save the part from the appearance of “saffron marks”, which spread very quickly through the metal, it is necessary to remove the door on the Priora and process it, eliminating problem areas.
- Repairing or replacing hinges is another reason why there is a need to remove doors on a Priora. Over time, the vehicle's door hinges wear out, which leads to misalignment of the devices, as well as an unpleasant squeaking sound. If the hinges are worn out, they should be replaced. This process involves welding. The hinges are connected to the door part by welding, so you will need the help of an experienced specialist and appropriate equipment.
If you are convinced that there really is a need to remove the door on a Priora, then you need to do it correctly. You will learn how to implement this from the instructions.
Gear shift levers are also produced by other manufacturers:
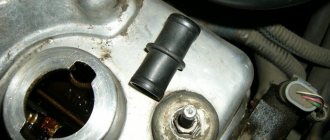
In order to remove the gearshift knob on a Priora, as well as to carry out any replacement or modification operations with it, it is necessary to dismantle the control system. So, for example, you can change a part by installing the version developed for Vesta. But the easiest way is to replace it with a standard part: you don’t have to make any modifications.
We remove the Priora gearshift knob, following the standard algorithm:
Watch this video for more details:
Lada Priora Hatchback 2010, 110 l. With. - breakdown
Cars for sale
Lada Priora, 2011
Lada Priora, 2010
Lada Priora, 2010
Lada Priora, 2012
Comments 30
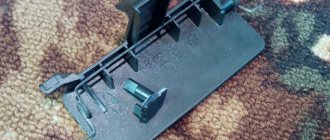
The cover seems to unscrew from the inside.
guys, help me how to remove this pad, I'm afraid to break it, what is the 2nd end to hold on to?
Yesterday morning I went out to warm it up, and then bam, the pen was almost left in my hands. I immediately remembered the article) I won’t repair it, I’ll change it to 10s in color
10e are more reliable and in color, they don’t get dirty yet. only poles!)
Yes, yes, and some people won’t have problems opening it, I often encounter this, “The door is closed, it won’t open”)))
the same garbage, on the passenger side, I sealed it with glue, but I don’t know how to remove it!
Hello colleague!) I want to do the same as you, is everything working fine?www.drive2.ru/cars/lada/p…/288230376153032450/#post
Yes everything is OK! The main thing is to degrease and glue the outer part of the handle to the inner one with superglue (I took a moment)! Everything has been fine for 1.5 years now!
Thank you! I'll try to do it your way!) Good luck!
The eyelet also broke off, only it broke off in the very hole where the self-tapping screw is screwed on. I thought I would glue it with glue, it seemed to be glued. Then after half an hour I tried to open the door, but the door stuck. Apparently the glue got into the groove where the handle goes and froze, the gap was reduced and now it moves slowly. I didn’t want to take the door apart, everything is noisy there, but now apparently I’ll have to take it off, buy a soldering iron and solder the whole thing.
Everything died like guys! Here I’m thinking of sticking the same soldering iron along with this fucking pen up their ass, maybe we’ll get out of this situation!
yeah! and what a sound it all makes when closing/opening! and it freezes in the winter too...
By the way, my second handle also broke...
Which ones are better to put instead of them then...or should these be repaired?)
I glued everything together and it holds up better than new! The original is not for sale! alternative options are even worse and weaker in quality!
It’s better to just glue the outer part to the inner part with superglue, having previously degreased it.
Today I encountered this problem... mine and the passenger's doors are broken... I'll go to the dealer and have them replace it... the car is on Garnatia.
There are none, you can wait indefinitely for an order.
and they’ll rather say it’s not a warranty case, they say you need to pull more gently!
That’s why I liked the standard 12th handles, which don’t get caught in anything, don’t freeze or break off, I already had the idea to install these, but then the sedan would look not like a 10th year, but like a 7th one)
you just need to properly seal them with cold welding, so that’s it forever =)
Source
Installation procedure
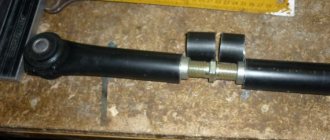
To avoid having to change the locking elements, it is recommended to use cylinders from old handles.
Before inserting them into new handles, you need to wipe the body from dust accumulations with a clean rag and apply lubricant to the surface. The Euro pen should be installed in the reverse order of the work carried out to remove the original. Fastening is carried out using two nuts, under which wide washers and old grommets are placed.
To prevent the handle from damaging the paintwork of the door, a gasket is installed under it. The fastening nuts are tightened, at this time it is recommended to monitor the tightening force so that the plastic fasteners do not burst. After this, the opening rods and unlocking of the locking mechanism are installed. Installation is complete, the handle can be tested for functionality. After opening and closing the door, you need to make sure that the lock works.
Stages of removing the casing
Before removing the trim from the clips, you must remove all bolts, clamps and fasteners that are located in different parts of the door. It is most convenient to do this in a certain order.
Before you begin removing the door trim, disconnect the negative cable from the battery.
From the front door
To remove the door trim on a Lada Priora, you need to get rid of all the fasteners. To do this, follow the following procedure.
- Unscrew the button responsible for locking the door and remove it.
- Unscrew the screw on the inside door handle.
- Remove the handle by carefully moving it away with a flat-head screwdriver.
- Find the two screws in the special pocket that secure the power window control module. They can be hidden under a rubber mat.
- Unscrew both screws and remove the ESP module. Now you need to disconnect the connector with wires from it.
- Locate the three screws at the bottom of the door that secure the trim to the door. Turn them inside out.
- This way you got rid of all the screws and fasteners. Now you need to take a flat-head screwdriver and carefully pry off the casing at the bottom.
- Unsnap all eight clips, which are indicated in the diagram, starting from the bottom of the door. Be careful at this stage: broken fasteners are quite difficult to repair.
- Carefully remove the trim. If done correctly, you should encounter almost no resistance.
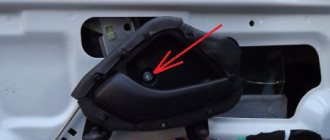
Location of the main screws that prevent the removal of the casing
after you remove the trim, your door will look like this
Due to their small size, screws and clips are often lost. To make the reassembly process easier for yourself, before starting work, prepare a container where you will put all the small parts.
To install the trim in place, place it against the door. Make sure the fasteners are in place. Insert and tighten the lock button. Thanks to this, you can pre-fasten the door components. Make sure the handle fits into its hole. Now you can snap all the clips into place and screw the screws back in.
Video: how to properly remove the trim from a Lada Priora car with your own hands
From the back door
The procedure for removing the trim from the rear door of a Lada Priora is not much different from what was given in the instructions for the front door. The exception is when working with window lifters: here they have a slightly different mechanism.
- Unscrew the door lock button and remove it.
- Using the same screwdriver, carefully press out the window lifter handle lock.
- Pull out the handle itself and its lock.
- Remove the screw holding the inner door handle trim.
- Remove the trim using a flathead screwdriver.
- Remove the two screws located in the small pen pocket under the rubber mat, and then remove the pen.
- Starting at the bottom of the door, remove the trim from the clips. The operating principle is the same as for the front door.
The rear door is assembled in the reverse order.
Be careful when working with wiring, especially those for window regulators. It is quite thin, so it can tear easily.
As you can see, the process of dismantling both the front and rear door trim of the Lada Priora is not particularly complicated and does not require many tools. A set of two screwdrivers will be sufficient. To avoid damaging the door, follow the main rule: not only unscrew the screws, but also remove the parts attached by them. All additional elements, such as door handles or window lifters, will greatly interfere with the process of removing the trim. If you strictly follow all the instructions, you can easily disassemble and reassemble the door trim without resorting to the help of specialists from car services.
Reviews
Delivery of goods is carried out throughout Russia and the CIS:
1. Russian Post (from 350 rubles and above)
Delivery to all regions of the Russian Federation and CIS countries
2. Transport Companies (from 350 rubles and above)
Delivery throughout Russia and the Republic of Kazakhstan
- TK Energy (nrg-tk.ru)
- TC Business Lines (dellin.ru)
- TC SDEK (www.cdek.ru)
- TK PEK (pecom.ru)
- TK KIT (tk-kit.ru)
3. Pickup
The order can be picked up at the office at Tolyatti, 40 Let Pobedy 38, TD “Malachite”, 1st floor.
The waiting time for sending an order in our online store is approximately 2-7 working days, large orders 7-14 working days. days; color of bumpers, mirrors, body parts, spoilers, etc. 7-14 work. days; sewing covers, upholstery, steering wheels, gear knobs, EVA mats, etc. 7-14 work. days.
During this period, we will send you a tracking number by email. email to track the parcel en route.
Payment can be made in the following ways:
1. Payment to a Sberbank card
You can pay using the SBERBANK-Online application and other Bank applications.
After placing an order, making payment, do not indicate comments , we ourselves will understand by the amount of the order and the name of the sender. After receiving the funds, the status of your order will be changed to paid until 17.00 of the current day, or from 9.00 of the next Moscow time.
2. By bank card
Automatic acceptance of payments using MIR Bank cards, VISA International, Mastercard.
You can also pay with credit cards with a grace period.
To select payment for goods using a bank card, on the corresponding page you must click the “Pay for order by bank card” button.
2. Payment to QIWI wallet 89272115207
3. Payment on Yandex.Money 410013993950891
5. Payment to a bank account for legal entities and individual entrepreneurs (commission 6%)
Send your organization's details to [email protected] for invoicing. After paying the bill, be sure to send a payment order.
4. Cash on delivery of Russian Post (commission from 4%)
IMPORTANT! When sending by cash on delivery, RUSSIAN POST will take a commission for providing the cash on delivery service of 150-300 rubles, and the delivery cost also increases due to the evaluation of the goods.
Cash on delivery delivery is possible only within Russia.
ATTENTION! When choosing cash on delivery, the delivery cost is paid in advance before shipment, for the product itself upon receipt.
The amount of the order by cash on delivery should not exceed 5000 rubles; also, painted parts, goods made to order, covers, upholstery, door inserts, EVA mats, steering wheels, etc. are not sent by cash on delivery. (minimum 50% prepayment).
How to remove and install the front door lock of a Priora
To perform the work of removing the lock, you will need a set of screwdrivers.
- Disconnect the negative cable from the battery.
- Remove the front door trim.
Squeeze the latch.
Video on the topic:
Euro door handles “Lynx” for LADA cars 2109-21099, 2114-2115.
Applicability:
- VAZ 2109;
- VAZ 21099;
- VAZ 2114;
- VAZ 2115;
Equipment:
- 4 handles;
- 4 traction;
- Package.
* Complete set with the ability to install standard lock cylinders in the front doors of the car (cylinders are not included in the delivery package). Complete set without coating, with chrome and color coating (in the full AVTOVAZ color range).
You can also order unpainted pens, price 1050 rubles.
It's easy to place an order on our website. Simply add the selected items to your cart, then go to the Cart page, check that the items you ordered are correct, and click the “Checkout” or “Quick Order” button.
Door hinge repair options
Failure or severely deformed hinges are repaired using the following methods:
- Complete door replacement. It is complicated by the fact that it is not always possible to find new VAZs for old ones. You have to buy old elements that are partially worn out.
Replacing door hinges, as well as fingers, is the most rational option in this case. It's inexpensive and relatively easy to do. If necessary, additional equipment can always be rented at a service center or automotive supply store. The cost of the hinges themselves for the VAZ 2110 and similar models is only about 300-500 rubles. You can also find old, used ones for sale. You will have to pay less for them. But new VAZ 2110 doors will cost several thousand rubles. And they are sold, as a rule, without glass and cladding. Their installation is an additional waste of money.