Hi all! Surely you have heard about such a thing as body rigidity. This is a truly important feature for any vehicle. Especially for those cars that operate on less than ideal roads.
Therefore, today we will talk to you about why the front strut strut is needed and what the installation of these elements gives. This will allow you to understand whether it makes any sense to buy and install such an element. Or this is true for some special sports car.
I will try to answer all the most pressing questions, understand why the spacer is used, and how you can install it on your own car with your own hands.
If you're ready, then let's go!
Driving a walk-behind tractor with a trailer - license category, driving rules
The car body includes a large number of elements that are connected to each other by welding, bolting and other fastening options. And when some forces appear on the body, the components interact. And the fewer movements are made, the higher the rigidity parameters are. This directly has a positive effect on controllability. Body rigidity is most noticeable when the car is moving at high speeds and cornering.
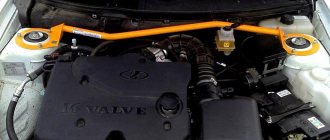
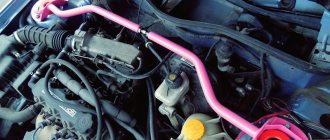
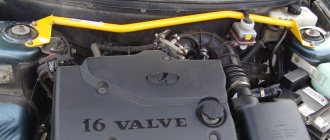
And so, a strut brace is a part that is designed to provide and create additional rigidity. The element looks like a tube with a round or rectangular cross-section. There are special platforms at both ends. They are welded and allow the levers to be fixed.
Installation is carried out across the engine compartment. And the mounting platforms are held on the rack glasses. The existing bolts help here.
After installing such a design, it is possible to eliminate body displacement and thereby improve the quality of handling. That is, the spacer takes on a certain part of the loads that affect the car body when driving. When the car turns into a corner at speed, the stretch prevents the cups from mixing, connecting them into a single whole.
Installing the front strut strut yourself
Once you purchase the spacer, you can install it yourself. However, if you do not have the necessary tools, then it is better to resort to the help of professionals. The whole process is as follows:
- The car must be on a level surface;
- With the hood open, it is necessary to unscrew all the nuts on the “glasses”;
- Now you need to put on the spacer. This should happen without difficulty;
- You also need to install washers;
- At the last stage, you need to tighten all the nuts back. They don't need to be retightened. If the spacer is adjustable, then it needs to be adjusted.
That's it, the installation is complete. As it turned out, there is nothing complicated about this.
Varieties
Whether or not to install a spacer with additional support for the internal combustion engine is up to everyone to decide for themselves. Someone reads reviews and understands that such a modification would not be superfluous. For others, the car has a very high-quality body, strengthened at the production stage, and therefore no special additions are required.
As practice shows, most often among domestic motorists, spacers are installed:
- on Priora;
- VAZ 2114;
- VAZ 2110;
- Lada Granta;
- VAZ 2109;
- Subaru Impreza;
- Mazda 6GG;
- Lada Vesta;
- Nissan Almera Classic;
- domestic classics;
- VAZ 21099, etc.
Suppose you decide to install such an element for yourself. But before you make modifications to the car, you should understand what kind of struts there are and how they differ from each other.
This is quite an important point, since it is better to choose devices that are optimally suited to your vehicle.
Based on the number of fixation sites, there are 2 categories:
Maintenance and testing of the front suspension of VAZ 2113-2114-2115
Maintenance and checking the suspension for damage.
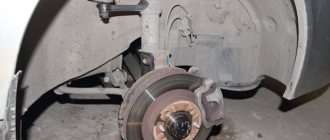
During each maintenance, as well as during repairs, you should always check the condition of the protective covers of the suspension ball joints, paying special attention to the absence of mechanical damage to the covers. Find out if there are any cracks or traces of contact with road obstacles or the body on the suspension parts, deformations of the transverse arms, braces, stabilizer bar and its struts and parts of the front body in the places where the suspension units and parts are attached
Deformation of the suspension parts of the Lada Samara 2 and, above all, the braces and parts of the front body of the body violates the wheel alignment angles and makes it impossible to adjust them
Find out if there are any cracks or traces of contact with road obstacles or the body on the suspension parts, deformations of the transverse arms, braces, stabilizer bar and its struts and body front parts in the places where the suspension units and parts are attached. Deformation of the Lada Samara 2 suspension parts and, above all, the braces and front body parts disrupts the wheel alignment angles and makes it impossible to adjust them.
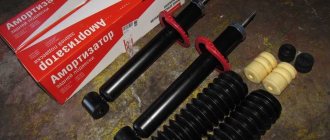
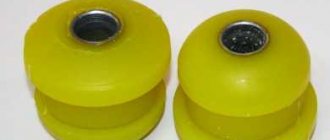
Check the condition of the rubber-metal joints, rubber cushions, suspension ball joints, as well as the condition of the upper supports of the telescopic suspension struts.
Rubber-metal hinges of the VAZ 2113, rubber cushions and the upper supports of the telescopic racks of the VAZ 2114 must be replaced in case of ruptures and one-sided “bulging” of the rubber and when their end surfaces are cut.
Front suspension assembly 1 – upper support of telescopic strut 2 – upper support cup 3 – compression stroke buffer with protective casing 4 – compression buffer support 5 – suspension spring 6 – lower spring support cup 7 – steering rod ball joint 8 – steering knuckle 9 – telescopic strut 10 – eccentric washer 11 – adjusting bolt 12 – strut bracket 13 – steering knuckle 14 – front brake protective cover 15 – brake disc 16 – lock ring 17 – wheel hub nut 18 – splined shank of the wheel drive joint housing 19 – guide pin 20 – wheel hub bearing 21 – ball joint 22 – suspension arm 23 – shims 24 – stabilizer bar 25 – stabilizer bar 26 – stabilizer bar cushion 27 – stabilizer bar mounting bracket 28 – body bracket for mounting the suspension arm 29 – suspension arm extension 30 – brace mounting bracket 31 – ball pin protective cover 32 – ball pin bearing 33 – ball pin 34 – ball pin housing 35 – suspension strut rod 36 – outer housing of the upper support 37 – inner housing of the upper support 38 – bearing of the upper support 39 – rubber element upper support 40 – travel limiter of the upper support 41 – protective cap of the upper support B – area for checking the suspension hinge
To check the condition of the suspension ball joint, remove the wheel and measure the distance between the lower arm 22 and the protective casing 14 in zone B. If, when the suspension is rocked, this distance changes by more than 0.8 mm, replace the ball joint. A more precise check of the ball joint is described in the chapter “Checking the technical condition”.
To measure the gap in the ball joint on a VAZ 2115, use tool 02.7834.9503.
Which antifreeze is better: let’s look into the issue in more detail
- Two-point. As you understand, these are spacers that have a pair of points for fixation to the body. They are mounted directly on the mudguard cups, that is, on the left and right sides. A fairly common and frequently used option. But not the most perfect and optimal for some cars;
- Three-point. Improved version. Here, a pair of the already mentioned fastenings are used, like the two-point one, but in addition there is another fixation point on the body. This creates a strengthened connection, and therefore this stretching works more effectively.
The main advantage of a three-point vehicle is maximum body rigidity. But here you will need to spend more time and effort on the installation process itself.
Devices are also differentiated depending on the adjustment. To be more precise, make adjustments whenever possible.
As a result, there are 2 types of structures:
- Unregulated. This is a one-piece part with no detachable components. Therefore, it will not be possible to somehow configure and regulate them. Non-adjustable options have lower rigidity parameters. They should be used only when there is no other design for your car;
- Adjustable. There is one important feature here. The design includes a pair of nodes, the connection between which is carried out using a special coupling. It is the coupling that makes it possible to change the length of the spacer to increase or decrease, depending on the situation.
It is also worth highlighting the differences across the cross-section. Spacers are divided into round and rectangular. Both options are identical in terms of rigidity and quality. Here the main role is played only by the thickness of the material. It is better to choose products with a thickness of 2-3 mm. There is no fundamental difference in the type of section. Choose what suits the configuration of your car.
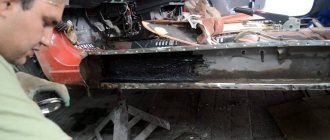
Making a spacer with your own hands
The first thing to do is to make flanges. To do this, unscrew the nuts securing the stands to the glasses and, placing cardboard on them, mark the future holes with a marker. Then cut them out in paper and put it on the pins. Now all that remains is to outline the outline of the flange according to the shape of the glass and trim off the excess cardboard. Inside the template, make a round opening corresponding to the protruding part of the support.
Ready cardboard template with holes
Important point. Make the outer edge of the template facing the engine not round, but straight, since a rib for attaching the pipe will be welded to it.
Perform further operations in this order:
- Attach the cardboard template to the sheet of metal, outline it with a marker and cut out the steel flange using a grinder. Round all edges and sand to ensure there are no burrs.
- Mark the centers of the holes and drill them according to the diameter of the studs. Use a small drill first and then a large one. Bevel both sides of the holes and try the part in place. If a discrepancy is found, widen each hole slightly with a round file.
- Cut a 4cm wide strip of steel and weld it at a 90° angle to the straight edge of the flange. To prevent the strip from bending back under pressure from the pipe, make triangular stiffening ribs and weld them along the edges.
- Place the flanges on the studs and check for distortions. Press them with two nuts and carefully measure the distance between the strips to cut the pipe as accurately as possible.
- Disconnect the battery and cover the engine compartment with a damp cloth. Attach a pipe cut to size to the flange brackets and securely weld it at both ends. Check the gap between the hood cover and your structure.
- Unscrew the nuts and remove the brace from the car. Boil all the seams thoroughly, remove the slag and try to put it back. If the structure has been welded so badly that the flanges do not fit on the studs, file the holes again.
- Remove the finished spacer again, clean it with a brush from rust, degrease it and paint it in 2 layers, after applying a primer. Place the jumper in place and finally tighten it with nuts.
Advice. If you plan to bend the spacer, do it before cutting the pipe to size.
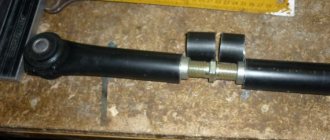
The coupling for regulation is placed in the pipe gap
If you are a specialist in welding, then you can easily make the stretch adjustable. To do this, buy a ready-made threaded coupling of the required diameter and weld it in the middle of the cross member, having previously cut it into 2 parts. After welding, twist them together, secure the coupling with a locknut, and only then cut the pipe exactly to size between the flanges.
Note. The described method is quite suitable for making a back stretcher, if you want to do it yourself. In this case, think carefully about the design so that the jumper takes up minimal space in the luggage compartment and does not block it in the middle.
Successful design of the stretcher - it stands right behind the seats
How to make a spread with your own hands - photo
A workpiece cut from metal The workpiece must be rounded and cleaned The part is tried on in place Strips and stiffeners are welded to the homemade flange The pipe must be carefully grabbed to the flange Correct design - the pipe goes around the tank with liquid After painting, the spacer is finally attached To distribute the load, a gusset must be welded to the pipe Last fitting spacers before painting First you need to unscrew the fastening nuts
Advantages and disadvantages
It’s not difficult to find a spacer option that suits you, using a specific article number or using the search by car model. The Autoproduct store alone offers the widest assortment.
But in order to make a final decision, it is worth dividing the characteristics of the spacer into pros and cons.
The positive points include:
- reduction of possible body deformation;
- confident cornering;
- improved off-road performance;
- increased steering sensitivity;
- improved vehicle stability.
But there are also disadvantages. Among them:
- a strong side impact deforms the entire rack;
- purchase and installation require large financial costs;
- access to some components in the engine compartment becomes more difficult.
And you can draw your own conclusions, since everyone sets their own priorities.
I'll say this. Spacers on the front struts increase body strength and vehicle stability when driving off-road and when driving straight along the highway.
The role of spacers in strengthening the car body: why is it needed?
The stretcher is an additional rigidity installed between the upper supports of the struts (most often the front ones). It is made of a metal pipe, the ends of which are attached to two support flanges. The latter have holes that match in diameter and placement with the studs on the rack cups. The flanges are put on them, adjacent to the planes of the glasses, and screwed with standard nuts.
This is what stretching on a car looks like
Reference. Since the distance between the supports and mounting bolts differs for different car models, the spacers are made for a specific car brand.
The body of a modern car is made of thin sheet metal, interconnected in such a way as to ensure maximum structural rigidity. However, when rolling, turning and driving on bad roads, the body experiences high loads, causing it to deform elastically. This behavior has a detrimental effect on handling and reduces the life of the machine for the following reasons:
- the lower the rigidity of the body, the more it “twists” when turning or when hitting a bump;
- over time, the metal “gets tired”, causing cracks to form in the load-bearing elements;
- from constant impacts from the wheels, the side members bend inward, which is why, at a certain moment, adjusting the camber of the front wheels becomes impossible.
Extracting the side members on the stand, after which you need to install the cross member
Note. As a rule, the effect of “lost wheels” is observed on cars that have served for more than 10 years in difficult conditions. Their side members are so concave that there is not enough adjustment to align the wheels, so the tires wear out on the inside. The problem is solved by drawing out the side members on the stand and installing elements that strengthen the structure.
The spacer located between the pillar supports provides additional rigidity to the body and reduces the amplitude of deformation. That is, its installation gives a real positive result, no matter what opponents of such tuning say. The stretcher can be installed on any car, but there are certain cases when it brings particular benefits:
- with constant use of a passenger car in rural areas on bad roads;
- on machines that have undergone the procedure of stretching the side members due to metal fatigue and excessive deflection;
- on amateur cars taking part in sports racing.
Cars with such a frame do not require bracing
Reference. In professional motorsport, spacers are not used as a separate element. In specially prepared vehicles, a supporting frame is installed into which body elements are attached.
There is a type of car that does not require any additional reinforcement. These are framed all-wheel drive SUVs such as Jeep Wrangler or Land Rover Defender. In small cars and minibuses, where the pillars go under the dashboard, installing the jumper is technically difficult. At the same time, on some models, amplifiers are installed at the factory and are standard design elements.
This car has spacers from the factory.
Why not install?
If we have already discussed the advantages of such tuning in sufficient detail earlier, then the disadvantages should be discussed separately. Unfortunately, one of the disadvantages of this modification is extremely significant: in a collision, the car will suffer much more serious injuries.
It is logical that if the wing is hit, the entire front part of the car will be damaged - such a violation of the geometry is very difficult to correct. In addition, when replacing the front end of the car, the rigidity of the body will also suffer significantly.
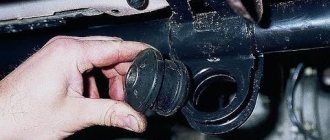
The second drawback is much less critical: due to the location of the elements under the hood, in some cars it will be a little more difficult to get to the barrel of brake fluid.
Tuning is always a compromise: each modification will bring with it not only positive, but also negative changes. Perhaps, when buying a car from a showroom and with a measured driving style, installing spacers will not be necessary - here the choice, as always, remains with the car owner.
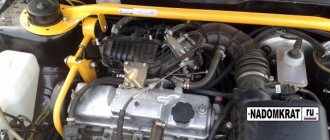
When is an engine mount needed?
Any engine braking, sudden starting, hitting various bumps - all this is smoothed out by additional support, limiting the maximum movement of the motor. It can also prevent the gears in the box from switching off automatically.
This can happen when approaching a roundabout, when the throttle begins to be released, while the gear remains engaged. Having assessed the situation, you suddenly decide to press the gas again in the hope that you will have time to overtake the person in front. The engine howls and there is no traction on the wheels due to a gear slipping out. There is no need to talk about the consequences, they will be disastrous. Therefore, installing additional support will be the right decision. In addition, it is easy to install it yourself.
In the case of an eight-valve injection engine, it is worth purchasing a bracket designed to transfer the ignition module. This will have a positive effect on the module, raising it higher and also protecting it from road moisture.