How to solve the problem of poor heating of the stove on a VAZ-2112
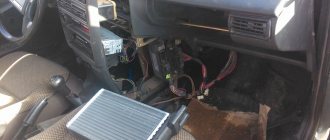
The onset of winter for car owners is indicated not only by worsening weather conditions and a decrease in ride quality, but also by problems with the stove. Which of us remembers the heater of our VAZ in the summer? In the spring the stove turns off and it only gets to work in the fall. And this is where problems begin, for example, the interior does not warm up well or, in general, cold air blows from the VAZ-2112 stove. Before contacting a car service, you can try to figure out this problem yourself. It’s not that difficult, believe me, many problems with the VAZ-2112 heater can be eliminated with minimal effort and expense.
VAZ-2112 owners need to know about some differences that are typical for the heating system. An important point is the separate operating principle. The heater design consists of a stove that prepares warm air to enter the cabin. The pipes are distributors of heated air. Thanks to the air ducts, heat comes from the control panel, is directed to the windows and blows on the feet. The heating system is controlled by a control unit. The heater design also includes an evaporator.
Weak warm air supply
The air flow is warm enough, but the pressure is insufficient. In such a situation, the following malfunctions are possible:
- The cabin filter is dirty. In this case, you need to clean it from dust with a vacuum cleaner. If this cannot be done, then it is better to replace it.
- The stove radiator is clogged. In addition to dust, both insects and leaves create plugs. Small particles can be blown out using compressed air. To remove large dirt, you need to remove the grill and wash it.
Insufficient air pressure may be due to a leaking radiator. This problem is determined very simply - if you constantly add antifreeze or antifreeze, then pay attention to the condition of this unit in the car. To eliminate this malfunction, you will need to gain access to the radiator and remove it along with the heater.
The practice of soldering the heatsink is unreliable. It is better to install a new part so as not to disassemble half of the front end later.
The main reasons for a non-working stove
If the VAZ-2112 stove does not heat well, then one of the following problems may be occurring:
These reasons are the most common. You can eliminate each of them yourself, and we will tell you how.
Inability to regulate temperature
If the VAZ-2112 stove does not heat, then it is worth checking whether it is possible to regulate the temperature regime. This problem may occur due to malfunctions in the control unit or due to a malfunctioning damper. First of all, it is worth checking the serviceability of the temperature sensor, which is located on the ceiling of the cabin near the ceiling lamp. We turn the temperature control lever starting from the cold position and ending with the hot position. Although temperature changes will still be felt. If the supply of hot air begins only when the sensor is installed in the hot extreme position, then we can speak of its failure and prepare to replace it with a new element.
Damper problems
If the stove is not blowing well, then it is worth checking the operation of the damper. The fasteners on it may oxidize and in this case the damper will not turn. You can only get to the damper through the hood, after first removing the deflectors and bending the antennae. After such actions, you can try to move the damper from the inside. If everything is fine with the damper and there are no traces of oxidation on the fastenings, then it will move easily.
Fan replacement
Dismantling
The fan assembly procedure is as follows:
- The lower heater regulator must be moved to the extreme position towards the passenger. The control panel and the glove box with shelf are removed. It is also necessary to remove the center console with the audio system.
- Using a wrench, unscrew and remove the rod designed to control the damper. Unscrew the nut securing the system radiator skin, as well as the nut located behind the glove box.
- Disconnect the air line attached to the casing of the radiator unit and remove the fan casing, as well as the device itself.
- Pull out the rubber seals and disconnect the red cable.
- Using a screwdriver, you need to remove the retaining ring, which is located on the drive shaft. You should also remove the fan impellers and adjusting rings.
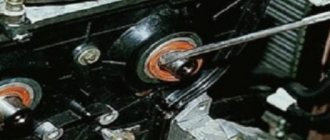
Repair
A disassembled fan must be repaired or replaced with a new, more powerful one, but experts do not advise doing this, since the heating system will have to be completely improved. As for the repair itself, this procedure will not take much time, since all actions associated with it only involve removing and assembling the mechanism. In general, there is nothing difficult about this - if you need to replace the impeller or electric motor, this can be done without problems.
So that the stove always warms
If you pay attention to the heating system and do not start this important element of the car, you can protect yourself from unpleasant surprises, lengthy repairs and unnecessary expenses. Follow simple rules and the stove will always work properly.
Now for each of you the question of why the stove on the VAZ-212 does not work will not seem so difficult. You can find the cause and eliminate it without specialists; you only need desire and at least minimal car maintenance skills.
Source
Modification of the air ducts of the VAZ 2110 – 2112 stove
The VAZ 2110 - 2112 has one bad feature: the heater does not work well, or rather, the flow of warm air weakly blows into the driver’s feet and onto the front side windows. For this reason, every now and then your feet freeze and the windows fog up. But as they say, there is always a way out of every situation. The solution would be to remake the stove, or, more precisely, its air duct.
So, let's begin. Before starting work, you need to make sure that the stove is working well, otherwise you will have to repair it. If it works properly, then we begin work. First we will need to remove the torpedo and disassemble it into parts. All elements of the stove panel are bolted together.
There are 2 options for solving the problem with poor blowing of the side windows:
For better blowing of the side windows, I chose option 2. The prerequisite for this choice was that corrugation is good only for heating the legs. In general, the second option is better than the first, so let’s get to work on gluing all the seams and cracks of the air ducts. Using silicone we glue the gaps between the lower and upper parts of the torpedo, as well as the holes for fastenings.
Next we move on to modifying the furnace dampers, which direct air to different zones. From the factory, the damper does not fit well to the body, so some of the warm air disappears, getting into the cracks between the damper and the body. The air begins to flow into nowhere, or more precisely, it circulates under the panel and does not provide heat.
Let's start dismantling the damper, remove the damper and see how Auto VAZ is still worried about us, the factory seal cannot be called a seal, it does not seal anything, but only slightly covers the cracks. Once the seal is removed, you will see gaps.
Using insulation, I glued the entire valve and removed the cracks. This procedure will have a good effect on the flow coming out of the damper; the air will not be lost in the gap before exiting, but will flow into the cabin in full. If you knead the lips, you can use Bitoplast 10 on the body. We work carefully with Bitoplast 10, in some places it will be necessary to glue it in 2 or even three layers, in a word, we make it last forever.
A larger percentage of the incoming air disappears in the area where the air begins to travel to the driver's window. This gap is very large, so I decided to foam it with polyurethane foam. Perhaps someone will wonder if the foam squeaks when driving, I will answer - no, it has been tested by time.
Next, let's move on to improving the air ducts in the area of the driver's feet, front and rear passengers. The module for distributing warm flow to the feet, as you already understood, is also full of cracks.
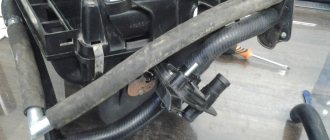
Because of these cracks, the wind blows poorly at your feet, because half the force of the flow goes nowhere. I thought a little and a great idea came to my mind. I decided to use corrugated pipe. This pipe is doubly good, since it delivers warm air in the initial volume, but also does not take up much space during installation.
The small size of the corrugation will free up space in a pile of wires, making it easier to access the wires. I did everything this way: I removed the standard air distributor, pushed three corrugations into the remaining hole and filled everything with foam.
The central corrugation has a smooth surface inside the hose, because if you install a hose with a ribbed surface inside, the stove will whistle when turned on. The diameter of the corrugation should be 40 millimeters - no less, no more. So what do we get? One corrugation goes to the driver’s feet, the second to the front passenger’s feet, and the 3rd goes back at the rear passengers’ feet. Then we put the entire structure in place and enjoy the warmth. And so, without investing a lot of money, we modernized the stove and it warms the interior better.
How to make a VAZ 2110 warmer
The VAZ 2110 - 2112 has one bad feature: the heater does not work well, or rather, the flow of warm air weakly blows into the driver’s feet and onto the front side windows. For this reason, every now and then your feet freeze and the windows fog up. But as they say, there is always a way out of every situation. The solution would be to remake the stove, or, more precisely, its air duct.
So, let's begin. Before starting work, you need to make sure that the stove is working well, otherwise you will have to repair it. If it works properly, then we begin work. First we will need to remove the torpedo and disassemble it into parts. All elements of the stove panel are bolted together.
There are 2 options for solving the problem with poor blowing of the side windows:
For better blowing of the side windows, I chose option 2. The prerequisite for this choice was that corrugation is good only for heating the legs. In general, the second option is better than the first, so let’s get to work on gluing all the seams and cracks of the air ducts. Using silicone we glue the gaps between the lower and upper parts of the torpedo, as well as the holes for fastenings.
Next we move on to modifying the furnace dampers, which direct air to different zones. From the factory, the damper does not fit well to the body, so some of the warm air disappears, getting into the cracks between the damper and the body. The air begins to flow into nowhere, or more precisely, it circulates under the panel and does not provide heat.
Let's start dismantling the damper, remove the damper and see how Auto VAZ is still worried about us, the factory seal cannot be called a seal, it does not seal anything, but only slightly covers the cracks. Once the seal is removed, you will see gaps.
Using insulation, I glued the entire valve and removed the cracks. This procedure will have a good effect on the flow coming out of the damper; the air will not be lost in the gap before exiting, but will flow into the cabin in full. If you knead the lips, you can use Bitoplast 10 on the body. We work carefully with Bitoplast 10, in some places it will be necessary to glue it in 2 or even three layers, in a word, we make it last forever.
A larger percentage of the incoming air disappears in the area where the air begins to travel to the driver's window. This gap is very large, so I decided to foam it with polyurethane foam. Perhaps someone will wonder if the foam squeaks when driving, I will answer - no, it has been tested by time.
Next, let's move on to improving the air ducts in the area of the driver's feet, front and rear passengers. The module for distributing warm flow to the feet, as you already understood, is also full of cracks.
Because of these cracks, the wind blows poorly at your feet, because half the force of the flow goes nowhere. I thought a little and a great idea came to my mind. I decided to use corrugated pipe. This pipe is doubly good, since it delivers warm air in the initial volume, but also does not take up much space during installation.
The small size of the corrugation will free up space in a pile of wires, making it easier to access the wires. I did everything this way: I removed the standard air distributor, pushed three corrugations into the remaining hole and filled everything with foam.
The central corrugation has a smooth surface inside the hose, because if you install a hose with a ribbed surface inside, the stove will whistle when turned on. The diameter of the corrugation should be 40 millimeters - no less, no more. So what do we get? One corrugation goes to the driver’s feet, the second to the front passenger’s feet, and the 3rd goes back at the rear passengers’ feet. Then we put the entire structure in place and enjoy the warmth. And so, without investing a lot of money, we modernized the stove and it warms the interior better.
Modification of the stove on a VAZ 2110 car
There is nothing perfect in the world. This becomes especially clear when it comes to modifying (upgrading) the stove on a VAZ 2110. No one wants to freeze in a car in winter, not to mention the windows covered with ice. Upgrading the VAZ 2110 stove becomes for motorists not just a momentary whim, but a cruel necessity dictated by the harsh Russian frosts.
Modification of the VAZ 2110 stove
In order to withstand the imperfections of the world in the form of the VAZ 2110 heating system, it will be enough to arm yourself with a tube of silicone or sealant, polyurethane foam, simple plumbing tools, and also a certain amount of patience. Without theoretical foundations, of course, there is no way either.
How to modify and modernize the stove with your own hands?
There are many options for tuning and improving the operation of the heating unit, which you can do yourself. To implement each task, you will have to completely or partially disassemble the heating unit.
Before remaking the heating unit of the VAZ 2110, it is necessary to seal the main air duct as much as possible.
Improved side ventilation
There are two ways to improve side ventilation:
- lay the corrugation, which will be aimed at blowing the glass of the side windows;
- modification of the VAZ 2110 stove may involve sealing all the cracks that lead to loss of air flow.
The first option is more effective for blowing the feet of passengers sitting in front and behind. In fact, practice shows that this method has no effect for blowing glass on windows. Therefore, to solve the problem, all the cracks in the panel are sealed.
The task is carried out using silicone sealant or a special anti-creaking agent. All cracks located around the perimeter on the upper and lower components of the center console panel are sealed. All holes located around the fasteners are treated with silicone.
Damper modernization
In cars manufactured after 2003, setting the damper to blow the feet does not produce results, since the heater blows in all directions. In older versions of the car, the damper works better.
The upgrade procedure is performed as follows:
- Using a metal saw, you should cut out the end parts of the damper. There is no need to dismantle the elements of the heating system. The place that needs to be cut is marked in red in the photo below.
- The flap intended for blowing the windshield does not need to be touched. If the consumer cuts off the end parts on it, then the airflow along the edges of the windshield will be worse.
- To increase air intake, a piece is cut out onto the windshield on the driver's side. This part is marked in green in the photo above.
- It will take a long time to cut out, it must be done carefully. The task may take several hours to complete.
- Next you will need a piece of soft aluminum. Alternatively, you can use iron from a coffee can, as shown in the photo. The iron is cut out with a regular knife and fixed on the stove elements.
Improved foot airflow efficiency
To complete the task you will need:
- new boots, the type of parts does not matter;
- grille, can be used from old speakers, you need to cut a circle out of it, if there is no grille, you can use rubber pads for a Fiat Punto car;
- A piece of rubber can be purchased at the car market.
Upgrade procedure:
- Using an elastic band, the cut circle from the grille is fixed to the boot. You can use super glue to attach the elements.
- On the other side, fixation is performed with a tie. In its absence, the use of plastic clamps is allowed.
- To modernize the driver's foot airflow system, it is necessary to ensure air flow to the pedals. To do this, a corner is cut on the plastic wall of the cladding from the bottom side of the pedal.
- A plumbing pipe is installed into it. This option is the simplest to implement and quite effective.
- To create a system for warming up the feet of passengers sitting in the rear, the corrugation must be removed from the ashtray. The use of plastic pads located under the seats is not recommended. To implement this option, it will be necessary to install two corrugations instead of one, and it is necessary to use elements with a smaller diameter. If you use this method, the plastic guides under the seats must be raised slightly, this will avoid directing the air flow onto the mats.
- After completion of the work, quality must be checked. To do this, turn on the stove, and bring a lighter with fire or a match to the blowing point.
Modifying the stove, simple techniques
Modernizing the VAZ 2110-2112 stove is a thorough and multifaceted process. If you don’t have the time or opportunity to fully remodel the stove system, but you need a positive result in the shortest possible time and with minimal effort, because winter is almost upon us, you can try to listen to the following advice.
Stove damper tens
Sealing the cracks in the front panel of the torpedo air ducts
The main problem with good blowing of side windows is the presence of a large number of cracks in the dashboard air duct system, which should only be sealed, thereby reducing heat loss and significantly increasing the pressure of the air flow for blowing the side windows of the car.
Heater duct routing
You will need silicone or anti-squeak (modelin). We seal around the perimeter all the cracks in the upper and lower parts of the torpedo panel. Also, do not forget to “silicone” all the mounting holes. At this point, you can consider the first stage of work completed.
Modernization of the heating system for rear seats and driver's feet in VAZ cars
Laying corrugated heating ducts
As for the module for distributing air flow to the driver’s feet, front seat passenger and rear part of the cabin, this also has its own factory flaws. They are also associated with insufficient sealing of cracks. You can fight with modelin or silicone, as in the case of a torpedo, if you do not want to disturb the factory aesthetics of the parts.
Airflow for rear passengers' feet
It would be much simpler and more reliable to cut off the ill-fated Christmas tree that distributes air flows and use three separate 40 mm corrugated pipes for heating ducts. What do you gain in this case:
Corrugation gasket for heater
We also remove the partitions of the old air distribution system. We seal the hoses using polyurethane foam. It should also be taken into account that the textured internal coating of a corrugated hose can cause whistling and howling of air, so we do not make the pipelines very large.
Typical faults
If the cooling system of the “tens” begins to function differently than it should, this indicates a malfunction.
They can be identified by their characteristic features.
- Coolant disappears from the system.
- The engine takes a long time to warm up or does not warm up well. If your region is characterized by severe frosts and weak heating is observed in winter, the reason most likely lies in the climate. Therefore, we recommend insulating the engine compartment.
- Engine detonation occurs. If a similar situation arose, the cooling system has been faulty for a long time, and you still continued to operate the car.
- The gauge on the instrument panel has reached the extreme red zone.
- Torque is reduced. This phenomenon is typical for a situation where the engine has overheated and there is a leak on the head gasket.
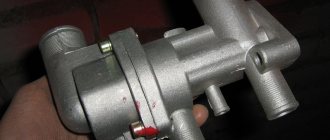
Refinement of the thermostat and its connection diagram
The previously discussed modernization of the VAZ 2110 stove by replacing a 5-hole thermostat with a 6-hole thermostat is not least related to the diameters of the bypass channels of the devices that regulate the flow of Antifreeze between the small cooling circuit and the radiator of the heating system.
The standard size of the bypass channel on a 6-hole thermostat is 11 mm, and on a 5-hole thermostat the hole is measured with a diameter of 16 mm. Regardless of what type of thermostat you have installed, you can always further adjust the flow of coolant. Thus, the interior of the VAZ 2110 will warm up better at idle engine speed.
It is recommended to use an aluminum pad to set the bypass diameter in the range from 4 to 6 mm. It is worth understanding that in this way we slightly increase the engine warm-up time. But the cabin will become really warmer.
When reinstalling the thermostat, swap the connections of the pipes coming from the expansion tank and coming from the radiator of your car's heater. Now there is no longer any need to cover the radiator with cardboard in winter; the VAZ 2110 heating system will work perfectly in any weather.
Thus, through far from the most complex manipulations, you can achieve a truly amazing effect. Just sealing the cracks of the VAZ 2110’s thermal channels can improve the temperature balance inside the interior of your car, not to mention a lot of simpler and more reliable methods.
Before you jump into upgrading your heating system, it’s still worth checking the operation of the stove itself. Do not forget to change the air filter of the VAZ 2110-2112 furnace every 15 thousand kilometers. Poor heating of the interior can also be caused by a faulty fan or a leaking coolant radiator.
Cooling system diagram
All the main elements are described below.
1 – heater radiator; 2 – steam removal hose of the heater radiator; 3 – outlet hose; 4 – supply hose; 5 – coolant temperature sensor (in the block head); 6 – pump supply pipe hose; 7 – thermostat; 8 – filling hose; 9 – expansion tank plug; 10 – coolant level indicator sensor; 11 – expansion tank; 12 – exhaust pipe; 13 – liquid chamber of the carburetor starting device; 14 – radiator outlet hose; 15 – radiator supply hose; 16 – radiator steam outlet hose; 17 – left radiator tank; 18 – sensor for turning on the electric fan; 19 – fan electric motor; 20 – electric fan impeller; 21 – right radiator tank; 22 – drain plug; 23 – electric fan casing; 24 – timing belt; 25 – coolant pump impeller; 26 – supply pipe of the coolant pump; 27 – coolant supply hose to the throttle pipe; 28 – coolant drain hose from the throttle pipe; 29 – coolant temperature sensor in the outlet pipe; 30 – radiator tubes; 31 – radiator core.
Cooling system components
Now that you know the entire diagram of the VAZ-2112 cooling system, you should learn about all its main details in more detail:
Cooling radiator
Copper cooling radiator
The radiator is designed to cool the fluid in the system as it passes through it in the so-called “great circle” . It is made of aluminum, has a tubular-plate, two-pass design, and is equipped with plastic tanks, one of which has a special partition designed to allow coolant to pass through. The liquid to pass through the “large circle” flows through the upper pipe and exits through the lower one.
Expansion tank
This tank is quite reliable, but its connections sometimes have to be checked for leaks.
The expansion tank, made of translucent polyethylene, is designed to fill and control coolant. When the fluid in the system is completely filled, it should be in the tank between o and “MAX”. Two pipes for removing steam are built into the tank, one from the heater radiator, the other from the cooling radiator.
Modernization of the VAZ 2110 stove on your own
Modernization of the VAZ stove
As you know, in the cold season a car simply cannot do without a heater, since without it both the driver and the passengers themselves will freeze. Naturally, all VAZ cars are equipped with a stove, however, the quality of its installation is an open question. Objectively, modernizing the VAZ 2110 stove is not only a necessary condition, but also mandatory. Because it is better to stop the emergence of negative consequences at the stage of their appearance, rather than try to overcome the consequences later. Upgrading the stove on a VAZ 2110 is a responsible process, but completely doable on your own.
How relevant and necessary is it to modernize the heater?
VAZ 2110 stove modernization
A short list of possible negative consequences of a VAZ factory stove:
Note. Before you move directly to upgrading the heater, you should first make sure that it is functioning properly. If during the inspection even small functional defects are discovered, they will need to be eliminated without fail before starting the upgrade.
To modernize the furnace, you first need to:
All functional elements of the furnace are connected to each other using bolts.
Upgrading the ventilation function of the furnace
VAZ 2110 stove modernization
You can improve side ventilation in two different ways:
In practice, the use of corrugations is a very relative concept, since their effect will only be noticeable to the feet of passengers. Corrugations are not suitable for creating proper ventilation, as they will provide virtually no real effect. In most cases, after installing the corrugations, the ventilation properties of the heater become worse even than before their use. In particular, especially rare cases, sometimes the ventilation properties after installing the corrugations may not be affected and remain at the same functional level.
Note. Based on the above, installing corrugations is not recommended.
If possible, sealing all the cracks seems to be a much more practical and effective solution. Gaps that need to be closed as a priority:
After eliminating the cracks, you need to take a close look at the heater damper. Because it is she who controls the efficiency of the ventilation air flow.
Furnace damper modernization
One of the most frequently asked questions is the squeaking of the heater panel, in practice it does not exist, so there is no need to worry about it.
Instruction No. 1
It often happens that the engine temperature does not rise to the optimal temperature during operation. For example, on the body of a thermostat device, 90 degrees is marked, and the temperature is not higher than 85. This problem can be solved with the help of a simple modification - modifying the rod. The fact is that in the process of opening the thermostat, the rod rests against the cover. If you expand the special recess in the lid, the thermostat will operate later. Therefore, it is easier to replace the rod with a bolt of the appropriate size.
- Pull the rod itself out of the cover.
- Drill a through hole at 4.5.
- Cut the internal thread to 5.
- Select the bolt length with a margin.
- Place a lock nut at 5 and a washer with an elastic band to seal.
- Reinstall the thermocouple.
- Fill with antifreeze.
- Check in practice, adjust the beginning of the opening of the large circle to 89 degrees.
Now the temperature will remain 90-92 degrees, as stated on the thermostat housing.