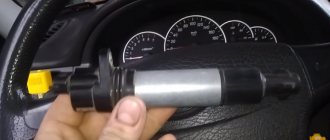
The ignition coil, which is located in the car, essentially converts the low voltage from the battery and generator into high voltage, to supply it individually to each spark plug. Roughly speaking, this is a miniature electrical transformer, the moment of failure of which is almost impossible to predict and repairs and diagnostics have to be carried out on the failed device. Below in our article we will tell you in detail how to check the ignition coil for a VAZ-2112 with your own hands.
The video describes in great detail the algorithm for checking the ignition coil on a VAZ-2112:
Custom ignition coils, which company is better?
| On 16-cylinder "tens" engines (for example, on a VAZ 21124 engine), the plant installs individual ignition coils (IKZ). High-quality IKZ is the key to uninterrupted engine operation. Do you know which ignition coils are best to choose? |
On VAZ 2110, 2111 and 2112 cars, IKZ from different companies were installed from the factory. You can distinguish them by the catalog number (article) that is stamped on them. For example:
- 2112-3705010-10 - “BOSCH”, Germany;
- 2112-3705010-11 - NPP "ITELMA", Moscow;
- 2112-3705010-12 - JSC "SOATE", Stary Oskol;
- 2112-3705010-13 - PO "SEVER", Novosibirsk.
Depending on the manufacturer, the price of ignition coils can vary significantly. Imported IKZ for VAZ can now be found for 1500-1800 rubles. Cheaper Russian analogues are 2 times cheaper.
It is worth considering that there are a huge number of fake IKZs . The service life of such products is significantly lower than the original ones. For example, according to reviews from owners, after installing Chinese ignition coils, the “cylinder misfire” error appeared after just a few hundred kilometers. And after the same amount of time they completely failed. An example of how to distinguish original Bosch IKZ from a fake.
Symptoms of a problem
It is extremely rare for two built-in coils to fail at once, so it is more likely to be possible to start the engine with a faulty unit. However, even an inexperienced driver will immediately suspect something is wrong. The malfunction will appear as follows:
- unstable (floating) idle speed;
- the engine has difficulty picking up speed;
- characteristic sound of the engine (triple);
- jerking when accelerating (while moving).
Operating a car with such a breakdown is possible (you can drive to a garage or car service station), but it is not advisable unless absolutely necessary.
Similar signs of unstable engine operation are possible with a number of other ignition or fuel supply faults. To differentiate possible breakdowns, the performance of the ignition unit should be determined. It would be useful to check the contacts of the wires coming to the device, as well as their integrity.
Stories from our readers
“Fucking basin. "
Hi all! My name is Mikhail, now I’ll tell you a story about how I managed to exchange my two-wheeler for a 2010 Camry. It all started with the fact that I began to be wildly irritated by the breakdowns of the two-wheeler, it seemed like nothing serious was broken, but damn it, there were so many little things that really started to irritate me. This is where the idea arose that it was time to change the car to a foreign car. The choice fell on the melting Camry of the tenth years.
Yes, I had matured morally, but financially I just couldn’t handle it. I’ll say right away that I am against loans and taking a car, especially not a new one, on credit is unreasonable. My salary is 24k a month, so collecting 600-700 thousand is almost impossible for me. I started looking for different ways to make money on the Internet. You can’t imagine how many scams there are, what I haven’t tried: sports betting, network marketing, and even the volcano casino, where I successfully lost about 10 thousand ((The only direction in which it seemed to me that I could make money was currency trading on the stock exchange, they call it Forex. But when I started delving into it, I realized that it was very difficult for me. I continued to dig further and came across binary options. The essence is the same as in Forex, but it’s much easier to understand. I started reading forums, studying trading strategies. I tried it on a demo account, then opened a real account. To be honest, I didn’t manage to start earning money right away, until I understood all the mechanics of options, I lost about 3,000 rubles, but as it turned out, it was a precious experience. Now I earn 5-7 thousand rubles a day. I managed to get the car buy after half a year, but in my opinion this is a good result, and it’s not about the car, my life has changed, I naturally quit my job, I have more free time for myself and my family. You’ll laugh, but I work directly on the phone)) If If you want to change your life like me, then here’s what I advise you to do right now: 1. Register on the site 2. Practice on a Demo account (it’s free). 3. As soon as you get something on the Demo account, top up your REAL ACCOUNT and go to REAL MONEY! I also advise you to download the application to your phone, it’s much more convenient to work from your phone. Download here.
Before replacing the ignition coils, make sure that they are the cause of the malfunction. To do this, you can check the ICP with a multimeter. Some car enthusiasts are trying to repair IKZ using a heat seal.
buy individual ignition coils in online stores (there is a discount for site users in some stores)
So, let’s vote and leave reviews about individual ignition coils for the VAZ of the tenth family:
- How long did the old IKZ last?
- Which company did you choose?
- Did you change one IKZ or a set at once?
ps Off-topic comments will be deleted.
Which brand of custom ignition coils is best to buy?
Source
Individual ignition coils for LADA, which company is better?
On some engines of LADA cars (for example, VAZ-21126, 21127, 21129, etc.), the plant installs individual ignition coils (IKZ). Currently, there are a large number of counterfeits of these products on the market. Let's find out what to look for when choosing ignition coils.
The table of applicability of individual ignition coils is compiled according to catalogs of parts and assembly units:
| Article\Model | Engine | Lada Priora | Lada Kalina 2 | Lada Granta | Lada Vesta | Lada Largus | Lada XRAY |
| 21120-3705010-10 | VAZ | + | |||||
| 21120-3705010-11 | + | + | + | + | + | ||
| 21120-3705010-12 | + | + | + | + | + | ||
| 21120-3705010-13 | + | + | + | + | + | ||
| 21120-3705010-15 | + | + | + | + | |||
| 8200765882 | Renault | + | |||||
| 224332428R | + |
The catalog number of ignition coils installed from the factory indicates its manufacturer:
- 2112-3705010-10 - “BOSCH”, Germany;
- 2112-3705010-11 - "Dynatec" BV, Amsterdam;
- 2112-3705010-12 - JSC "SOATE", Stary Oskol;
- 2112-3705010-13 - “FSUE PO Sever”, Novosibirsk
- 2112-3705010-15 – ELDOR CORPORATION
Original or analogue?
There are more than 10 different manufacturers of ignition coils on the market. Depending on this, the price for IKZ can vary significantly. For example, good imported ignition coils for VAZ engines can now be found for 1500-1800 rubles. Cheaper Russian analogues will be 2 times cheaper.
It is worth considering that a fake part will have a significantly shorter service life than the original part. For example, according to reviews from owners, after installing Chinese ignition coils, the “cylinder misfires” error almost immediately appeared and the engine began to tune up. After 500-1000 km, the ignition coils completely failed.
How to spot a fake
A few examples of how to visually distinguish original (high-quality) Bosch ignition coils from counterfeits :
- Under the casing of the original, a plastic case is visible (the fake has a metal case).
- There are two stamps on the original casing. They are not present on the fake.
- The outer edge of the original mounting axle box has a protrusion. There is no protrusion on the fake.
- On the fake there is no high voltage symbol (lightning) next to the mounting axle box.
- On the original plug, the font is made more clearly, the surface of the plug is better processed.
- The coding profile of the counterfeit plug is more rounded.
- The fake contacts are noticeably thicker and more rounded.
- The original has traces of casting.
- The factory number on the original is circled in an oval.
- The counterfeit rubber tip does not have a manufacturing date, product type number or logo.
- The extreme turns of the contact spring of the original are wound more tightly.
Other distinctive features with photos are presented in the report, which site users can download:
To download files you need to log in to the site.
Before purchasing new IKZ, make sure that the old ones are faulty (how to check ignition coils). Or maybe try to repair them? Leave reviews about ignition coils and your recommendations in the comments.
Let us remind you that the smooth operation of engines also depends on spark plugs. Do you know which candles are best to choose?
Source
Possible causes of failure
The weak point of the ignition coils and modules is the secondary winding, which generates a high voltage pulse. A coil break or breakdown may occur in it. The following factors lead to this phenomenon:
- use of low-quality or unsuitable candles;
- operation with non-functioning high voltage wires;
- frequent attempts to check the spark.
The high-voltage pulse arising in the secondary winding must be realized (spent). If this does not happen (if the integrity of a high voltage wire is broken, for example), a high-energy electrical pulse seeks an outlet. He will find it, with a high degree of probability, in the thin secondary winding.
Often, a module malfunction occurs when the integrity of poor-quality factory soldering of wires going to the switch elements is violated. This happens from vibration. Also, the cause of non-working coils can be a banal contact failure in the incoming connector. Another factor leading to a malfunction of the ignition unit is often moisture that gets on the device during washing or driving in unusual conditions.
Which ignition coils are better for the VAZ 21124
To do the job you will need a multimeter.
1. We prepare the car for work (see “Preparing the car for maintenance and repair”).
2. Remove the decorative trim of the engine (see “Decorative trim of the engine - removal and installation”).
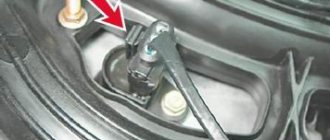
3. Press the lock of the wiring harness block.
While holding the latch in this position, disconnect the wire block from the ignition coil of the first cylinder.
4. Turning on the ignition, use a voltmeter to measure the voltage at terminal 3 of the wiring harness block (the numbering of the terminals is marked on the ignition coil).
5. Similarly, we check the supply voltage to the ignition coils of the second, third and fourth cylinders.
The voltage at the terminal must be at least 12 V. If the voltage does not reach the block or it is less than 12 V, then the battery is discharged, there is a malfunction in the power circuit, or the ECU is faulty.
When the voltage measurement is complete, turn off the ignition.
6. Using an ohmmeter, measure the resistance between the coil terminals. The electrical resistance between pins 1-3 should be close to zero (about 1 ohm). The resistance between pins 1-2 and 2-3 should be high (tend to infinity).
The faulty coil must be replaced.
10 mm socket wrench
Unscrew the bolt securing the ignition coil to the cylinder head cover.
8. Remove the ignition coil from the spark plug well.
Install the ignition coil in reverse order.
I think that there is no need to talk about the fact that VAZ 2110, 2111 and 2112 engines come in both 8 and 16 valves. In previous articles we have already looked at the process of replacing a module with an 8-cell one. motor. Today we’ll look at the example of another power unit - 16V.
On the one hand, this is convenient, and if one of them fails, you won’t have to change everything. On the other hand, maintenance is more expensive when replacing all these parts at once.
It’s quite easy to do the replacement yourself and for this you will need:
- socket head 10
- extension
- ratchet handle
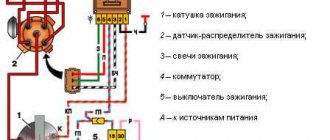
Checking module power
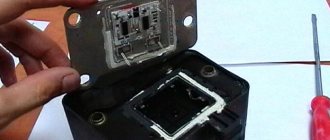
Before testing the performance of the coils, you should make sure that a possible breakdown is not caused by a loss of power to the device. First, you need to try to simply restore contact by moving it several times or disconnecting/connecting the block of wires included in the connector. If such manipulation does not lead to improved engine performance, a tester (multimeter) is used to determine the quality of incoming pulses.
The block of wires is removed from the connector. On the block, each terminal (A, B, C, D) has a corresponding socket. Testing with the engine running is done as follows.
- The first contact of the tester is in socket D, the second is to ground. The multimeter switch position is 20 volts. If there is power, the tester shows 12 volts.
- The first contact is in socket C, the second is ground. Switch on ohmmeter (20 Ohm). Normally it shows less than 1 ohm, that is, the mass is normal.
- The first contact is in socket B, the second is ground. 20 volt switch. The norm is not less than 0.3 volts. If this is so, it means that a normal pulse is coming from the Hall sensor to position B.
- Contact A is checked similarly to the previous one.
If such a check shows the norm, you need to test the module. If not, look for the cause in the electrical circuit to the coil.
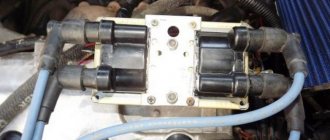
The process of checking all ignition coils on a VAZ-2112
The VAZ-2112 engine with 16 valves uses individual Bosch ignition coils and in order to check them, the following procedure must be followed:
- First of all, we remove each coil from its landing well.
- Then we turn off the power supply and remove them all together as an assembly.
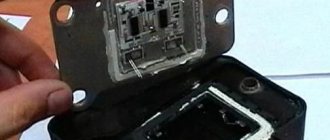
- First of all, we pay attention to its external condition, the absence of cracks and various breaks.
- The same applies to the spring located inside the coil, look at its position, it should be exactly in the center.
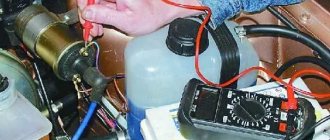
Despite the fact that many people on the Internet talk about the impossibility of checking a coil with their own hands, it is possible to check it only by knowing their initial values, which are measured in ohms .
- In order not to make false measurements, first of all we check the internal resistance of the wires and the multimeter itself . To do this, switch the device to the OM position and connect the probes to each other. What value the multimeter gives is its internal resistance. The value can range from 0.0 to 0.3 ohm.
- First of all, we “ring” the primary winding, which is located on the first and third contacts; when connecting, the polarity does not matter.
- Depending on the presence of error readings and coil readings, we add up the final indicators. For example, if the internal resistance is 0.2 ohms and the coil value is 0.7 ohms, therefore the correct value would be 0.5 ohms. Which is the norm.
- We continue diagnostics with each of the coils.
- If it happens that there are no indications, then we once again check the quality of the connections and the correctness of the connection. If the readings are still zero, then the primary winding on this coil is faulty.
When the readings on the primary winding on all coils are correct and show their values, we proceed to checking the secondary winding.
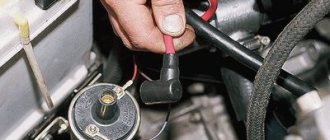
- To do this, set the switch to 2000 kOhm mode.
- Next, we place the multimeter probe on the coil, observing the polarity, black to pin 2, which is located exactly in the middle of the connector, and the red probe to the spring, inside the rubber plug.
- Three-digit values will mean the coil is working properly, and infinity values will indicate its failure.
- Please note that if you cannot measure the resistance correctly the first time, you can wipe the fixed elements from dirt and deposits, since dirty parts can interfere with the signal output.
- When replacing old coils with new ones, you should strictly use analogues, taking the faulty part with you to the store in advance.
Methods for diagnosing device performance
The simplest method that will help determine the performance of the coil is to replace it with a similar working device. This is possible if there is somewhere to get it. Please note that the module must match the parameters of the device under test. If the engine with a working coil works as before the breakdown, the ignition module is definitely faulty.
The main testing method involves using a multimeter. It consists in determining the resistance of the secondary windings of the coils built into the ignition module. The method is simple and does not require additional skills.
The device does not need to be removed for testing. The check is done with the engine turned off.
This is how you check the resistance of the secondary winding with a multimeter
- High-voltage wires are removed from the module sockets.
- The tester switch is set to the 20 kOhm position.
- The multimeter rods are placed in turn in the recesses of the corresponding contact pairs (1 and 4, 2 and 3).
- With an intact secondary winding, the performance in both cases is the same. Normally, the resistance should be about 5.4 kOhm (in some models the indicators differ, which needs to be clarified). If the resistance is much greater, then there is a winding break. The resistance is much lower - a breakdown. The coil is faulty and cannot be repaired.
Source