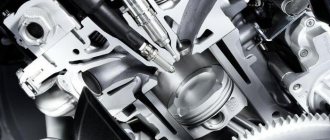
IKZ device
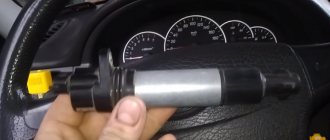
The Priora coil consists of a primary and secondary winding, between which a core is placed. To contact the spark plug, a spring is used, which is placed in a rubber tip. The IKZ also has a metal screen that protects the coil from high temperatures, because IKZ is installed in the well of the cylinder head, then the temperature conditions there are simply enormous.
The primary winding is wound from thin copper wire with a number of turns of 10,000-15,000.
The secondary winding of the coil consists of 100-150 turns of thick copper wire.
The connection between the coils is electromagnetic.
Types of coils
Which spark plugs are suitable for a Priora car? It is worth remembering the quality of the parts and their condition. Sometimes spark plugs have an incorrect gap; it should not be less than 1 mm. To be sure of the performance of your car, it is better to change the spark plugs and ignition coil at the same time. This is important because the contact mechanism gradually wears out and becomes unusable, as a result of which sparking is disrupted and fuel consumption increases.
Replacing spark plugs is as follows:
The spark plugs are screwed in using a special wrench so that the O-ring fits into place. After this, you need to tighten the spark plug 90 degrees with a wrench. When installing old spark plugs, they are tightened only 15 degrees.
The ignition system uses individual ignition coils for each cylinder. The ignition system has no moving parts, so it requires no maintenance or adjustments.
The ignition system uses spark plugs of the AU17DVRM type or their foreign analogues BOSCH FR7DCU, BERU 14FR-7DU, CHAMPION RC9YC, NGK BCPR6ES.
In the ignition system, the distribution and moment of spark occurrence in the cylinders is monitored by the ECU.
Sparking occurs sequentially in those cylinders in which the compression stroke ends and, accordingly, the order 1–3–4–2 is observed.
The crankshaft and camshaft position sensors supply pulsed “reference” signals to the computer, on the basis of which the computer calculates the firing sequence of the ignition coils.
To accurately control the ignition, the ECU uses the following information:
– crankshaft rotation speed;
– engine load (mass air flow);
– coolant temperature;
– position of the crankshaft;
– position of the camshafts;
Ignition coils in the electronic circuit of Lada Priora
The ignition system on Priora differs from the usual classic scheme of carburetor models. On old cars there was one ignition coil, and the specific distribution of impulses to the spark plugs was carried out by a distributor, which still needed to be configured correctly. On injection models of cars with electric fuel injection, each cylinder has a personal > newspaper, a personal ignition coil, which supplies an impulse to the spark plug for its own cylinder.
The entire process is controlled by the ECU, an electrical on-board device, from which the signal goes directly to the short circuit. If you set a goal to correctly control the injection process and send a signal to an electronic impulse at the right time, the ECU uses data from the following sensors:
- DPK - taking into account the position of the engine crankshaft, it sends an impulse to the ECU;
- phase sensor - it talks about the position of the camshaft, masters call it a synchronization sensor;
- tachometer - from it a signal is sent to the ECU at what frequency the crankshaft rotates;
- Mass air flow sensor - through the use of measuring air flow through the air filter, determines the load on the engine at this point in time;
- DTOZH - determines the engine temperature;
- DT is a knock sensor, its readings affect the ignition timing.
Under standard criteria, according to the ECU signal, the cylinders operate in the subsequent cycle - 1 - 3 - 4 - 2.4.
In other words, the impulse to the spark arrives in those cylinders in which the compression cycle is completed, before the valve opens, fuel is injected and a discharge occurs, detonation occurs and the cycle continues.
Ignition of gasoline in the cylinders of an internal combustion engine occurs using a spark generated by the ignition system. The ignition module is the main element of the system, creating a spark on the spark plugs using high voltage. Each car manufacturer develops and produces its own original module, but the principle of its operation is the same for all devices. During operation, deviation from the specified parameters or breakdown of the ignition module negatively affects engine operation until the power unit fails.
Coil characteristics
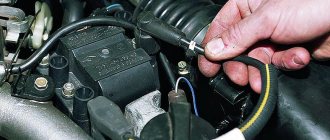
Most likely, the electronics will signal a malfunction, but sometimes it is difficult to guess the causes of incomprehensible vibrations. Therefore, the first thing to do is to check whether the Priora’s ignition coil is working. It is worth noting that even some diagnosticians do not always quickly recognize a faulty part. Therefore, car enthusiasts have found several ways to check the ignition coil without visiting a service center.
What is the coil for? To ignite the air-fuel mixture in the cylinder, you need a high voltage current, but in a car battery it is low voltage. Thus, the ignition coil is something like a transformer, generating a current with high voltage. Its primary winding consists of only 150 turns, and in the secondary their number is much larger, which allows it to generate pulses using the spark plug as a spark gap.
Current passes through the primary winding and produces a magnetic field. When the starter opens the circuit, the energy stored in the coil is released and the cherished spark appears on the spark plug. The engine started.
To make the magnetic field as strong as possible, an iron core is located inside the coil. The main characteristic of a coil is the resistance value of its windings, which is taken into account when diagnosing ignition. Failure of such an important component threatens to completely stop the engine, not to mention interruptions in operation.
Checking the performance of the coil
| № | Examination | Description |
| 1 | Visual inspection | We remove the coils from the cylinders. |
| First, let's inspect the rubber part. There should be no breaks or cracks on it, and if there are any, it means that the coil has served its purpose and needs to be replaced. | ||
| Then we look inside, see what condition the internal spiral is in, its position. | ||
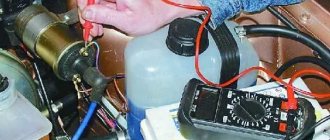
| 2 | Checking the primary winding of the coils with a multitester (checking Priora coils with a multitester) | Before connecting the device to the coil, its internal resistance must be checked to take into account possible errors. |
| We connect the tester to the primary winding. If the device shows no more than 0.5 Ohm, taking into account the measurement error, then everything is fine with this coil. | ||
| 3 | Checking the secondary winding of coils with a multitester | Switch the tester to 2000 kOhm |
| We connect the probes to different parts of the coil, observing polarity: the red contact is to the spring under the rubber cap, and the black one is connected to the middle contact of the connector. A working Priora ignition coil shows a secondary winding resistance of 342 kOhm. A faulty tester will show infinity. |
You need to remove the coil from its place by disconnecting the negative terminal of the Priora battery. Decorative plastic is removed from the motor. Then you need to press out the plastic clamp and disconnect the coil from the wiring, after which the fastening bolt is unscrewed with a 10mm wrench and the device is removed from the spark plug well.
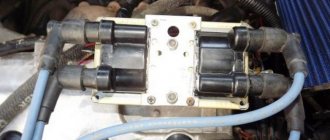
Currently, there is simply no trust in standard Priora coils. Some immediately replace them with foreign-made devices, with Bosch products being especially popular. Since the designers have not eradicated this hereditary problem in the Priora model, the owners themselves will have to correct it, investing not so small sums, because Bosch sometimes asks for no less than 1,500 rubles apiece.
Problems with coils can lead to sudden jerks in engine operation, speed surges, and cylinder failures. Therefore, if you have such symptoms, it is better to use the above information and replace the suspicious part before it completely fails. It also happens that the coil has not yet broken, but is already malfunctioning. This does not necessarily mean that a replacement is needed; some repairs will do, or rather cleaning of water condensation and dirt.
Experienced drivers have verified that after a couple of hours of painstakingly cleaning the coils, the motor stops tripping and works like new. It turns out that it did not burn out, but simply passed current in places. Such a nuisance can be eliminated even on the road. It is enough to remove condensation and wipe important parts with gasoline to remove dirt. If you attach heat shrink to the coil, there will never be problems with interruptions again, and Priora will not spoil the mood of its owner.
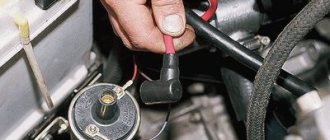
Sometimes coils fail when the spark plug gap is incorrect. Checking the performance of the coil on a Priora car can be easily done by turning the crankshaft. To do this, you need to relieve the pressure in the fuel system and remove the fuel pump fuse. Then we remove the coil, insert a spark plug into its rubber tip, and connect the wires to the coil itself.
After this, we carefully place the experimental spark plug on the cylinder block, ensuring contact between the spark plug and the mass. Do not touch the spark plug coil with your hands to avoid getting an electric shock. Now you need to turn the crankshaft. An assistant does this while you look carefully at the candle. A spark should appear between its electrodes when the starter is turned on and the shaft is turned. This is an indicator of her work.
You can check the coil power circuit. You need to take the multitester mentioned above and connect its probes to its terminals. If you turn on the ignition at this moment, the tester should show a voltage equal to that at the battery terminals. Otherwise, it is necessary to check the circuits for opens and shorts. If the power and control circuits are working properly, but when checking there is no spark on the working spark plug inserted into the tip, then the coil is faulty and will have to be replaced.
Tip repair
High-quality coils for a Priora car can withstand from 50 to 100,000 km. To increase the life of the coils, you need to prevent engine oil from coming into contact with them.
A cracked ignition coil tip is a common problem. However, you can return the coil to working condition by making repairs on your own, provided that the coil itself has not burned out. This will require a degreasing wipe, a silicone ignition coil O-ring (new), a new tip and silicone sealant. The whole procedure will take a couple of minutes.
Remove the old tip. If the o-ring is damaged, remove it too. To install the tip, its skirt is turned inside out. We take the previously prepared sealant and apply it to the lower part of the tip with a cotton swab. We do this slowly so that there is no excess sealant left around the edges. We put the tip on until it stops.
We wait a while for the sealant to fix the part. We wipe the entire coil with a degreasing cloth, which is now brought back to life. Pay attention to the contact spring; it should move freely in the tip cavity. The necessary parts for the job can be purchased at car markets and online stores. Good luck!
Basic faults
A normal Priora part should last from 50 to 100 thousand kilometers, depending on how often you start the engine. If an element of the Priora ignition system malfunctions, the following symptoms will occur:
- When accelerating, the car will jerk (as if the box is kicking in a car with an automatic transmission), or when driving in first or second gear.
- The integrity of the winding is broken. It is worth paying attention to the tip of the ignition coil of the Priora car.
- The motor "troits". This manifests itself in vibration and excess noise that appears under the hood, while traction decreases.
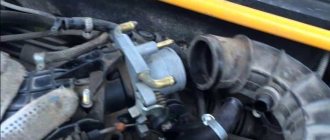
Visual inspection of the IKZ
Remove the ignition coils from the engine using a 10mm or Torx E8 socket wrench (depending on the powertrain model). Carefully inspect the removed coils. There should be no cracks, damage to the rubber cap, melting or leakage of plastic. The spring located inside the coil must be in the correct position.
Symptoms of a bad coil
There are many symptoms of coil failure and sometimes it is very difficult to determine that the coil is to blame. If such symptoms appear in your car, then you should pay attention to the ICD.
Signs of coil failure:
- One of the cylinders does not work;
- The car does not develop power;
- Jerking when pressing the gas pedal sharply;
- The engine shakes at idle;
- Increased vibration at idle;
- Floating speed;
It should also be noted that if the ignition coil is faulty, misfires will appear in the cylinders, as a result of which the ECU will turn off the operation of the faulty cylinder and signal this by turning on the “Cheek Engine” lamp. When “Cheek Engine” appears on the car, it is necessary to diagnose the system. If there are misfires, the ECU will display errors 0301, 0302, 0303, 0304. Where the last digits of the codes are the cylinder number.
It is not recommended to operate a car with a faulty ignition coil; this can lead to failure of the catalyst.
Description of the ignition coil
Let's start with a description of automotive short circuits. First of all, it is necessary to consider the device, as well as the operating principle of the unit on an engine with 8 or 16 valves.
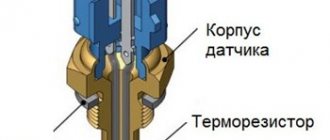
Design and designation of the main elements of the NGK ignition coil
Design and principle of operation
Every car enthusiast knows that the main function of the short circuit on the Lada Priora is to ignite the combustible mixture, which is necessary to start the power unit. To ensure the mixture is ignited, a very high voltage is generated in the short circuit, amounting to 40 thousand volts. The short circuit itself is a transformer device designed to increase the low voltage produced by the battery. According to its design, the short circuit of a 16-valve engine consists of two windings - primary and secondary, which are wound using a copper wire on a steel core.
First, the primary device is wound onto the core, and the secondary device is wound on top of it. This design is protected by a special housing. If the primary winding contains about 150 turns, then the secondary winding will have more than one thousand of them. There are no high-voltage cables in the short-circuit design, since they are put on the spark plug.
When the powertrain control unit transmits a signal to the primary winding, a magnetic field is generated around the core. Ultimately, it contributes to the formation of high voltage on the secondary winding. As for the spark plug, at this moment it ignites the combustible mixture in the cylinders of a 16-valve engine. The short circuit is equipped with a protective housing, and inside the structure there is a special spring with a diode. The latter is designed for promptly cutting off high-voltage signals (the author of the video about the node malfunction is the IZO)))LENTA channel).
Types of coils
Let's briefly consider the main types of short circuits for cars:
- General short circuit, this type is one of the most common. It can be used in both contact and non-contact systems, as well as electronic systems with a distributor.
- Individual type of short circuit. Designed for use in electronic systems. By design, this type also consists of primary and secondary windings, only they are located in reverse - first the secondary, then the primary. Also, such short circuits can use electronic components to ignite a combustible mixture.
- Dual type, such short circuits are also often called two-terminal. Such units are used in various electronic systems. The key difference in the design is the presence of two high-voltage cables, designed to ensure the formation of a spark in two cylinders simultaneously.
Symptoms of a problem
The ignition coil on a Priora on a 16-valve engine, like any other mechanism, sooner or later fails.
The driver can recognize that this device needs replacement or repair by the following symptoms:
- The operation of the power unit as a whole is disrupted. The 16-valve engine begins to vibrate, its power drops, and when you press the gas pedal it will be difficult to accelerate. In addition, the engine begins to stall. The same signs also appear with inoperative spark plugs, so they need to be checked first.
- While trying to accelerate, the driver will notice that the vehicle begins to jerk. Shocks also appear when driving at low speeds.
- Another symptom is the presence of cracks or traces of breaks in the insulation.
Ignition coils for VAZ (Lada) Priora
for repair of VAZ (Lada) Priora
I bought an Omega coil, I wanted it cheaper, but it didn’t work for Bosch, so I changed it to Bosch and the flight is normal!
Applies to paired ignition coils, which are installed on 8-bug units. If we take SOATE, then they do not last more than 40 - 50 thousand mileage, but BOSCH, with a price, of course, 2.5 times higher, last hundreds of thousands of mileage.
I arrived at work as usual without incident, got paid from work, showed the receipt (the computer in the Gamma GF822 dashboard showed misfire in cylinder 2), went straight to the auto store to buy an ignition coil.
The sellers offered: a beam for 1100 and a boche for 2200 rubles, in comparison they are identical in appearance - they only differ in the stamps. I say where on the Bosch it says that it is BOSCH, but the seller says only Chinese counterfeits write Bosch, and on the still product there is a Bosch badge (| = |).
In the end I took the Bosch, it might last longer. After the replacement, it whispered and ran fine... (I examined the old coil in the red soot where the metal cylinder was and when I took it off it was hot).
Checking the ignition coil
There are two reliable ways to check IKZ: visual inspection and checking with a multimeter.
It should be noted that the IKZ check is similar for all Lada cars with a 16-valve engine, i.e. the check on cars such as LADA Vesta and X-ray will be the same.
In order to check the ignition coil, it must be removed from the car.
Removing IKZ:
- Disconnect the negative terminal from the battery.
- Remove the decorative plastic trim.
- We unscrew the coil we need with a “10” or Torx E8 head.
- Remove the coil plug and remove it.
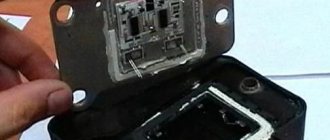
Visual inspection
After the coil is removed, it must be carefully inspected. The rubber tip should not have tears or cracks. The plastic part must not be melted or cracked. The contact spring must be in the correct shape without oxidation or rust.
Crack in the coil
Cracks in the coils or tears in the rubber cap will direct the spark to the engine body, therefore, no current will be supplied to the spark plug, which will lead to misfires.
Cracks in the rubber band
If such visual faults are detected, the coil must be replaced.
Checking with a multimeter
Testing with a multimeter is divided into two stages. Checking the resistance of the IKZ itself and checking the control voltage of the IKZ (checking the voltage on the IKZ power supply block).
Let's start by checking the voltage at the IKZ power supply.
To do this, set the switch on the multimiter to constant voltage.
Turn on the car ignition
On the block in connector number 3 we take a measurement (we connect one multimeter probe to the motor body and the other to pin number 3) the voltage should be at least 12 volts. If the voltage is less, this means that the battery is discharged or the ECU controller is faulty.
Checking the IKZ resistance
In order to check the resistance of the IKZ, you need to use a multimeter. It should be noted that resistance measurements must be carried out on a cold engine, because The resistance of the coil windings strongly depends on its temperature.
To check the resistance, it is necessary to check two windings, the secondary and the primary.
Checking the primary winding of the IKZ
When checking the primary winding of the IKZ, it is necessary to set the resistance readings on the multimeter, namely 200 Ohms. Since the resistance readings on the primary winding are not large, and the error of the device is possible, you first need to find out the error of the multimeter. In order to find out the error, you need to close the probes together, the value that will be reflected on the multimeter screen will be the error.
In this case, the instrument error is 0.7 Ohm
Next, we connect the multimeter probes to contacts 1 and 3 (the outermost contacts of the IKZ) and obtain resistance readings. From these readings we subtract the multimeter error and get the true value of the resistance of the primary winding.
Ideally, the resistance of the primary winding should be about 1 Ohm, or better yet 0.
In this example, the reading is 1.1 Ohm without taking into account the error; from 1.1 Ohm we subtract 0.7 Ohm to get 0.4 Ohm. Verdict: the primary winding of this IKZ is in working condition.
Checking the secondary winding of the IKZ
In order to check the secondary winding of the IKZ, set the multimeter to 2000 kOhm.
We connect the red multimeter probe to the spring, and the black one to the middle contact on the IKZ (pin 2). We look at the readings of the device; on a working coil, the resistance of the secondary winding should be in the range of 300-400 kOhm.
As we see, the readings of the secondary winding are also within the normal range. It follows that this IKZ is working.
If the readings are too high, you can try removing the rubber cap and spring from the coil and cleaning the contact patch, then measure the resistance directly again without the spring. If the resistance reading still does not decrease, you should think about replacing the ICP.
The easiest method to detect a faulty ignition coil, without any devices or instruments. This is a reversal of the IKZ.
Design and principle of operation
So, starting the engine begins with turning the key in the ignition switch. At the same time, current must flow to the spark plugs, they give a spark to the fuel-air mixture, which is pumped up by the pump, the starter begins to rotate, causing the crankshaft to start moving. But the battery operates with low voltage electrical current.
Each coil is a small transformer. Two levels of winding are hidden under the housing of the element of the VAZ-2170 Priora ignition system. Its wires are low-voltage and high-voltage. The first ones receive current from the battery, the second ones transmit it to the spark plugs. When the current is converted, it is transferred to the spark plugs. The ECU “manages” this process, correctly distributing the force between the spark plugs.
As for how many ignition coils are in the Priora, there are 4 of them - one for each cylinder. Their work does not mix or overlap in any way. Each of them has “its own scope of work.”
Which ignition coils to choose for VAZ (Lada) Priora?
Last month, PartReview users preferred SOATE. 40% of positive votes belong to this manufacturer.
In second place were Bosch ignition coils - 27%.
Firm Sever closes the top three with 13% of the votes.
In the general rating of ignition coils, which takes into account the opinions of owners of different brands and models of cars, these brands occupy the following positions:
- SOATE received 5th place, PR score - 76. Data from 57 reviews and 177 votes are taken into account.
- Bosch took 4th place, with a PR score of 78. Based on 57 reviews and 85 votes.
- North - does not have enough reviews to participate in the rating. You can help by adding a review indicating the brand and model of your car.
Manufacturers and prices of analogues - which ignition coils are better for the Priora
No one, not even AvtoVAZ, promises that the analogue will work as long as the standard model. There are a sufficient number of options on the market. It will take quite a long time to determine which is better. The following components are suitable for Priora 16cl:
- SOATE (manufactured in Stary Oskol) (article 2112-3705010-12), price – 1,200 rubles.
- MZATE-2 (article 59.3705), price - 1,000 rubles.
- Baker Priora 2112-3705010-10 – 1100 rubles.
- Fenox IC16085 (STK) – 1,300 rubles.
Communities › Lada Priora Club › Blog › Selecting ignition coils for Priora
Hello everyone, many may think that this topic is well-worn. But so far we have not been able to find a normal option for our engine. The result is a garage full of reels, but no use. The mileage is only 80 thousand km, many spark plugs have been tried except iridium.
What was already on the reels:
— SOATE (factory) — SOATE from the manufacturer (number 2112-3705010-12) — BOSCH (0 221 504 473/461) — AvtoVAZ 2112-3705010-12
Candles:
— AU17DVRM (they are factory and work best, although they are cheap) — DENSO K16TT — Beru Z16 14 FR-7DU — Bosch WR78X — Denso K20TXR — Bosch FLR8LDCU
Performance check: how to check ignition coils on a Priora
Before you start replacing the ignition coils, you definitely need to check them and inspect them. Cracks, chips, and other damage to its body are unacceptable. If you see that the plastic is damaged, it means the part has overheated and cannot be used further.
The answer to the question of how to check an element of the 16-valve Priora ignition system is not limited to inspection. First you need to swap them and see if there are interruptions in the other cylinder. If there are interruptions, the problem is in the coil. There are several ways to use devices. To work you need:
- Secure the car in place and turn off the engine.
- Remove the negative from the battery.
- Disconnect the part from the motor, and then connect a fully functional spark plug to it.
- Turn off the fuel pump.
- Use protective equipment against electric shock, this is a must!
- Turn on the ignition and crank the starter. The spark plug should spark during normal operation.
- Sometimes repair of the Priora ignition coil begins after receiving data from the ECU. The codes start with 0301 and end with 0304, indicating each cylinder accordingly. However, the problem is displayed in the coil-plug module, so the culprit will have to be found out separately.
Now we check the ignition system element on the Priora with a multimeter. For this and further work with components, models AZ-1 or MD-1 are suitable. For this:
- Remove the part to be examined from under the hood.
- Set the measurement switch to the “200 Ohm” position, connect the probes. The display should show “0” or values close to it.
- Using probes, the external winding is checked. Pinout – 1.3. The display should show exactly 0.08 Ohm. The error is the number that the display showed during calibration; it must be subtracted. If nothing is shown, check that the probes are accurately touching the winding. If there is contact, but there is no result, the winding is broken and needs to be replaced.
- Set the multimeter to 2 MΩ measurement limit to test the high voltage winding. Connect the black probe to the terminal of the second connector, and the red probe to the terminal of the coil. The indicator should be 342 kOhm - but only for a cold part. It should be cooled before testing. This also requires checking the exact contact with the probe.
Remember that the winding of this spare part does not change, but the tip can be easily changed. Most often, repairs are limited to routine replacement - in order to be completely sure of the tightness of the part.
Ignition coil malfunctions on Lada Priora 8 and 16 valves and choice
The ignition coil is a key element in the entire system. The car battery provides DC power that is unable to start the car. To start the engine, conversion to alternating, high-frequency current is necessary. This is exactly the problem that this node solves. However, all sorts of malfunctions can also occur with it, and the device can no longer be repaired and requires replacement. Today we’ll talk about how to check for a faulty part and which ignition coil for a Priora would be the best option.
Removing and installing a coil on a Priora
To change the ignition system element in a 16 valve engine, follow these steps:
- Park the car level, securing it with the hand brake.
- Raise the hood and remove the negative from the battery.
- Undress the motor by removing its plastic protective casing.
- Find the spare part you need, and then the wire block connected to it.
- Squeeze the wire block clamp and turn off the power.
- Using the 10th key, unscrew the bolt that secures the part to the metal.
- Carefully remove the spool, trying to move it vertically. It would be a shame to damage the wiring at the very last moment.
- Remove the faulty part and replace it with a new one. Tighten the fastening bolt, connect the wire block and place the negative on the battery. Check functionality.
Checking the ignition module
Checking the ignition module for functionality is carried out in the following ways:
Replacing the ignition module with a known good one
1. The easiest way is to connect a known working module. In this case, the devices must be completely identical, the high-voltage wires are in good condition, and the reliability of the contacts has been checked.
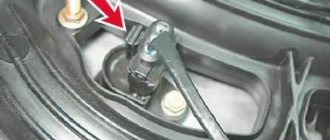
Checking the contacts on the ignition module
2. Moving the module, which allows you to identify unreliable contacts. To do this, move the wire block and the module itself. If during exposure the engine reacts by changing its operation, then the cause of the problem lies in poor contact.