The car jerks, there is no traction, vibration is felt, or the engine is rough; all these are symptoms of improper operation of the individual ignition coil (IIC). Other signs of a faulty ignition coil are the presence of errors 0301, 0302, 0303 and 0304, indicating misfire in one of the cylinders. Let's look at a few simple ways to check the ignition coil with your own hands.
It is worth noting that the process of checking IKZ on modern Lada cars (XRAY, Vesta, Largus, Granta, Kalina and Priora) does not have significant differences. All actions are performed in the same way.
Description of the ignition coil
Let's start with a description of automotive short circuits. First of all, it is necessary to consider the device, as well as the operating principle of the unit on an engine with 8 or 16 valves.
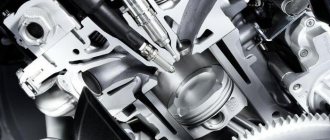
Design and designation of the main elements of the NGK ignition coil
Design and principle of operation
Every car enthusiast knows that the main function of the short circuit on the Lada Priora is to ignite the combustible mixture, which is necessary to start the power unit. To ensure the mixture is ignited, a very high voltage is generated in the short circuit, amounting to 40 thousand volts. The short circuit itself is a transformer device designed to increase the low voltage produced by the battery. According to its design, the short circuit of a 16-valve engine consists of two windings - primary and secondary, which are wound using a copper wire on a steel core.
First, the primary device is wound onto the core, and the secondary device is wound on top of it. This design is protected by a special housing. If the primary winding contains about 150 turns, then the secondary winding will have more than one thousand of them. There are no high-voltage cables in the short-circuit design, since they are put on the spark plug.
When the powertrain control unit transmits a signal to the primary winding, a magnetic field is generated around the core. Ultimately, it contributes to the formation of high voltage on the secondary winding. As for the spark plug, at this moment it ignites the combustible mixture in the cylinders of a 16-valve engine. The short circuit is equipped with a protective housing, and inside the structure there is a special spring with a diode. The latter is designed for promptly cutting off high-voltage signals (the author of the video about the node malfunction is the IZO)))LENTA channel).
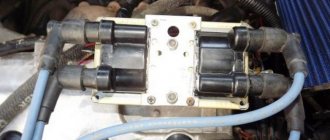
Types of coils
Let's briefly consider the main types of short circuits for cars:
- General short circuit, this type is one of the most common. It can be used in both contact and non-contact systems, as well as electronic systems with a distributor.
- Individual type of short circuit. Designed for use in electronic systems. By design, this type also consists of primary and secondary windings, only they are located in reverse - first the secondary, then the primary. Also, such short circuits can use electronic components to ignite a combustible mixture.
- Dual type, such short circuits are also often called two-terminal. Such units are used in various electronic systems. The key difference in the design is the presence of two high-voltage cables, designed to ensure the formation of a spark in two cylinders simultaneously.
Symptoms of a problem
The ignition coil on a Priora on a 16-valve engine, like any other mechanism, sooner or later fails.
The driver can recognize that this device needs replacement or repair by the following symptoms:
- The operation of the power unit as a whole is disrupted. The 16-valve engine begins to vibrate, its power drops, and when you press the gas pedal it will be difficult to accelerate. In addition, the engine begins to stall. The same signs also appear with inoperative spark plugs, so they need to be checked first.
- While trying to accelerate, the driver will notice that the vehicle begins to jerk. Shocks also appear when driving at low speeds.
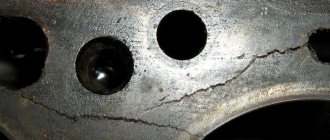
- Another symptom is the presence of cracks or traces of breaks in the insulation.
Assignment of contacts of the instrument cluster block
1 To the electric power steering 2 To the hazard warning lamp 3 To the emergency oil pressure sensor 4 To the parking brake switch 5 To the immobilizer control unit 6 To the airbag control unit 7 To the exterior lighting switch 8 To the turn signal switch (starboard side) 9 To the indicator switch turn (left side) 10 To the fuel injection system control unit 11 To the front passenger airbag deactivation sensor 12 To the seat belt sensor not fastened 13 To the control unit of the electronic brake force distributor 14 To the “RESET” button on the steering column switch (-) 15 To the level sensor brake fluid 16 To the anti-lock brake system control sensor 17 To the headlight high beam switch 18 To the instrument cluster lighting switch 19 Housing 20 To terminal “30” of the battery 21 To terminal “15” of the ignition switch 22 To the fuel consumption sensor 23 To the function switching mode key trip computer in a ring forward and changing the minutes (-) 24 To the mode key for switching the functions of the trip computer in a ring back and setting the clock (-) 25 To the outside temperature sensor (-) 26 To the outside temperature sensor (+) 27 To the fuel level sensor 28 To speed sensor 29 To coolant temperature sensor 30 Low-voltage tachometer input 31 Diagnostics during production of instrument cluster 32 To terminal “L” of generator relay regulator
Functionality check
There may be several options:
- Visual inspection. If there are even small cracks on the short circuit, this indicates that the device is not working. If there are cracks or other damage on the housing, most likely the short circuit has burned out. It is also necessary to inspect the internal components, namely the spiral. If there are defects, the unit is replaced.
- Another way is to check on the car. The short circuit is removed from the engine, the fuel pump is turned off, a working spark plug is installed in the high-voltage terminal, then you need to try to start the engine. If the short circuit is working, then you will see a spark (the author of the video is Alexander).
Checking with a multimeter - for this, the short circuit must be dismantled in advance. The multimeter must be set to resistance measurement mode at 200 Ohms, then the probes of the device are closed. The calibration number will appear on the tester display; you must write it down.
Next, the following actions are carried out:
- The multimeter probes should be connected to the short-circuit connector and measure the resistance of the primary element. The tester should show a value of about 0.8 Ohm, you need to subtract the calibration number from it - the resulting value will be the resistance. If there are no values during diagnostics, it can be concluded that the primary winding is faulty.
- Next, you will need to check the secondary element; for this, the resistance of the multimeter is set to 2 mOhm. The red probe should be installed in the short circuit terminal, and the second black probe should be installed in the middle connector of the block. Diagnostics should show 342 kOhm. In general, it should be understood that the obtained parameters largely depend on. How hot the short circuit was, so it is better to carry out diagnostics on a cold device.
Possible causes of failure
The weak point of the ignition coils and modules is the secondary winding, which generates a high voltage pulse. A coil break or breakdown may occur in it. The following factors lead to this phenomenon:
- use of low-quality or unsuitable candles;
- operation with non-functioning high voltage wires;
- frequent attempts to check the spark.
Often, a module malfunction occurs when the integrity of poor-quality factory soldering of wires going to the switch elements is violated. This happens from vibration. Also, the cause of non-working coils can be a banal contact failure in the incoming connector. Another factor leading to a malfunction of the ignition unit is often moisture that gets on the device during washing or driving in unusual conditions.
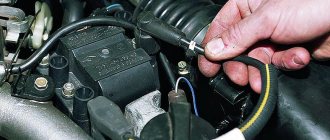
Checking the ignition coil and its circuits
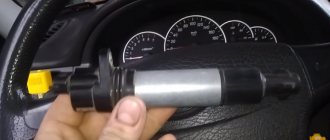
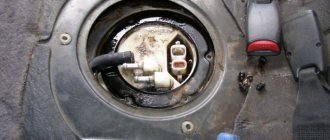
To check the functionality of the ignition coil, release the pressure in the engine power supply system and do not replace the fuel pump fuse (see “Replacing the fuel filter”). Remove the ignition coil (see “Checking the condition and replacing spark plugs”). We insert a known-good spark plug into the rubber tip of the coil and connect the engine management system wiring harness block to the coil.
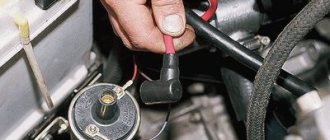
We place the spark plug on the cylinder head cover... ...so that there is contact between the side electrode of the spark plug and the engine ground.
To avoid electric shock, when cranking the crankshaft with the starter, do not touch the spark plug and the tip of the coil with your hands, but hold the coil by its plastic housing. An assistant, turning the ignition key to the “starter” position, turns the crankshaft. If the ignition coil and its circuits are in good working order...
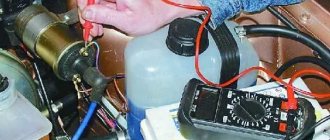
...a spark should regularly jump between the electrodes of the spark plug. If this is not the case, you need to check the power supply and coil control circuits. To check the coil power circuit, disconnect the engine control system wiring harness block from it...
...and connect the tester probes to terminals “2” and “3” of the wiring harness block. When the ignition is turned on, the device should detect a voltage equal to the voltage at the battery terminals. If the voltage value does not correspond to the norm, check the serviceability of the circuits (open and short to ground) between terminal “3” of the wiring harness block and terminal “30” of the socket of the main relay of the engine management system (“+” power supply), as well as between terminal “ 2" wiring harness blocks and engine ground. To check the ignition coil control circuit, we use a probe with a 1.2 W lamp (you can use, for example, a cigarette lighter lamp).
We connect the probe probes to terminals “1” and “3” of the control system wiring harness block. If the control and power circuits of the ignition coil are working properly, the probe light should blink frequently when cranking the crankshaft with the starter. Otherwise, check the wire connecting terminal “1” of the wiring harness block to the corresponding (for each engine cylinder) terminal of the controller for open circuit and short to ground. If the power and control circuits of the ignition coil are working properly, but when checking there is no spark on the working spark plug inserted into the tip of the coil (see above), then the coil is faulty and must be replaced.
LADA 2170 Instrument panel diagram
1, 2, 3, – instrument panel harness connectors to the front harness 4 – instrument panel harness connector to the rear harness 5 – contacts of the mounting block connector 6 – brake light switch 7 – instrument cluster 8 – lighting control module 9 – driver airbag module 10 – sound signal switch 11 – diagnostic block 12 – on-board computer mode switch 13 – ignition switch 14, 15 – blocks to the electric amplifier control unit 16 – electrical package controller 17 – light alarm switch 18 – windshield wiper switch 19 – air flow distribution gearmotor 20 – block heater control 21 – heater electric motor switch 22 – rear window heating switch 23 – clock 24, 25 – instrument panel harness connectors to the radio 26 – hazard warning switch 27 – glove compartment lighting switch 28 – glove compartment lighting switch 29 – instrument panel harness connector to ignition system harness 30 – airbag system control unit
Basic faults
A normal Priora part should last from 50 to 100 thousand kilometers, depending on how often you start the engine. If an element of the Priora ignition system malfunctions, the following symptoms will occur:
- When accelerating, the car will jerk (as if the box is kicking in a car with an automatic transmission), or when driving in first or second gear.
- The integrity of the winding is broken. It is worth paying attention to the tip of the ignition coil of the Priora car.
- The motor "troits". This manifests itself in vibration and excess noise that appears under the hood, while traction decreases.
Tip repair
High-quality coils for a Priora car can withstand from 50 to 100,000 km. To increase the life of the coils, you need to prevent engine oil from coming into contact with them.
A cracked ignition coil tip is a common problem. However, you can return the coil to working condition by making repairs on your own, provided that the coil itself has not burned out. This will require a degreasing wipe, a silicone ignition coil O-ring (new), a new tip and silicone sealant. The whole procedure will take a couple of minutes.
Remove the old tip. If the o-ring is damaged, remove it too. To install the tip, its skirt is turned inside out. We take the previously prepared sealant and apply it to the lower part of the tip with a cotton swab. We do this slowly so that there is no excess sealant left around the edges. We put the tip on until it stops.
We wait a while for the sealant to fix the part. We wipe the entire coil with a degreasing cloth, which is now brought back to life. Pay attention to the contact spring; it should move freely in the tip cavity. The necessary parts for the job can be purchased at car markets and online stores. Good luck!
Design and principle of operation
So, starting the engine begins with turning the key in the ignition switch. At the same time, current must flow to the spark plugs, they give a spark to the fuel-air mixture, which is pumped up by the pump, the starter begins to rotate, causing the crankshaft to start moving. But the battery operates with low voltage electrical current.
Each coil is a small transformer. Two levels of winding are hidden under the housing of the element of the VAZ-2170 Priora ignition system. Its wires are low-voltage and high-voltage. The first ones receive current from the battery, the second ones transmit it to the spark plugs. When the current is converted, it is transferred to the spark plugs. The ECU “manages” this process, correctly distributing the force between the spark plugs.
As for how many ignition coils are in the Priora, there are 4 of them - one for each cylinder. Their work does not mix or overlap in any way. Each of them has “its own scope of work.”
Signs of Engine Cylinder Failure
When driving, the engine begins to pull poorly. Work intermittently. However, at idle it seems to run smoothly. At speeds, if the neutral gear is engaged, there are no interruptions either. But as soon as you start moving, the engine shakes. Speed is gained pl
The electronic injection system is designed in this way. That it will compensate for the lack of operation of one cylinder. If you are supposed to maintain a certain number at idle. Even if the cylinder is not working, the electronic unit will give a command to increase the speed. And compensates for the loss of one cylinder. Also, as the speed increases, the injectors will begin to supply more fuel to the remaining cylinders than usual. The absence of one cylinder will not be noticeable. It's worth starting to move. The electronic control unit will also equalize engine speed by increasing the fuel supply to the working cylinders. But the loss of power will already be visible. Three cylinders are not four. The engine will choke. The sound of the engine will change. And there will be no pleasant acceleration like when 4 cylinders are running. Diagnostics involving a tester is expensive. Moreover, a faulty coil can be detected directly on the car.
Manufacturers and prices of analogues - which ignition coils are better for the Priora
No one, not even AvtoVAZ, promises that the analogue will work as long as the standard model. There are a sufficient number of options on the market. It will take quite a long time to determine which is better. The following components are suitable for Priora 16cl:
- SOATE (manufactured in Stary Oskol) (article 2112-3705010-12), price – 1,200 rubles.
- MZATE-2 (article 59.3705), price - 1,000 rubles.
- Baker Priora 2112-3705010-10 – 1100 rubles.
- Fenox IC16085 (STK) – 1,300 rubles.
Lada Priora fuse box under the instrument panel
F1 25 Electric radiator fan of the cooling system F2 25 Heated rear window Priors F3 10 High beam right F4 10 High beam left F5 10 Sound signal F6 7.5 Low beam (left) F7 7.5 Low beam (right) F8 10 Alarm signal F9 25 Heater Priors F10) 7.5 Interior lighting, instrument cluster, brake light F11 20 Windshield wiper F12 10 Terminal 15 devices F13 15 Cigarette lighter F14 5 Left side light, license plate light, trunk light F15 5 Right side light F16 10 Terminal 15 ABS F17 10 Fog light (PTF) left F18 10 Fog light (PTF) right F19 15 Heated seats F31 or F27 30 Electrical package control unit
Performance check: how to check ignition coils on a Priora
Before you start replacing the ignition coils, you definitely need to check them and inspect them. Cracks, chips, and other damage to its body are unacceptable. If you see that the plastic is damaged, it means the part has overheated and cannot be used further.
The answer to the question of how to check an element of the 16-valve Priora ignition system is not limited to inspection. First you need to swap them and see if there are interruptions in the other cylinder. If there are interruptions, the problem is in the coil. There are several ways to use devices. To work you need:
- Secure the car in place and turn off the engine.
- Remove the negative from the battery.
- Disconnect the part from the motor, and then connect a fully functional spark plug to it.
- Turn off the fuel pump.
- Use protective equipment against electric shock, this is a must!
- Turn on the ignition and crank the starter. The spark plug should spark during normal operation.
- Sometimes repair of the Priora ignition coil begins after receiving data from the ECU. The codes start with 0301 and end with 0304, indicating each cylinder accordingly. However, the problem is displayed in the coil-plug module, so the culprit will have to be found out separately.
Now we check the ignition system element on the Priora with a multimeter. For this and further work with components, models AZ-1 or MD-1 are suitable. For this:
- Remove the part to be examined from under the hood.
- Set the measurement switch to the “200 Ohm” position, connect the probes. The display should show “0” or values close to it.
- Using probes, the external winding is checked. Pinout – 1.3. The display should show exactly 0.08 Ohm. The error is the number that the display showed during calibration; it must be subtracted. If nothing is shown, check that the probes are accurately touching the winding. If there is contact, but there is no result, the winding is broken and needs to be replaced.
- Set the multimeter to 2 MΩ measurement limit to test the high voltage winding. Connect the black probe to the terminal of the second connector, and the red probe to the terminal of the coil. The indicator should be 342 kOhm - but only for a cold part. It should be cooled before testing. This also requires checking the exact contact with the probe.
Remember that the winding of this spare part does not change, but the tip can be easily changed. Most often, repairs are limited to routine replacement - in order to be completely sure of the tightness of the part.
Diagnostics of spark plugs by plaque
When the engine starts running cold or hot, you can check. If the coating is white, this indicates a lean mixture and overheating of the engine. A black tint indicates a rich mixture. In both the first and second cases there are problems with the operation of the electronics. This is either installing new firmware, or replacing the ECU. A normal spark plug has By the way, the engine may stall at idle if the part is damp. This also significantly increases the warm-up time. In addition to the spark plugs, the ignition coil may also be acting up. Priora (8 valves) is equipped with distributor ignition. Overheating of the coil is often observed. You can restore the operation of the motor by simply replacing the element.
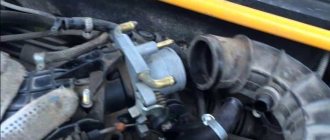
Removing and installing a coil on a Priora
To change the ignition system element in a 16 valve engine, follow these steps:
- Park the car level, securing it with the hand brake.
- Raise the hood and remove the negative from the battery.
- Undress the motor by removing its plastic protective casing.
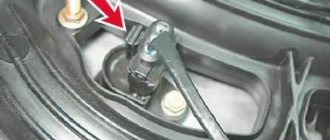
- Find the spare part you need, and then the wire block connected to it.
- Squeeze the wire block clamp and turn off the power.
- Using the 10th key, unscrew the bolt that secures the part to the metal.
- Carefully remove the spool, trying to move it vertically. It would be a shame to damage the wiring at the very last moment.
- Remove the faulty part and replace it with a new one. Tighten the fastening bolt, connect the wire block and place the negative on the battery. Check functionality.
Electrical diagram of the LADA PRIORA car
For all owners of the domestic passenger car Lada Priora, as well as for service auto electricians who repair cars, we offer high-quality color electrical diagrams for your reference, indicating all fuses, relays, fans and other modules. The Lada Priora has a 1.6 liter 16 valve engine, an anti-lock brake system (ABS), and air conditioning. The material is intended for electrical equipment specialists and employees of enterprises involved in the maintenance and repair of automobiles, and can be used in training service station personnel.
How to distinguish a simulator from a real short circuit
There are plenty of counterfeit goods on the markets. First of all, you should focus on cost. A short circuit for the fuel system of Priora cars should cost from 1,200 rubles in retail sales. The original product must have a plastic casing under the protective casing.
The mounting axle box should have a lightning bolt symbol to indicate high voltage. The plug surface is finished perfectly, the letters are clear and laser-etched. The serial number must be taken in the oval. The coils of the spring are tight. Experts advise cleaning the short circuit attachment points as often as possible, removing dust accumulations and moisture from them, checking the tightness of the wiring fasteners, first of all, high-voltage wiring, and replacing the short circuit as soon as the warranty period expires.
Stories from our readers
“Fucking basin. "
Hi all! My name is Mikhail, now I’ll tell you a story about how I managed to exchange my two-wheeler for a 2010 Camry. It all started with the fact that I began to be wildly irritated by the breakdowns of the two-wheeler, it seemed like nothing serious was broken, but damn it, there were so many little things that really started to irritate me. This is where the idea arose that it was time to change the car to a foreign car. The choice fell on the melting Camry of the tenth years.
Yes, I had matured morally, but financially I just couldn’t handle it. I’ll say right away that I am against loans and taking a car, especially not a new one, on credit is unreasonable. My salary is 24k a month, so collecting 600-700 thousand is almost impossible for me. I started looking for different ways to make money on the Internet. You can’t imagine how many scams there are, what I haven’t tried: sports betting, network marketing, and even the volcano casino, where I successfully lost about 10 thousand ((The only direction in which it seemed to me that I could make money was currency trading on the stock exchange, they call it Forex. But when I started delving into it, I realized that it was very difficult for me. I continued to dig further and came across binary options. The essence is the same as in Forex, but it’s much easier to understand. I started reading forums, studying trading strategies. I tried it on a demo account, then opened a real account. To be honest, I didn’t manage to start earning money right away, until I understood all the mechanics of options, I lost about 3,000 rubles, but as it turned out, it was a precious experience. Now I earn 5-7 thousand rubles a day. I managed to get the car buy after half a year, but in my opinion this is a good result, and it’s not about the car, my life has changed, I naturally quit my job, I have more free time for myself and my family. You’ll laugh, but I work directly on the phone)) If If you want to change your life like me, then here’s what I advise you to do right now: 1. Register on the site 2. Practice on a Demo account (it’s free). 3. As soon as you get something on the Demo account, top up your REAL ACCOUNT and go to REAL MONEY! I also advise you to download the application to your phone, it’s much more convenient to work from your phone. Download here.
Method No. 2: Spark piezoelectric probe (for example, Test-M) or lighter.
If you don’t have a ready-made device at hand, you can use an element from a piezo lighter instead. The principle of testing is similar: we connect the device to the upper contact of the spark plug and to the body. The button is pressed, if a spark jumps, then the spark plug is working; if it drips or is missing, then it is broken. Details in the video:
Method number 3: Use a multimeter. You should check the electrical circuit of the central electrode by setting the device to 20 kOhm.
If there is “contact” between the central electrode and the tip (shows resistance), then the reason for the lack of a spark may be damage to the insulator. Video example:
Each type of candle must have its own resistance. This verification method is less accurate.
These methods work, but they cannot determine the serviceability of the spark plug 100%. For example, a spark plug installed in an engine has a bad spark, but when checked it will look like it is fully working. Why? In open air, the voltage required to form a spark is much less than in a cylinder. In the combustion chamber of an engine, a spark appears in the presence of a compressed air-combustible mixture.