First of all, it is necessary to point out that no matter what type of power unit (carburetor or injector) your car is equipped with, in any case, it has a distributor ignition system. Its advantage is its low cost. The disadvantage is the comparatively low durability of the units.
In this article we will talk about how to properly check the ignition coil on a VAZ-2109 car with your own hands.
labavto.com
One of the reasons for problems with a spark in the internal combustion engine on a VAZ 2109 is a malfunction of the ignition coil (IC). To accurately diagnose a malfunction, you need to know the design of the unit, be able to check it and, if necessary, install a new product.
Coil design features
This unit is designed to convert low on-board voltage (12 V) into high voltage (15-30 thousand V), which is supplied to the spark plugs to ignite the fuel assemblies in the engine cylinders. The impulse is transmitted through high voltage wires.
Both engines with injector and carburetor engines have an ignition system with a distributor (distributor). The scheme of work is not complicated. The distributor receives low-voltage current, which is then transmitted to the short circuit. The received pulse is converted into high-voltage current. Then the distributor distributes it in a certain order to the candles.
The main elements of the coil are the primary and secondary windings, wound on an external magnetic circuit. The first one has a small number of turns of copper wire - from 100 to 150, but it has a large cross-section. The second has a much larger number of turns - from 15,000 to 30,000, the wires are also made of copper, but with a smaller cross-section. There is a primary winding on top, and a secondary winding inside it.
In the secondary winding, a high-voltage current arises due to the action of electromagnetic induction and the accumulation of charge in the primary winding, which arise after cutting off the current in the primary. The high-voltage current is supplied to the central terminal of the short circuit, and then the distributor distributes it to the spark plugs.
Signs and causes of malfunctions
Most often, the spark disappears unexpectedly, but attentive drivers with experience can predict the disappearance of the spark by the following signs:
- 500 km before the end of the short circuit service life, the car can sometimes be difficult to start, only after a few minutes of warming up. Some drivers associate this with idling.
- When starting a cold engine and pressing the accelerator pedal, the engine begins to actively rev. This lasts a few seconds and after further pressing the accelerator, the engine runs normally.
- Dips or jerks at start.
- Unstable idling, unstable engine operation at low speeds.
- When you press the accelerator hard, instead of increasing speed, dips appear.
- Weak spark or its complete disappearance.
Typical short circuit faults:
- there are oil stains on the cover;
- short circuit between the turns of any of the windings;
- breakdown of insulation of the secondary winding to the housing (ground) short circuit;
- break in the electrical circuit of the windings;
- mechanical damage or defects on the body or cover of the short circuit;
- The readings on the measuring tester do not meet the requirements.
Short circuit malfunction can be caused by the following reasons:
- Inexpensive low quality spark plugs. Saving on candles results in expensive repairs.
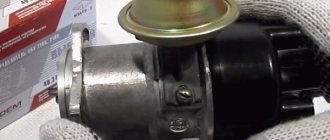
- Overheating is a common cause of short circuit failure. If the engine constantly overheats, the short circuit will not last long. The product has an acceptable number of heating and cooling cycles.
- Over time, the short circuit wears out, like any product. The service life of the coil is 50-70 thousand km.
How to check a short circuit in a garage
If signs of a problem with the VAZ 2109 short circuit are detected, it should be checked for functionality. During the test, you can determine what caused the problem and how to fix it. First we do a visual inspection of the unit. If there is damage to the cover or body, replace it with a new one.
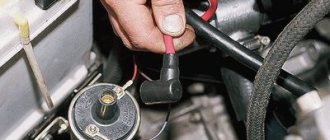
If the engine does not start, you need to make sure that the short circuit does not produce a spark. To do this, remove the central wire from the distributor and connect the spare spark plug. Then we clamp it with pliers and place the body on the power unit or distributor. If there is no spark after the starter turns, this means there is a problem with the ignition system.
First of all, you need to check the presence of power at the short circuit. We connect one crocodile of the multimeter to terminal B on the short circuit, and throw the second one to ground.
If there is voltage and no spark, check the integrity of the wiring of the primary winding. We disconnect the low voltage wires from the short circuit and use a multimeter or tester to measure the resistance of the windings.
To carry out the test, you need to prepare an open-end wrench set to “8” and a measuring device: a tester or a multimeter. In addition, you should turn off the power to the car by removing the negative terminal from the battery.
Checking the short circuit consists of the following stages:
- On a de-energized machine, use a 8-mm wrench to unscrew the nuts securing the high-voltage wires to the short-circuit contacts and disconnect them. Before doing this, remember how they were connected so as not to make mistakes during installation. We clean the contacts on the coil from any remaining oxidation and dirt.
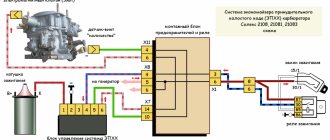
- At the next stage, we check the primary winding of the short circuit. Switch the multimeter to resistance measurement mode. We connect one of its crocodile to output K on the primary, the second to B. Two types of coils are installed on the VAZ 2109: 3122.3705 - dry, which has a closed magnetic circuit and 8352.12 and analogs filled with oil with a magnetic circuit that is open. Their control resistances are slightly different. With a working primary for 3122.3705 it is within 0.43 Ohm +/- 0.04 Ohm, for 8352.12. – 0.42 Ohm +/- 0.05 Ohm.
Purpose, principle of operation of the ignition coil
The device is the most conservative part in a gasoline internal combustion engine. Its prototype was invented in Germany by the engineer Ruhmkorff in the mid-nineteenth century. It replaced magnetos in automobile engines in the early 20th century.
The main purpose of the device is to convert low-voltage electrical pulses with an amplitude of about 12 Volts (vehicle on-board voltage) into high-voltage pulses with an amplitude of more than 15,000 Volts. High voltage is necessary to break down the working area of the spark plug.
According to the type of design and ignition circuit, the coils are classified:
- single;
- double (triple, four-block);
- individual.
Ignition coil design
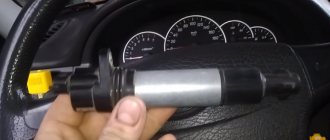
Single devices are used in systems with an ignition distributor. Twins are used in four-cylinder internal combustion engines without a distributor. One part forms a high-voltage pulse to the 1st and 4th cylinders, the second serves the 2nd and 3rd. Triple and quad coils are sometimes used in six-cylinder and eight-cylinder engines, respectively. Individual coils are widely used in modern cars. They are installed on each spark plug individually. A custom spark plug coil has a number of advantages over conventional ones:
- failure of one of the devices does not lead to a complete stop of the engine;
- it is easier to organize an electronic control scheme;
- the absence of a mechanical ignition distributor makes the system more reliable;
- distribution of pulse load reduces currents and increases service life;
- it is easier to identify a faulty device, which is easily done by computer diagnostics;
- Most individual coils have a pulse amplifier installed; it is controlled by low signal currents, which reduces electrical interference and increases the reliability of electrical equipment.
By type of control they are divided into:
- contact;
- electronic;
- with built-in switch (pulse amplifier).
In the ignition contact bobbins, a low-voltage pulse is generated by a chopper. When the primary circuit is switched by a breaker, an electromotive force pulse is induced in the primary circuit. The device is an autotransformer that increases the pulse amplitude N times, where N is the transformation coefficient equal to the ratio of the number of turns in the secondary to the primary winding. The transformation ratio of contact devices exceeds 1000.
Contactless systems use electronic coils. Their transformation ratio is higher and they form a stable spark. During repairs, contact and non-contact devices cannot be interchanged.
A built-in switch is installed on most individual coils, often installed on dual coils. Their disadvantage is a higher probability of failure due to the presence of electronic components.
Device Features
The ignition coil serves to produce a spark coming from the spark plug electrodes. To put it briefly and simply, this is a small transformer that operates in pulse mode and converts 12 volts from the car into 20-30 thousand volts at the output. High-voltage wires are used to transmit the impulse, which also sometimes cause coil malfunctions.
Structurally, the VAZ 2109 coil consists of a pair of windings - secondary and primary.
- The primary winding has fewer turns, but wires with a larger cross-section;
- The secondary winding of a coil with a large number of turns, but a smaller wire cross-section.
Methods for preventing the ignition module on a VAZ-2114
Malfunctions of automobile ignition coils on the VAZ-2114 can be avoided if preventive procedures are regularly carried out. These include:
- Periodic unraveling of high-voltage wires (associated with greatly increased internal resistance, as this can damage the module).
- Checking the spark gap between the electrodes of the spark plugs (if the distance between the electrodes changes, this will affect the efficient operation of the ignition coils).
If faulty spark plugs are identified, they are replaced, after which the car will function properly again.
Examination
If you notice signs of a problem with the ignition coil, or have to deal with a situation where the engine “died,” be sure to check the condition of this element.
As you test, you will be able to determine what caused the coil to fail and how the problems can be corrected.
How to check the device? The instructions are not complicated, even a beginner can handle it.
First, let's check the condition of the unit, and then check for correctness of the resistance of the coil itself.
- If the engine cannot be started, make sure that the coil itself is producing a spark at all. To do this, the central wire is removed from the distributor and a spare spark plug is connected to it.
- Now take the spark plug with pliers and place the metal casing on the breaker or motor.
- If a spark does not appear when the engine starter is turned, there is a malfunction in the ignition system.
- So check the power to the coil, or rather its presence. For this you will need a multimeter. One terminal is connected to contact B on the coil, and the second goes to ground. Turn on the ignition. If there is no voltage, the culprit is the ignition switch.
- You can start the engine in emergency mode. To do this, the plus from the battery is thrown onto contact B of the coil.
If there is voltage but there is no spark, check whether the primary winding is intact. To do this, the side low-voltage wires are disconnected from the coil and resistance measurements are taken with a multimeter. Then the secondary winding is checked.
We will tell you about this procedure in more detail.
Multimeter for testing
Causes of ignition coil failure
Let's look at the reasons why the ignition coil fails.
Natural wear and tear
Like all electrical and electronic units, the reel has a certain trouble-free operation life. The average service life of ignition coils is approximately seven to ten years of operation or 150,000 - 200,000 thousand mileage. The device is operated in extreme conditions with large differences in temperature, humidity, and the possibility of ingress of moisture, dirt, and foreign liquids. In this case, large currents flow through the primary winding, and a high-voltage pulse is formed in the secondary winding.
Electrical breakdown
Let's figure out why the ignition coil breaks. Firstly, over time, as a result of high temperature changes, the dielectric insulation cracks, and salty moisture, which is a conductor, can enter microcracks. For voltages of more than 15,000 volts generated in the secondary winding, even pure undistilled water acts as a conductor. Secondly, during operation, the physical properties of the dielectric and rubber insulation of the tips of high-voltage wires, especially those of dubious production, change. High-voltage breakdown can be caused by the installation of non-standard high-voltage wires in which there is no distributed current-limiting resistance. A breakdown can occur as a result of severe contamination or waterlogging. Even in the event of a single breakdown, irreversible changes occur in the structure; further operation is not recommended.
Symptoms of malfunction
As practice shows, the spark in a carburetor power plant very often disappears suddenly. However, having the necessary experience and knowledge, it is possible to identify the problem in advance.
Approximately half a thousand kilometers before the coil finally breaks down, problems arise with starting the engine when cold. It is usually possible to move off only after several minutes of warming up. The engine starts reluctantly. Moreover, most car enthusiasts are sure that the fault lies in the idle system.
This nuisance is often combined with unstable operation of the unit at low speeds. However, this lasts very little time - no more than half a minute, and therefore many simply do not notice the problem.
Another fairly clear signal is that the engine starts running when cold with the gas pedal pressed. The syndrome is eliminated in 5 seconds or even faster. If you press the pedal again, everything will work as it should.
Verification procedure
If you detect one or more signs of “dying” of the coil or if it is impossible to start the engine, you should definitely check its performance.
This is necessary in order to find out what nature of the breakdown occurred, and, therefore, begin to eliminate it. Can this be done without instruments? Unfortunately no. Unless you immediately replace the coil with a known good one. At the very least, a regular multimeter will suffice. Such a tester must be kept in the car - its cost is almost symbolic.
In general, verification is relatively easy. It is enough to follow the steps described below, and even a completely inexperienced car enthusiast can handle it.
First of all, you need to inspect the ignition unit itself. If the engine does not start at all, then you need to find out if there is a spark. You need to do this:
- disconnect the main wire from the distributor (located in the center);
- connect a candle to it;
- holding it with pliers, apply it to the motor housing or to the breaker;
- turn on the ignition.
If there is no spark, there is only one conclusion - failure in the coil. Next, you need to find out whether electricity is supplied to it.
The check is carried out with a multimeter. One of its probes is applied to terminal “B” on the coil, the second to ground. If there is no voltage after turning on the ignition, the fault is looked for directly in the lock.
In addition, it is also possible to power the coil using an emergency circuit. Here the wire from the positive terminal of the battery is connected to contact “B”. In this situation, you can be absolutely sure that voltage is supplied. However, when these actions did not lead to a spark, you will have to test the primary winding for integrity.
- the wiring located on its sides is disconnected (they are low-voltage);
- the multimeter is set to Ohms and the resistance is measured;
- The secondary winding is also ringed in the same way.
How to identify a faulty ignition coil
The procedure for checking the serviceability of the coil depends on how many ignition coils are in the car. If your car has individual ignition coils, in order to identify the faulty one with a high degree of probability, you can swap the supposedly faulty and known-good coils. If, as a result of this replacement, a spark appears in the cylinder in which there was no spark, and disappears in the other, therefore, the bobbin is truly faulty. In the same way, you can check dual and block coils, but you will have to modify the circuit, which is not always convenient.
How to determine which ignition coil is not working without making changes to the electrical circuit
To do this, you need to stock up on thick dielectric gloves and a dry rubber mat. The use of only ordinary dielectric gloves is unacceptable: they can withstand a breakdown voltage of 6300 Volts; the voltage applied to the candle is approximately three times higher.
If your car has two or more ignition coils, if one of them malfunctions, the car should start, but struggle a lot. By removing the tips of the high-voltage wires of the spark plugs or connectors from individual coils one by one, the stability of the engine is assessed. If the internal combustion engine has not changed its operation as a result of removing the connector, then there is no spark in this cylinder. If the engine starts to shake even more, or stalls altogether, there is a spark, the bobbin is faulty, or it is not receiving impulses or power.
High voltage arrester
Multimeter
If the car engine does not start at all and does not catch, you can evaluate the serviceability of the coil using the parametric method. For this you will need a multimeter. An ordinary coil like the Zhiguli one can be ringed without difficulty. To do this, first set the multimeter’s measurement limit to the resistance measurement mode of 200 Ohms or “diode, continuity” and measure the resistance between the coil terminals + and K. The resistance should be in the range from 0.2 to 1.0 Ohms. Please note that during measurement at this limit a small error may appear, which will slightly increase the multimeter readings. Then switch the multimeter mode to the limit of 20 kOhm and measure the resistance value of the second winding (between terminal K and the copper tip into which the high-voltage wire is inserted). The resistance should be in the range of 1 kilo ohm to 3 kilo ohms (2000 - 3000 ohms).
It is impossible to check a coil with a built-in pulse amplifier using this method, since the lead of the primary winding is not connected to its terminals. A common malfunction of individual devices is breakdown of the limiting resistor. It is located under the rubber extension of the reel structure, which is easily removed. The resistor should be removed and its resistance measured with a multimeter at a limit of 20 kilo-ohms. It should be between 1 and 3 kilo-ohms.
Megaohmmeter
You can also evaluate the insulation resistance if you have a megohmmeter at your disposal. The insulation resistance (between the copper contact into which the high-voltage spark plug wire is inserted and the housing) must be more than 300 megaohms. This measurement is of an evaluative nature. If the resistance is less, the coil is probably faulty, if the resistance is more, it is probably working, it is impossible to judge more precisely.
A simple three-terminal coil can be checked “by weight”, that is, by assembling a simple circuit. The +12V voltage from the battery is connected to the + terminal, a high-voltage wire is inserted into the connector, and a spark plug is connected to the second terminal. The spark plug body is connected to the metal part of the engine. Next, connect a stranded insulated conductor with a cross-section of 2 sq. mm to contact K. Holding the insulation, briefly touch the metal part of the engine with the other stripped end of the wire. A spark should jump where the engine touches and through the spark plug. In electronic coils, the spark from the spark plug is less intense. You cannot experiment with this method for a long time.
Some specialized service stations have self-made inspection stands. Their use requires special methods.