Time required: 15 minutes.
Instructions for replacing the speed sensor VAZ 2114 2115 2113
- Disconnect the negative terminal from the battery
- Remove the plastic cover from the engine
- For convenience, remove the air duct tube
- Disconnect the chip from the sensor
- Unscrew the sensor counterclockwise
- The sensor drive may have failed.
Unscrew the nut by 10 and pry off the drive with a screwdriver. Carefully take it out, it may be destroyed, try to pick out the remains. - We install new parts and assemble everything in reverse order.
All that remains is to assemble everything and it’s ready.
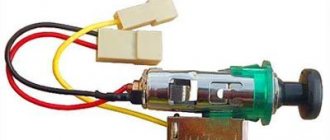
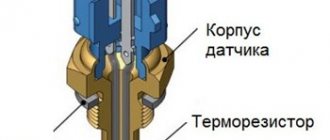
VAZ 2114 speed sensor pinout
The pinout of the VAZ 2114 speed sensor looks like this:
This part may have different connectors for different electronic units. A square connector for connection is used in Bosch brand systems, a round connector is used for “January 4” or GM devices. Therefore, to purchase a device, you need to know the type of electronics installed at the factory on the VAZ 2114.
It is necessary to take elements with contact group designations “-”, “+” and “A”. They must have metal rods. Devices with a plastic stem or symbols “1”, “2” and “3” cannot be installed on this car model.
Examination
Checking the speed calculation system must begin with its most important component, the speed sensor. Further along the chain you need to go through the entire chain until the problem is completely identified.
On 8 valve injection models of the VAZ-2114, the installation of a metal speed sensor is not provided. To check the device you need to:
After dismantling, inspection and cleaning must be carried out.
If there is no visual damage, you need to check the device using a multimeter.
During rotation, the EMF should produce from 0.5 to 12 volts of direct voltage. If there is no data at all, the part is considered faulty. The rotation test can be carried out using a hand-held electric drill. You need to clamp the rod into the carabiner of the device and turn on the rotation. Diagnostics can be carried out without dismantling. To do this, the car is jacked up and the EMF readings are measured at first speed.
If the test does not give a negative result, you need to look for the cause in other elements.
Wiring
The wiring is checked by a simple test. To do this, you must first check all 3 wires coming from the EMF connector to the ECU. The tester is set to diagnostic mode with a sound alert. The wires are checked at both ends at once. A sound signal will confirm the integrity of the circuit.
Next, you need to ring the cable from the ECU to the speedometer. To do this, you need to dismantle the speedometer and disconnect its electrical connector. The wiring is checked in a similar way from 2 sides of one wire. An audible warning indicates the integrity of the cable. If the circuit does not ring, the reason may lie in the fuse, which also needs to be checked.
Fuse
The fuse responsible for protecting the speedometer from electrical overloads is located in the block under serial number “9”. This element is marked with the corresponding icon on the block cover. It's very easy to find. He is responsible for the operation of the heating system and speedometer. Checking the node is not difficult; to do this you need to:
No sound will indicate a faulty fuse element. It will have to be replaced. The operating current of the factory fuse is 7.5 A. It is imperative to replace the damaged element with exactly the same marking. It is prohibited to insert metal objects or thick wire into the connector. Such jumpers will not protect the speedometer during a short circuit or voltage drop. The fuse socket itself may burn out, the insulation of the wires may melt, and a fire may occur.
If the fuse is in a transparent case, then you will not need a tester for checking. You only need to visually assess the condition of the part. Both contacts must have a whole jumper between them.
After installing a new fuse, you need to test it for a short to ground. You just need to connect one tester probe to the car body, and the other to the fuse contact. The presence of an audible signal will indicate a short circuit to the housing. You will need to disconnect all the speedometer plug sockets and repeat the test. If the short circuit does not disappear, the problem must be looked for in the electrical circuit of the heating system.
Speedometer
If all previous checks have shown that the speedometer elements are in good condition, this device must be checked. To do this you will need a wire up to 2 meters long. Further:
If, after applying voltage, the needle drops or trembles, the problem may be poor contact.
Domestic speedometers suffer from poor contact soldering. To check, you need to disassemble the device and check the integrity of all current-carrying paths. If melts or breaks are detected, they need to be soldered. After soldering, the speedometer needle still does not work, the problem is in the impulse relay. This part cannot be repaired, so it will have to be replaced.
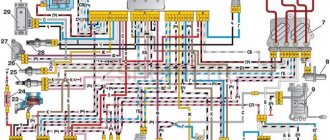
Speed sensor connection diagram
The VAZ 2114 speed sensor connection diagram looks like this:
In the general electrical circuit, the device is powered using a 7.5 Ampere fuse. It is located in the cabin on the heater fan relay. At the front of the instrument panel there is a "9" plug, which is designated "DC" and "engine control controller". That's all you need to know to replace the element. You also need to understand how the speedometer works.
How the speedometer works
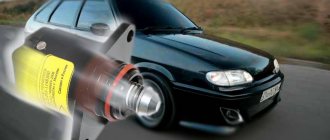
The speed sensor (DS) is connected to the speedometer and the ECU. The speedometer receives data from the DS and shows the speed of the vehicle. And the element itself works based on the Hall effect. Pulses are sent from it to the electronic engine control unit. The higher the speed of the machine, the greater their frequency. Based on this information, the unit regulates the speed at idle and creates the correct composition of the fuel mixture. The part is located in the engine compartment at the gearbox.
OPERATING PRINCIPLE OF DS AND OPERATING FEATURES
The fourteenth VAZ is a modern car equipped with an electronic speedometer. The principle of operation of the electronic speedometer, in contrast to mechanically driven speedometers installed on VAZ classics of old, is based on determining the current speed of the car based on the frequency of the received pulse signals DS.
Simply put, a pulse speed sensor generates 6000 signal pulses for every kilometer of distance traveled by the car (6 pulses per full revolution of the crankshaft). Accordingly, the number of pulses transmitted by the sensor to the ECU in one second depends on the speed at which the car is moving. Receiving a pulse signal, the car’s brains calculate the frequency of its arrival and, based on it, calculate the current speed.
Based on the data obtained, the electronics of the VAZ 2114 not only determines the speed of movement of the fourteenth, but also regulates the operation of the engine in idle mode and the frequency of air supply bypassing the throttle valve.
The cost of a new DS for the fourteenth is about 300-400 rubles, the part marking is 2111-3843010. When choosing a new device, give preference to designs with a metal rod. The rod is generally the most wear-prone part of the DS, but some manufacturers manage to make it out of plastic (such DS rarely last longer than 6 months).
A faulty VAZ 2114 speedometer sensor is determined extremely simply - in this case, the speedometer stops working, it can also show signs of life, but show incorrect information.
Problems may also occur when the engine is idling - if the engine stalls when the car is coasting, the reason is most likely the DS.
The main reason for the breakdown of the DS is a break in the contact chain, which changes the frequency of generating a pulse signal, which the controller is not able to recognize.
How to check the speed sensor on a VAZ 2114?
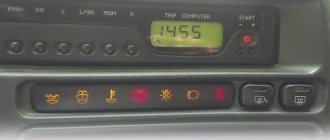
If error P0500 (no speed sensor signal) occurs on the on-board computer or the speedometer on the VAZ 2114 has stopped working or shows incorrect data, the first step is to diagnose the DS.
There may also be other symptoms of a malfunction. They do not always indicate a breakdown of this device and may be caused by other reasons. There are various ways to check this part. Many of them are suitable for independent use. Therefore, it is not at all necessary to contact a car service for this malfunction. This is necessary only as a last resort, when you yourself have not been able to identify or fix the problem.
Method one.
- Remove the part from the car;
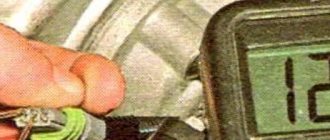
- Take a multimeter and switch it to voltmeter mode;
- Place plastic tubes on the DS axis;
- Spin the part to a speed of approximately 3-5 km/h;
- Measure the voltage and frequency of the signal;
If the part is working properly, the faster it rotates, the higher the frequency and voltage should be.
Method two
- Using a jack, raise the front wheel of the “four” so that it can be turned by hand;
- Connect a multimeter to the device contacts in voltmeter mode. There is no need to remove the DS from the car;
- Spin the wheel and analyze the data on the display of the measuring device.
If the frequency and voltage increase during spin-up, the device is working properly.
Method three
- Raise the front wheel with a jack;
- Disconnect the impulse wire from the element;
- Turn on the car ignition;
- Take a control device or light bulb;
- Using the “control”, find “+” and “-” on the DS;
- Connect the device to the “Signal” wire and spin the wheel by hand;
If the DS is operational, the device will show “-”.
When using a light bulb, it must be connected to the “Signal” wire and the battery positive. If it blinks when the wheel spins, it means the sensor does not require replacement.
Method four
- Raise one of the front wheels of the car with a jack;
- Remove the DS from the seat;
- Find the device drive and rotate the wheel;
- Touch the drive with your hands while rotating. If it spins and does not jam, then the element is working.
This technique helps verify the functionality of the drive of this part.
Installation instructions
- Before replacing a broken sensor with a new one, you need to keep in mind that the body of the device is made of plastic, so it is important to be very careful not to break it.
- For proper installation of the VAZ 2114 speed device, it is necessary that the groove of the device fits exactly into the groove of the bushing. Otherwise, it will not be able to properly lock and sit in place.
- The last step is to securely fix it. To do this, you need to carefully tighten the sensor clockwise. The main thing is not to overdo it and not break the new device.
This completes the replacement of the device. Is it worth contacting a service center and how much money will you save by doing it yourself, think for yourself.
Source
Replacing the speed sensor
The speed sensor cannot be repaired. Therefore, when it fails, it is replaced. The part can be purchased at an auto store or ordered online. Its cost is approximately 250-350 rubles. You can replace the element yourself. To do this, you must follow the following procedure:
- Place the car on a pit or overpass.
- Unscrew the DS counterclockwise. This can usually be done by hand. But sometimes a 21 (22) wrench may be required if the part does not unscrew easily.
- Install a new sensor. Make sure that the pin fits into the hole in the wire.
- Tighten the part by hand. No force or tools required. The element made of plastic may be damaged.
When replacing an element, it would be useful to check the operation of the drive. For this, the fourth diagnostic method described above is used. If the drive is broken, it also needs to be replaced.
Driving with a faulty DS is not prohibited, but is undesirable. A non-working speedometer can cause an emergency. And other problems associated with this breakdown can significantly affect the performance of the car. Therefore, it needs to be changed within a reasonable time frame.
How to remove?
- Open the hood and, using a 10mm wrench, remove the ground from the battery;
- Removing the adsorber will make the replacement process more convenient. This is done very quickly: unscrew the nuts and move it to the side so that it does not interfere with work;
- Remove the block along with the wires. To do this, you need to tighten the latch;
- Remove the device. You need to carefully turn it counterclockwise until it comes out. Then we remove the sensor using a 21 key;
- The place where it is installed must be cleared of dirt and debris.
Speedometer sensor location
Regardless of the year of manufacture of the car, this device is installed on the gearbox housing .
It is attached to the drive using a threaded connection. To find this sensor you need to look at the gearbox in the area of the right CV joint . Next, you should find a part with a connected electrical connector. Below is a photo of where the VAZ 2114 speedometer sensor is located. On older models, a cable is attached to the device. It is necessary to transmit torque to a mechanical speedometer.
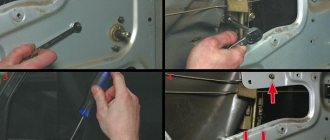
Photo gallery
More photos of the replacement are shown below. As you can see, in general, the replacement procedure is quite simple, no specific knowledge is required for this, so it is quite possible to change the DS at home.
1. Disconnect the battery and remove the air duct corrugation.
2. Press the connector latches and disconnect the wires.
3. Remove the drive and replace it with a new one.
REMOVAL AND REPLACEMENT
If the check shows that the DS is faulty, it needs to be replaced. Repairing sensors and similar small electronic devices is a thankless task. It is unlikely that this will be possible to do in a garage; the only thing that can be done is to clean the contacts from oxidation.
VD-40 or any solvent (the same alcohol) is perfect for this; wipe the contacts on the block with a cotton swab; if the problem was oxidation, the DS will start working.
Fault repair
In fact, no one is repairing the speed sensor on these VAZ models, since it is much easier and faster to replace this entire unit - it costs around 400 rubles, which is not that expensive.
In order to begin the replacement process, it is recommended to drive the car into a pit and prepare screwdrivers, pliers and a set of wrenches. If there is no hole nearby, you first need to remove the terminals from the battery, then remove the air filter and intake pipe, and then remove the terminal from the DS itself (if the car uses a cable drive for the speedometer, you need to remove that too).
Next, use a rag to clean the work area of debris, oil or dust, and then proceed directly to the replacement:
- Remove the terminal block using the button that deactivates the spring retainer.
- Using a 21mm wrench, remove the speed sensor from its socket.
- Install the new device so that its rod precisely fits into the fixing sleeve to transmit rotation.
- Tighten the thread back with a 21mm wrench, without pinching it, so as not to damage the integrity of the plastic housing of the DS.
Replacing DS VAZ 2114
The result can be assessed immediately - if the sensor does not fit into the socket, it means that its rod has not moved into the bushing, so the procedure will have to be repeated until success is achieved. After this, you need to return the removed units to their place, connect the power and check the operation of the new sensor while the car is moving. Or, if the replacement was carried out in a pit and with a jack, you can evaluate the performance of the DS using the same multimeter and rotating the hung left wheel.
Speedometer drive: types and differences
A speedometer is an important element in cars, as well as several other vehicles, as it is necessary to monitor speed in order not to violate traffic rules. But this is not the last function of this device.
All possible speedometers have a high-speed magnetic unit; due to the rotation of the magnets, a flow is formed, it moves through the coil, thereby facilitating the induction of eddy currents. They thereby begin to create more magnetic fields. They interact with each other, the needle of the device moves along the frequency scale, with the help of this the magnet rotates.
All speedometers are divided into three categories.
- Mechanical speedometers.
- Electromechanical speedometers.
- Electronic speedometers.
Mechanical speedometers. In this type of speedometer, the process of speed measurement and indication occurs thanks to a mechanical device. A gear is used as sensors, which is connected to the secondary shaft of the gearbox; this is the speed unit with an arrow indicator and the drum counter. Previously, speedometers were used in the form of a drum and tape. But they stopped using them quite a long time ago.
Electromechanical speedometers. In these devices, speed is measured using various electronic or electromechanical sensors that are connected to the gearbox. The speed is indicated by a milliammeter or the speed unit of a mechanical speedometer, and the distance is indicated by a counting drum, which drives a stepper motor.
Electronic speedometers. This is a development of new electromechanical speedometers; the main difference is the replacement of the odometer - in an electronic device it is completely digital.