The camshaft sensor in the VAZ-2114, however, as in other modern cars, has a fairly important role. Correct fuel injection, and therefore its consumption, depends on its correct operation. This part was first installed on the VAZ “fourteenth” in 2007. Accordingly, before this, the design of the car did not provide for the presence of a camshaft sensor. Considering the fact that the manufacturer nevertheless decided to supplement the design of the car with it, we can conclude that the use of this device provides some advantages.
We check the camshaft sensor on a VAZ-2114 using a tester or multimeter
Many motorists have encountered the fact that the camshaft sensor, or in other words, the VAZ-2114 phase sensor, has failed. There can be many reasons for this phenomenon, but as a rule it is wear and tear. Not all car enthusiasts are able to diagnose this sensor, although there is nothing complicated or abstruse in the process itself.
Video review of the symptoms of a camshaft sensor failure on a VAZ-2114:
What needs to be done before replacing the DPKV
When symptoms of a malfunction appear, you need to check several points due to which the control unit is not receiving proper information.
PHASE SENSOR.FULL OPERATION CHECK
HELLO EVERYONE, IN THIS VIDEO I WILL SHOW HOW TO DIAGNOSE A PHASE SENSOR
.THE PROCEDURE IS SIMPLE AND...
Quick check of the phase sensor
How to quickly check the phase sensor
.
- Inspect the DF for external damage.
- Make sure that no moisture gets on the contacts.
- Check contacts for oxidation.
- Make sure that the electrical wiring near the unit is intact.
If nothing was found during a visual inspection, then it is necessary to dismantle the device. How to change the camshaft sensor on a VAZ 2114?
Dismantling any sensor or repairing electrical wiring should always be carried out only with the battery disconnected, otherwise you can complete the repair not only by replacing the burnt circuit, but also by purchasing a new vehicle.
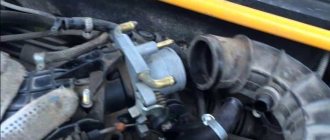
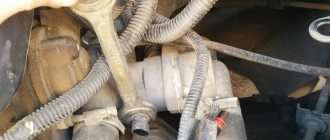
Dismantling on an 8-valve engine is not difficult. Where is the phase sensor located on the VAZ 2114? It is located on the right, on the top of the engine, near the air filter. It is secured with one 10mm wrench bolt. With a few simple movements, the bolt is unscrewed and the sensor is removed. After the unit has been removed, it is necessary to close its structural socket from accidental entry of foreign objects.
Operating principle of the sensor
General view of the camshaft sensor
The camshaft sensor or phase sensor is a part of the main power unit of the car, which is responsible for reading information about the location of the camshaft and is also involved in adjusting the ignition angle.
This meter is similar in principle to a Hall sensor .
Reading occurs using a special camshaft gear that has no teeth. The missing elements are located in such a way that when this gap hits the sensor, the first piston is at the dead center, at the top or bottom.
A signal is triggered and transmitted to the engine's electronic control unit when the sensor hits the missing teeth. In turn, depending on the received indicator, the ECU adjusts the ignition angle. Thanks to the installation of such a system, Samara-2 engines have become more efficient and popular.
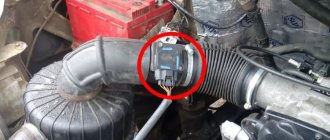
Location of the sensor under the hood of the VAZ-2114
The camshaft sensor on the VAZ-2114 is located near the air filter, at a very close distance from the cylinder head. This meter location is almost always standard for other cars in the injection group.
Camshaft sensor location
The main reasons for sensor failure
Before proceeding directly to the diagnostic process, it is necessary to find out the causes of the malfunction of the VAZ-2114 phase sensor.
So, let's move directly to the most direct and indirect indicators:
Electrical circuit of the sensor
- Check Engine on the dashboard indicates that a malfunction has occurred. In this case, the engine starts without waiting for a response from the camshaft sensor, and the ignition system works based on the latest indicators.
- Increased consumption of the fuel mixture can also serve as an indirect indicator of a malfunction of the air flow control valve.
- The car begins to lose power and dynamics as a whole.
The combination of these reasons can serve as an indirect indicator of a malfunction of the camshaft sensor.
Errors DPRV VAZ-2114-2113-2115 for M73 EURO-3 controller
| Error number | Error interpretation |
| P0342 | Phase sensor line, low pulse level |
| P0343 | Camshaft sensor chain, large signal value |
| P0346 | Series of DPRV, pulse output beyond the permissible size |
Error P0342 is recorded when:
- the crankshaft rotates;
- There is a constant low pulse level at the ECU input (terminal “79”).
The malfunction indicator light flashes on the 3rd drive cycle after the malfunction error is indicated.
Temporary damage can be created by the presence of the following deficiencies:
- Not a strong connection between the terminals of the harness strips of the ignition structure, sensor and ECU. Check the connectors of the sensor and controller, the harness strips for strength of connection, the absence of damage to the pad locks and damaged terminals.
- Destruction of the tourniquet. Check the harness for any damage.
Replace the broken camshaft sensor with a working one and try for secondary error formation.
Error P0343 is recorded when:
- the crankshaft rotates;
- There is a constant high pulse level at the ECU input (terminal “79”).
The damage warning light comes on on the 3rd drive cycle after the damage code repeats.
Non-permanent damage can be caused by the presence of the following defects:
- Poor fastening of the contact strips of the ignition structure harness, sensor and computer. Check the connectors of the sensor and the ECU, the cord connectors for the strength of the connections, the absence of damage to the locking bars and broken contacts.
- Harness defect. Inspect the harness for damage.
Replace the damaged camshaft sensor with a known intact one and check for secondary occurrence of the error.
Checking the operation of the camshaft sensor
So, when all the questions have been considered, you can proceed directly to diagnostic operations.
The first method is manual diagnostics . How is it carried out? Let's consider this issue step by step:
- We dismantle the sensor.
- The first diagnosis is visual. It is worth inspecting the condition of the case, the presence of damage and cracks.
Sensor wire pinout
Multimeter to help
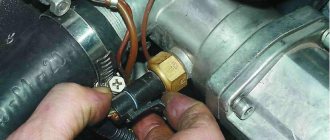
Now you need to check the contact group using a multimeter. First, we inspect the contacts for the presence of moisture, and then “ring” them. If the tester does not respond, then the sensor is faulty.
Diagnostics is carried out as follows: the “minus” probe of the tester is connected to the left contact on the sensor, and the “plus” to the central one. Next, we bring the metal plate to the sensor. A change in the voltage reading on the sensor will be immediately visible on the multimeter.
Checking the sensor using a multimeter
The second diagnostic method is to connect to the vehicle's electronic control unit. In it, when the Check Engine appears, error codes remain that indicate a malfunction. There are two errors associated with the phase sensor, namely:
- FAZ sensor error 0340 - shows that the ECU does not receive a signal from the camshaft sensor. You should check the breakage and condition (oxidation) of the contacts before damaging the sensor itself.
- Error 0343 - high signal level of the camshaft sensor. Most often this is damage to the wiring from the ECU to the sensor, or breakage and oxidation of the terminals, or an unreliable connection.
Working principle of the camshaft sensor
Oscilloscope
The third method of diagnostics is an oscilloscope. Using this device, you can almost immediately determine whether the camshaft sensor is faulty. But, unfortunately, not every car enthusiast has this device in his arsenal.
Checking with a computer or oscilloscope
Symptoms of malfunction
The vehicle owner can independently determine the failure of a part. Incorrect operation of the device leads to deterioration in engine power and the appearance of other symptoms such as:
- Difficulty starting the power unit, regardless of its heating temperature. When you try to start the engine, the time it takes for the flywheel to spin up with the starter increases.
- Incorrect engine operation at idle. Lack of stability, floating speed. Due to lack of information, the electronic control unit cannot select the correct ignition timing. Car owners note the lack of stability in the operation of the power unit.
- Deterioration in response to pressing the accelerator pedal. Reduced dynamic performance of the vehicle. The symptom is especially noticeable when changing gears; there is a failure.
- Spontaneous stopping of the power unit at idle speed.
- Gasoline consumption increases significantly. Incorrect operation of the gas distribution mechanism and the lack of information supplied to the control unit make it impossible to correctly select the air-fuel mixture.
If the above symptoms appear, you should check the performance of the DPRV and, if necessary, replace it. Particular attention should be paid to checking the electrical wiring.
In some cases, the reason for the lack of information transmitted to the control unit may be a broken wire or oxidation of the connectors.
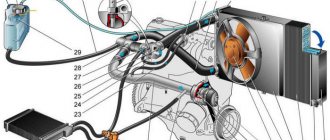
Injection engine operation
The normal operation of an internal combustion engine is due to the coordinated action of all components. The fuel combustion process is controlled by an electronic unit. The following systems are used that are responsible for the operation of the injection engine 2115, 2114 models:
- air preparation;
- fuel supply;
- electronic engine control system (ECM);
- ignition;
- gas distribution;
- exhaust;
- cooling;
- engine oil system.
The ECM system for a Priora or VAZ 2115 car is controlled by an electronic control unit (ECU). Stable operation of the unit largely depends on the condition of the sensors. The ECU processes information received from various sources. Based on the analysis, a command is issued to open the injectors.
The camshaft position sensor tells the processor the actual position of the pistons at that moment. The operating principle is based on the Hall effect. When the gear teeth approach the device, an electrical signal appears at the output. In Priora and other cars, the gear is installed on the valve control shaft. It is set on a dowel. One tooth is missing on the camshaft gear.
The depression is placed opposite the sensor. The mark must not be moved. Such positions of the distribution mechanism correspond to the extension of the piston of the first cylinder to top dead center.
When the position of the VAZ 2114 camshaft changes, an alternating magnetic field appears. The sensitive element generates a pulse signal. The ECU counts the number of pulses and issues the necessary commands.
Signs of device failure
A faulty phase sensor will result in signal disruption. The ECM polls the DF for 4-5 minutes. If the signal does not appear within the specified period, the unit switches to double fuel injection mode.
If the phase indicator fails, the controller queries only the crankshaft position sensor. In this case, gasoline is supplied simultaneously to two cylinders. At the same time, fuel consumption increases by approximately 10%.
Failure of the phase sensor leads to a number of other troubles. Repairs need to be made. Signs of engine trouble:
- Increased gasoline consumption.
- Vehicle diagnostic failures.
- Violation of acceleration dynamics of VAZ 2115.
- Difficult start. The engine starts after 4-5 seconds.
- After starting, the Check Engine light comes on.
- Error P0343 or 0340 appears during diagnostics.
Before inspecting the sensor, you should make sure that the remaining parts are in good condition. Failures will occur due to a broken timing belt, loose camshaft gear, or incorrect installation of marks.
Often sensor error 0343 is associated with oxidation of contacts or broken wires. Before discarding the phase indicator, make sure the wiring is intact. Resistance measurements in the circuit are carried out with a multimeter.
It is difficult to determine the malfunction of the phase sensor yourself. It is better to carry out diagnostics at a service station. The sensor is checked on a computer.
If the auto mechanic makes a disappointing diagnosis, then we go to the store. You should know that you can run into low-quality spare parts or fakes. Experts advise purchasing sensors from Bosch or the Kaluga plant.
The phase sensors for 8- and 16-valve engines are different. Therefore, when purchasing, tell the seller your engine type. The best option would be to go to the car market with your original. If after replacement the sensor error occurs again, return it.
Literature on operation and repair
| 1 | Reviving a VAZ 2113, 2114, 2115 car on the road. | 2007 | 49 pp. | Size - 1.71 MB | Format - djvu |
| 2 | OPERATING INSTRUCTIONS FOR CAR VAZ-2113, -2114, -2115 AND THEIR VERSIONS | 2002 | 88 pp. | Size - 751 KB | Format - pdf |
| 3 | Structures of split gasoline injection for VAZ cars - design and diagnostics | 2003 | 128 pp. | Size - 1.67 MB | Format - pdf |
| 4 | LIST OF COMPONENTS AND ASSEMBLY PARTS VAZ 2113, 2114, 2115 | 2010 | 266 pp. | Size - 6.37 MB | Format - pdf |
| 5 | VAZ 2113, 2114, 2115 - Manual on maintenance, maintenance, restoration and tuning | — | 240 pp. | Size - 29.31 MB | Format - pdf |
Replacing the device
Dismantling the part is not difficult. We find it behind the air filter. The phase sensor housing is secured with a bolt.
First, disconnect the terminals from the battery. In this case, the electronic unit will be de-energized. The control unit memory is reset to zero.
If you don't turn off the on-board network, you won't feel the difference. After replacement, the unit will maintain the same mode as with a faulty phase sensor. Process control returns to normal only after several engine starts.
Tools and materials for removing the sensor are available in the arsenal of every motorist. You need to prepare a key for ten, sealant, alcohol, rags. It is convenient to unscrew the fastening bolt using a socket wrench. Take the sealant from ZOLLEX. It is designed for temperatures up to 350°C.
Replacing the sensor will take 10 minutes. First of all, disconnect the wire block from the phase sensor. To do this, you need to bend the latch with one hand and pull out the wiring with the other. Next, unscrew the only bolt. It's on the back side. We take out the body of the spare part.
Do not apply great force when removing the DF.
Moreover, you should not use impact-type locksmith tools. The plastic housing may crack. Residues will fall inside.
Before installing a new device, you need to clean the seat. Apply a thin layer of sealant to the joining ring. Let stand for a few minutes. We put the camshaft sensor in place. We tighten the bolt.
Feel free to connect the wires. Oxidized contacts on the plug are cleaned with alcohol. The pinout of the wires will not be disturbed. The VAZ 2115 has a lock. When connecting the terminal block, watch the latch. The latch should engage.
That's all. Don't forget to connect the terminal to the battery. Turn on the ignition. We start the car and watch the instrument panel. The indicator should go out within a second after starting. This means that the replacement was successful.
Of course, the main test of the VAZ 2115 will take place on the road. Therefore, we turn on the gear and enjoy the growl of the engine. If the problem is solved, the engine will restore its former agility, and the car will restore its acceleration dynamics.
Replacing the RV position sensor
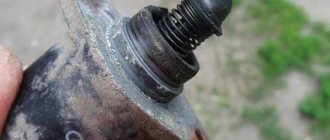
If during the inspection it turns out that the camshaft position sensor itself has failed, then it must be replaced. As a rule, these units are non-repairable, since their body is sealed and cannot be disassembled. The sensor is inexpensive, and the replacement procedure is simple, and even a novice car enthusiast can handle it.
The sensor replacement algorithm is as follows:
- With the engine not running, disconnect the negative terminal from the battery.
- Disconnect the “chip” from the camshaft position sensor (as when checking).
- Depending on the vehicle model, it is necessary to remove parts that prevent access to the sensor. For example, on modern cars like the Lada Vesta, it is necessary to remove the bracket for auxiliary units.
- Using a wrench, unscrew one or two mounting bolts, depending on the type of fastening. The size of the wrench can be different, usually for VAZs it is a 10 mm wrench.
- After dismantling the mount, you must similarly remove the sensor from its seat.
- Installing a new sensor is performed in reverse order.
- Connect the negative terminal to the battery.
When purchasing a new camshaft position sensor, you need to pay attention to the condition of its O-ring. It is usually sold separately. When changing the sensor, it is advisable to also change the O-ring, since over time it wears out and loses its elasticity. You can use an old ring only in case of emergency, when it is not possible to buy a new one.
Conclusion
The camshaft position sensor is a simple but important device in the engine, and the normal functioning of the engine depends on its operation. Therefore, when identifying signs of its failure, it is advisable to carry out the appropriate diagnostic procedures as quickly as possible. They are simple, and even a novice car owner with no experience can handle them. The same goes for replacing it. The price of a phase sensor for VAZ cars as of winter 2019 is about 400 rubles.
Source
Design features and operating principle
The VAZ 2114 FAZ sensor is an integrated device, the main function of which is to receive information about the current operating cycle of the power unit and transmit it to the ECU via pulse signals.
Structurally, the DF consists of two parts - a sensitive element and a pulse signal converter, which in turn consists of an operational amplifier, a bridge circuit and an open collector type output stage.
The DF sensitive element operates according to the Hall principle; it is a microcircuit that responds to fluctuations in the magnetic field, which gains the ability to transmit an electrical signal only when there is a magnetically conductive material next to it, which is the steel head of the valve.
The location of the VAZ 2114 camshaft position sensor is as follows: it is located on the end of the cylinder block, not far from the air filter.
There is a lot of discussion on the Internet about which phase sensor is best to buy from which manufacturer. We recommend giving preference to devices from the German company Bosch. It is she who has the license to manufacture sensors operating on the Hall principle, so, in essence, you get a reliable and durable device produced by the direct owner of the technology by which it is made.
Checking DPRV on Priora
After removing the sensor, inspect its condition. The absence of external defects does not mean that the part is working properly. If there is mechanical damage to the case, the product must be replaced and does not need to be checked. Next, we will consider the general picture of testing manipulations for the serviceability of the DPRV and its circuit.
- Using a multimeter, we check the presence of power in the chip. To check, you need to set the measuring range on the device above 12V, then touch the first and second contacts (A and B) with probes, turning on the ignition (be careful not to provoke a short circuit).
- We touch the first and second contacts, and record the presence of voltage in the circuit. It should be equal to the value of 12V (on-board network).
- Below is a pinout diagram for the power supply circuit of the DPRV.
- The next way to check is to connect the multimeter probes to pins 1 and 3 (A and C) of the power chip. After this, turn on the ignition, and with the sensor missing, determine the voltage, which should be about 11V. The controller has a resistor, so the voltage on the signal wire should be 1V lower depending on what is supplied to the sensor.
- If the circuit is working properly, then we check the sensor. To do this, connect it to the chip (removed sensor), after which you need to attach the probe from a red multimeter to terminal “C” (on the back of the chip). Connect the black probe to terminal “A”. Turn on the ignition and note the presence of voltage on the signal wire of the sensor. It should be about 11-11.5V, that is, 90% of the applied voltage to the DPRV. If this is the case, then the device is presumably working properly. To make sure of this for sure, you need to bring a metal part (preferably a plate into the slot) to the end of the sensor. If the voltage drops to zero, this will indicate that the device is working properly.
This completes the procedure for checking the serviceability of the camshaft position sensor, and you can draw appropriate conclusions about the serviceability of the product. If the sensor shows inappropriate values, it should be replaced.
In the event of a power supply circuit malfunction, it is necessary to check the condition of the wires. To do this, you need to know the pinout of the contacts. To test the power wires, you need to connect the tester probes to terminal “2” on the sensor chip and terminal “45” on the controller terminal block. Next, the serviceability of the wire core responsible for the signal circuit is checked in the same way. To do this, connect the probe to contact “3” on the sensor and “79” on the controller terminal block
.
Once the cause of the malfunction has been found, you can begin to eliminate it. On Priors, the problem of chain breakage in the bundle, where the corrugation bifurcates, occurs very often. That is why it is recommended that before dismantling the sensor on the Priora, check the serviceability of the circuit and power wires.
More accurate and correct operation of the sensor is checked using an oscilloscope.
Symptoms and check
Signs of a malfunctioning camshaft sensor, by which you can determine that the device has failed, are as follows:
- Increased fuel consumption;
- Problems in the vehicle self-diagnosis mode;
- Reduced acceleration dynamics;
- The “Check Engine” sign or errors 0343 or 0340 appear on the dashboard.
The “Check Engine” icon, as a rule, lights up when the DF is completely out of order. The following happens: you turn on the ignition, after which the starter starts working, at this time a signal should be sent to the ECU from the sensor, but since the DF is broken, it is not there, and the electronic control switches the engine to twin injection mode (based solely on the data received from the DKPV ), turning off the phased injection of the fuel mixture.
If you find any signs of malfunction, you need to check the DF. You can do this yourself; you only need a tester (multimeter), which can be purchased at any car store for 400-600 rubles. The device is inexpensive, but useful - you will need it several times when diagnosing a car.
On fourteenths with a 16-valve engine, DF models 21120-3706040 are installed, on 8-valve engines - 21110-3706040 . Checking each of them has some features.
Checking the phase sensor of a VAZ 2114 with an 8-valve engine:
- On the multimeter probe (V1 mode), which will be connected to contact “E” on the sensor, set the voltage to 13.5 V. on the second probe (connect to contact “B”) - 0.9 V;
- We close the probes on the corresponding contacts. We bring a metal plate to the end part of the DF (a screwdriver will do). If the device is working normally, the multimeter will show that the voltage at pin “B” has dropped to 0.4 V (should return to 0.9 when the plate is removed). Differences in readings indicate a replacement sensor.
Checking the DF of a 16-valve engine:
- We switch the tester to V2 mode. On the probe of contact “E” we set the voltage to 13.5 V, on contact “B” - 0.4 V;
- Insert a screwdriver into the hole at the end of the DF housing. When the sensor is working, the voltage at contact “B” will rise to 0.9 W and drop back if the screwdriver is removed.
If the VAZ 2114 is equipped with an on-board computer, if the device malfunctions, it will display one of the errors with code 0340 or 0343. Let’s analyze each of them in more detail.
- FAZ sensor error 0340 - indicates the absence of a DF signal. The cause of this error can be anything from oxidized contacts to mechanical damage to the device. Solved by replacing the part with a new one.
- Error 0343 - high signal level of the phase sensor. Its cause, as a rule, is damage to the wiring itself or the terminals in the contact block, or their loose/oxidized connection.
Errors in the VAZ 2115 phase sensor are completely similar to the errors that occur on the fourteenth.
It is worth noting that in addition to a malfunction of the DF itself, the cause of errors may be a slipped timing belt or a loose crankshaft gear.
Checking the functionality of the phase sensor
If typical signs of DF failure occur, or if errors 0343 or 0340 are displayed on the on-board computer of the fourteenth, it is necessary to check the functionality of the DF. This is done using a conventional multimeter.
Fourteeners with 16 and 8 valve engines have different DFs, so the specifics of checking them will be slightly different.
How to check the camshaft sensor VAZ 2114 8v:
- On the first probe of the tester we set the voltage to 13.5 Volts and connect it to contact “E” on the DF, on the second probe, which must be connected to contact “B” - 0.9 V;
- Having closed the contacts, we bring a metal screwdriver to the end of the sensor. If the DF is working properly, you will see on the tester screen that the voltage of contact “B” has dropped to 0.4 Volts. If this does not happen, the DF is broken;
How to check the camshaft sensor VAZ 2114 16v:
- We set the following voltage on the multimeter: contact “E” – 13.5 Volts, “B” – 0.4 Volts;
- We close the contacts and insert a screwdriver into the hole on the phase sensor. If the device is working properly, the voltage at pin “B” will increase to 0.9 Volts.
A multimeter is a standard device for checking the performance of any sensor