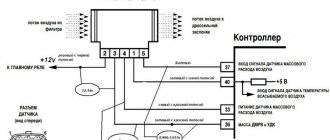
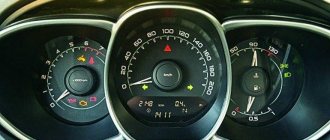
When problems arise on VAZ injection cars, decoding can be done without visiting a service station and using a diagnostic scanner, which is inserted into the OBD2 connector. For this purpose, there is a special daily mileage reset button on the instrument panel. With its help, you can enable quick self-diagnosis. VAZ error codes are displayed among the VDO instrument panel indicators at the bottom, in the same place as the firmware version.
For 8 and 16 valve engines, errors on the VAZ 2114 or 2115, their codes and interpretation are identical.
How to identify errors by self-diagnosis
Not everyone knows that the standard firmware of the VAZ 2114 has a function that allows you to do independent diagnostics without special equipment. By its principle, the self-diagnosis procedure is quite simple and allows you to quickly decipher VAZ 2114 errors that cause the check engine light to light up. To do this, you need to perform the following manipulations:
How to properly conduct self-diagnosis on a VAZ 2114
- Turn off the ignition and press and hold the button, which is responsible for resetting the daily mileage on the odometer.
- After this, you need to insert the key into the lock and turn it to the first position to turn on the ignition.
- When you turn the key, release the odometer reset button. On the fuel gauge, speedometer and tachometer, the needles will first move to the maximum position and then return to zero.
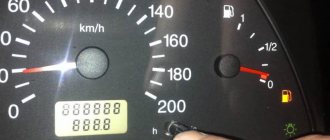
- The mileage reset button must be pressed again and the firmware version will light up on the devices.
- Another press of the button displays error codes for the VAZ 2114 on the panel.
At this point, you can begin to decipher the code and identify possible faults.
Recovery
Is it possible to restore a broken sensor? This can be done only in one case - if the cause of the malfunction is poor contact and the sensor itself is working normally. You can also try removing the carbon deposits inside. But to do this, you need to take the sensor out and lower it into an aggressive environment (white spirit or gasoline). Please note: do not use sandpaper, needle files or other rough objects for cleaning. To avoid damaging the tip, use a soft cloth soaked in solvent. By treating the sensitive element with white spirit, you can restore the functionality of the sensor. But it is not a fact that after cleaning it will take accurate measurements. Ideally, this element should be changed entirely. Fortunately, the operation is simple, you can do it yourself. We’ll tell you exactly how below.
What are the error codes for the VAZ 2114
Determining errors on a VAZ 2114 using an odometer with such self-diagnosis will make it possible to determine problems in the electronics and interruptions in the operation of various engine sensors. However, remember that the codes only indicate the units and wiring circuits, so you can accurately determine the nature of the breakdown only by disassembling and checking.
A detailed explanation of the VAZ 2114 error codes is presented in the table.
| Error code | Decoding | What does this mean? |
| 0 | No errors | Everything is okay |
| 1 | Microprocessor error | Need to do a flashing |
| 2 | Fuel level sensor error in gas tank | You need to check the sensor, the supply wires or replace the indicator itself |
| 4 | A high voltage was detected in the electrical network - more than 16 V | Check wiring |
| 8 | Low voltage or worn generator brushes, voltage below 8 V | Check wiring, battery charge, generator (voltage regulator brushes) |
| 12 | Indicator Lamp Diagnostic Circuit Error | The control lamp is not working correctly, you need to check the wires |
| 13 | Signal error from oxygen sensor | The circuit is broken, the wire needs to be inspected or the faulty oxygen sensor needs to be repaired |
| 14 | The signal from the antifreeze temperature sensor is too strong | The motor is overheated or the temperature sensor circuit is shorted |
| 15 | The signal from the antifreeze temperature sensor is too weak | DVT has closed, check, replace if necessary |
| 16 | High voltage detected in the on-board network | The voltage in the network is too high, a wiring inspection is necessary |
| 17 | Low voltage detected in the on-board network | Charge the battery |
| 19 | Incorrect signal from the crankshaft position sensor | Check and replace DPKV |
| 21 | The signal from the throttle position sensor is too strong | Network short circuit |
| 22 | The signal from the throttle position sensor is too weak | Short circuit in the TPS circuit |
| 23 | Strong signal from the intake air temperature indicator | Short circuit, check wires |
| 24 | Failures in signal transmission from the speed sensor | Power cores are damaged |
| 25 | Weak signal from the intake air temperature indicator | Short circuit, check wires |
| 27 | Too strong impulse from CO controller | CO sensor for replacement |
| 28 | The pulse from the CO controller is too weak | |
| 33 | Strong signal from mass air flow sensor | Repair open circuit or short circuit |
| 34 | Weak signal from mass air flow sensor | |
| 35 | Idle speed violation | IAC sensor for replacement |
| 41 | Signal failures from the phase regulator | Repair short circuit or replace sensor |
| 42 | Error in electronic ignition control circuit | Check electronic ignition wires |
| 43 | Signal error from knock sensor | Replacement knock sensor |
| 44 | Lean air-fuel mixture | Lean air-fuel mixture |
| 45 | Rich air/fuel mixture | |
| 49 | Diagnosis in case of vacuum loss | Check the vacuum system |
| 51 | PROM malfunctions | You need to check or do a reflash |
| 52 | RAM faults | |
| 53 | There is no signal from the CO potentiometer | Replace potentiometer |
| 54 | There is no signal from the octane corrector | Check wiring to knock sensor |
| 55 | Leaning of the mixture at high engine loads | Check the fuel system |
| 61 | Lambda probe faulty, replacement required | Remove, test the lambda probe, replace if necessary |
Quick deciphering of VAZ 2114 error codes will allow you not to go to diagnostics and save money. It is worth considering that in rare cases, self-diagnosis codes are added together. So, for example, error “8” can consist of two codes - “1” and “7”. Therefore, you need to carefully look at the codes and check the decoding of all possible options on the VAZ 2114, taking into account the characteristic deviations in the operation of the car.
Possible faults
Why is the panel or instruments on the control panel not working?
If the backlight does not light up, or one light bulb goes out and stops lighting, this may be due not only to the failure of the lamp itself, but also to other faults:
- Before removing and disassembling the device, you must make sure that the ground wire is securely fastened. It happens that the wire comes off because the front passenger touches it with his feet.
- If the main sensors refuse to function, while the audio system and instrument lights work normally, in most cases the cause of the malfunction is fuse F3. It is located on the block and needs to be replaced, but before that it is advisable to find out why it failed. On older VAZ 2114 models, fuses may blow out after each wash if there are problems in the wiring, in particular, we are talking about a short circuit. Even if the safety element is visually intact, it still needs to be dismantled and the contacts diagnosed.
- The dashboard lights may go out and the sensors may fail due to a faulty ignition relay.
- In the event that, in addition to the instruments on the control panel and the backlight not working, window regulators, wipers and other elements refuse to function, there may be several reasons. The malfunction may be caused by burnt-out contacts on the lock or incorrect operation of the mounting block. The tracks on the unit may burn out - this problem can only be solved by replacing the device.
- If individual components of the shield refuse to work, perhaps the problem lies precisely in their performance. So the owner of the VAZ 2114 will have to remove and disassemble the shield, and then look for the problem in a specific sensor. It is quite possible that the gear on the control panel is simply cracked - it will simply need to be replaced.
- It happens that due to vibration, the nuts securing the mass are unscrewed not only on the dashboard, but also on the body, and then everything begins to take on a life of its own (the author of the video is Sergey Kamaspring).
Frequent errors on the VAZ dashboard and detailed decoding of their codes
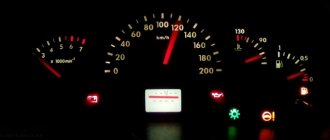
Display of error “8” during self-diagnosis of VAZ 2114
With more than fifty errors generated by the on-board computer of the injection VAZ on the VDO instrument panel, the most common are:
- 8;
- 10;
- 12;
- 14.
Therefore, we will give a more detailed decoding for them.
Code 8 . Error “8” on the VAZ 2114 means that there are problems with the charge level and network power. Most likely the battery is low or the wires are damaged. The problem may also be wear on the generator brushes. Therefore, to eliminate this error, you need to check/replace the brushes and recharge the battery.
Code 10 . There is no independent error code “10” on the VAZ 2114, because it is the sum of codes “2” and “8”. In this case, you need to check the fuel sensor and the wires that go to it.
Code 12 . From these four, error 12 on VAZ 2114 and 2115 occurs least often. What to do in this case? You can remove the negative terminal from the battery and leave it like that for 10 minutes. If the error is displayed again, you need to diagnose it with a scanner and look at the wiring.
Code 14 . Error “14” in the VAZ 2114 occurs when the engine overheats or the coolant temperature sensor itself is faulty. Then, before resetting the error, you need to check the sensor and the cooling system. The thermostat may be stuck, the fan will not turn on, or the DTOZ connection circuit may be broken.
If error 14 or 12 occurs on the panel, you should look at the symptoms of the car, since the problem may be different - the error may be the sum of codes “1” and “13” or “4” + “8”, respectively.
Diagnostics using special equipment
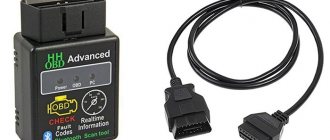
1. Diagnostic connector
2. Connecting a wire with an adapter to the diagnostic socket
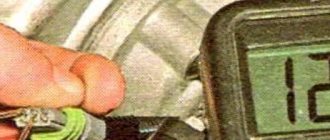
3. Connecting the wire to the computer
4. Launching software for testing
The diagnostic process using special equipment consists of checking the car using a laptop. To connect to the diagnostic connector you will need a cable with an adapter. Using this cable, we connect the computer to the connector via USB output. For testing you will also need software; the power of the computer used is not important. There are many versions of different testing programs on the Internet.
Diagnostics is performed as follows:
- It is recommended to inspect the vehicle before starting the inspection. Check the volume of consumables - engine oil, brake fluid, coolant.
- Find the diagnostic connector and connect your laptop to it. If you have a special scanner, then that's even better. But since finding a scanner is not so easy, and buying one is not cheap, you can use a laptop. Before testing can begin, the ignition must be activated. There is no need to start the power unit.
- After connection, the testing utility starts. The software interface may vary. When you launch the software, graphs or a list of parameters with numbers may appear. This information will allow you to draw conclusions about the operation of the power unit.
- The scan starts. Fault codes will appear on the laptop screen. To decrypt, use the information provided in this article. We could not describe all the codes, but we deciphered those that occur most often. Usually, when downloading a program to a computer, users are provided with a separate file describing the faults.
- After decryption, the problem is repaired.
How to reset errors yourself
Video on how to reset the error code on a VAZ 2114, 2115
After checking the components and repairing, it is necessary to reset the errors. In principle, this can be done at any time, even without checking, if you want to make sure that it was not erroneous.
To reset the self-diagnosis codes of the on-board computer on the VAZ 2114 panel, after displaying the firmware version and the code itself, press the button again and hold for 4-5 seconds. As a result of resetting the error codes, “0” will be displayed on the VAZ 2114 injector.
Such a system for checking error codes is available not only on VAZ 2113, 2114, 2115, but also on models 2110, 2111, 2112, Priora and Kalina. The principle of checking and resetting errors is similar.
Let's sum it up
If you own a VAZ car, then you are familiar with the incorrect operation of on-board computers. Often errors are issued for no reason at all, but they interfere with the normal operation of the power unit. Therefore, the best way to protect against most unforeseen situations with on-board computers is to change the software.
In this process, it is important to install the official version of the program without risking the viability of your car. There are known cases when unofficial software killed the entire electrical system of a car, sending incomprehensible commands and signals to all sensors of the on-board system. Also, the setup should be done by a professional. Have you had any problems with VAZ on-board computers?
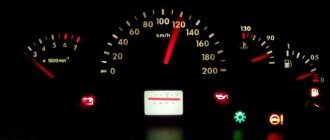
Backlight tuning
Tuning the dashboard may include replacing the backlight - this will allow the instruments on the dashboard to look more stylish. In general, tuning the dashboard is not so difficult; all you need to do is dismantle it and disassemble it, replace the light bulbs and perform other simple steps, after which the device is put in place.
First of all, you need to change the standard yellow lamps to bright diode elements. Chinese-made LEDs are cheaper, but their service life is much shorter. To ensure that the light from the LEDs comes directly, you can put heat shrink on them - this will ensure that the hands glow normally even in the dark. The LED wires must be connected to the backlight from the heating device. If you want the color of the arrows to be original, you can put a red LED on each of them, this will significantly update the shield (video author - By garage #229).