With the help of an additional pump for the VAZ stove, you can solve the problem with the low performance of the cooling system. This can be done on almost any domestic car. The stove functions normally under average operating conditions, but it may fail at extremely low or very high ambient temperatures. If the outside temperature is very high, the engine will begin to overheat. If the temperature is too low, the cabin will be very cold. This happens due to the fact that the heater does not work well and cannot provide normal air temperature in the car.
What is a pump?
A pump is a liquid pump that creates excess pressure in the cooling system. Using this pressure, the liquid circulates through all pipes of the system, evenly taking heat from all heated elements. On most vehicles, pumps are mechanically driven by timing belts or a generator.
As for the additional pumps, their design is approximately the same as the standard ones, except that they are driven by an electric motor. This is much better, since even at low crankshaft speeds (i.e., at idle), effective cooling can be achieved. All liquid will circulate through the channels at maximum speed, which will improve the operation of the entire system.
Please note that to this speed you still need to add the pressure that is created by the standard pump - no one removes it during modernization. After all, the task is not to replace the pump with another, but to improve performance.
When should you consider installing a second pump?
An additional pump for the VAZ-2114 stove can significantly improve comfort in the car in winter. It is often necessary to install an additional pump in the cooling system in the following cases:
- If the air temperature is more than 30 degrees, and the engine in such conditions overheats to critically high values. But only if the entire cooling system is in good condition. Therefore, before installing an additional pump, you need to make sure that the cooling system is working correctly.
- In the event that in cold weather the heater blows cold at idle, and the engine temperature, according to the dashboard indicator, is in the operating range.
But such problems do not always arise and not on all cars. The main criterion is the complete serviceability of all cooling elements. If the thermostat is faulty, then no additional pump will help in this case. First, you need to completely overhaul the system, install new pipes and clamps, and treat the joints with sealant. And only after that carry out the modernization.
What can it give
So, let’s first find out what an additional electric pump in the VAZ 2109 will give us:
- It turns out that installing an additional pump in a car of this model of the VAZ family can significantly increase the efficiency of blowing warm air into the interior at idle.
Note. In other words, if a standard stove blows hot air only when the car is moving, and only blows warm air at idle, this means poor circulation of fluid in the CO. Modernizing CO by installing an additional pump will allow antifreeze to circulate faster.
- Installing an additional pump, of course, will significantly insulate the interior, but the volume of pumped antifreeze will double. This, in turn, will lead to the fact that the engine will begin to cool down more and you need to take care, in addition, to conserve its heat. In this case, complete thermal insulation of the car will be what is needed, especially since nowadays you can find a huge amount of materials for this in stores.
- An additional pump, of course, gives an irreplaceable effect. On the other hand, this creates an additional load on the VAZ generator, which will also have to be upgraded. The fact is that the “nines” have a slightly weak current converter.
What machines might have problems?
Very often such problems can be found in cars of the 9th family, as well as the 14th, “tens”, as well as “Gazelles” and “Volgas”. The only exception is the GAZ-31105 model. On this car, the listed malfunctions can manifest themselves even at normal temperatures. The problem is that there is a lot of liquid in the system, and the pump power is simply not enough.
Please note that there is no need to install an additional pump on the Gazelle stove if the engine is overheated or the stove fails to operate at normal temperatures. If the temperature ranges from -25 to 25 degrees, then a standard working cooling system will function normally in this case. If a failure occurs, then you need to look for a breakdown, which, as a rule, lies in the standard pump or thermostat. Sometimes radiators become clogged.
Pump selection
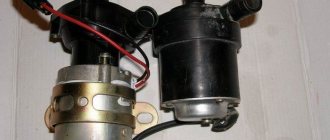
Standard pumps are driven by a timing belt, generator, and so on. But additional pumps for the 2114 stove are usually made on the basis of an electric pump. Motorists often use electric pumps that are installed on Gazelle cars. This unit has very high performance, but the build quality is not always very good. Therefore, before installing such a pump, you need to completely disassemble it, lubricate all the seals with sealant, then reassemble it and wait at least a day for all connections to dry.
Everything that was said above should only apply to old-style pumps. As for the new pumps on Gazelles, they are of fairly good quality. But after some time they can still leak.
A good alternative to the Gazelle pump is a similar one manufactured by Bosch. These units are of very high quality and also have slightly different functioning. The impeller rotates under the action of a magnetic coupling. The pumps use a DC electric motor. Since this scheme is used, it was possible to get rid of sealing connections. In this case, the possibility of leakage is completely eliminated.
But there are also disadvantages. First of all, this is a high price, as well as low performance. Let's compare the additional pump for the Bosch stove with the Gazelle unit. If the Gazelle pump has a capacity of about 1200 liters per 1 hour of operation, then the Bosch pump has only 700 liters.
How to install a pump
It is best to install an additional pump for the stove either in the engine compartment or under the dashboard. It is best, of course, to install it under the hood, since excess sound during operation will not penetrate into the cabin. In addition, you completely eliminate the risk of antifreeze getting inside the cabin if a leak suddenly occurs. The unit can be mounted using additional brackets. For all VAZ and GAZ cars, an additional pump is installed in the supply pipe of the stove. Consequently, you will be able to achieve the injection of coolant into the radiator, which significantly increases heat transfer.
Please note that in this case, during operation, the pressure in the cooling system will increase significantly. This can lead to loose pipes breaking off or the radiator breaking through. Therefore, before installing additional equipment, it is necessary to fully diagnose the cooling system, and be sure to eliminate all faults.
Tools for installing an additional pump
Modernization of the VAZ-2115 heater consists of installing an electric pump, which will save passengers and drivers from the cold, especially when the vehicle is idling.
Before starting installation, prepare the following tools and materials:
- Electric pump suitable for a gazelle. Experts recommend this type of pump; it pumps heat into the cabin in the most efficient way. Externally, the device resembles a centrifugal pump, where the fluid flow is rejected from the center of the periphery using blades.
- Relay. Ideally, a starter or ignition device would be suitable; here the open contacts are more convenient.
- Small pieces of hose made of aluminum and reinforced material.
- Coolant with a volume of 2 liters or more. You can take antifreeze, antifreeze or, in extreme cases, ordinary water.
- 6 clamps.
Preparing to install the pump
Before installing an additional pump on the VAZ-2110 stove, it is necessary to completely drain the antifreeze from the system. After this, you need to use a blade to cut the pipe on which the pump is supposed to be installed. A pump is installed in the gap. Make sure that the arrow, which is drawn on one of the pump outputs, is looking at the heater radiator. It indicates the direction of fluid movement.
The pipes that are put on the outlets must be secured with reliable clamps. It is recommended to use Norma screw-type clamps, as they are more reliable than all others. On sale you can find products from lesser-known manufacturers, which have very sharp edges. When tightening, they simply cut the pipe, which causes a leak.
Additional pump: what you need to know
So, if the stove initially works poorly, although it is fully operational, and also if the car is often operated in severe frost conditions, standard heating may not be enough even for a middle-class car.
In the case of a VAZ or old foreign cars, the problem is solved by gluing the dashboard, upgrading the heating system, installing tight dampers, replacing the heater radiator, the heater motor itself with a more efficient one, etc.
However, if all these actions are not enough, then an additional pump for the stove may be the solution. In a nutshell, the auxiliary heater pump is an electric pump that circulates the working fluid of the cooling system in a small circle even when the engine is not running.
This allows you to more actively warm up the interior when the internal combustion engine is running or when the warmed-up engine is turned off, but the driver and/or passengers are in the car (fuel savings and increased comfort).
Also, an additional heater pump helps out when the engine is idling without load (for example, when sitting in a traffic jam) and quickly cools down. In such conditions, a standard stove usually does not blow hot air, but only warm air.
By the way, the same thing happens when driving on the highway at high speed in the cold season, when oncoming air flows intensively cool the engine compartment, as well as the coolant in the cooling radiator, etc. In turn, the additional pump to the heater causes the coolant to circulate more actively and give off more heat.
Another advantage is ease of installation, which means minimal intervention and changes to the factory design. To put it simply, an additional pump is installed so that the coolant circulates in a small circle.
A simple connection of the pump to the vehicle's electrical network is also implemented. Usually, all the necessary fasteners, adapters, connectors, etc. are included with the pump.
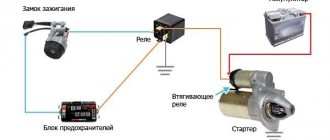
Connection diagrams
Please note that almost any electrical connection scheme can be used. It depends on what goals you set for yourself. If you are installing a pump to cool the engine more, it is recommended to connect it so that it always functions when the ignition is turned on. The pump can be powered directly from the battery. But you need to make sure that the circuit is closed only with the help of an electromagnetic relay, which will be activated only after turning the key in the ignition switch.
In the event that an additional pump is installed only to improve the operation of the stove in idle mode, it is best to connect the power through a button. In this case, it is necessary to include elements such as a fuse, relay, power button, and battery in the power circuit. Electricity can be supplied using a single-wire circuit. The “minus” is the car body. If you use such a scheme, then you will be able to turn on the pump when the need arises.
What to expect in the end?
When all the elements are installed and connected according to the diagram, it is necessary to perform operational tests. It is imperative to fill the system with antifreeze - starting the pump without it is strictly prohibited, as this will lead to its failure. The minimum operating time of the pump during testing is 1 hour. At the same time, be sure to inspect all joints and connections to identify leaks. If they are not detected, it is necessary to check the operation of the system on the fly. After all, it may be that the pump operates stably in idle mode, but when the pressure increases, it simply fails. If all work is done correctly, warmer air will enter the cabin. In addition, even under increased load, the motor will be cooled efficiently.
Hi all. Today I’ll tell you about a useful modification to the stove, which will improve the efficiency of the stove, and at the same time the interior climate. You will learn how to install an additional pump on a VAZ 2114 at home.
Owners of “fourteenth and fifteenth” are well aware of how there is not enough warmth in cold times, and we are not talking about global seasonal cooling, but about the climate inside the beloved swallow. While driving, the stove’s performance is quite sufficient, but as soon as you stop somewhere at a traffic light or in a traffic jam, the stove immediately begins to heat poorly, a lukewarm stream of air comes out of the air ducts, which makes it difficult to warm up. It was experimentally determined that the pump does not have enough power or speed to disperse hot antifreeze.
In fact, not many people know that the “jamb” with the stove and pump, which is observed in all “our” cars, can be eliminated quite easily, the main thing is to know the sequence of actions. As an option, some install an additional radiator, but a more effective option is to install an additional electric pump, which increases the performance of the stove and accelerates heat transfer.
For our “experiments”, it was decided to use an additional pump from the Gazelle; it was decided to install it on the “return” of the stove. In addition, we needed:
- A button (in my case “recirculation”) plus a connector;
- Four-pin relay, plus a connector for it;
- Several pipes plus clamps for them;
- Wiring;
- Fuse socket;
- Sealant;
- A bracket in the form of a metal corner plus a couple of bolts;
- Well, as I already said, the pump itself, in my case from the Gazelle.
When everything is available, you can transgress!
Installing an additional pump on a VAZ 2114 - step-by-step instructions
- The first step is to disassemble our add-on. pump, this is done in order to improve the tightness of the connections. Remove the rubber gasket and coat it generously with sealant. As many who have done this procedure write, over time the rubber gasket begins to leak, so it is necessary to “seat” everything with sealant. Instead of standard fasteners, I decided to use studs with nuts of suitable diameter.
- Installation of an additional pump. In most cases, everyone recommends draining the antifreeze, but I was able to complete the installation without the need to drain the coolant. The connection looks like this: we take the “original” pipe that goes from the stove to the pump and connect it. The L-shaped part of the hose that goes to the block had to be cut off, and the pump outlet was connected with another hose. All hoses are secured with clamps, and the pump itself is conveniently located on one of the gearbox fasteners; all that was required was a curved bracket. You can see more clearly what it looks like in the photo.
Instructions for installing an additional butt VAZ-2115
An additional pump can be equipped in the VAZ-2115 as follows:
- First, cool the engine as usual.
- Remove the cap from the reservoir and drain the coolant (antifreeze, water) into a container.
- Don't throw away the liquid; you'll need it later. Cover the container to prevent debris from getting inside.
- Take a new sample of the pump and unscrew 4 screws at the place where the impeller passes.
- Now you will see a rubber gasket material that should be lubricated with sealant.
- Assemble the pump again, but instead of screws, place thin elongated bolts that fit the nuts. This simple method allows for greater sealing.
Next, decide where you will mount the additional electric pump. Experts offer several options:
- Fasteners on the stud for fixing the washer reservoir.
- Mounting on a pin, which is located near the battery.
- On the fixing parts of the standard Shumka located on the monitor panel.
Most often, car enthusiasts prefer to choose the second method. The additional pump in the VAZ-2115 is positioned so that the pipe faces towards the location of the block, for which the iron fastener clamp is unclenched.
The installation of the pump is not yet complete. Next, start installing the hoses. How to do it?
- Remove the hoses from the heater and the tube coming from under the manifold.
- Take a reinforced hose and try it on the desired area.
- Make sure that the hose from the brass manifold tube goes all the way to the pump tube without kinks or tension, otherwise it will not function well or quickly deteriorate.
- To secure the hose to the tube coming out from under the manifold, install an adapter angle; this method allows you to avoid bending the hose. The angle should be combined with a small section of the hose - up to 10 cm. The mechanism is fastened using clamps, 4 pieces are enough.
The procedure for connecting the pump to the hose from the stove heater is faster and easier, because there is no provision for installing an adapter - stretch the element to the required length and connect with two clamps.
Final fastening of a high degree of reliability is possible by fixing the aluminum corrugated pipe in place of the exhaust manifold; this is the only way the hoses will not melt from the influence of the hot air flow and will remain unharmed.
At the final stage, check all the fasteners again, if you need to improve, do so, then proceed to connecting the electrics.
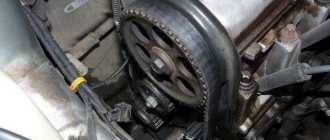
Cooling system and its features
From thermostat 29 to tap 21 there is a “supply hose”. We are not interested in him! The pump is inserted into hose 19. It is connected to the pump supply pipe (part 20).
Everything here is trivial
If we look from under the bottom, we will see two hoses near the partition. We need the one that is fixed closer to the right wheel. And now, instead of hose 19, an assembly is installed: the same hose “21083-8101010-01”, an electric pump, hose “2101-8101204” (to pipe 20). That's all, actually.
Each hose is attached to the nozzles with two clamps. The article number of one clamp is “2108-1300080-10”.
Purchase parts in advance:
- BOSCH pump 0 392 020 034 or pump 32.3780-01 for Gazelle with 18 mm pipes (important);
- Electrical parts;
- All hoses and clamps;
- The BOSCH pump requires VAZ fasteners: a intake pipe clamp, as well as a bracket for this clamp (all from LADA-2101).
The pump from the Gazelle will have to be modified: the body is disassembled, degreased, the rubber gasket is lubricated with sealant...
GAZ pump after modification
When assembling, use screws with nuts instead of standard self-tapping screws (see photo).
By installing an additional pump on the VAZ-2114, you don’t even have to connect it. Everything will work as before. The main thing is that the pump does not leak, and we have already indicated the solution.
Which stove pump is better to choose?
First of all, the pump itself is the most important element. The GAZelle stove pump is in greatest demand on the market, as it is cheap and affordable. However, the solution has several serious drawbacks (noise during operation, high power consumption, average resource).
It turns out that even taking into account the fact that the Gazelle heater pump is inexpensive, experts recommend considering an additional BOSCH pump for a passenger car.
Depending on which pump was chosen and which car it is installed on, you may need to purchase a 4-pin relay, a 3-pin toggle switch, as well as wires, terminals, corrugation, hoses and clamps, bolts, fasteners and even sealants.
For example, a sealant is necessary if a Gazelle stove pump is installed on a VAZ 2114. Let’s also add that the GAZelle pump requires additional modernization, while installing an additional BOSCH pump is faster and easier.
Approximate procedure for installing an additional pump
If all the necessary parts have been purchased, do the following:
- A “unit” consisting of three parts is assembled. The short hose is the “outlet”. Below is an example with a BOSCH pump.
Antifreeze drainage unit
External outlet hose
BOSCH pump mounting method
Be aware that the plug from the knock sensor will fit into the pump connector (you need to buy it). The connection diagram is discussed below.
Example with a GAZ pump
Clarifications for the domestic pump:
- Do the “assembly” as in step 1 (see above);
- The “assembly” is assembled;
- The pump mounting location is the upper corner of the manual transmission housing (see photo). Without the details of an iron constructor about here .
GAZ pump mounting method
Variant of the scheme for the VAZ-2114
We connect the motor through a fuse and a relay rated at 10 Amps. The relay will be turned on by a button attached to the device.
Scheme (simple version)
The “+” voltage was taken directly from the battery, but this can be done - a sealed holder “hangs” on the wire, where the fuse (5A) is located. Installing a button looks simple:
- Remove all the handles;
- Move the plastic panel towards you;
- We install a new button and connect the wires.
As a result, you can see what is shown in the photo.
Circulation button
What can be improved
- A diode is connected in parallel with the relay winding in the “back to front” direction, thereby extending the service life of the button;
- Connecting to the battery directly is bad. It’s better to find another point with a “plus”;
What we got
How to properly connect an additional pump
Beginners in the VAZ-2115 repair business often have a question: how to properly seal the ground wire of the winding when installing the pump? Only to ground, and connect the power wire to the wire coming from the pump.
Pass the positive wire coming from the relay through a fuse connected to the battery positive wire. The control wire from the relay should be routed to the start button inside the car, taking into account the battery positive. The key can be placed in any convenient place for the driver, at his request.