Print this article Font size 16
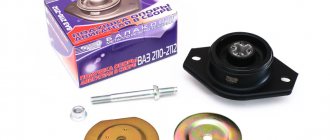
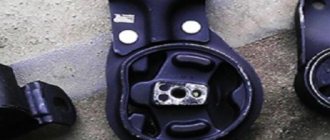
The cushion is one of the support elements that performs the functions of attaching the engine to the body of your car. This is a rubber-metal product consisting of a steel body and a thick rubber cushion.
The main function of engine mounts is to dampen vibrations that come from the engine.
What is needed for repairs
First, you need to determine which support on the VAZ 2110 engine should be changed (if you do not want to change all the damper mounts at once). To do this, you need to do an independent inspection of these parts. Sometimes, the power plant seems to be tilted horizontally on one side or tilted along the central axis of the car. This is the first sign to replace the damper mounts.
| Locksmith kit | Rolling jack |
| A couple of short boards | Angle grinder (grinder) |
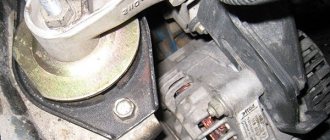
Two cushions (side) secure the engine to the left and right side members in the engine compartment. And one (rear) fixes the motor to the bottom. Therefore, it is necessary to lift the machine on a lift or install it on a viewing hole. The wear is immediately visible. The rubber has tears and core failure. Depending on the result of visual diagnostics, you should purchase the required number of parts for installation.
You will need a tool. In most cases, a standard locksmith set consisting of open-end and box-end wrenches with heads will be sufficient. In addition, to replace engine mounts on a VAZ 2110 you will need a rolling jack and a pair of short boards. It is advisable to have electricity and a cutting machine with a disc, since you may have to cut off the mounting bolts.
Helpful information! A couple of hours before repairs, it is strongly recommended to apply universal lubricant “Liquid Key” to the threaded connections. Damper supports are changed very rarely, therefore, unscrewing them without prior preparation is quite difficult.
Additional mounting of the VAZ 2110 engine 8 valves with your own hands - Wheels in Tomsk
photo of engine 2110
Do-it-yourself VAZ 2110 engine mounts - Do-it-yourself replacement of the VAZ 2110 timing belt and tension pulley
Installing an additional airbag on a VAZ 21103 :: Unlimited downloads
Answers@Mail.Ru: about mounting the 2111 engine
The battery mount is oxidizing VAZ 2110 - daina-vova.ru
Additional engine support for VAZ 2110
How to rebuild a VAZ 2110 engine video - Online courses
Additional engine mount as on VAZ 2110 - logbook Lada 2109 additional engine mount 2110 DRIVE2
Additional support for the power unit on VAZ 2112, VAZ 2111, VAZ 2110
Additional engine support for VAZ 2110, 11, 12 (Tuning VAZ 2110)
Replacing engine mounts for a VAZ 2110 16 valves - WORKSHOP OF LIFE
How to replace the engine mount of a VAZ 21099 video - Njkmznnb.ru
Additional engine support for VAZ 2110
Replacing engine mounts for a VAZ 2110 16 valves - WORKSHOP OF LIFE
Make your own additional engine support for VAZ 2110 8 valves - All Berezniki
Installation of the VAZ 2110 VAZ (2111, 2112) engine
Tuning of VAZ 2110, 2111, 2112 cars, Ten for dummies - Additional support - LADA 110/111/112
Make your own additional engine support for VAZ 2110 8 valves - All Berezniki
Add. Engine and Chassis Support — logbook Lada Priora hatchback Juicy Hatch =SOLD= DRIVE2
Installation of additional engine support for VAZ 2110, VAZ 2111, VAZ 2112
On cars of the Lada 110 series (VAZ-2110, VAZ-2111, VAZ-2112), the power unit is installed on three supports: the left and right ones are connected to the engine bracket (similar in design), and the rear one is connected to the gearbox housing bracket. In case of sudden aggressive driving, frequent collisions with potholes and other road irregularities, it is necessary to install an additional (fourth) engine mount to limit its movement. An additional support will connect the suspension cross member to the clutch housing.
In order to install the fourth support on VAZ-2111 engines, you will have to move the ignition module. To do this, you need to buy a special bracket for attaching this very ignition.
Design features
If you have a “ten” with an 8-valve engine, then the design provides two side and one rear support;
On a 16 valve engine there are two side mounts, one lower and one upper.
It is important to note that 8 valve engines on the 10 have a rear engine mount, while on the 16 valve there is none. But such motors can boast of having additional supports.
Regardless of the design, the replacement procedure is performed using a similar method.
Malfunctions
In fact, it is quite easy to detect failed airbags, since engine vibrations will immediately increase.
If the power unit is working normally, but the body is shaking, vibration is felt on the steering rack, pedals, and dashboard, then there is no doubt that the engine mounts are worn out.
The vibration peak occurs when the engine starts and when it is turned off. If the rubber elements are completely worn out, then a knocking noise will begin to appear. It is caused by contact of engine elements with the supports.
To make sure the cushions are worn, turn on the engine, lift the hood, and visually inspect the supports and cushions. By placing your hand on the engine, you will tactilely feel an increase in vibrations compared to the normal behavior of the car.
There may be several reasons for problems.
| Causes | Peculiarities |
| Deformations | Deformation of elements can occur during the life of the pillows, under mechanical or temperature influences |
| Loss of elasticity | Rubber does not have a large margin of strength, so it ages over time. This effect increases when exposed to temperature changes. |
| Delamination and cracking | The pillow can literally fall apart and creep apart when exposed to chemically aggressive substances. |
Is replacement required?
If you find that the rear airbag or any other airbag has begun to wear out, you should under no circumstances delay repairs.
In addition to the discomfort of the driver and passengers when the car is moving, you risk delaying the breakdown until the moment when destructive processes begin in the operation of the gearbox and power unit.
When starting to repair engine mounts, you should think about whether it is worth changing the cushions separately, or replacing the mounts as a whole.
If the support is not damaged, it is not necessary to replace it. That is, in such situations it is enough to simply replace the pillow. A set of new pillows for a VAZ 2110 today costs about 1.3 thousand rubles. A set of supports will cost you 2.5 thousand rubles.
Doing the work yourself or contacting a service station is your choice. But you should know that you will be charged at least 300 rubles for replacing one pillow.
Manufacturers and prices
Now you know how to change engine mounts, and you need to talk about the cost of the products. The most popular producers in Russia are Balakovo and Tolyatti. Which manufacturer of the part to choose is up to you to decide. They differ little in quality; the choice depends only on individual preferences. Their prices are approximately the same:
- Engine side mount (popularly called “guitar” for its resemblance) - cost 480-600 rubles, depending on the seller.
- Rear airbag attached to the gearbox (without bracket) – 350 rubles.
- For 16-valve engines, supports cost about 450-500 rubles.
A complete set will cost you approximately 1500-1800 rubles.
But this will significantly improve driving comfort, and the level of extraneous noise will decrease, since the new rubber installed in the supports is much more elastic. Usually there is little choice in stores. Therefore, before removing the engine, make sure that all the cushions are in good condition. If not, replace it. Source
Replacing the left engine mount of a VAZ 2110
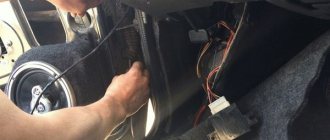
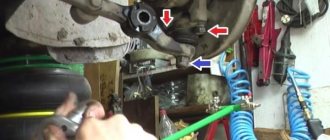
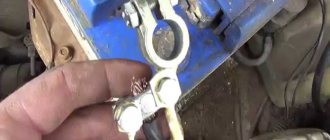
Place the car on a level and solid surface. Disconnect the negative terminal from the battery. Remove the crankcase protection. We place a jack under the engine, and use a piece of board (as a spacer) to lift the engine. The power plant is suspended in this way and the supports do not experience any load.
Next, we perform the following steps:
- Unscrew the nut of the central stud (15 mm wrench);
- unscrew the two fixing bolts of the protective cover (13mm wrench);
- under the bracket, unscrew the 3 bolts that connect it to the spar (17 mm wrench);
- then, we take out the worn-out pillow;
- We replace the damper part with a new one and assemble the structure in the reverse order.
On a note! Spare parts from imported suspension manufacturers, such as: Lemferder, SWAG, RUVILLE, SKF, can provide high-quality and long-lasting performance. If they are not in the store, they can be delivered to order.
Replacement
For eight-valve engines
- Prepare the car for repair: place it on a flat surface, place stops under the rear wheels, remove the engine protection.
- Unscrew the generator belt tensioner bolt and remove the belt (key 13).
- Place the jack under the engine, place a thick wooden beam or board under its upper part. Raise the engine to remove the load on its mounts.
- Unscrew the nut of the central fastening of the right pillow (15 wrench).
- Unscrew the bolts securing the pillow to the bracket (key 13).
- From the bottom side of the right arch, unscrew the 3 bolts securing the bracket to the spar (17 key).
- Remove the bracket and replace the old cushion with a new one.
- Carry out installation in reverse order.
- Move the jack under the gearbox and lift it up.
- Unscrew the nut of the central fastening of the left pillow (15 wrench).
- Unscrew the two bolts securing the support and remove it (key 13).
- Replace it and reassemble the structure in reverse order.
- Unscrew the two 17 nuts securing the cushion to the body, and then two more nuts securing it to the gearbox (removal and replacement of the rear support is carried out from the bottom of the car).
- Remove the rear support.
- Unscrew the nut securing the pillow to the bracket (19mm wrench). Remove the old pillow and install a new one.
- Install the rear support in reverse order.
Replacing the right engine mount of a VAZ 2110
Place the jack under the box. We hang the engine and remove the load from the cushion. Completely disconnect the battery and remove it (this will be more convenient).
Next, we move in the following sequence:
- Unscrew the nut of the central stud (15 mm wrench);
- Unscrew two bolts (13 mm wrench);
- We take out the central pin (you will have to loosen the jack a little);
- We take out the support bracket and replace the pillow with a new one;
- We insert the new support into place and raise the engine;
- We tighten the damper assembly with the bolts in the reverse order.
On a note! The support mounting areas on the side members may be in poor condition (rust). In order to extend their “life,” you should cover the damaged area with Movil immediately before installing the bracket.
Functionality check
Before you start replacing the pillows, it is recommended to check whether they have really lost their functionality. It is likely that vibrations can occur for other reasons.
To check you need to do the following operations:
- Place the car on stands;
- Place a jack under the oil pan, placing a block or board at the same time;
- Raise the engine until the mounts relieve the weight of the engine;
- Check the pillows;
- Inspect them for cracks;
- Check if they come off easily from the metal backing;
- Has the original hardness of the material been preserved, or has it become too elastic;
- If no visual defects are found, check the play between the plates and the frame;
- Treat the cushions with protective compounds, return the engine to its place;
- Sometimes, to return the supports with cushions to normal operation, it is enough to tighten the fastening nuts.
If the check shows that the pillows have already served their purpose, then the only correct solution is to replace them. These elements are not subject to restoration.
Replacing the rear engine mount of a VAZ 2110
If, when dismantling/installing the left and right supports, the work was carried out in the engine compartment, then to remove the rear damper you will have to crawl under the car. It’s good if there is an inspection hole in the garage, since the ground clearance of the “ten” is quite low and it’s very difficult to crawl up on your belly.
The replacement process looks like this:
- We install a jack under the box and hang the rear part of the engine;
- Unscrew the two support nuts from the body (17 mm wrench);
- Using 2 19 mm keys, unscrew the support mount from the gearbox;
- We remove the support from the seats and take it out from under the car;
- We take out the bolt and replace the damper with a new element (a vice may be needed);
- We return the knot to its place and tighten it;
- We lower the engine with a jack and install the crankcase protection.
After you have managed to change all the engine mounts on the VAZ 2110, the engine should take a level position. You should start the engine and carefully observe the vibration. It should be minimal. This means that the repair was carried out correctly.
Installing an additional engine mount
Manufacturers claim that the rod was developed and tested at AVTOVAZ as a standard suspension element of the VAZ-2110 power unit. Works when braking the engine or suddenly moving away. Increases the service life of drive wheel drives and exhaust systems, improves vehicle acceleration dynamics. "BEHIND THE DRIVE" approved.
You can buy an additional engine mount for a car of the tenth family in online stores (section “Tuning”, code 1001.0100.04).
In order to install the additional engine rod, you will need to disassemble it into parts. Then remove the ignition module and install part No. 1. After this, we install part No. 2 and secure the structure with bolt No. 3. If the installation is carried out on an 8kL engine, then you will need to move the ignition module using a special bracket (code 3705.0100.04). On a 16kL engine such a bracket will not be needed, but installing the support is somewhat more complicated because -for less space under the hood. It is better to carry out the work on a lift, and at the same time it is recommended to install a standard support from 8kl on the gearbox.
If the engine is 1.6 l, then a bracket will be required (code 3705.0300.04).
Conclusion
I installed an additional engine mount on a VAZ 2110 and..
Photo source: Key words:
Characteristics
Additional engine support for 8 cells. VAZ 2110 engine is attached to the engine bracket. Designed to limit the movement of the power unit, especially when braking the engine, when hitting road irregularities, you can install an additional (fourth) support for the power unit, as well as when the car suddenly starts moving. An additional support for the VAZ 2110 connects the clutch housing to the cross member of the front suspension. The part ensures uninterrupted operation of the system. The support is made of high-strength material, the distinctive feature of which is reliability and wear resistance. Additionally, a plate for transferring the ignition module is purchased.
The manufacturer reserves the right to change the characteristics of the product, its appearance and completeness without prior notice to the seller.
| Packed length | 0.25 m |
| Packed width | 0.11 m |
| Packed height | 0.11 m |
| Package weight | 1.6 kg |
| Automobile model | VAZ 2110, VAZ 2111, VAZ 2112, VAZ 2170 Priora, VAZ 2171 Priora, VAZ 2172 Priora |
Installing an additional engine mount
Manufacturers claim that the rod was developed and tested at AVTOVAZ as a standard suspension element of the VAZ-2110 power unit.
Works when braking the engine or suddenly moving away. Increases the service life of drive wheel drives and exhaust systems, improves vehicle acceleration dynamics. "BEHIND THE DRIVE" approved. You can buy an additional engine mount for a car of the tenth family in online stores (section “Tuning”, code 1001.0100.04).
In order to install the additional engine rod, you will need to disassemble it into parts. Then remove the ignition module and install part No. 1. After this, we install part No. 2 and secure the structure with bolt No. 3. If the installation is carried out on an 8kL engine, then you will need to move the ignition module using a special bracket (code 3705.0100.04). On a 16kL engine such a bracket will not be needed, but installing the support is somewhat more complicated because -for less space under the hood. It is better to carry out the work on a lift, and at the same time it is recommended to install a standard support from 8kl on the gearbox.
If the engine is 1.6 l, then a bracket will be required (code 3705.0300.04).
Conclusion
I installed an additional engine mount on a VAZ 2110 and..
Photo source: Key words:
Useful tips
Please note that when engine vibrations occur, you should not always immediately change all the supports “in a circle”. It happens that even on a relatively “fresh” car, only one element fails, while others are quite suitable for further use. This occurs as a result of technical fluids getting into contact with the rubber part of the cushion, etc.
However, as for basic recommendations, if the car has a mileage of about 80-100 thousand km. and more, and all engine mounts have the same service life and have begun to fail, it is better to immediately replace all such mounts.
The reason is obvious - if the rubber begins to deteriorate from old age, after replacing one clearly faulty element, after a while the next cushion will also no longer cope with its task.
It is also important to select only original products or high-quality analogues for replacement, as well as purchase parts from trusted sellers. The fact is that there are a large number of spare parts on the market for VAZ cars, but not all of them are of high quality. Moreover, you often come across cheap fakes of an original of unknown origin.
Photo gallery
Many people have their own cars, of various brands, configurations, tuned and simply “gray” cars for everyday driving. Some make various gadgets for cars with their own hands, some send them to special services, and others simply admire how people do it. Actually, this is what I would like to talk about - tuning!
I didn’t have a car before and somehow didn’t need one, but in my heart I always wanted to sit, steer and enjoy the speed. The first step to buying a car was getting a driver's license, which I also went to study for spontaneously. In general, I studied for 3 months in DOSAAF and on February 29, 2008 I received my driver’s license. From time to time there was a desire to buy a car, but there was no money to buy it, and I began to think about it – where should I go?
Time passed, years flew by, rumors circulated about a crisis. By that time, we had managed to save a little cash, which we finally decided to invest in some kind of automobile before it disappeared. One wonderful morning, we got ready and went to the car market in Saratov to choose a car for me. I had to borrow a considerable additional amount of cash from friends, otherwise my savings were not enough.
We set off on the road, drove and drove, and finally arrived. Let's go to the market.
There were a lot of cars in Saratov, some not for our money, others too dead, in general, we wandered and wandered and saw a red VAZ2110 (my favorite color). After some time, after a lot of walking, it was finally decided to buy the first car I liked and finally go home.
The path to home was not close, about 200 km. At first, I thought that my friend would drive and drive my car to my native Kamyshin, but I still drove it back myself. This is my very first time when I drove for so long, because the last time I held it in my hands was back in February and that was for about 10 minutes. For the first 10-20 minutes I couldn’t come to my senses that I was sitting behind my own car, My hands were shaking a little and I still couldn’t believe that I was going. Literally, after driving 50 kilometers, I already began to feel much more confident, fell back on the seat and began to enjoy the trip.
Everything would be fine, but in Krasnoarmeysk at the traffic police checkpoint we were stopped to check our documents. And I stupidly took only my license with me, and the rest of the documents remained with my mother, who drove ahead in another car with a driver. Luckily they stopped about 300 meters from us. The inspector had to wait for some time, to which he made a menacing expression on his face. They brought the documents, checked everything, but still got to the bottom of the fact that there was no first aid kit, fire extinguisher and sign. And the fact that the car even had transit license plates and had just been purchased did not bother him; he had to pay some fine to the Inspector’s fund. We got into the car, refueled and hit the road.
We got home quickly, we drove for about 3 hours in total, although it could have been longer, but I was still a beginner at that time, and the car was not tested, you never know what would break down, so I kept the speed around 100-110 km/h . But still there was a desire to experience the drive and therefore I accelerated once to 155 km/h, the car behaved amazingly on the road, I remained satisfied throughout the journey.
Here is a short story about the steps to buying my first car, which is with me to this day and makes me happy. From time to time I do something for the soul in it, a little tuning, etc. what I will tell you about in my Logbook
.
Express your opinions about my work, and just like that, we can discuss something, further work, plans...
Features of replacing engine mounts with a 16-valve engine
The main difference in the mounting of the 16-valve engine is the absence of a rear lower support. The engine is attached with a rear support from above to the number plate of the body. Another additional damper bracket is located at the bottom front. It connects the motor and the lower beam of the radiator (TV) frame. These parts are called “guitar”. After hanging the engine with a jack, they change simply.
Sources
- https://FokSevmash.ru/dvigatel/podushka-dvigatelya-vaz-2110.html
- https://www.tuningsvs.ru/zapchasti/sportivnyje-zapchasti-vaz/podvjeska-rastjazhki-opory-stojki/usiljenija-podvjeski/usileniya-podveski-lada-priora/dopolnitelnaya_opora_dvigatelya_svs_dlya/
- https://medwegonok.ru/dopolnitelnaya-podushka-dvigatelya-vaz-2110-8-klapanov-svoimi-rukami/
[collapse]