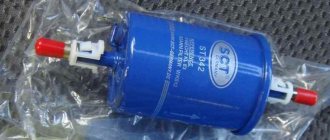
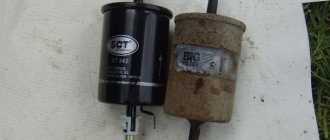
Every car owner knows that in order to prolong the life of the power unit of the Lada Priora and any other car, it is necessary to promptly replace filters and engine oil, as well as other consumables. The fuel filter, as recommended by the manufacturer, should be replaced every 30 thousand km, but as experienced car owners advise, it is better to shorten this interval, since most cars are operated in difficult conditions, which include driving on dirt roads, the dust from which settles in machine components and low-quality fuel.
In this material, we invite you to study the information on how and when the fuel filter is replaced on the popular Lada Priora in our country, which has 16 valves. Below we will tell you where the filter we need is located, and how to change it yourself.
How to replace faulty devices
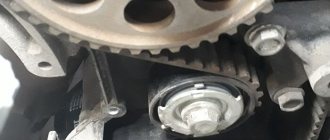
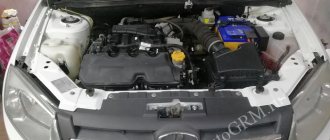
The power system filters are replaced by first disconnecting the battery. The replacement sequence for car modifications with different engines is the same. It is more convenient to remove a fuel module with a coarse filter when there is little fuel in the tank.
- screwdriver;
- socket wrench 10;
- 0.5–1 liter container for draining gasoline from the filter.
Before removing the fuel filter or opening the gas tank, relieve the fuel pressure.
The most common reasons when the Check Anger light comes on on a Priora
Lada Priora Sedan Logbook Replacing valve seals
But the Priora has the most common breakdowns. To begin with, it is worth listing the main sensors included in the Priora ECM.
- Mass air flow sensor (MAF).
- Throttle position.
- Camshaft positions.
- Crankshaft.
- Knock sensor.
- Oxygen sensor (2 pcs.).
- Speed.
- Rough road sensor.
And also the actuators can make the “Check” light up.
- Idle air control (IAC).
- Fuel injectors (4 pcs.).
- Ignition modules (4 pcs.).
- Canister valve.
- Electric fuel pump.
All these components are activated through the computer, and therefore, if their operation fails, the “Check” light immediately lights up.
MOST COMMON ECU ERRORS THAT CALL THE “CHECK LIGHT”
In the first place, of course, there will be malfunctions of the oxygen sensor. These devices are installed in the exhaust manifold (sensor No. 1) and after the fuel afterburner (catalyst), No. 2. They read the percentage of CO content in the exhaust gases. Due to soot from burnt fuel, they most often deteriorate. The car begins to lose power, the “Check” light comes on. After all, the computer receives a signal that there is too much fuel.
Alas, it is only possible to accurately determine the reason why the signal may have come on using software diagnostics.
On the second place, the mass air flow sensor deservedly stands. A thin thread made of a special alloy changes resistance depending on the amount of air passing through the nozzle. The malfunction is characterized by severe engine malfunction. The revolutions “float”, the power drops, and, of course, the “Check” light comes on. And also checking only with diagnostics through the program.
And the camshaft sensor closes the top three. Its malfunction is characterized by an increase in startup time. Sometimes there may be slight jerks when accelerating. Again, there is no way to determine a breakdown without a program.
PRIORA ACTUATORS
Here in the first place is the IAC, a device that regulates the supply of additional air bypassing the throttle valve. It works by means of a micromotor that extends and retracts the shutter mechanism. If there is a malfunction, the engine will not start at idle. Or, conversely, it increases the speed to 1500-2000. "Check" lights up
Then the ignition modules. When it fails, the motor “troubles” and the speed “floats”. Power is lost. And as a result, the “Check Anger” icon lights up.
Faulty injectors give similar symptoms. It is interesting that all breakdowns of actuators, with certain skills, can be diagnosed without a computer. At least they will make the “Check” signal light up. This is done by either replacing it with a known-good unit, as with IAC, or by replacing it in places, as with ignition modules or injectors. And only the adsorber valve requires connecting equipment.
So what can we say. There is only one conclusion. If the “Check” indicator light on the instrument panel lights up, you need to do computer diagnostics in any case. This is the surest way out.
Procedure for replacing the fuel pump mesh
The procedure for replacing fuel filters looks like this:
- Purchase of spare parts.
- Choosing a workplace.
- Preparing the tool and vehicle for disassembling part of the fuel system.
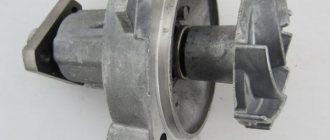
- Removing the electric fuel pump and installing a new filter.
If the gasoline pump screen is not changed in time, the suction pipe may become clogged with dirt.
Since the FTO is located on the bottom of the car, replacing it will require a lift, inspection hole or overpass. Replacing the fuel pump mesh can be done by simply placing the car on a flat surface. In this case, the gas tank must be at least half empty. Otherwise, when manipulating the FGO, you can spill fuel on the casing, and a persistent smell of gasoline will appear in the cabin.
Preparing for work
You can dismantle the electric fuel pump in any convenient place, observing fire safety measures.
The following tools will be required:
- two screwdrivers - flat and figured;
- pointed pliers or round nose pliers;
- socket or socket wrenches for 10, 12 and 13;
- car vacuum cleaner and rags.
To dismantle the electric fuel pump you will need a minimum set of tools
Preparing the car involves providing access to the top hatch of the gas tank. To do this, the rear seats are removed and the surface under them is cleaned with a vacuum cleaner. This will prevent debris from entering the tank.
The hatch under the seats is covered with a layer of dust that needs to be removed
Then the fuel supply system releases the pressure that remains after the engine stops. If this is not done, then when you remove any tube, gasoline will splash out. Pressure can be relieved in three ways:
- The electrical connector is disconnected from the fuel pump. The engine starts and runs until it stops completely.
- The fuel pump can be turned off by removing the corresponding fuse. The car starts and runs until the remaining fuel in the lines is completely exhausted.
- A universal option is to relieve pressure through the diagnostic fitting on the ramp. The hood opens and the cap is removed from the valve at the end of the ramp. The pressure will decrease when pressing on the spool with a screwdriver - in this case you need to place a small container. The cap is then screwed into place.
The valve is a regular spool closed with a plastic cap
Procedure for removing the mesh
To get to the metal hatch located under the rear seats, you need to fold back the floor flap at the right (in the direction of travel) door. Further operations are performed in the following order.
- Use a Phillips screwdriver to unscrew two self-tapping screws that press the cover to the bottom of the car. The hatch is removed and moved to the side.
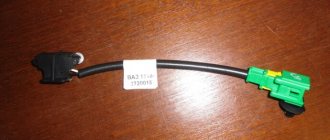
The hatch covering the fuel pump is screwed on with two self-tapping screws. - The bolt on the negative terminal of the battery is loosened, and the battery is disconnected from the on-board power supply. The plastic tab on the fuel pump power connector is bent and the block is disconnected.
The block is easily removed from the socket - The fuel hoses are disconnected. On the supply hose, the plastic stopper is first unlocked, then the wire lock. The return hose is secured with a metal clamp, which must be carefully squeezed with pliers to remove the pipe.
To remove the tubes, you need to bend the wire retainer - The eight nuts holding the mounting flange are unscrewed, and the washers are removed from the studs (they may get lost). The flange is dismantled.
The flange holds the pump housing and is secured with eight nuts - Having remembered the correct position of the plastic cover, the electric fuel pump is removed from the tank. When the body is halfway out of the opening, tilt the tank and pull out the float. To prevent debris from entering the tank, cover the hole with a clean rag.
When demolishing, the electric fuel pump housing rises up and then tilts to the side - To remove the suction pipe with filter from the glass, the internal connector is disconnected. Then you should simultaneously press on the ends of the four plastic latches and pull out the pipe.
The glass is attached to four plastic latches that must be pressed simultaneously - The contaminated mesh is removed from the tube and replaced with a new one. Fitting the filter is accompanied by a characteristic click.
The mesh is put on the suction pipe by hand and fixed - The inner surface of the glass is cleaned of dirt. Assembly of the unit is carried out in the reverse order.
Having removed the hatch cover at the very beginning of disassembly, pause and clean all the dust from the opened opening. Otherwise, some of it will inevitably end up in the tank.
Assembly should be performed carefully, preventing foreign objects from entering the gas tank. After installing the pump flange, attach a ground wire to any stud. After removing traces of fuel, you need to check the tightness of the connections. When the ignition is turned on, the operating pump will begin to increase pressure, and gasoline may leak out through loose joints.
After replacing the mesh, the engine is started and its operation is checked in different modes.
The technology for replacing FGOs on engines with 8 and 16 valves is absolutely the same. There is only a minor difference in the location of the fuel rail diagnostic fitting, which does not affect the procedure.