Former flagship of the Russian automobile industry VAZ 2110 with a 1.5 16 valve engine, replacement of the timing belt, rollers and pumps. The recommended replacement interval is from 40 to 60 thousand kilometers. The mileage on this strap is 80 thousand and, as the autopsy showed, if they hadn’t changed it today, then tomorrow it would have been more work for our mechanic. In general, we recommend that all customers check the condition of the belt at least once every 5 thousand kilometers, or once a year. But knowing the quality of our spare parts, more often is better.
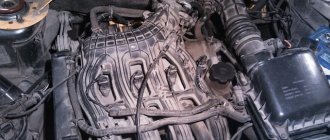
Attention! On this engine, when the timing belt drive breaks, almost all the valves bend.
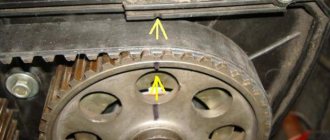
Consequence of exceeding the replacement interval. We look, remember and don’t let it get to that point. A little more and the meeting of the valves with the pistons would have been ensured.
The patient became five millimeters narrower and generally looked very bad. We send him to the honor board.
Timing marks - installation of timing marks using the example of a VAZ 2110, 2111 and 2112 engine
Dear friends, today we will tell you the basics of setting timing marks using the example of a VAZ 16 valve engine. It's no secret that correctly set timing marks are the key to proper engine operation. If the marks are set incorrectly, then normal engine operation is impossible.
It is also important to tension the belt correctly, this greatly affects its durability. So, when do we have to deal with the procedure for setting timing marks? When, according to the regulations, we need to replace the timing belt at the next maintenance, by the way, the rollers are also necessarily changed along with the belt in this case
Also, if our pump is “covered,” the timing belt will have to be removed, since it is this that drives our “water pump.” Well, what if (the worst case scenario) is that our belt broke. Here, if the engine is “plug-in”, then this is a huge nuisance, the pistons meet the valves, and at a minimum, we are guaranteed to remove the cylinder head and replace the valves. So, what are timing marks and where are they applied? The first is the marks on the camshaft pulleys, both on the intake and exhaust:
They must coincide with the mark on the crankshaft, and there are already several methods for calculating this mark. It’s quite difficult to remove the generator belt pulley (it doesn’t allow you to see the mark) and see if the marks match.
With such a coincidence of the piston marks, they are at TDC (Top Dead Center)
The second method is to calculate the DPKV sprocket by the teeth
Recommendations for purchasing consumables
When buying a timing belt, choose only high-quality consumables. Here are the best belts to buy:
The Lada automobile plant produces fairly durable belts. By the way, here excellent quality is combined with low cost, which may well be the deciding factor for some car enthusiasts. The Japanese company Lynx produces very high quality consumables. The belt is made of high quality material and at the same time it is inexpensive. Bosch belts are the embodiment of quality and durability. Consumables from this company have proven themselves in the market and are very popular among car enthusiasts.
They will definitely work out the allotted time to the end. The German company ContiTech also produces consumables that you can pay attention to. The belt drive here is made durable by adding fiberglass, synthetic rubber and polyamide fiber to the structure. Optibelt
The service life of this company's belts is very high. There is not yet a single case known when they failed ahead of schedule. Gates. Belts are made here only from high-quality materials. Cases of their breakage have not yet been recorded. The Russian company BRT produces belts that are not inferior in quality to their foreign counterparts. Moreover, they are cheaper.
Before installing the belt drive yourself, be sure to install the shafts according to the given marks. The gears must be in the zero position. All marks must be aligned as shown in the photo below. The marks on the camshaft and housing must also match.
We need to find the flywheel in order to indicate the location of the crankshaft. Remove the plug; it is located under the thermostat. The marks must align not only on the camshaft and housing, but also on the flywheel and casing. After setting the mark, the flywheel must be locked. And now about the actual installation of the belt.
Timing belt price
The price of a VAZ 2110 timing belt, depending on the manufacturer, can vary from 400 to 1000 rubles. The tension roller costs about the same, which is recommended to be changed along with the belt. The cost of replacing these timing drive elements is 600-1000 rubles.
To save money, you can replace the belt and roller yourself. There is nothing complicated in this procedure, and no special tools are required. You just need to purchase spare parts.
The table below shows timing belt models for the 8-valve VAZ 2110 from different manufacturers, indicating their catalog numbers.
| TIMING BELT VAZ 2110 (8 VALVES) | |
| AVTOVAZ | 2112-1006040 |
| BOSCH | 1987949559 |
| CONTI | CT996 |
| CONTITECH | CT 996 |
| GOODYEAR | G1535 |
| GATES | 5539 |
| FLENNOR | 4428 |
| LUZAR | LTB0112 |
| LYNX | 136CL254 |
| PILENGA | CTP0996 |
| OPTIBELT | ZRK1538 |
| TENSION ROLLER | |
| AVTOVAZ | 21120-100612000 |
Regulations and articles
Check the timing belt tension every 15 thousand km - this is the regulation. We will not give the belt part number - we were not talking about replacement. And if you decide to change the tension roller, find part 2112-1006120-XX. Instead of XX there may be numbers from 00 to 10, and all of these are products of domestic factories (00 is VAZ).
Components produced in Russia
All analogues
- MASTER SPORT 2112-1006120-AT-PCS-MS
- TORQUE KR5048 or 830900AE2
- INA 531075010
- CORAM C747
- PILENGA PT-P 1545
- FINWHALE BT010
- ESPRA 2112-1006120/ES0120
- GATES T42042A
- SCT SR 912
- VBF 830900АЕ1
- QUARTZ QZ-12-6120 or QZ21126120
The brands GATES and INA are especially popular.
Source
How to set timing marks VAZ-2112 16 valves
A break in the timing belt of the 16-valve VAZ 2112 engine can lead to bending of the valves. The result is an expensive engine overhaul. To prevent this from happening, you need to promptly replace the VAZ 2112 timing belt. Moreover, you can do it yourself.
The belt has a resource - a set service life. If this period has expired, the spare part must be replaced even if it looks normal. After all, a break can happen at any moment.
When asked how many kilometers it is necessary to replace the belt so that the belt does not break, experienced car enthusiasts give different answers. Some believe that after 50–60 thousand kilometers. Others clarify: this replacement period is relevant for an 8v (eight-valve) engine. If a 16v (sixteen-valve) engine is installed, then replacement must be done after 30–45 thousand kilometers.
In the video, a practitioner shows what timing belts look like after a long run and whether advertising should be trusted. Filmed by ExpertR channel.
Selecting a new belt
It is necessary to choose the correct size belt. The length of the product should be 742 mm. An important question for car enthusiasts is which manufacturer is better to choose. Today, high-quality products are produced by both foreign and domestic suppliers:
How to change it yourself?
Before changing the timing belt yourself, you need to study the diagram of the gas distribution mechanism, stock up on the necessary tools, and also imagine the order of work in the form of a sequence of actions.
Before replacing, study the timing diagram. There are differences between modifications of the VAZ 2112, but the basic algorithm is approximately the same for all modifications. This algorithm can also be used on VAZ cars of other modifications, for example, 2110. It is necessary to have a good manual that explains the progress of work step by step. And if you have at least a little experience in car maintenance and minor repairs, we can calmly carry out timing belt maintenance ourselves and change the necessary parts.
Tools and materials
The set of basic tools is small:
- socket heads for 10, 15 and 17;
- spanner or open-end wrench 17;
- large flat screwdriver;
- key for the tensioner pulley (if power steering is installed on the car).
The materials required are a new timing belt.
Step-by-step instruction
- The work begins by removing the negative terminal of the battery.
- Using a 10mm socket, unscrew the six bolts and remove the gas distribution mechanism cover.
- The crankshaft sensor chip is disconnected.
- The crankshaft sensor mount is unscrewed. Then you need to remove the sensor.
- The sensor hole must be aligned with the part of the pulley where there are no teeth. This is done so that the crankshaft sensor can detect TDC (top dead center). In addition, the area without teeth is used to block the pulley. After alignment, you need to put a 12mm hexagon in the hole of the sensor and fix the pulley.
- When the pulley is blocked, the generator nut is unscrewed.
- The belt tension roller bolt is loosened. After this, the belt is removed. Often during this operation the tension and support rollers and the pump are also changed.
- Installing a new timing belt. There are two ways to correctly install this part. First: put on the belt with the tension roller removed. The tension is adjusted after installing the roller. Second: install the belt by turning the exhaust camshaft pulley using a 17mm wrench.
- Next, you need to tighten the timing belt using the adjusting bolt. It rotates using a 10 key. Rotation clockwise increases the tension, counter-clockwise weakens it.
Replacing a belt on a car with power steering
If your car has power steering. then the procedure for replacing the timing belt has some differences. Before starting work, it is necessary to remove the power steering reservoir, since it blocks access to the timing belt.
In addition, cars with power steering do not have an adjusting bolt. The belt is tensioned using a tension roller and a special key. If such a key is not available, you can use a homemade device consisting of two nails and a screwdriver.
Error warning
If we talk about the VAZ-2112 engine, the timing belt tension can be increased or decreased. In this case, you must adhere to the recommendations:
- Let the holes for the pins first be in the lower left quarter;
- Taking the tuning key, the tension is increased by rotating the roller counterclockwise.
The result of correct and incorrect settings is shown below.
Turning to the right should correspond to a loosening of tension. And the one who did the opposite, then let him take offense at himself: the belt will wear out very quickly!
If all recommendations are followed, the holes cannot be at the top (as in photo 2).
Replacement with a self-tensioning roller (automatic tensioner)
On engines 11194 and 21126, rollers with an “automatic tensioner” are installed. It would seem that the automatic roller is suitable for any VAZ engine. But don't rush.
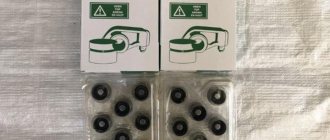
Two different tension rollers
The roller from the VAZ-2112 engine is equipped with protrusions on the sides. There are no protrusions on part 21126-1006238. This is the problem.
Don’t take unnecessary risks - you only need the original roller 2112-1006120 or its equivalent.
What did we try for?
If the timing belt malfunctions, the VAZ-2112 engine successfully bends its valves, requiring their replacement. Violations include belt breakage, as well as jumping over several teeth. The second malfunction occurs when the tension force is too low, and the first is the result of wear on the belt as a whole. Draw conclusions.
How to set timing marks on a 124 engine
Should the tension be checked on a hot or cold engine?
In conclusion, let’s talk about two more secrets. The first one - as a reminder: on a 16-valve engine, the correct belt tension is obtained only when adjusted while hot. Second: depending on the position of the crankshaft and camshafts, the belt tension changes cyclically from minimum to maximum
Second: depending on the position of the crankshaft and camshafts, the belt tension changes cyclically from minimum to maximum
Second: depending on the position of the crankshaft and camshafts, the belt tension changes cyclically from minimum to maximum
A little different. Or rather, almost like that, but I don’t know how to explain. In general, under the action of valve springs, camshafts in certain positions tend to rotate in different directions, tensioning or relaxing the belt. But there are situations in which the springs of one cylinder themselves balance the springs of the other - and the RV pulley itself will not rotate anywhere. And this position is close to the TDC position
Or rather, it is 2 teeth away from it (in fact, it depends on the shafts used). 2 teeth is a small thing. One spring has not yet straightened out, and the other has just begun to compress. The force there is minimal, the RV pulley can be turned +/- 5 teeth easily by hand
Causes of belt breakage
One of the common problems with the model is the failure of the timing belt. The reasons for this may be different:
- Simple wear and tear caused by a long period of use of the vehicle;
- Regular increased loads under which the engine has to work intensively;
- Mechanical damage as a result of improper operation or received during the repair of other components;
- Manufacturing defect.
Regardless of the causes of the problem, it must be eliminated.
Over time, it stretches so much that the gear teeth jump by 1-2 links. This disrupts the valve timing and causes interruptions in engine operation. But this is the best-case scenario for such a situation. The worst is when the strap breaks and the valves bend.
Belt tension on 8-valve VAZ engines
Before tightening the timing belt on the VAZ, the following preparatory work should be performed:
- Hang up and remove the right front wheel;
- Unscrew the 3 bolts securing the front timing cover;
- Remove the cover;
- Use a 17 key to loosen the tension roller.
After this, you should check the drive marks. One of them, located on the crankshaft pulley, must coincide with the installation tab of the rear cover. At the same time, check the mark on the flywheel. It should be flush with the alignment mark on the block boss.
If the marks match, the question of how to tighten the timing belt can be considered resolved. Without removing the belt, it is necessary to move the weakened tension roller to the right so that the necessary tension occurs. After this, the roller is tightened tightly. To adjust the roller, a special “horned” key is used. If it is not available, you can use two Phillips screwdrivers, which are inserted into special holes on the roller.
If the marks do not match, the timing belt on the VAZ-2109 must be removed from the pulleys. After this, the pulleys themselves are individually set according to the marks. It is better to start reinstalling the belt from the rear branch. After installing it, the roller is tightened.
It is necessary to finish tensioning and fixing the belt, and then manually turn the engine 2-3 turns by the crankshaft pulley. To do this, it is convenient to use a “19” head with an extension. The gearbox must be in neutral. If after turning the marks have not moved relative to each other, the procedure can be considered completed. Assembly is carried out in reverse order. » alt=»»> The question of how to check the consistency of the tension should be answered. To do this, hold the strap between your thumb and index finger and turn it 90°. The technician must be able to do this, otherwise the belt is considered over-tensioned.
If the plate is not made
Everyone knows that on a VAZ-2112 engine, tensioning and replacing the timing belt is done using a key. Its appearance is shown in the photo.
Tension adjustment key
You can make a slot on the handle, and then, installing a dynamometer, adjust the force as shown above.
If the force is 4 kgf, then the distance from the slot to the midpoint between the pins should be 49.5 mm.
The difference between methods “1” and “2” is very simple: in the second case, the plate (key) is not fixed. This means that the key will have to be held at the same level while tightening the nut. Make a choice.
Description of the procedure for replacing the timing belt VAZ 2110, (2112) 16 valves
Former flagship of the Russian automobile industry VAZ 2110 with a 1.5 16 valve engine. Scheduled replacement of the timing belt 30,000 km after the last replacement. The autopsy showed that if they had not changed it today, then tomorrow there would have been more work for our mechanic. In general, we recommend that all customers check the condition of the belt at least once every 5,000, or once a year. But knowing the quality of our spare parts, more often is better. On this engine, if the belt breaks, almost all the valves bend. The article is also relevant for VAZ 2112))
We look, remember and don’t let it get to that point.
The patient became five millimeters narrower and generally looked very bad. We send him to the honor board.
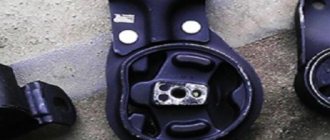
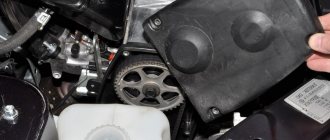
And here is the hero of the occasion himself.
We remove the absorber and power steering reservoir so that they do not interfere in the future.
We loosen the bolt by seventeen, the tension roller of the service belt and remove the last one. It will not be possible to remove it completely because the engine mount is in the way. If the belt requires replacement, you will have to unscrew the engine mount.
Remove the tension roller. We unscrew the bolts securing the upper protective cover; they are hexagonal.
Remove the right wheel, plastic mudguard and drain the antifreeze.
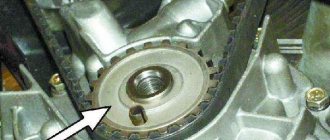
We see the crankshaft pulley. Using its bolt, clockwise, rotate the crankshaft until the marks on the camshaft pulleys and the timing belt protective cover match.
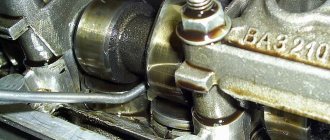
Markings on the left exhaust camshaft. The mark on the protective cover is highlighted in red.
Likewise for the intake camshaft. He's on the right. Its pulley has an inner ring for the phase sensor, so it is very difficult to mix up the pulleys.
Remove the crankshaft pulley. Let's lock the crankshaft with the help of a friend. We put him in the car and force him to turn on fifth gear and press the brake all the way. And at this time, with a slight movement of your hand, unscrew the crankshaft pulley bolt. Remove it and the lower protective cover.
We see that the mark on the sprockets and the slot on the ebb of the crankshaft cover coincide.
Loosen the seventeen bolts of the tension and idler pulleys and remove the timing belt. Then the videos themselves. We change them anyway.
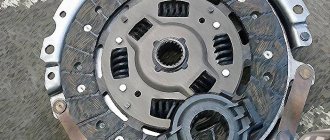
We lock and unscrew the camshaft pulleys and remove them. Remember that the right camshaft has a pulley with an inner ring for the phase sensor. The picture should look like this.
We unscrew everything that holds the protective plastic cover and remove the latter. Unscrew the three bolts holding the pump. They are hexagonal.
The pump for a sixteen valve engine is slightly different from the usual for an eight valve engine. It has a small threaded ear for attaching the protective casing.
Lubricate the gasket with a thin layer of sealant and put the pump in place. Tighten the fastening bolts. We put the protective cover in place. We make sure that he sits in his place, otherwise he will rub the belt. If everything is in order, tighten everything that holds it and install the camshaft pulleys and new rollers.
We check that the marks on the camshafts and crankshaft match. We install a new timing belt. If there are no directional arrows, put it so that the inscription is read from left to right.
The right, or descending, branch of the belt should be tight. You can turn the right camshaft clockwise a few degrees, put on the belt and turn it back. In this way we will stretch the descending branch. The tension roller has two holes for a special key. You can find it in any auto store. The issue price is 60 rubles. To tension the timing belt, insert a special key and turn the roller counterclockwise. Since there is a lot of controversy about tensioning the timing belt, we will write this: a tensioned belt should not have a sag between the camshafts of more than 5 mm when pressed and 7 mm on the longest branch (specially experimented). Remember: an overtightened belt reduces the service life of the pump, and an undertightened belt can lead to cylinder head repair. (photo below)
We check all the marks. We turn the crankshaft two turns and check the marks again. If the pistons and valves do not meet and the marks coincide, then accept my congratulations. Then we put everything back in place in the reverse order of removal. Don't forget to tighten the bolts. We tighten the service belt roller with the same wrench as the timing belt tension roller. Fill with antifreeze and start the car. We wish the belt many years of service, but don’t forget to check it periodically; after all, it was made in Russia.
What can cause a timing belt to break?
In a VAZ-2112 car with 16 valves, rupture of a belt part can occur due to:
- Strong or, on the contrary, weak tension. To make sure it is tensioned correctly, it is recommended to use a special device called a frequency meter. Measurements should only be taken from a cold engine, the indicator should not exceed 155 Hz +/- 3 Hz.
- A rupture will be inevitable if the part has been in use for a long time and the replacement was not made in a timely manner. Since there is a constant temperature difference during the working position, the belt element gradually collapses, cracks appear on it, which leads to rupture.
- Due to improper placement of the bearing, which can jam and tear the timing belt.
- Due to leakage of the oil seal, which coats the part with oil.
- Due to a low-quality timing belt, which was installed in the 16-valve VAZ-2112 engine by the manufacturer.
These are the most basic reasons that lead to the rupture of the HMS belt. If you carefully monitor the technical condition of the machine and repair it yourself at the slightest sign of breakdown, you can avoid very unpleasant situations that can happen at any time.
How to change it yourself?
Before changing the timing belt yourself, you need to study the diagram of the gas distribution mechanism, stock up on the necessary tools, and also imagine the order of work in the form of a sequence of actions.
Before replacing, study the timing diagram
There are differences between modifications of the VAZ 2112, but the basic algorithm is approximately the same for all modifications. This algorithm can also be used on VAZ cars of other modifications, for example, 2110. It is necessary to have a good manual that explains the progress of work step by step. And if you have at least a little experience in car maintenance and minor repairs, we can calmly carry out timing belt maintenance ourselves and change the necessary parts.
Tools and materials
The set of basic tools is small:
- socket heads for 10, 15 and 17;
- spanner or open-end wrench 17;
- large flat screwdriver;
- key for the tensioner pulley (if power steering is installed on the car).
The materials required are a new timing belt.
Step-by-step instruction
- The work begins by removing the negative terminal of the battery.
- Using a 10mm socket, unscrew the six bolts and remove the gas distribution mechanism cover.
- The crankshaft sensor chip is disconnected.
- The crankshaft sensor mount is unscrewed. Then you need to remove the sensor.
- The sensor hole must be aligned with the part of the pulley where there are no teeth. This is done so that the crankshaft sensor can detect TDC (top dead center). In addition, the area without teeth is used to block the pulley. After alignment, you need to put a 12mm hexagon in the hole of the sensor and fix the pulley.
- When the pulley is blocked, the generator nut is unscrewed.
- The belt tension roller bolt is loosened. After this, the belt is removed. Often during this operation the tension and support rollers and the pump are also changed.
- Installing a new timing belt. There are two ways to correctly install this part. First: put on the belt with the tension roller removed. The tension is adjusted after installing the roller. Second: install the belt by turning the exhaust camshaft pulley using a 17mm wrench.
- Next, you need to tighten the timing belt using the adjusting bolt. It rotates using a 10 key. Rotation clockwise increases the tension, counter-clockwise weakens it.
Replacing a belt on a car with power steering
If your car has power steering. then the procedure for replacing the timing belt has some differences. Before starting work, it is necessary to remove the power steering reservoir, since it blocks access to the timing belt.
In addition, cars with power steering do not have an adjusting bolt. The belt is tensioned using a tension roller and a special key. If such a key is not available, you can use a homemade device consisting of two nails and a screwdriver. During operation, it is necessary to check the degree of belt tension and, if necessary, tighten it. Finally, you need to tighten the tension roller nut.
Features of labeling
Before tensioning the belt and tightening the bolts, you need to check the position of the marks. If the marks are set incorrectly, this will, at best, manifest itself in a decrease in engine power and traction characteristics. In the worst case, in those engines where valve bending is possible, it can occur even with a fully functional timing belt.
In order to avoid these problems, it is necessary to follow the order of placing labels:
- After installing the timing belt, but before tensioning it, the marks on the crankshaft pulley and the oil pump housing are aligned.
- Marks are placed on the intake and exhaust camshaft pulleys.
- The belt is tensioned, the tension roller nut is tightened.
- The crankshaft rotates two revolutions. If after this check the position of the marks remains the same, you can replace the crankshaft sensor, connect the power connector and replace the timing cover. Replacement of the VAZ 2112 timing belt is completed.
The stages of replacing the timing belt can be seen in the photo below.
Blocking the crankshaft pulley
Placing marks on the crankshaft
Marking valve pulleys
Preparatory work
Before you start work, familiarize yourself with the timing system diagram and the location of the marks on the camshaft and crankshaft.
This is what a detailed timing belt diagram looks like.
Scheme: 1 . Crankshaft pulley. 2 . Timing belt. 3 . Water pump pulley. 4 . Tension roller. 5 . Intake camshaft pulley. 6 . Timing belt upper protective cover. 7 . Exhaust camshaft pulley. 8 . Phase sensor synchronization dial. 9 . Support roller.
A – TDC mark on the crankshaft pulley. B – Mark on the oil pump cover. C – Installation mark on the protective cover. D – Mark on the exhaust camshaft pulley. E - Mark on the intake camshaft pulley. F - Installation mark on the protective cover.
Tools for work
To carry out all the work you will need:
- New timing belt for the 16-valve VAZ-2112 engine.
- Socket head for “10” and “17”.
- The key is "17".
- Screwdriver.
- Tensioner pulley key.
Step-by-step replacement procedure
- First of all, after opening the hood, remove the negative terminal from the battery.
- Next, remove the timing belt protective cover by unscrewing 6 bolts using a “10” socket.
Replacing the timing belt on VAZ 2112 cars 16 valves from A to Z
In what cases is replacement required?
To understand that the timing belt needs to be replaced, you need to visually inspect the element.
It is necessary to stop using it if the following damage is detected:
- cracks, cuts have appeared on top of the timing belt, or its base is delaminating;
- if the notches located on the inside of the belt are damaged.
The most common reasons why a belt breaks:
- the car enthusiast simply does not know how to tighten it properly;
- improper operation or use of the belt for longer than the specified period;
- contact with the belt surface of coolant, fuel, lubricant;
- incorrect operation of the water pump;
- play in the belt rollers: tension and support.
If you do not ensure the correct adjustment of the belt, do not inspect and replace the rollers on the VAZ 2112, this can lead to other breakdowns. We will find out which timing belt rollers for the VAZ 2110-2112 16v are better from the author of the video, MegaMeyhem.
If the timing belt breaks, it will disrupt the operation of the entire engine. Then everything descends into chaos: valves and pistons touch each other because their movements are not controlled. As a result of the impact, the valves bend and, touching the pistons, damage their outer walls, scratch the cylinders and important parts of the gas distribution mechanism.
In addition to visual diagnostics of delamination, cracks and other things, it is recommended for a VAZ 2112 car (including the injector) every 50 thousand km. movement to change the belt. Which timing belt for a VAZ is better to choose is described below.
Selection options
In the automotive market you can find several companies that produce high-quality belts. Its length should be 742 mm.
When choosing a belt for 16-valve engines, you can pay attention to:
- Factory belt from the Volzhsky Automobile Plant: Lada 21126-1006040. This is a durable belt made from quality material. It is not so expensive that you can spare money.
- Lynx 137FL22 – timing belt from a Japanese manufacturer. On its inner side there are 137 serrated cuts. Since it is relatively inexpensive, it will have to be replaced more often than others. This does not mean that the quality of the material is bad. Japanese products have proven themselves well among car enthusiasts.
- Belts from Bosch. This company has established itself in the market as the embodiment of quality and sustainability. The belts from the manufacturer turned out to be excellent and, as a result, they are deservedly popular among car enthusiasts. The recommended service life of the straps is fully met.
- German ContiTech belt. Manufacturers tried to make the product durable by including polyamide fabric, fiberglass and synthetic rubber.
- Optibelt. Belts from this company are also installed on 12-valve engines. They enjoy a good reputation among car enthusiasts due to their large resource. This is because cases of belt “death” are almost never recorded, and it serves its life due to the quality of the materials used.
- Gates 5631XS heads the line of the most popular belts, the quality of which is at its best. This is a well-deserved sales leader. Gates belts are made of high-quality material, and therefore the risk of timing belt breakage on a VAZ with a 16-valve engine is reduced to zero.
- BRT belts of domestic production. Experts believe that BRT is the Russian analogue of Gates. What is noteworthy is that the quality of a domestic belt is not inferior to a foreign product, but its price is an order of magnitude lower.
After how long to change the timing belt, we find out from the video from the AVTOTEMA TV channel.
Features of labeling
Before installing another timing belt, it is better to set the crankshaft and camshaft to the specified marks from the very beginning. We set the gears to 0 position. Points A, B, C, D, E, F must match as shown in the picture. After this, you need to set the marks on the camshafts and the belt casing in the same position.
Diagnostics
The belt must be checked every 20,000 km to prevent it from breaking. The essence of belt diagnostics is to prematurely detect aging and wear of timing components.
When checking, you need to pay attention to the operation of the belt, special attention should be paid to its alignment, that is, it should run exactly in the center of the gears, there should be no creaks or lifts.
Timing belt slipping to the outside
The following diagnostics must be carried out when replacing it. With the belt removed, you need to check the play in the tension and idler rollers, as well as in the coolant pump. If play, squeaks, leaks or snags are noticed in the rollers or pump, they need to be replaced.
Belt faults
Malfunctions of the timing belt can arise as a result of its long-term operation, and can also be the result of incorrect adjustment or malfunctions of the pump or tension roller. These include:
- violation of the integrity of the belt (cracks, delamination);
- deformation;
- belt break.
If any of the specified malfunctions are detected, the belt must be replaced.
Causes of belt breakage
One of the common problems with the model is the failure of the timing belt. The reasons for this may be different:
- Simple wear and tear caused by a long period of use of the vehicle;
- Regular increased loads under which the engine has to work intensively;
- Mechanical damage as a result of improper operation or received during the repair of other components;
- Manufacturing defect.
Over time, it stretches so much that the gear teeth jump by 1-2 links. This disrupts the valve timing and causes interruptions in engine operation. But this is the best-case scenario for such a situation. The worst is when the strap breaks and the valves bend. By the way, this problem was finally solved on the new Lada Vesta.
List of damage to the timing belt on the VAZ 2110
Replacing the timing belt of a VAZ 2110 8-valve injector with your own hands is carried out:
- As a result of increased tension, the surface begins to become shaggy. Gaps appear.
- If the product was loosely tensioned, this leads to cutting off the tooth. In such a situation, replacing the VAZ 2110 8-valve timing belt on a VAZ 2110 is required immediately.
- The teeth are largely worn. This is also a consequence of poor tension adjustment.
- The surface of the product is covered with small cracks. This happens due to prolonged overheating or hypothermia.
- Sometimes the wear area is between the teeth. This is also the result of poor belt tension.
- If oil constantly leaks from the engine and gets on the belt, then the product is removed. Then you need to find and fix the leak. The timing belt is replaced with a new one.
- On a VAZ 2110 with 8 valves, the timing belt is changed if there was a misalignment during its installation. Its end wear is observed.
When driving the car, you must constantly listen to noises. When it is clearly audible in the engine area, it means you need to stop and tighten the belt.
In some cases, the tooth skips. This problem is indicated by a signal from the sensor. It is necessary to stop and carry out another drive adjustment.
Timing belt life
From time to time you need to inspect the belt and replace it if:
- the belt structure began to delaminate;
- cracks appeared on the surface;
- the teeth that are on the inner surface of the consumable are damaged.
But what could be the reasons that the consumable has reached a state where it is no longer possible to do without replacing it:
- the consumable was not properly tensioned initially;
- the belt has been used longer than expected;
- a lubricant has reached the surface;
- the water pump did not work well;
- the tension roller had play.
If you do not periodically inspect the belt and do not change it on time, this can ultimately lead to a break. And a break is very serious, since in this case the pistons will collide with the valves. As a result, they will be damaged and the engine part will have to be seriously repaired. A broken belt drive will cause real chaos, as a result of which other timing parts will also suffer serious damage.
The manufacturer promises that you should be interested in the condition of the belt only after 50,000 km. This is not entirely true, because premature wear of consumables can be influenced by a number of factors, such as aggressive driving or weather conditions. Therefore, it is recommended to inspect the belt drive after 20-25,000 km.
Signs by which you can determine the need to replace the VAZ 2110 timing belt
To replace the timing belt on time, you need to monitor the condition of the engine. The timing belt needs to be replaced if:
- there are oil leaks on it;
- there are many cracks and signs of increased wear on its surface;
- timing belt teeth are damaged;
- the belt has delaminated, cuts, bulges or folds have appeared;
- threads appeared on the surface.
Troubleshooting methods
Now we list methods for eliminating these causes. Let's go in the same order.
- Belt tension . First you need to check the tension level and compare it with the one recommended by the car manufacturer (usually indicated in the technical documentation for the car, also can be found on the Internet). If this value is higher than the recommended value, then the tension must be loosened. This is done using a torque wrench. If you don’t have one, then it’s better to contact a car service. As a last resort, you can perform this procedure “by eye,” but use the indicated devices as soon as possible. You can also use a regular dynamometer and a regular wrench for this.
- Poor quality belt . If the two edges of the belt have different stiffness, then a situation will arise where the timing roller eats the belt from the softer side. You can check this by replacing its right and left sides. If after replacement the second side does not wear out, then the belt is to blame. There is only one way out, and it consists in purchasing and installing a new, higher quality part.
- Wear of pump bearings . To diagnose this problem, it is necessary to dismantle the belt and check for play on the toothed pulley. If there is play, it means the part needs to be replaced. Bearings cannot be repaired.
- The pump is installed crookedly . This situation is possible if, during the previous replacement, the adjacent surface was poorly cleaned, and small particles of the old gasket and/or pieces of dirt remained on it, but if this happens, then most likely you will understand this by the leak that appears after filling the antifreeze and starting the engine. When installing a new pump (or even an old one, if it is in good condition), be sure to thoroughly clean both surfaces (including the bolt holes), both on the pump itself and on the motor housing, and install a new gasket. In some cases, instead of a gasket, sealant is placed under the pump.
- Problems with the video . The video needs to be reviewed. It should have minimal play and a flat working surface. To check, you can use a ruler or other similar object of the required width. It also makes sense to check the presence of grease in the bearing. If its quantity is small, it should be added. If the roller is of poor quality, it must be replaced. It is almost impossible to repair the bearing, much less the roller surface.
- Damage to stud threads .
To correct this situation, there are two options. The simplest is to use a saw with the appropriate diameter for turning internal threads and/or a die for turning similar threads on a stud. Another option is more labor-intensive and involves completely dismantling the block in order to restore the specified thread. This method is used if for some reason it is impossible to use the sword. Installing washers under the roller - Roller pin bend . Mechanically fixing a stud is almost impossible. Sometimes (but not in all cases, and it depends on the degree of curvature of the pin and the location of its bending) you can try to unscrew the pin and screw it back in, but with the other side. If the curvature is small, then such a solution may be successful. However, in most cases, shims are used. Let's consider this point separately, since most car enthusiasts consider this method a real panacea if the timing belt is eaten from the engine side or from the opposite side.