REASONS FOR VAZ 2114 OVEN MALFUNCTION
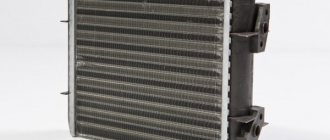
- The heater on a VAZ 2114 is leaking. In this situation, it is cheaper and easier to purchase a new radiator. Despite the fact that the hole may be small in size, the radiator will no longer be able to fully perform its functionality and fully comply with the presented characteristics. Of course, if you seek qualified help from a specialized service, the malfunction will certainly be eliminated, but this is not a solution to the problem, because a short period of time will pass and the defect will reappear, given that the amount of repair is not so small.
- The VAZ 2114 radiator is clogged. In this situation, there is a chance to give the radiator a new life if proper repairs are carried out. But before repairing it, it must be removed. Cleaning can be done using KARCHER or by blowing with compressed air. But this process must be carried out very carefully, because... The radiator may not withstand high pressure and will simply break as a result. And then you will definitely have to buy a new one to replace it.
- Motor failure. This problem occurs as a result of a damaged fuse. Solving this problem is quite easy; a failed fuse simply needs to be replaced. But perhaps this is not enough to solve this problem. The question arises, why did the fuse blow? Most likely, a short circuit has occurred in the wiring; to prevent a repeat situation, the best solution would be to “ring” the entire circuit to identify the system flaw and then eliminate it. Otherwise, if things go badly, a short circuit may occur, with negative consequences.
On VAZ 2114 models, the fuse is class F7 and has a current of 30A. It is additionally responsible for the cigarette lighter circuits, built-in lighting in the glove compartment, and heated rear window. If the cause of the malfunction lies in the fuse, this can be determined in the early stages.
If the cause is not the fuse, make sure that the fan is receiving voltage; use a multimeter to check. Or the reason is in the incoming wires indicating a weak contact.
- Poor contact inside the mounting block. This is a fairly common drawback of these models. It is imperative to check all available contacts in the unit; there is a possibility of oxidation or poor-quality connection, as a result the circuit breaks, which negatively affects the operation of the fan.
- Water in the ignition relay. The radiator starts working when the car is warm, this is directly related to the evaporation of water in the relay, only after this the relay works.
- The interior of the VAZ 2114 is poorly heated. Despite the fact that the 2114 stove, according to the first signs, supplies warm air to the cabin, the engine is also heated up to 90 degrees, however, the air in the cabin is not warmed up enough. Here you need to unscrew the side of the torpedo from the passenger side and check the two hoses coming from the stove; if they are cold, then the reason is that they are clogged. It is enough to clean them with simple manipulations.
How to avoid the problem
If the airflow in your car works well, and you want it to continue to work that way, then you should follow a few simple rules:
- Use high-quality and suitable coolant.
- Monitor the coolant level and add it immediately if necessary.
- Periodically clean and vent the radiator to avoid severe clogging.
- Monitor the condition of the stove fan and if it loses power, replace it (preferably with a fan from a foreign car, as discussed above).
Antifreeze for VAZ 2114
Following this will help avoid most of the troubles that may arise with the interior airflow system.
TIPS FOR SELECTING A RADIATOR
Let's look at the main nuances when choosing a stove for a VAZ 2114. As you know, the factory-produced VAZ 2114 heater device has a high level of required heat transfer. But the required model is simply not available for free sale; in this case, we purchase what is available. Naturally, the characteristics of a used radiator are absolutely no good, the reason is obvious, in a couple of months you will have to change the radiator again, in a word, you will be throwing money down the drain. In this situation, a better solution would be to overpay a little and purchase a new device.
Based on consumer reviews, radiators from the manufacturer DAAZ are in great demand, because The quality indicators of the produced models are met, the heat transfer parameters are also at their best. As for the material from which the VAZ 2114 stove is made, it is impossible to confidently determine the leader among aluminum or copper radiators. Each has advantageous indicators and certain disadvantages, such as heat transfer characteristics and operating life.
Symptoms of a problem
Among the frequently encountered ones are the following: when the stove is operating, hot air is supplied exclusively through the central openings, while a slightly warm breeze blows from the side deflectors - both upper and lower. As a rule, this indicates that the air ducts were poorly assembled on the conveyor. As a result, large gaps remained between them and the dampers. In this case, you will have to adjust the rods. In this case, most likely, you will need to disassemble the instrument panel to gain access to them.
Problems with the dampers, in turn, lead to the fact that you have to wait a long time for the windshield to thaw.
The list of other possible failures and the reasons that led to them is as follows:
- at idle almost cold air comes in - the pump is faulty or the heater radiator is clogged;
- cold pipes (including those blowing into the feet) - the thermostat is jammed, the heating tap does not open;
- side deflectors supply unheated air - problems with dampers and rods.
Experienced auto mechanics recommend installing a similar suitable unit from a foreign car instead of the “native” fan. This usually significantly improves heating efficiency.
As a preventative measure, you should also ensure that antifreeze is filled in the required quantity at all times. Don’t forget about the need to regularly ventilate the radiator.
VAZ 2114 OVEN DIAGRAM
The diagram clearly shows the structure of the VAZ 2114 stove:
number 44 is the ventilation motor, 45 is the additional resistance resistor, 46 is the toggle switch for switching speeds. This diagram makes it clear how the VAZ 2114 heater works.
VAZ 2114 stove diagram
To diagnose the performance of the VAZ stove, you must apply the following steps:
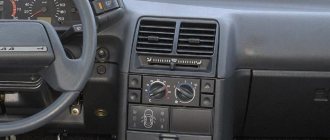
We turn on the VAZ 2114 heater with switch (1) to the 1st, then 2nd and 3rd speed modes. Lever (2) and (4) adjust the desired air direction, and the last one (4) has the function of selecting the air temperature. It also happens that even some people do not know how to turn on the heater on a VAZ 2114.
VAZ 2114 stove diagram
If there are no signs of operation, therefore, the fan does not turn on at all. But if the radiator shows signs of operation at some speeds, therefore, the reason is not a fan malfunction, but possibly a resistor (additional), or the VAZ 2114 interior heater does not respond to the switch. If the fan is running at full power and the temperature is set to the maximum when the engine is fully warmed up, and cold air comes from the air duct. This is likely the cause of a clogged heater radiator.
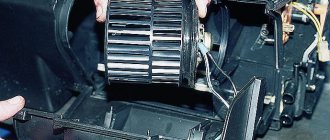
What is a stove fan
A fan is a functional element that drives air through the heater radiator and into the cabin. The fan, along with the radiator, pipes for refrigerant circulation, liquid regulator and air duct, is part of the heating unit. Its purpose is to drive cold air through a heated radiator, creating heat exchange.
Node functions
The heater fan is a motor that supplies air. You can imagine its operation in more detail only during the operation of the entire heating system:
- As the car engine heats up, liquid enters it, cooling the walls of the cylinder block and taking away heat.
- Hot antifreeze enters the heater radiator, and the latter quickly heats up.
- A motor (fan) is turned on, supplying flows of cold air, thereby cooling the element.
- The interior of the car begins to warm up.
The heating diagram of the VAZ 2113–2115 clearly shows the purpose of the motor
Where is the VAZ 2113-2115 heater motor located?
On VAZ 2113-2115 vehicles, the heater motor is located in the engine compartment. It is covered with a protective casing secured with four screws. The fan itself is also supported by bolts and nuts and is connected to the body of the car.
HOW TO CARRY OUT WORK TO REPLACE THE VAZ 2114 OVEN (REPLACING THE RADIATOR)
The heating of the VAZ 2114 is replaced as follows, first you need to drain the cooling liquid from the system, only after this simple manipulation is the panel (instrument) removed in order to easily get to the radiator. To save operating time, it is possible to detach only part of the panel, in the area of the glove compartment and console. It is better to carry out this procedure together, so that one person pulls the panel as necessary, and the second removes the radiator. But there is another method: remove the panel fastenings from both sides, and then carry out the procedure of loosening the brackets. As a result, you can easily replace the VAZ 2114 stove with a new one. But do not forget to disconnect the wires first. The next step will be to remove the nuts that secure the radiator to the body, and further loosen the clamps that secure the pipes. That's all, further replacement is carried out in the reverse order.
Replace without removing the panel
But no matter what method is used, you will first have to drain the coolant from the system. Therefore, you will have to stock up on antifreeze in the required quantity in advance.
First, let's look at the replacement method without removing the panel. As already mentioned, this will require making cuts in some places.
To complete the work you will need:
- Set of screwdrivers of different lengths;
- Hacksaw blade for metal;
- Flat container for draining residual coolant from the radiator;
- Rags.
Having prepared everything and drained the coolant from the cooling system, you can begin work:
- We remove the storage box (glove compartment) from the panel, for which it is necessary to unscrew 6 screws securing it;
- Remove the side trims on the center console;
- Using a metal blade, we make the necessary cuts: The first cut is vertical
, we make it on the inner wall of the panel near the center console (behind the metal strip of the glove compartment). Moreover, here you will have to make two cuts. - The second cut is horizontal
, runs in the upper part along the rear wall of the opening under the glove compartment.
- The third one is also vertical
, but not end-to-end. It is done on the right on the rear wall of the lower storage shelf of the panel;
- After all the cuts, part of the panel together with the wall can be bent down, which will provide access to the radiator. We bend this part and fix it;
- Unscrew the near bracket for fastening the heating system flap control cable and move the cable to the side;
- Loosen the clamps of the coolant supply pipes to the radiator. In this case, you should place a prepared container under the connection points, since liquid will flow out of the heat exchanger. Remove the pipes;
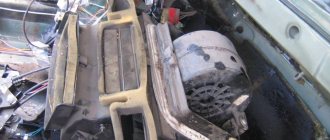
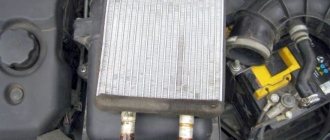
- We unscrew the three screws securing the radiator, remove it and immediately inspect it.
Afterwards we replace the heat exchanger, fix it in the seat, connect the pipes to it and clamp it with clamps. To make the pipes fit easily, lubricate them with soap.
At this stage of work, you should fill the cooling system with liquid and run it to remove air pockets.
Next, it remains to make sure that the connections between the pipes and the radiator are not leaking, and that the damper and faucet are connected without errors.
After this, all that remains is to return the cut part of the panel to its place and fix it. To do this, you can use screws and plates.
The main thing is to fix it in several places so that in the future the cut off part does not rattle when moving. Use sealant or silicone.
This method is convenient because if you replace the radiator again (which is quite possible), all the work will be very simple - you just need to remove the storage box and unscrew a few screws.
In addition, all cuts are made in such places that after assembling the panel and installing the glove compartment they will not be noticeable.
REPAIR OF OVEN VAZ 2114
To repair the stove, it is necessary to remove it and then make the necessary adjustments.
VAZ 2114 stove diagram
VAZ 2114 stove diagram
- Before removing the heater (1), be sure to remove the wire going to ground, and the coolant must be drained in advance.
- Carefully remove the dashboard, and with careful movements disconnect the air duct (19) through which air enters the car interior.
- The next step of the work will be to conduct an audit of the electrical system: checking the wires of the resistor (18), fan, electric motor (2), hoses of the outlet valve (13 and inlet valve (12).
- On the shield, 2 nuts securing the tap are removed in sequence.
- Carefully remove the seal from the tap pipes.
- The nuts securing the stove to the body are removed.
- As a result, the heater can be removed.
- After making the necessary adjustments, installation is carried out using the same method but in reverse order.
Preparatory operations
Attention! Be sure to let the car cool down!
- Remove the engine protection.
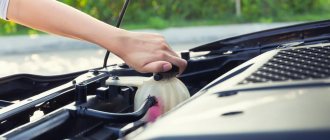
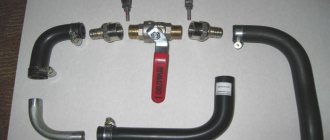
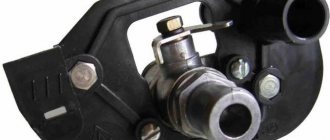
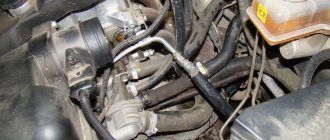
- Drain the antifreeze. I remove the pipes from the heater tap in the engine compartment, having previously placed a special trough for clean antifreeze. This allows you to drain as much coolant as possible from the heater radiator. Just remember to open the stove tap. As soon as the antifreeze has stopped flowing, unscrew the two 10-point nuts securing the stove valve (if you are going to change it!).
Heater valve fittings in the engine compartment.
CHANGING THE CABIN FILTER OF VAZ 2114
The air inside the cabin without using a filter will be filled with road dust and exhaust gases; it is clear that this will negatively affect the health of the driver and passengers. The immediate function of a car filter is to purify the air entering the cabin. As a result, it is susceptible to rapid contamination, and there is absolutely no benefit from such a filter. It only makes it difficult for air to get to the heater. For this reason, the filter must be replaced. This procedure is available for DIY replacement. First, dismantle the brush holders and the windshield wiper system, then remove the grille (plastic). After this, the nuts securing the plastic cover are removed, resulting in a small hole being freed. The filter is not attached to anything, so there should not be any problems in removing it, and replace it with a new one in the same way. All parts are mounted in place.
CONCLUSION
The procedure for replacing a VAZ 2114 stove is quite simple. The main point is the timely replacement of pipes and clamps if they are not suitable for further use.
After carrying out repair or maintenance work, do not forget to refill the system with coolant.
At the end of the work, when you start the engine, the stove should cope with the heating function perfectly. If the opposite happens, there is most likely an air lock.
During repairs, the vehicle must be kept on the handbrake. If the car was running before starting repair work, then the radiator will be very hot, so wait a little.
If you understand that you cannot cope with this work, please contact the service department.
WE FIX THE PROBLEM OURSELVES
This also happens - at high speeds the stove “breaks through” and it starts to heat up, but at idle speed the fan blows cold air. Why doesn't the VAZ 2114 heater heat up at idle? We immediately note that if you are the owner of a VAZ 2113 or VAZ 2115, then all solutions to problems with the lack of heating of the interior will be similar to the solutions with the 2114 model. So, we are trying to find simple solutions to the problem ourselves:
- Insufficient coolant level. Add antifreeze; if the stove breaks, the problem is solved.
- Airlock. How to check? In the area of the heater radiator, the characteristic murmur of antifreeze is heard, the temperature sensor on the instrument panel shows almost maximum (almost boiling), one of the main radiator pipes is cold. You need to remove the expansion tank cap, press on the pipes and “gas” the engine. Perhaps the plug will break. It happens that the valve itself in the tank plug is to blame; you can try replacing it. It is also often advised to park the car on a hill, with the plug removed, “gas” the engine, and then add antifreeze when the plug “breaks”.
- Also, if one of the pipes is cold and the temperature on the sensor goes off scale, a faulty thermostat is to blame. It's easy to check. We remove and place the thermostat in a container of water, heat the water and see at what temperature the thermostat valve begins to close. It should open at engine operating temperature (90-95ºC). The faulty part needs to be replaced.
- The head gasket begins to burn out. With such a malfunction, an air lock is created in the cooling system, but it will not be possible to expel it using all known methods. The gasket will have to be changed. True, not every car enthusiast can do such work with his own hands.
Removing the thermostat