The white wire is connected to the power supply circuit for the instrument panel lighting.
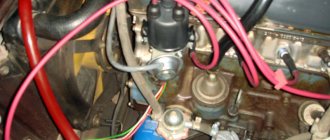
Incorrect operation of the device is often caused by incorrect settings. The ends of the axle are lubricated during assembly with a special silicone liquid, which has a damping property - it dampens the vibrations of the needle when the car moves. Correct connection of the ignition coil and more. The new version of the input part is shown in the figure to the left of the main tachometer diagram.
To remove the circuit from the case, it is necessary to flare the metal rim 16, remove the arrow from the axis, and remove the scale. Only a complete replacement can help.
If the capacitor breaks down, simply replace it.
It is these factors that are of great importance when choosing a tachometer design. If the VAZ tachometer is connected at home, then it is usually placed on the dashboard or on the center console, in fact, as in production.
Tachometer for UAZ loaf
Checking the correct operation of the tachometer
In a car service center, the accuracy of the tachometer readings is checked on a special stand that simulates the ignition system. The design of the stand includes a power source, a distributor and a counter of its shaft revolutions. The table below shows the calculated values of the distributor rotor speed and the corresponding tachometer readings.
Table: Calculated data for checking the tachometer
| Number of distributor shaft revolutions, rpm | Correct tachometer readings, rpm |
| 450–550 | 1000 |
| 870–1050 | 2000 |
| 1350–1550 | 3000 |
| 1800–2050 | 4000 |
| 2300–2500 | 5000 |
| 2900–3000 | 6000 |
| 3300–3500 | 7000 |
You can independently check how much the device is lying by connecting to it in parallel an autotester, the functionality of which includes a tachometer. It is necessary to turn it on in the desired mode, connect the positive probe to terminal “K” on the ignition coil, and the second to the “ground” of the car. Next, we look at the readings of both instruments and draw conclusions. Instead of an autotester, you can use a known-good tachometer TX-193. It is also connected in parallel to the one being tested.
What is the price
A complete set for a VAZ 2106 costs from 3,000 to 4,000 rubles, depending on the manufacturer. Typically this includes:
- switch;
- distributor;
- coil;
- Hall controller;
- wiring.
Some kits also contain a set of spark plugs and high-voltage wires.
If the driver does not understand auto electrics, additional assistance from specialists will be required. Services at a service station will cost another 1000-2000 rubles. The specific cost of installation in each city can vary significantly.
Installing electronic ignition on the 2106 is carried out according to a similar principle as on other classics. If you have direct hands and a little knowledge of auto electrics, you can install the system yourself.
Source
Why the tachometer on the VAZ 2107 carburetor and injector does not work and the needle jumps: repair and diagram
Design and purpose of the tachometer
The purpose of the VAZ tachometer is to visualize the readings of the crankshaft. The device shows how fast the crankshaft rotates per minute, these readings are also called engine speed. Structurally, the VAZ 2107 tachometer is a milliammeter connected in one housing to an electronic part; these elements are installed on a printed circuit board.
As for the principle of operation, it consists in measuring the frequency of pulse transmission in the primary circuit of the engine ignition system. With the power unit operating, during one revolution of the distributor shaft, the contacts on the breaker should close and open 4 times. Accordingly, with one revolution, 4 voltage and current pulses are formed in the electrical circuit. As the crankshaft speed increases, the pulse transmission frequency also increases, which, in turn, affects the deflection of the instrument needle.
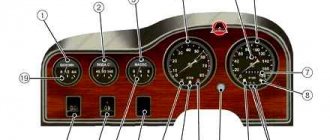
"Seven" tidy with tachometer
Possible malfunctions and ways to eliminate them
Often the cause of device malfunction is the use of inappropriate high-voltage wires. In particular, this problem usually occurs as a result of replacing them with silicone ones. Due to the use of silicone high-voltage wires, the instrument needle may begin to twitch.
As for malfunctions in which the tachometer does not work at all, the procedure for identifying them may differ depending on the type of engine:
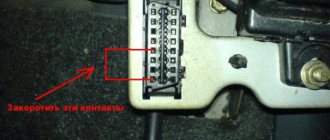
- On carburetor engines, three wires are connected to the device. Two of them are power, and the third is connected to the coil. To determine the cause of the device failure, you need to gain access to the back of the control panel and disconnect the terminals connected to the device. Then, using the other three wires, which must be operational, the device should be connected directly to the battery, as well as the coil. When the power unit is started, the device should start working (then the reason lies in the circuit); if this does not happen, then it is necessary to look for the cause in the ignition system or the device itself.
- As for injection engines, in this case the tachometer connection diagram is somewhat different; 4 wires are used here. Two of them are power, one goes to the ECU, and one goes directly to the crankshaft sensor. The best option would be to conduct computer diagnostics. You can also try checking the condition of the contacts on the connectors or replacing the DPKV with a working one (the author of the video is minishumaher).
DIY replacement instructions
Car owners, as a rule, think about the need to service and repair the tachometer if it fails.
More information about replacing the device:
- Disconnect the battery and use a flat-head screwdriver to pry and remove the three handles installed on the heater control selector.
- Unscrew the nut securing the odometer reset lever, and also remove the washer installed behind it.
- Next, using the same flat-tip screwdriver, pry off the cap of the bolt that secures the tidy. After removing it, unscrew the screw securing the shield to the center console bracket.
- Having done this, move the right part of the tidy to the maximum, then remove the left part. After this you will have access to the back of the shield, now you need to unscrew the speedometer cable nut and completely disconnect it. Next, disconnect all hoses and connectors connected to the shield.
- Remove the dashboard. Remove the tachometer from it and install a new one. If you have connected everything correctly, the installed device will work.
Photo gallery “Dismantling the tidy”
Video “Overview of the dashboard on a microcontroller”
The video below provides an overview of the updated shield running on a microcontroller (author - Vadim Kornelyuk).
avtozam.com
Sensor failure and diagnostics
Replacing the tachometer on a “six” is most often done due to a breakdown. What could be the reason? It is worth noting that the operation scheme of such a device is not simple, which means that tachometers usually cannot be repaired. If you begin to notice that such a counter shows false data or does not respond at all to flywheel speeds, then first of all you need to pay attention to the wiring and its connection.
The diagnostic scheme looks like this:
- We remove the wiring and clean the contacts. Electric current may not pass due to oxidation of the wires, which makes the tachometer impossible to operate.
- We determine whether the sensor connection diagram is executed correctly.
- If the tachometer still does not work well, replace the original cables with more universal silicone ones. They conduct electricity better and are able to work in any conditions.
- Next, the quality of the power connection to the ignition switch is checked, with the obligatory replacement of the fuse (most often the cause of the malfunction is a blown fuse).
If you understand electromechanics, you can check the current resistance or inspect the device board by disassembling it.
I would like to draw your attention to the fuse. Under no circumstances replace it with any pieces of wire or coins. It's better to let a fuse blow than an expensive tachometer.
A device such as a tachometer does not in any way affect the operation of the engine or the driving performance of the car, but without it, the dashboard of a modern car will be incomplete. In this article we will look at why it is needed, how it works, what malfunctions it may have, and how to deal with them without the help of specialists.
Tachometer VAZ 2106
The first car from the Zhiguli family equipped with a tachometer was the VAZ 2103. Neither the “kopek” nor the “two” had such a device, but they drove and drive without it to this day without any problems. Why did the designers need to install it on the panel?
Purpose of the tachometer
The tachometer is used to measure the crankshaft speed. Essentially, it is a revolution counter, showing the number of revolutions to the driver by deflecting the scale needle to a certain angle. With its help, the person sitting behind the wheel sees in what mode the car’s power unit is operating, and also whether there is any excess load on it. Based on the information received, it is easier for the driver to select the correct gear. In addition, the tachometer is indispensable when adjusting the carburetor. It is its indicators that are taken into account when adjusting the idle speed and the quality of the fuel mixture.
What tachometer is installed on the VAZ 2106
“Sixes” were equipped with the same tachometer as “threes”. It was a TX-193 model. Precision, reliability and excellent sporty design have made it a kind of standard automotive device. It is not surprising that today many car owners install these tachometers as additional devices. Moreover, they are equipped with motorcycle and even boat engines. As for the Zhiguli, the device can be installed without modifications on such VAZ models as 2103, 21032, 2121.
Table: main technical characteristics of the TX-193 tachometer
TX-193 is still on sale today. The cost of a new device, depending on the manufacturer, varies between 890–1200 rubles. A used tachometer of this model will cost half as much.
Design and principle of operation of the TX-193 tachometer
The “six” tachometer consists of:
- plastic cylindrical body with glass holder;
- a scale divided into zones of safe and dangerous modes;
- backlight lamps;
- a milliammeter with an arrow attached to its shaft;
- electronic printed circuit board.
The design of the TX-193 tachometer is electromechanical. The principle of its operation is based on measuring the number of electric current pulses in the primary (low-voltage) circuit of the car’s ignition system. In the VAZ 2106 engine, for one revolution of the distributor shaft, corresponding to two rotations of the crankshaft, the contacts in the breaker close and open exactly four times. These pulses are removed by the device from the final terminal of the primary winding of the ignition coil. Passing through the parts of the electronic board, their shape is converted from sinusoidal to rectangular, having a constant amplitude. From the board, the current flows to the winding of the milliammeter, where, depending on the pulse repetition rate, it increases or decreases. The arrow of the device reacts precisely to these changes. The greater the current, the more the arrow deviates to the right and vice versa.
Electrical diagram for connecting the tachometer VAZ 2106
Considering that the VAZ 2106 was produced with both carburetor and injection engines, the tachometer connection was different. Let's consider both options.
Connecting a tachometer in carburetor VAZ 2106
The electrical circuit of the speed counter of the carburetor “six” is quite simple. The device itself has three main connection wires:
- to the positive terminal of the battery through the contact group of the ignition switch (red);
- to the “ground” of the car (white wire with a black stripe);
- to terminal “K” on the ignition coil connected to the breaker (brown).
There are also additional wires. They serve for:
- supplying voltage to the backlight (white);
- connections to the battery charge indicator relay (black);
- contact with the oil pressure sensor device (gray with a black stripe).
The wires can be connected either using a block or separately, depending on the year of manufacture of the device and its manufacturer.
In carburetor “sixes” with contactless ignition, the tachometer connection diagram is similar, except that the “K” terminal of the coil is connected not to the breaker, but to contact “1” of the switch.
Connecting a tachometer in injection VAZ 2106
In the VAZ 2106, equipped with engines with distributed injection, the connection diagram is slightly different. There is no breaker, no switch, no ignition coil. The device receives fully processed data from the electronic engine control unit (ECU). The latter, in turn, reads information about the number of crankshaft revolutions from a special sensor. Here the tachometer is connected to the power circuit through the ignition switch, the vehicle ground, the computer and the crankshaft position sensor.
What to consider when installing
If you still decide to install the VAZ-2106 tachometer on the Oka, the diagram for connecting it to the ignition system will be the same. But the choice of installation location needs to be approached more thoroughly. You need to consider the following features:
- The tachometer installed on the panel should not block the view.
- It should not interfere with driving. This is especially true for cars like Oka.
- You definitely need to choose an option for decorating the device. He shouldn’t stand out, but it’s difficult to achieve this.
Sheet metal is perfect for making a housing for a tachometer. Some motorists use large coffee cans. But before you use it to make the body, you need to clean it to a shine, sand it, cover it with a layer of primer and paint it. This will increase the service life.
It is advisable to then cover the body with some material so that it harmonizes with the overall appearance of the interior - leatherette or dermantine is suitable. If you can find an attractive plastic case, that's great - it will look much better. And there is no need to prepare a place for installation - black plastic looks very good in the interior of an Oka or Kopeyka.
Advantages of contactless systems
For an ignorant car enthusiast, the main argument in favor of BSZ is the fact that at the moment not a single manufacturer produces cars with a contact-cam spark generation system. Foreign brands abandoned it in the distant 80s of the last century, and in the Russian Federation mechanical ignition lasted until the 90s. The reasons for the refusal are quite clear:
- sparks constantly flashed across the contacts, causing them to burn and require frequent cleaning;
- the contact group wore out quite quickly, on average it was enough for 15-20 thousand kilometers, after which the element had to be replaced;
- the wear of the bearing on which the contacts were located made itself felt, which caused unstable operation of the power unit;
- the springs of the balance weights were stretched.
Non-contact ignition produces a powerful spark, which makes fuel burn better
All of the listed malfunctions appeared one by one, haunting the owner of the “classic” Zhiguli. Due to an imperfect design, the spark power of the spark plugs was constantly decreasing, engine performance was deteriorating, and fuel consumption was increasing. New BSZ systems are free of such disadvantages; they are characterized by durability and stable sparking. The spark power also increased, since the output pulse voltage increased from 16-18 kV to 24 kV, which contributes to better ignition of the fuel.
Selecting an electronic ignition kit
Since the “sixes” were equipped with three types of engines (volume 1.3, 1.5 and 1.6 liters), the BSZ kits for them differ in the design of the distributor. The engine has 1.3 liters. (model VAZ 21063) there is a distributor with a shortened shaft, and in 1.5 and 1.6 liter engines. (VAZ 21061 and 2106, respectively) this shaft is equally long. The electronic ignition kit contains the following:
- distributor with catalog number 38.3706–01 for a 1.3 liter power unit. or 38.37061 - for 1.5 and 1.6 liter engines;
- high voltage coil marked 27.3705;
- electronic control unit, marking - 36.3734 or 3620.3734;
- connecting wires.
Attention! When buying a contactless kit for the “classic” Zhiguli, do not confuse it with products intended for the Niva VAZ 2121; the distributors are very similar in appearance. But the “Nivov” part differs in technical characteristics and is marked as follows: 3810.3706, 38.3706–10 or 038.3706–10. Setting it to “six” is strictly not recommended.
Kit for installing contactless ignition
Of the manufacturers selling their ignition kits in the Russian Federation, the most popular among motorists are spare parts from the SOATE company from Stary Oskol. It is worth noting that the new spark plugs of the A-17DVR brand, installed on classic VAZs with electronics, are not included in the delivery package; they will have to be purchased separately. To experience the full results of the replacement, it is also recommended to install new high-voltage wires if you have not replaced them in the recent past.
Despite the fact that the oil pump is one of the most reliable components in VAZ 2106-2107 cars, sometimes it also fails. In order to replace it, it is recommended to study this material: https://vazweb.ru/desyatka/dvigatel/zamena-maslyanogo-nasosa-vaz-2107.html
Steering column switch VAZ 2106
On classic Zhiguli cars, the steering column switch is located on the steering column and consists of three levers. On the left side of the column there are switches for the direction indicators “A” and the head optics “B”.
Depending on the position of the switch levers, certain devices operate
The steering column switch lever “A” can be in one of the following positions:
- 0 — direction indicators are off;
- I — right turn indicators are on;
- II - left turn indicators are on.
Scheme for switching on turn signals and hazard warning lights on a VAZ 2106: 1 - sidelights; 2 — side direction indicators; 3 - battery; 4 - generator; 5 — ignition switch; 6 — main fuse block; 7 - additional fuse block; 8 — relay-interrupter for alarm and direction indicators; 9 - indicator lamp for direction indicators in the speedometer; 10 — alarm switch; 11 — rear lights; 12 — direction indicator switch
Lever “B” is activated by pressing the exterior lighting button on the dashboard:
- 0 — external lighting and low beam headlights are on;
- I — external lighting and high beam headlights are on;
- II — high beam headlights are on (non-fixed position).
Scheme for switching on the headlights and rear fog lamp on VAZ 2106 cars: 1 - external headlights; 2 — internal headlights; 3 - fuse block; 4 — relay for low beam headlights; 5 — headlight switch in a three-lever switch; 6 — external lighting switch; 7 — rear fog lamp; 8 — rear fog lamp switch; 9 — ignition switch; 10 — control lamp for high beam headlights; 11 — relay for turning on the high beam headlights; A - to power supplies
On the right side of the steering column there is a windshield wiper and washer switch “C”.
The right lever can be used to control the wipers and windshield washer.
Switch “C” can operate in the following positions:
- 0 — windshield wiper is turned off;
- I — the windshield wiper operates intermittently;
- II - the windshield wiper operates continuously;
- III - the windshield washer is turned on.
How to disassemble
The steering column switch is a non-separable mechanism and must be replaced if problems arise. However, if you wish, you can try to repair it yourself. The essence of the procedure comes down to dismantling the rivets, carefully disassembling the device, replacing damaged springs, and repairing contacts. The performance of the repaired unit directly depends on the correct assembly. If you want to save yourself from this procedure, just buy a new device and install it on your car. The cost of such products ranges from 700 rubles.
To repair the steering column switch you will have to disassemble it.
How to replace
Replacing the steering column switch on the “six” may be necessary in the following cases:
- damage to the contacts of one of the levers;
- failure of the horn contact;
- one of the switches is broken.
Any of the listed problems require removing the switch from the steering shaft. The tools you will need are a Phillips and slotted screwdriver, and the procedure itself is carried out as follows:
- Remove the terminal from the negative battery.
- We dismantle the steering wheel by unscrewing the fastening nut.
- Using a Phillips screwdriver, unscrew the fasteners of the plastic casing.
- Remove the casing from the shaft.
- For convenience, we dismantle the instrument panel.
- Under the tidy, we disconnect the steering column switch pads, consisting of two, six and eight contacts.
- We take out the connectors from the bottom of the panel.
- Loosen the fastening of the switch clamp.
- We remove the mechanism from the steering column along with the wires.
- We install the new device in the reverse order.
Video: replacing the steering column switch on a “classic”
Repair of the instrument panel of the VAZ “Six” or its components is carried out with a minimum list of tools according to step-by-step instructions. All you need is a couple of screwdrivers, pliers and a digital multimeter to fix basic problems without visiting a car service center.
Scheme
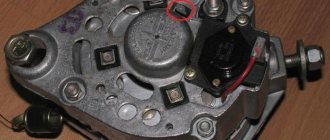
The standard contactless ignition system on the VAZ classic consists of several modules. Typically, the installation kit includes hardware.
- Ignition coil for electronic module. Some motorists leave the old block.
- Distributor, also known as distributor. This is where the main difference lies. The two devices are similar only in appearance. The internal contents of the contactless and classic modules are completely different.
- Controller. This detail is not present on the standard system at all. The electronic unit is installed on the car body and connected to the distributor with wires.
- Hall controller. This part is extremely important for the normal operation of the system. A small sensor is responsible for reading the rotation of the engine crankshaft. If a part fails, the entire system stops working.
More complete kits include spark plugs and armored wires. For the electronic system, the gaps on the spark plugs are set differently, or the elements are replaced.
Installation
It’s easy to install the BSZ on a VAZ with your own hands. You will need to perform a certain sequence of actions.
- Disconnect battery power.
- Remove the distributor cover and turn the crankshaft. Set the first cylinder to TDC so that at this moment the ignition slider aligns with contact 1 of the working chamber.
- Remove the standard ignition coil and replace it with a new one. Here the position of terminals B and K must be observed. This is necessary because the contacts on the modules can be turned out.
- Now we remove the high-voltage wires from the spark plugs and remove the distributor cover from the car.
- Disconnect the distributor itself and remove it from its seat.
- Now we place the switch in a suitable place. It is desirable that the back wall of the device is completely adjacent to the metal surface. This will help cool the device better. Typically, drivers place the part on the inside of the wing or the interior bulkhead. Experts also advise treating the panel to bare metal.
- Next, a new distributor is installed. Here you need to set the marks to the zero position. Align the slider to the ignition firing position on cylinder 1.
- Add high-voltage wires to the cover according to the engine strokes.
Connecting electronic ignition to a VAZ 2106
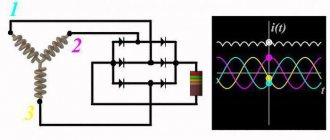
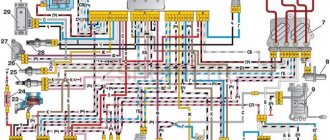
Installing the device is half the trouble. Now you need to configure it correctly. The wiring of the new module is included in the kit and is wound into one bundle. The figure above shows a diagram of connecting the device to the on-board network.
The first contact of the switch and the tachometer wire, both brown, are connected to terminal “K”. Two wires are also placed at the output of coil “B”, from terminal 15 of the ignition coil and block 4 from the control unit. The second wire from the block is routed to body ground.
How to set electronic ignition
Adding a new distributor using the marks is much easier than performing a similar procedure on a classic. The ignition timing is set using the marks. The sequence of actions looks like this.
- Set the distributor according to the marks to advance “0”.
- Try to start the engine.
- Next, you need to turn the distributor body to catch the moment of optimal advance. In this mode, the engine runs smoothly, responds quickly to the gas, and there are no dips.
If you have no experience in such repairs, it is recommended to contact a specialist. Beginners rarely catch the right moment correctly.
Adjusting contactless ignition 2106
Once set, no procedure is required. The module does not have a large number of moving parts. It is enough to set it up correctly initially and use it for a long time.
The adjustment procedure may be necessary after repairing the internal combustion engine, when the valves or carburetor were adjusted. The technician's actions may cause the device to go astray, and its position will need to be corrected.
How to connect a tachometer to a generator
HomeDriving rulesHow to connect a tachometer to a generator
The tachometer is a device that is actively used on gasoline and diesel cars. This device is used to measure the rotation speed (rpm) of the crankshaft or generator. Most modern vehicles are equipped with a standard tachometer straight from the factory.
The need to independently install a tachometer on a diesel engine may arise for various reasons. It should be noted that the tachometer connection diagram on a diesel engine is somewhat different from a similar solution for gasoline internal combustion engines. When choosing a tachometer for a diesel engine, it is necessary to take this feature into account, since a tachometer for gasoline engines will not fit on a diesel engine.
Where does the tachometer signal come from for a diesel engine?
Today, electronic, digital and analog tachometers are available for sale for diesel engines, the connection diagram of which requires a number of features. The fact is that the connection point for the tachometer for a diesel engine in the vast majority of cases is the generator.
To connect to the generator, you must have the tachometer itself, an insulated wire and accompanying instructions for installing and operating a car tachometer.
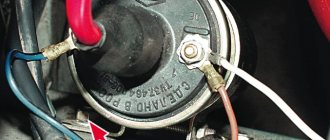
Connecting the device
The operating principle of an electronic tachometer is based on reading electrical impulses. In gasoline units, pulses are read and supplied in a certain amount to the ignition coil. As for the diesel engine, reading is carried out from a special terminal located in the generator housing.
To connect the tachometer to a diesel engine, it is advisable to carry out work on a lift or use an inspection pit.
At the initial stage, it is necessary to remove the protection from the generator, avoiding dirt getting inside the device. The next step is a visual inspection of the generator coil, which has several terminals.
The tachometer contact (input wire) should be connected to the terminal that is usually marked with the letter “W”.
Also, in some sources it is recommended to additionally implement the closure of the contact that comes from the oil pump.
It is noted that otherwise, after the engine reaches a certain crankshaft speed, a warning light may falsely light up on the instrument panel, indicating a critically low engine oil pressure in the engine lubrication system.
If the terminal marked “W” is not initially present on the generator, then you will need to independently install a separate contact wire. The pre-prepared wire must be properly insulated.
To facilitate access, the generator must be completely removed, as it will require partial disassembly. After disassembly, the wires (3 pieces) will become visible, going from the generator winding to the rectifier, which is also built into the device.
It is imperative to check that during the assembly process the wire brought out does not come into contact with moving elements in the generator structure. Next, the tachometer wire is connected to the contact brought out from the generator in the same way as when there is a terminal marked “W”.
The remaining contacts of the tachometer are connected in accordance with the diagram contained in the instructions for the specific device.
It is also worth considering that directly connecting the wire to the tachometer will lead to incorrect values. Additionally, you will need a divider board, which will make the speed readings correct.
Device
The tachometer makes it possible to switch to another speed in time so that the engine operates in economical mode.
A novice driver can focus on the position of the arrow. If it approaches the red zone, then you need to shift to a higher gear. In addition, the device is used to adjust the operation of the power unit at idle and control the crankshaft speed while driving (author of the video - Avto-Blogger.ru). Analog tachometers are reliable and simple measuring instruments.
Their design includes the following elements:
- pointer arrow;
- graduated scale;
- an electromagnetic coil with a shielded winding;
- cable for transmitting information from the crankshaft.
The operation of the device is based on the electronic principle. The signal from the crankshaft is transmitted through wires to a microcircuit, thanks to which the needle moves along the dial. Information can be taken directly from the shaft, from the generator or from other power take-off shafts. In this case, the original signal is converted with a certain coefficient.
types, connection methods and advantages of devices
Which owner would not want to install a tachometer on a VAZ 2105? Only those who already have it. The basic configuration does not require its presence on the instrument panel. Which is very disappointing. But if a torpedo and a shield from a VAZ 2107 are installed, then it is already there. The useful operation of the device was appreciated by professionals and amateurs
Many people cannot imagine driving without such an important device.
What does a tachometer do?
Its work is based on reading crankshaft revolutions. This is necessary in many life situations. Experienced car owners may argue that it is of no use on the VAZ 2105. This is fundamentally wrong. It’s enough to imagine a situation where you can’t hear the engine running due to noise on the street or loud music in the cabin. You can drive based on the speedometer, but what if the car, for example, is heavily overloaded or has a trailer?
To put it briefly, you can make a list of tachometer functions.
- Determining the optimal moment for changing gears.
- Detection of floating revolutions.
- Determination of surges and maximum torque.
- Idle speed adjustment.
- Helping beginners learn how to drive a car.
- Ease of use in noisy environments.
- Early detection of engine or electrical problems.
- Reduces engine wear and saves fuel thanks to timely gear changes.
Kinds
There are many types of tachometers. What are the differences between them?
- Installation.
- Tachometer type.
- Differences between carburetor and injection systems.
- Connection method.
- Principle of operation.
VAZ 2105
Installation
There are 3 main options for this parameter:
- contactless;
- regular;
- remote
Installation of standard devices is carried out in the panel. We are talking about a shield with a VAZ 2107. Remote ones can be located anywhere. They come with a special leg for fastening. You can use either adhesive tape or double-sided tape. In a word, everything depends on the flight of fancy. Non-contact tachometers do not require connection, which means that installation is not necessary for them. It should be taken into account that such devices are not designed for constant monitoring of speed. They are better suited for checking, tuning the engine and the main tachometer.
Types
By type, all tachometers are divided into:
- digital;
- electronic;
- analog;
- mechanical.
A mechanical tachometer is a rarity. These are the very first devices that were installed on cars. Its use today has no basis other than adherence to retro style. Analog tachometers are the main type that is found on the VAZ 2105. They have the form of a dial and a arrow, less often, a vertical or horizontal scale. These are the devices installed in panel 2107, but they can also be remote.
And the last type is the most modern. This is a digital tachometer. It has a lot in common with the electronic one, but the display is better. Capable of displaying several different dimensions at the same time and having a nice design. This is the most expensive type.
Injector and carburetor
Many car owners have long switched to using an injector instead of a carburetor. The tachometer of the injector and carburetor has a slight difference. But it will not work correctly, without intervention in the design.
You need to pay attention to this
Connection method
The device is selected for a specific type of engine. The connection is carried out strictly according to the tachometer instructions. The colors and purpose of the wires may vary greatly.
The most common connection is 3 wires:
- "+" to "+";
- “–” to “–” or “ground”;
- "signal" for ignition.
This connection is used when replacing the tachometer on a panel from a VAZ 2107.
The second connection is more often used on remote devices. It looks like this:
- “+” to “+”, to the terminal marked “B+”;
- “–” to “–” or “ground”;
- “signal” to the coil (contact “K”).
There are all sorts of options that allow you to use the device for your own purposes. For example, the connection determines when and how the device will turn on. The choice depends on the owner’s knowledge of the car’s electrical circuits and the flight of his imagination.
Note
The number of engine cylinders is indicated on the box of each tachometer. Accordingly, it must coincide with their number in the car. Otherwise, the readings will not be accurate.
Among the remote devices that the market offers, there are a large number of low-quality products. The error in their work can be enormous. It is better to opt for well-known manufacturers.
https://youtube.com/watch?v=jfIlfopkod0
Possible faults
A typical malfunction for the mechanical tachometer of the VAZ 2106 is wear of the cable. Coil failures are a little less common.
An analog tachometer most often becomes unusable due to various malfunctions of the microcircuit. And in second place is the same coil.
Digital measuring instruments, due to their novelty, do not yet allow us to talk about weak points. However, it can be assumed that the pulse counter and the processor chip will be subject to the greatest load.
One of the main mistakes that causes the tachometer to malfunction is thoughtless placement of the display by the car owner. On the one hand, mounting it on the dashboard, above the instrument panel, is very convenient and has many advantages when driving. But this area is often exposed to environmental influences, or more precisely to heating from the sun. The heated plastic housing of the tachometer melts, making further work difficult.
Making a simple tachometer with your own hands
To make this device, a microcalculator is used as the basis. This option is suitable for those who have problems with the element base. It is worth noting that such a device does not provide 100% accuracy, and the tachometer will not display the number of rotations per minute on the display. Nevertheless, the calculator is a good alternative to other devices for counting signals.
To manufacture the signal regulator, inductive or similar controllers are used. When the disk rotates, the display shows one signal after each rotation. The contacts must be open at this moment. They close when the assembly passes the disc tooth. The tachometer in question (it’s quite easy to make it yourself, as we see) of this type is excellent for those cases where measurements are rarely taken. For those who want to install a regular speed controller, it is better to opt for more reliable devices.
Video
The procedure for installing a tachometer from a VAZ 2106 to a VAZ 2105:
A car enthusiast who cares about his car should have, among other devices, a tachometer, which helps to operate the car correctly. If there is no standard device, then it should be installed. The article describes their types and gives instructions on how to correctly connect the tachometer to a diesel engine and to a gasoline engine.
How is the tachometer connected to car sensors?
When purchasing a new tachometer, a motorist may notice that the kit does not include a separate sensor. In fact, the device is not equipped with an individual sensor, which is installed on the motor shaft. There's simply no need for it. It is enough to connect the wires to one of the following sensors.
Crankshaft sensor. It fixes the position of the cranks in the 1st cylinder of the engine and supplies an electrical impulse. This signal goes to a magnetic coil or to a processor (depending on the type of device). There the pulse is converted into the appropriate value and then displayed on a scale or dial.
Idle speed sensor (correct XX valve). In injection engines, it is responsible for supplying air to the intake manifold, bypassing the throttle valve. In carburetor engines, this regulator controls the supply of fuel to the idle channel (when the engine brakes, it cuts off the flow of gasoline, which leads to fuel savings). The amount of fuel that the valve regulates determines the engine speed.
ECU. Modern tachometers are connected to an electronic control unit, which receives signals from all sensors connected to the engine. The more data is received, the more accurate the measurements will be. In this case, the indicator will be transmitted with minimal error.
Analog or digital?
Typically, the VAZ 2106 has an analog device, where the arrow shows the number on the scale. Such a tachometer transmits the physical rotation of the flywheel, which cannot be an accurate indicator, so service stations often replace the standard version with a digital one.
The digital device performs a formulaic count of revolutions using a small processor. This calculation includes a variety of jumps in flywheel speed, taking into account all the errors and inaccuracies. The digital version of the device gives a more complete picture of the operation of the vehicle engine.
After all the owners of the “six” began to switch en masse to digital tachometers, analog meters began to gradually disappear from the market. However, VAZ 2106 drivers who value classics, elegance and style prefer analog versions of the device, since the arrow on the dial looks more solid and vintage. And we are talking not only about devices integrated into the panel, but also about remote rotation sensors.