Depending on the year of manufacture of the car, the connection diagram for the VAZ-2107 generator may vary. Over the years, various devices have been added to the car, and electricity consumption has increased. If in the early 80s you could find a radio or (in very rare cases) a cassette recorder on cars, today the list is supplemented by central locks, alarm and security systems, and acoustics (subwoofers, powerful amplifiers).
Various types of devices help the driver - video recorders, navigators, inverters, chargers, pumps, etc. And they all consume electricity, and a generator helps replenish the charge, which charges the battery to the optimal level.
Carburetor engines
The connection diagram for the VAZ-2107 generator (carburetor and injector) depends on the year of manufacture of the car. The first carburetor models had a G-222 generator installed. The same device can be found on commercially produced VAZ-2105 and VAZ-2104 models with a carburetor injection system.
The maximum output current for such an installation is 55 amperes. But in recent years, cars with fuel injection systems have become widespread. Its use implies a large current consumption, so it is necessary to use a generator with a high current to ensure a normal charge level and power supply to all consumers.
Injection engines
On injection engines, generator sets 5142.3771 or similar are used. They have increased energy, the maximum current is about 80-90 A, it all depends on the design option. Cars of the seventh series and similar models are good because they are like a designer set. You can install almost any generator on them, similar in design to the “native” one.
For tuning, installations with an output current of 100 amperes and higher are used. But the use of such devices is justified only if many powerful consumers are connected to the electrical equipment. Regardless of the design, the generators produce alternating current; a voltage regulator, capacitor and diode block are installed in the housing.
Cars before 1986
The G-222 generator was used in cars. The connection diagram for the VAZ-2107 is almost the same as on later models. But there are features, among the main ones - there is a control lamp indicating battery charging. Moreover, it worked using an electromagnetic relay.
When the ignition is turned on, power is supplied from the lock through the instrument panel fuse to the electromagnetic relay of the battery charge lamp and the coil contact. The second contact of the coil is connected to the center wire on the generator (the point where the three windings connect).
The electromagnetic relay has normally closed contacts, so when the ignition is turned on, the lamp lights up. But as soon as the engine starts running, the generator produces current. And a current flows through the control lamp coil, which causes the armature to attract and open the contacts.
At the same time, the power to the incandescent lamp stops and it goes out. This indicates that the battery is charging normally. Only when the power supply to the lamp stops will voltage be applied to the excitation winding and the generator will be able to return to operating mode.
How to independently connect a generator to a VAZ 2107?
Every G7 car owner should know what the generator set connection diagram is.
Despite the fact that this unit is quite reliable and has a long service life, sooner or later it will still fail, the reasons may be as follows:
- burnt out windings inside the unit;
- interturn short circuit formed in the system;
- damage and other defects in the device body, etc.
If you do not plan to repair the generator or the repair work is not successful, then you will need to replace the device.
To do this you need to do the following:
- First you need to turn off the power to the vehicle's on-board network. To do this, turn off the ignition, then open the hood and disconnect the negative terminal from the battery.
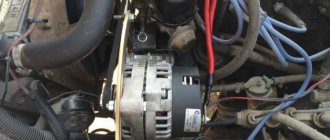
- Then you will need to find the generator itself - as we reported above, it is located on the right side of the power unit. Wires and a power cable with a plug are supplied to the generator - it must be disconnected. It is advisable to remember the location of the wires.
- Next, it is necessary to dismantle the mudguard on the right, as well as the motor protection, if any.
- Now comes the hard part. Using a wrench, you will need to unscrew the nut of the screw that secures the unit to the power unit housing. If you have difficulty unscrewing the nut, treat it with WD-40, after which the screw itself will need to be removed from its seat. Try hitting it with a hammer from the other side, but not too hard, this will knock out the bolt. If you were unable to remove the screw, you will have to dismantle the unit with the bracket on which it is fixed.
- To dismantle the bracket you will need to unscrew two screws; some modifications of the VAZ 2107 use three-screw fastenings. In any case, when performing these actions you must be guided by the design features of the vehicle. Sometimes, to remove the unit, you also need to remove the radiator device or move it a little to the side to gain access to the bracket. In this case, there is no need to disconnect the pipes connected to the radiator.
- After the unit is removed from its installation location, you will need to remove the drive belt and remove the generator.
- This way the knot is removed. To dismantle it, you must perform all these steps, only in reverse order. Before installing the device, you must familiarize yourself with the installation wiring diagram and the electrical connection diagram; all this must be indicated in the service book for the car.
- When the knot is installed, it is necessary to adjust the strap tension. To perform these steps, you will need to loosen the two screws that secure the assembly. Using a pry bar, you need to tighten the strap and secure it in the appropriate position with a nut located on the adjusting plate. When adjusting, be sure to check the degree of belt tension; to do this, press the belt in the free space between the pulleys. The belt will bend, and the deflection should be at least 1 cm and no more than 1.7 cm, otherwise the generator will not work correctly, and the belt may wear out earlier. When the adjustment procedure is completed, you need to tighten all the nuts.
Photo gallery “Changing the generator with your own hands”
Cars manufactured in 1996 and later (carburetor engines)
The connection diagram for the G222 generator on a VAZ-2107 after 1996 differs from the previous one in one small feature - the power supply to the excitation winding has been changed. Cars have been improved, and some improvements make it possible to kill two birds with one stone - simplify the design and make the fate of the driver easier.
After 1996, instead of a warning lamp, they began to install a voltmeter, which more or less accurately shows the battery charge level. And if the lamp allows you to monitor only the presence or absence of voltage on the generator, then using a voltmeter the driver visually assesses the level. And if necessary, it can understand that repairs or maintenance are necessary.
Generator circuit for injection engines
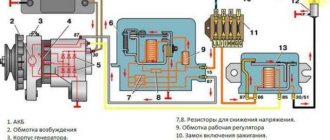
In fact, the design of the generator set is not much different from those installed on carburetor engines. Only the type of excitation and serviceability monitoring differ. The dashboard contains not only a warning lamp, but also a voltmeter; these two devices allow you to assess both the presence and level of charging. Current flows through the lamp filament and is supplied to the field winding when the engine starts. The connection diagram for the VAZ-2107 generator, regardless of the year of manufacture, implies operation in the following mode:
- When the ignition is turned on, power is supplied to the excitation winding. A magnetic field appears around the armature.
- When the crankshaft rotates with the starter, the generator armature also begins to move. With the help of movement and a magnetic field, a potential difference arises at the ends of the stator windings.
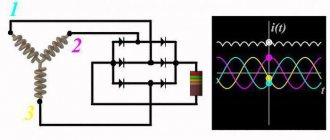
- From the windings, voltage (alternating, three-phase) is supplied to the rectifier unit, and from it to terminal “30” of the generator.
- Pin “30” is connected to the battery (positive terminal). Consequently, the entire electrical system is powered and the battery is charged.
In this case, the battery and generator G221A work in parallel. The connection diagram for the VAZ-2107 with carburetor and injection engines is almost identical, with only minor features.
?Why doesn't the car start in cold weather?
Can you list a couple of dozen reasons? Will they help you? Will you implement them all without hesitation?
Of course not, because winter will end sooner than you can double-check all this.
So what's the point?
I will not tire of repeating - there is no magic pill. There is only a magical tool called Diagnostics!
Without it, it is impossible to quickly determine the cause of poor engine starting.
A simple diagnostic adapter for 10 usd will help you in one minute determine the performance of all sensors of the engine management system, except for the camshaft position sensor.
But even if you don’t want to buy an adapter and delve into diagnostics (I understand that not everyone likes this), then at least don’t listen to the advice of gifted bloggers and don’t rush to immediately change the DTOZH, IAC, DPKV...
They will advise you this way for more than tens of thousands of hryvnias, rubles or whatever currency you have...
I agree, both the temperature sensor, the idle speed control, and the crankshaft position sensor can affect the confidence and duration of starting.
But if you drove into the garage yesterday and the engine started perfectly, the temperature on the panel was normal, the tachometer worked, the idle speed was excellent, then what do these sensors and actuators have to do with it???
Nothing will happen to them from exposure to frost. And the likelihood that they themselves failed overnight is very, very small.
Therefore, do not listen to anyone and do not run to spend money on replacing “frozen sensors” and “broken spark plugs”.
Difference between carburetor and injection systems
Many car owners independently replaced the carburetor with an injector, and some bought a car with an already updated system. One thing is certain – this is a step forward. But this means changing the operation of many nodes. How are things going with the generator, its operation and repairs?
There are differences, albeit minor ones. The injector assumes the presence of an ECU on board the VAZ 21074. And this is another consumer of electricity. Additional wiring is connected to the generator to provide power to the elements of the electronic control system. There are no more changes.
Note
You cannot check the functionality of the generator by disconnecting the terminals from the battery while the engine is running. This will damage the ECU.
Types of breakdowns
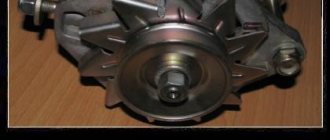
Generator VAZ 2107
What problems occur if the generator is not working properly?
- Extraneous noise appears.
- Complete lack of battery charging while the engine is running.
- Overheating and failure of the same battery.
- Damage to any or all energy consumers, including the injector.
- Increased or decreased voltage in the electrical system. The standard voltage is 13.6-14.5 V.
- Mechanical or electrical damage to the elements of the generator itself.
Obviously, this node requires special attention.
Let's start the renovation
How to change the generator on a Priora with your own hands
There may be several reasons for the battery not charging. The instructions below are quite universal and are suitable for any case.
Troubleshooting algorithm:
- First of all, we check the serviceability of the belt and its tension. If it is damaged or loose, charging will be less than normal and will ultimately lead to battery failure. The belt is also partly responsible for the operation of the cooling pump, so a damaged belt can cause other problems as well.
The problem can be determined by the sign when, when the engine is running, the voltage in the power circuit is within the normal range, but immediately after connecting the load it disappears. Another sign of a weak belt may be a whistling sound. It may appear immediately after starting the engine or when large current consumers, such as lights, are turned on.
This needs to be corrected, since a poorly tensioned belt slips during operation of the mechanism, which accelerates its wear. It must be tightened to a deflection level of 12 - 17 millimeters with a pressure of 10 kgf, or replaced with a new one;
- In order not to waste time and not draw false conclusions, you need to check the voltage on the battery with the engine stopped and running. The normal supply voltage of the machine when the engine is running should be 13.6 - 14.1 volts. A voltage below this will indicate a weak belt (point 1), a faulty regulator relay, or a failed diode bridge.
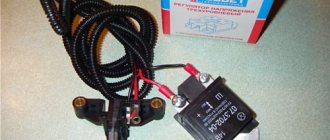
- If everything is fine with the belt, remove the charging relay and check the wear of the brushes. They should be longer than 5 millimeters, this can be seen visually, but to be sure, check with a ruler. If they malfunction, replace the VAZ 2022 charging relay.
You can check the relay by applying a battery voltage of up to 12 volts to it and connecting a multimeter to the brushes. There should be tension. Next, you need to apply a voltage of 16 - 18 volts to the relay. There should be nothing on the brushes;
- The next reason for low voltage is a break in one or more diodes. Revealed when removing and disassembling the generator.
It’s worse when a diode breakdown occurs, then there is no voltage drop, but this has a detrimental effect on the battery. An alternating voltage enters the machine's power circuit, which leads to boiling of the battery, destruction of the plates and a decrease in its service life.
- If the VAZ 2107 battery charging does not light up, or rather, the indicator light on the instrument panel does not light up, despite the fact that the voltage gauge shows normal voltage and despite all this there is no charging, then the problem lies in the contact at the terminals. To fix this, you need to disconnect the wire and clean it with sandpaper or a file and check the integrity of the wire from the battery to the generator.
- Another reason why the battery charge lamp does not light up at all is a break in the armature winding. It can only be determined after disassembling the generator and measuring the winding for an open circuit using a tester or a multimeter.
Below is a charging diagram for the VAZ 2107 battery:
Main details
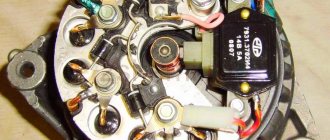
To understand where to look, you need to remember the main components that make up the generator. This:
- pulley;
- front bearing;
- rotor impeller;
- stator winding;
- magnetic circuit;
- rotor;
- rear bearing;
- “chocolate” (relay-regulator);
- diode bridge.
Most often, the brushes that are part of the relay-regulator unit wear out. Bearing wear is also common. You should also expect breakdowns of the diode bridge and the generator belt (which drives the pulley). Another part that requires periodic replacement is slip rings. They are located on the rotor and are in contact with the brushes.
To increase service life, you should regularly lubricate the mechanical components of the device (especially bearings), measure the voltage, the battery charge level and its condition, and tighten the fasteners. If you suspect any kind of breakdown, you must immediately begin repairs, otherwise there is a risk of failure of any connected device and component. If an injector and an ECU are installed on the car, then they do not joke with electricity. And the most ordinary care and prevention will reduce the likelihood of breakdown to almost nothing.
What should you pay attention to?
To carry out repairs, you need to have a general understanding of electricity and its properties. If with mechanical breakdowns everything is much simpler and often a visual inspection is enough to detect a part that needs replacement, then with electrical faults there is no such clear visualization. Moreover, the initial cause of generator breakdowns may be a malfunction of another component of the VAZ 21074, for example, the same battery. And vice versa. Very often a chain reaction is detected, with damage to several nodes.
In such cases, it is important to discover the cause before taking action. Otherwise, there is no guarantee that after replacing one or another element everything will not happen again.
As mentioned earlier, you cannot check the operation of the generator on the VAZ 21074 using the old method of tilting the terminals. Don't forget about the injector and ECU.
General recommendations
There are several more general preventative tips that will help deal with the problem of a stalled engine. Even if the car starts easily, it is better to protect yourself.
- Buy and always have with you a set of wires with which you can start the internal combustion engine from another car. The wires will not take up much space, but they will prove to be an indispensable device if the battery is dead. Another option is a starter charger. Conveniently, it starts the engine easily. For automatic machines such a device is mandatory.
- Have a cable with you (for manual transmissions). This is the simplest solution for a car that stalls in cold weather.
- Monitor the condition of the battery. If there are any doubts about its reliability, you should remove it at night and put it in a warm place.
- Choose low viscosity oil for cold weather. Synthetic is good because it thickens less than mineral.
Before the onset of frost, it is recommended to carry out a full diagnostic of the machine in order to identify all faults, because in cold weather they will manifest themselves especially strongly. If problems do arise and the car cannot be started even with a wire, then it is better to tow it to a warm box and let it warm up for several hours.
Malfunctions and their elimination
Let's start with the simplest and most obvious. From the work of indicators. These are the difficulties that may arise.
Constantly lit indicator (even when the ignition is turned off)
To eliminate the problem, you will need to replace the diode bridge with a new one. The reason for this was a short circuit on it. You can try to repair it, but this requires knowledge. Replacement cost is low.
Devices and sensors do not work
To do this, you will need to check all wiring and contacts. Often the cause of such an incident is the fuse box. It is necessary to check the voltage in all areas to determine the location of the fault. If the cause is the generator, then you need to check the belt tension and the stability of the pulley. Next, the “chocolate”, brushes, and diode bridge must be checked.
The battery indicator is always on when the ignition is on
You need to start by checking the battery. In this case, the inspection is carried out both on a cooled down car and on a warm one. If overheating and boiling occurs, then you need to check the voltage regulator unit on the generator and check the wear of the brushes. We must not forget about the belt, pulley and bearings. To avoid unnecessary work, you need to measure the voltage between the generator and the battery. Most often this is a signal that the battery is not charging.
The indicator flashes
If in the previous case there is often not enough charging, here, on the contrary, there is a recharge. The regulator and brush assembly need to be replaced.
The noise may be caused by worn bearings, excessive tension or loosening of the belt. You need to make sure that all fasteners are secure and the gaskets are intact. Less commonly, the cause of this is a malfunction of the rotor or stator. And, again, the same generator brushes can make the most unpleasant sounds. In this case, they are changed or wiped with gasoline.
Voltage drops
This is best seen at night. If the headlights burn unevenly and constantly change light intensity, then the voltage regulator needs to be replaced.
Multimeter testing method
The most informative is a full check of the diode bridge. To implement it, you will need a multimeter, tester or Tseshka - any of these devices is equally suitable for measurements.
Time spent checking: 10 minutes.
Follow these steps:
- Determine the purpose of the pins. The method is universal, so you can check both the diode rectifier as an assembly and the design of individual parts without disassembling them.
- Install the multimeter probes. Install the multimeter probes into the appropriate connectors on the device, observing the color markings (black - minus, red - plus). Switch the switch to dialing mode.
- Use the negative lead of your multimeter.
Connect the negative probe of the multimeter to the plus of the diode bridge, and the positive one in turn to each of the AC voltage terminals. As a result of touching, the opening voltage of the diodes should be displayed on the multimeter display; at both points this measurable value is the same for each measurement. Otherwise, the assembly is faulty. - Swap the tester probes.
Next, you need to swap the tester probes - set the red one to positive, and alternately touch the black leads to the AC voltage terminals. The display will display a unit, indicating an infinitely high resistance - with reverse polarity, the diodes remain closed. Otherwise, if any voltage is displayed, the bridge is broken. - Use the positive lead of your multimeter. Touch the positive probe of the multimeter to the negative terminal of the diode bridge, and touch the negative probe in turn to the variable terminals. In both cases, the voltage drop should be displayed on the display.
- Use the black probe. Install the black probe on the negative terminal of the assembly, and connect the red probe to the variable terminals. There must be a unit in both positions on the multimeter, otherwise the element is broken.
Completion
The most typical and common breakdowns were presented. For correct diagnosis in serious cases, special stands are needed, which are present in many workshops. It should be noted that sometimes the cost of such repairs can be equal to or even exceed the price of a new generator. Therefore, repair is not always the answer.
From the text it becomes clear that there are no significant differences between the injection VAZ 2107 and the earlier carburetor version. The same applies to the modification of the VAZ 21074 and all others.
Generator manufacturers claim that the generator is designed for 200-250 thousand kilometers. After passing the barrier of 100-150 thousand, it is necessary to conduct a thorough inspection and lubricate all mechanical connections.
Spark plug
You should enter the winter season with proven spark plugs. It is usually recommended to change spark plugs after 15 - 20 thousand kilometers, iridium - up to 80,000 km. If you use regular candles, it is better to replace them regularly before the onset of the first cold weather. Then you can be sure that the spark plug system is prepared for winter. In any case, if such a replacement is not planned, it is necessary to check the condition of all spark plugs. To do this, you need to unscrew them and evaluate the quality of the working area. There should be no heavy carbon deposits, signs of oiling or overheating. Normal color: light gray or brownish.