Many people are interested in which generator is better to install on the VAZ 2106 and 2107. After all, the standard device has some disadvantages that negatively affect the performance. Standard generators were developed quite a long time ago, and they were not designed for a large number of energy consumers. At that time, a couple of light bulbs and a starter were used. It is not surprising that with a large number of devices, the generator cannot cope with its responsibilities.
We have to look for a suitable replacement for him. To do this, it is important to take into account all the features of the electrical circuits of the machine. The new device must fit them completely.
Standard option
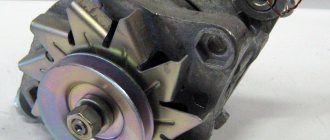
Which generator is better to install on VAZ 2106 and 2107? The question is quite complicated. It needs to be considered starting with the most common option. After all, any manufacturer will say that it is the standard version that should be installed on the car. Let's look at the features of the standard version G221.
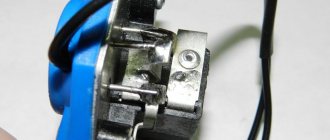
In this type of relay generator, the regulator is installed separately from the brush assembly. This makes it easier to troubleshoot some problems to some extent. The advantage is the ease of installation, there is no need to adjust the wiring for connection, everything is done according to the standard scheme. But such a generator is low-power; it produces a charge of a maximum of 42 A, which is not enough for most modern batteries.
From all this, we can conclude that a standard generator is certainly good. But, if you have additional devices, it is not very profitable to use it. It is best to choose a more powerful option.
This generator is intended for use on Niva cars. It is capable of delivering 50 A of current, which is quite enough for full-fledged electrical work. It differs from a standard “six” generator in the presence of a built-in regulator relay. Here it is assembled into one unit with brushes. Therefore, to install it on a VAZ 2106, you just need to make some minor modifications. This electric machine is installed on 2107 without any special interference or modifications.
There are several ways to refine such a generator. The easiest way would be to install brushes from the G221 generator. They fit perfectly in place of the relay assembled with the brush assembly. No modifications are required, this allows you to install such a generator, even for people without special skills. It is possible to install the G222 with a standard regulator, but to do this, you will have to redo the generator connection diagram. Otherwise, nothing will work out.
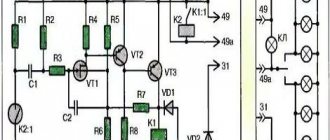
Mounting block connection diagram
P1 — relay for turning on the heated rear window; P2 - relay for turning on the headlight cleaners and washer; P3 - relay for turning on sound signals; P4 - relay for switching on the electric motor of the engine cooling system fan; P5 - headlight high beam relay; P6 - low beam headlight relay; A - the order of conditional numbering of plugs in the mounting block blocks. The outer number with the letter “Ш” in the plug designation is the block number, and the inner number is the conventional number of the plug.
Generator 2108
This device is often installed on both 2106 and 2107. This is due to its greater efficiency; it produces a charging current of 55 A, which is quite enough for most motorists. But, if your car has significantly more equipment, then it is better to choose something more powerful.
These generators are identical in terms of mounting, so there will be no problems with the installation itself. Of course, if you remember to remove the terminal from the battery. The fun starts when you connect. The whole point is that 4 wires are attached to the original device. There are only 3 for the “eight” one. This is due to the built-in voltage relay. To obtain a normal result, you need to insulate the black wire, and connect the rest as usual. When the generator is running, the light indicating the discharge will be on. This is a normal phenomenon with such a connection. Accordingly, it should go out when there is no charging.
In principle, you can already drive like this, but if you want to do everything as expected, you will have to make some more modifications. We remove the old relay and replace it with a regular power relay. Now the light will light only when the engine starts, and also at low speeds, which is quite acceptable.
When installing on a VAZ 2107, you only need to add a power relay.
Malfunctions
The main malfunctions of the VAZ 2107 generator include:
- brush wear;
- failure of the diode bridge (rectifier unit);
- failure of rotor bearings;
- short circuit in the excitation winding;
- break or short circuit in the stator winding.
Signs of a faulty generator are:
- no indicator light on the dashboard comes on;
- the voltmeter needle is in the red zone;
- sparking inside the generator;
- noise during operation (hum or howl);
- smoke and burning smell coming from the generator.
Generators for VAZ 2106 and 2107
The generator on the VAZ 2106-2107 costs the same as on the VAZ 2101 - G221. If you install additional external current consumers that operate constantly, this will lead to undercharging and insufficient current will be supplied from the relay regulator. These additional devices include:
- powerful audio systems;
- fog lights;
- TV;
- preheater;
- additional heater;
- fridge.
Any similar device will lead to greater power consumption and, consequently, to premature battery discharge, even when the engine is running at high speeds. Standard devices for 2106 were developed a long time ago and are not designed for modern energy-consuming add-ons.
In this case, it is recommended to replace the standard generator with a more powerful unit.
What to install?
G 222
If you need to increase the current power, then, when deciding which generator is better to install on the VAZ 2106 or 2107, instead of the standard one, take the G 222, which was installed on the VAZ 2105, Nivakh. It would seem that it itself is no better than the standard one on the “six”, but you can take an upgraded version that will be more powerful. Unlike the 221, this unit is designed with a built-in regulator relay, assembled into one unit with brushes. The G 221 gives an output of 42 A, and the 222nd - 50 A. Increasing the cross-section on the rotor winding increases the power, although the design is completely similar to the G 221. However, to install it on the 2106 you will need minor modifications. The easiest way is to install brushes from G 221. They fit perfectly in place of the relay. This modification is quite feasible even for car enthusiasts who do not have the skill.
It can be installed on a VAZ 2106 G222 with a standard regulator, but then it is necessary to change the connection diagram of the electrical machine.
On 2107 everything is installed without problems.
Check the voltage at medium engine speeds at the battery terminals, if it is 14 V at 2500 rpm, then everything is fine. You can drive with a more powerful unit by connecting additional options.
Generator 2108
This installation has greater efficiency, delivering a current of 55 A. It is installed on both 2106 and 2107.
The mount is identical to the standard ones, there are no problems during installation. Just remember to remove the battery terminal. You'll have to tinker with the connection to 2106. There are 4 wires going to the standard device. On the “eight” - three, since the voltage relay is built-in. To get a good result, insulate the black wire, connect the rest according to the standard system. The light bulb - the discharge indicator will light up when the generator is running, and will go out if there is no charging.
How to remove the unit with your own hands?
If malfunctions are detected in the operation of the generator device, it is necessary to remove the unit for further repair or replacement. If the generator cannot be repaired, which is extremely rare, then it will be useful for you to learn how to dismantle the unit to change it.
So, how to change the unit yourself:
- First you need to open the hood and disconnect the battery terminals, and then disconnect the connector with the connected wire from the unit.
- Then you need to remove the insulating cover from the battery and slightly loosen the device. By loosening the tensioner pulley nut, you can remove the drive belt.
- After this, you will need a 17mm wrench, with its help you will need to unscrew the adjusting bar and remove it.
- Now you should unscrew the fastening nut from the bottom side, and then remove the bolt with sleeve from the seat. After completing these steps, you will be able to dismantle the generator unit (the author of the video is Roman Romanov).
Lada Priora - generator replacement
The Priora requires a powerful generator; the car has a lot of electronics and a weak installation cannot cope with it.
A generator labeled 5102.3771 is recommended for the Priora, providing a power of 80 A; on luxury versions with even more electronics, a 115 A device is installed. Then which generator is better to install on the Priora?
Car owners recommend a unit produced by KZATEtm Samara plant under number 9402.3701-14, producing 115 A.
There is no need to modify it during installation, you just need to find the connector, because there are differences from the standard one. You can use a plug from a VAZ-2108 from the limit switch for turning on the reversing lights, which costs only 20 rubles.
Next, you will have to make a little modification when connecting to the “B+” power terminal in order to fit it to the desired size.
The cost, of course, of domestic units is higher than that of Chinese or Bulgarian ones, sold for 2200 and 3000, respectively. For Russian ones they ask for about 4000. But if you need repairs with Russian-made components, you can easily find spare parts.
Interchangeability of autogenerators
Interchangeability of generators for Lada cars is achieved if the following requirements are met:
- the main technical characteristics of the installed generator are not lower than those of the device being replaced;
- the gear ratio from the internal combustion engine to the generator is the same;
- the devices have similar electrical circuits;
- The new generator is suitable in terms of weight and dimensions and type of fasteners.
Most Russian-made automobile generators have a 2-leg mount. These fasteners are found on both covers. For equipment of foreign brands, installation is carried out using 1 paw, the fasteners are located on the front cover.
In order to correctly install and securely fasten a foreign generator in a car from AvtoVAZ, it is necessary to replace the bracket.
Which generator is better to put on a VAZ 2110
VAZ 2110 factories install KATEK generators with a current of 80 A. The service life is 140,000 km, which is approximately 10 years of vehicle operation. Answering the question of which generator is better to install on the VAZ 2110, experts recommend products from Russian manufacturers.
What to consider when choosing
- Russian manufacturer or foreign? Of course, first of all, Russian manufacturers are preferable. If only because it is easier to find spare parts in the event of a minor breakdown. If you purchase a generator for a VAZ 2010 from a not so popular company, it may be difficult to find spare parts, and they will not cost you so much.
- Current strength. Factory models for VAZ 2010 - 3771 or 94.3701 - are designed for 80 A, this current is enough, even if there are additional devices that consume it. More powerful ones - 120 A - are installed in the presence of powerful acoustics, no harm is done to the battery, and you will provide all energy consumers with uninterrupted current.
- It is better to purchase a generator if there is a warranty on it. There may well be a defective product, and the warranty will provide the opportunity to replace it with a new one.
Generator Manufacturers
It is best for 2010 to purchase a standard generator from KATEK or KZATEtm Samara plant, and about 50% of owners do just that, according to statistics. They are reliable, cope perfectly with their functions, creating the necessary tension.
Among the foreign-made generators, we can recommend Bosch, Delphi and Denso, which are also reliable and popular.
About the current-speed characteristic
TLC is the dependence of the current supplied by a car generator to the on-board network on the rotor speed at a constant voltage. This parameter is calculated when the device is operated together with a charged and serviceable battery with a rated capacity of at least 50% of the rated current of the generator. The characteristic is calculated in the heated and cold states of the equipment.
Main consumer characteristics
- Maximum current.
- The magnitude of the operating voltage.
- Rated power.
- Gear ratio.
- Efficiency
- Dimensions and weight.
The main operating parameters, type and brand are usually indicated on the device label.
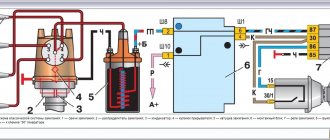
Schemes of individual blocks of the seven
Power supply system
Power plant starting system
1 - starter; 2 - relay; 3 — ignition switch; 4 - battery
Ignition system
1 - generator; 2 — ignition switch; 3 - distributor; 4 - breaker; 5 — candles; 6 - coil; 7 - battery
Contactless ignition system
External and internal lighting
Windshield wipers and washers
1 — electric motors of the windshield wiper; 2 — washer motor; 3 — mounting block; 4 — ignition switch; 5 - washer switch
Cooling Fan
1 — fan electric motor; 2 - sensor; 3 — mounting block; 4 - ignition relay; 5 - ignition switch.
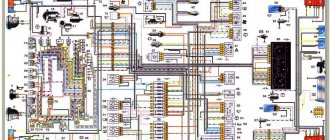
Car wiring diagram
1 – radiator fan drive motor; 2 – relay and fuse block (mounting block); idle speed sensor; 4 – engine control unit; 5 – potentiometer; 6 – set of spark plugs; 7 – ignition control unit; 8 – electronic crankshaft sensor; 9 – electric fuel pump; 10 – tachometer 2107; 11 – lamp for monitoring the health of electronic systems; 12 – ignition system control relay; 13 – speed sensor; 14 – diagnostic connector; 15 – set of injectors; 16 – adsorber solenoid valve; 17, 18, 19 – fuse block protecting the injection system circuits; 21 – electronic fuel pump control relay; 22 – electronic relay for controlling the intake pipe heating system; 23 – intake pipe heating system; 24 – fuse protecting the heater circuit; 25 – electronic oxygen level sensor; 26 – cooling system temperature control sensor; 27 – electronic air damper sensor; 28 – air temperature sensor; 29 – pressure control sensor.
Wires for connecting electrical appliances
| Connection type | Section, mm 2 | Insulation color |
| Negative terminal of the battery - vehicle ground (body, engine) | 16 | Black |
| Starter positive terminal - battery | 16 | Red |
| Positive contact of the generator - plus battery | 6 | Black |
| Generator - black connector | 6 | Black |
| Terminal on the generator “30” – white MB block | 4 | Pink |
| Starter connector “50” – starter relay | 4 | Red |
| Starter Start Relay - Black Connector | 4 | Brown |
| Ignition switch relay - black connector | 4 | Blue |
| Ignition switch output “50” – blue connector | 4 | Red |
| Ignition switch connector “30” – green connector | 4 | Pink |
| Right headlight plug - ground | 2,5 | Black |
| Left headlight plug - blue connector | 2,5 | Green, gray |
| Generator output “15” – yellow connector | 2,5 | Orange |
| Right headlight connector - ground | 2,5 | Black |
| Left headlight connector - white connector | 2,5 | Green |
| Radiator fan - ground | 2,5 | Black |
| Radiator Fan - Red Connector | 2,5 | Blue |
| Ignition switch output “30/1” – ignition switch relay | 2,5 | Brown |
| Ignition switch contact “15” – single-pin connector | 2,5 | Blue |
| Right headlight - black connector | 2,5 | Grey |
| Ignition switch connector “INT” – black connector | 2,5 | Black |
| Six-pin block of the steering column switch - “ground” | 2,5 | Black |
| Two-pin block of the steering column switch - glove box illumination lamp | 1,5 | Black |
| Glove compartment light - cigarette lighter | 1,5 | Black |
| Cigarette lighter - blue block connector | 1,5 | Blue, red |
| Rear window defroster - white connector | 1,5 | Grey |
Completion
The most typical and common breakdowns were presented. For correct diagnosis in serious cases, special stands are needed, which are present in many workshops. It should be noted that sometimes the cost of such repairs can be equal to or even exceed the price of a new generator. Therefore, repair is not always the answer.
From the text it becomes clear that there are no significant differences between the injection VAZ 2107 and the earlier carburetor version. The same applies to the modification of the VAZ 21074 and all others.
Generator manufacturers claim that the generator is designed for 200-250 thousand kilometers. After passing the barrier of 100-150 thousand, it is necessary to conduct a thorough inspection and lubricate all mechanical connections.
Source