Hi all. I haven’t written about a car in a magazine for a long time; I haven’t had time to create an entry. Back in the summer, I came to the conclusion that the generator somehow gave little charge, the battery began to fail, replaced the battery, then I came to the Auto League for a relay regulator, where an acquaintance suggested a 3-level regulator instead of the standard one, I read a lot about it on the drive, but it didn’t work I got around to ordering it from the manufacturer’s website, but then it was in stock, so I bought this electric miracle.
According to the instructions supplied with the product, I installed the product by dismantling the original regulator and installing a new one, the procedure is not complicated at all, I performed it without removing the genes, because the place allows.
I installed everything and started trying, I was pleased with the result, without load 14.9-15.1 - at maximum voltage,
A three-level voltage regulator VAZ 2114 is required primarily for operating the vehicle in harsh conditions. Unlike conventional devices of this type, which are installed on generators, these have the ability to adjust the output voltage from minimum to maximum. But let's look at the design and device in more detail. But it’s worth starting with a review of the standard voltage regulator. And this is a device that allows you to stabilize the power supply to the excitation winding.
How does a voltage regulator work?
In a broad sense, all regulators can be divided into two types:
- Electromagnetic, their operating principle is based on a relay. It is for this reason that the device is sometimes called a relay regulator.
- Semiconductor, the design of which contains transistors, or one crystal.
As you understand, the first designs are used extremely rarely today, as they have a number of disadvantages, including low reliability due to the presence of moving contacts. Car generators use exclusively transistor designs. And the three-level voltage regulator VAZ 2114 is no exception; it is built on a modern element base.
But using the example of an electromagnetic device it is very convenient to consider the operating principle in general. As you understand, there is a certain voltage range, which is what needs to be maintained at the generator output. But if it is higher or lower, outside intervention is required. The operation of an electromagnetic type voltage regulator can be divided into two modes:
- High voltage - in this case, using a relay, a resistor winding is connected to the power circuit. It allows you to reduce the voltage to working voltage (
13 V).
- Reducing the voltage - the resistance is turned off, due to this the power supply to the excitation winding increases, therefore, the magnetic flux increases.
If we turn to a physics textbook, we learn that the main condition for the operation of a generator is the presence of a driving magnetic field. Moreover, the change in voltage at the generator output is directly proportional to the change in voltage at the excitation winding. It is for stabilization that a regulator is needed. As for semiconductor devices, they work according to the same scheme, only instead of a relay with a winding in them, there are transistors or a silicon crystal.
PRICE CATEGORIES
To find out the cost of a voltage regulator for a VAZ 2114, it is advisable to simply go to the nearest car market and ask, the price range may vary. This factor is influenced by the type of components and the region in which the store is located.
Typically, the price of a two-level standard regulator, which is installed at the factory in the VAZ 2114 and their families, can range from 300 to 1200 rubles, here the reason for the fluctuation depends on the quality and the specific manufacturer; more reliable and high-quality options will always be somewhat more expensive than their low-quality counterparts. As for three-level models, their price starts from 1,500 rubles, but their productivity is much greater. During the purchase, it is advisable to immediately ask the seller to check the functionality so that there are no problems in the future.
Operating highlights
On VAZ 2114 cars, as well as similar models - 15th series, 8th, 9th, voltage regulators are installed, which are structurally combined with a brush mechanism. Let us recall that brushes are needed to transmit supply voltage to the contacts of the rotor winding. Therefore, the life of the regulator is limited by the service life of graphite brushes, which is not very long. Signs of device failure:
- Noticeable deterioration in lamp brightness.
- Battery discharge.
- The lamp with the battery icon on the dashboard lights up - a clear sign of a breakdown.
When replacing a standard voltage regulator on a VAZ 2114 car, you must perform the following steps:
- Disconnect the negative terminal from the battery.
- Disconnect the power wire of the field winding. Slim with a female connector. There will be no problems with this.
- Unscrew the two screws that secure the device body to the back cover of the generator.
- Install the new device in reverse order.
To check the functionality, you need to use a power source of 12 and 16 Volts. The first is, of course, the battery. The second is a pair of AA batteries connected in series with it. The power supply is connected to the plus and minus of the voltage regulator. The control lamp must be connected to the brushes. The malfunction can be diagnosed by the following symptoms:
- Without checking, measure the length of the brushes - it should be at least 5 mm.
- The lamp lights up at any supply voltage.
- The lamp does not light up at all.
Only replacing the device will help. It is worth noting that there is no point in making it yourself - the cost ranges from 200-300 rubles, and the service life is at least two years. But for difficult conditions, three-level regulators can be supplied with a special design. It’s worth talking about them at the conclusion of our article.
Checking the functionality of the regulator
When diagnosing the generator voltage regulator, it is necessary to determine what breakdowns may be revealed during inspection (in order to avoid further malfunctions and effectively carry out preventive procedures).
Malfunctions while driving the car
- The light on the panel and other light sensors do not light up.
- The battery is low/overcharged and the regulator button is dark/bright.
The breakdowns can be as simple as a loose belt, a burnt-out relay, or worn out brushes.
To check the device you will need the following tools:
- sets of keys and screwdrivers;
- various testers;
- lamp 12 Volt 3 Watt;
- wires for connection;
- regulating current sources.
Checking the voltage regulator of the VAZ 2114 generator is carried out together with brush holders in order to immediately check the entire mechanism. You should carefully examine the condition of the brushes, their fragility, mobility, and length.
Check without removal. Using a voltmeter, we measure voltage readings. The optimal result is 13.5 - 14.2 V. If the data does not correspond to the norm, then there is a high probability of mechanism failure.
Before checking the voltage regulator and removing it from the car, you need to make sure that the fault lies in it and not in other components of the generator. How can I check this?
The first test option is diagnostics with the engine running using a voltmeter
What should be done? Start the engine and check the indicator light; if it does not go out and flashes brightly, it means there are problems in the generator. After a few minutes, when the engine increases speed and creates maximum conditions for the network load, we connect the meter and set 3500 rpm. Less than 13 Volts - the battery is completely discharged, when more - the regulator on the car needs to be replaced.
When you hear unusual noise from the unit, it means the bearings have failed, resulting in the drive belt being too tight. To adjust it, you need to turn off the ignition and release it. The deflection when pressed should not be less than two centimeters.
The second option is to check the mechanism on a stand
Before placing the electrical unit on the stand, you need to visually assess the condition of the brushes and slip rings of the commutator. Rings must be clean and dry. At the output, the current indicator gives at least 13 Volts, and the rotor speed is 6000 min-1. After 10 minutes of generator operation, the power output force can be measured. For a working unit, the indicators vary within 80 A.
If the indicator is less than normal, you need to look for faults in the starter windings or generator valves. If the indicators are not within the acceptable values, then we need to change the brush holder.
There are three valves with a red mark that provide a positive charge on the housing, they are located in the same plate of the rectifier block. Three more mechanisms have a negative charge, indicated by a black mark, connecting to ground.
Third option - check the serviceability of the winding and diodes
The multimeter shows the level of winding resistance; if there are malfunctions, there may be no indicators (break), or they will differ significantly from the norm - 4.5 Ohms. To fix the problem, the correct solution would be to replace or rewind the product.
To diagnose the relay-regulator, it is necessary to connect it to a regulating power source. This is a control lamp, the minus goes to the body of the electrical unit, and the plus goes to the terminal. The measuring device is turned on between the brushes, when the voltage increases to 17 Volts, the lamp should stop burning. When the opposite happens (the lamp burns brightly or dimly), then you need to change the voltage regulator.
You can ring the diodes with a tester; to do this, bring the probes of the device to the diode terminals. If a squeak occurs, then the probes should be changed, but when this sound does not stop, then there is definitely a breakdown of the diode. To eliminate it, the faulty unit or the entire unit is replaced.
When diagnosing the regulator, you need to inspect the electrical equipment protection capacitor. You can detect a fault with a megger. Visually inspect the fastening of the product. If there is no break, then the arrow of the device will first sharply deviate in the direction of decreasing voltage, and then return back again. The permissible capacitance of the capacitor is 2.2 µF ±20%.
How to verify that a regulator that is located far from the car is faulty. The 12V power source can be a car battery and 2 or 4 AA batteries connected in series, which will give a result of 16 V. If the lamp lights up during the test in both cases, and does not go out the second time of diagnosis, then a break has occurred and the unit needs to be replaced.
The fourth option is to check the removed regulator
Checking the VAZ 2114 voltage regulator
Above is a diagram of checking the voltage regulator after it has been removed. You need to connect exactly as indicated in the diagram. If everything is connected correctly and the lamp is on, then the regulator is working, and if the lamp remains extinguished, then it is faulty and requires replacement.
To get rid of on-board network voltage sags, you can use a three-level voltage regulator, which is used in many cars today, but that’s another article and new interesting information.
Despite the fact that the VAZ 2114 runs on gasoline, the electrical component in it is very important. Without maintaining the voltage within the required limits, the lighting will not be able to work, and the battery will be discharged. And most importantly, the ignition system will not be able to function without electricity, which means the engine will not work. Therefore, it is important that the electrical circuit of the machine is maintained in good condition.
Three-level voltage regulator VAZ 2114
With its help, you can change the voltage at the generator output within a small limit. It is especially worth noting about devices with thermostats. The sensor is mounted on the battery case and allows you to regulate the voltage depending on the current temperature of the electrolyte in the battery banks. This significantly increases the battery life. Installation of three-level devices is simple. The difference from the standard one is the separation of the brush block and the main circuit of the device into different housings. Otherwise, the principle of operation is the same as that discussed above. But with a nuance - the voltage at the generator output changes depending on operating conditions.
The operation of the three-level voltage regulator VAZ 2114 looks like this:
- The switch is in the minimum position. In this case, the voltage remains at 13.6 Volts. Ideal for use in summer, under conditions of high engine loads.
- The average value, also known as normal, allows you to maintain the voltage at 14.2 Volts. Relevant for work in the off-season - at temperatures of 0..20 degrees.
- And the maximum position is a voltage of 14.6 Volts, ideal for use in winter.
GENERATOR
The generator is designed to generate electricity, which is so necessary for the stable operation of the vehicle's electrical equipment. Additionally, it performs the function of recharging the battery - with a discharged battery it will be impossible to start the engine. For the VAZ 2114 model, the nominal voltage of the electrical circuit is considered to be 12 Volts, but taking into account all consumers (lighting, ignition system, instruments, stove motor, windshield wiper motor, etc.) it should always be higher. Therefore, the voltage in the electrical circuit can range from 13.2 to 14.7 Volts. To maintain it at the required value, a regulator is installed in the generator circuit. Moreover, this device is present in any car, and not just on the 2114 model.
It is important for the car owner to know whether the generator produces the required current. Checking the functionality of the generator is primarily determined by the charging indicator located on the instrument panel inside the car. If the lamp lights up while the engine is running, then the generator circuit is faulty; diagnostics and, if necessary, repairs are required.
Replacing the generator voltage regulator on VAZ 2113, VAZ 2114, VAZ 2115
Welcome! Voltage regulator - it is present in any generator on any car, thanks to it the voltage in the on-board network does not jump and stays even, also thanks to it the voltage in the on-board network does not go too high (The higher the voltage in the on-board network, the faster the wiring will burn out) and as it should be within normal limits (Basically for all cars, the norm is 13.2-14.7 volts in the car’s on-board network), this voltage is enough for the battery to charge and for other devices to still light up (The more devices in the car you turn on, the voltage and will become stronger, thanks to the same voltage regulator), when the regulator becomes unusable, the first thing that begins is a problem with the voltage and, in connection with this, a problem with the wiring occurs, for example, if the regulator suddenly stops restraining the voltage then it will rise to high marks, then the wires will begin to melt first, but if you have all the fuses for the required amperes, then there is nothing to be afraid of, you’ll just change the fuses every five minutes when the voltage jumps and this will continue until you change the regulator to a new one (But this may not be from him, fuses in general can blow out for various reasons, one of the most striking is water getting on the wiring, after which the fuse immediately blows).
Note! Replacing the voltage regulator that is on the generator is not so difficult, especially if you have a set of tools, in this set you should have: Wrenches, as well as screwdrivers, you will also need a test (This is a 12-volt test lamp) and a megohmmeter (Data devices are needed only to check the regulator for operability, if you don’t need to check anything and you are sure that your regulator has become unusable, then in this case you don’t have to stock up on these things)!
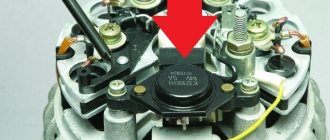
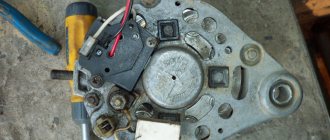
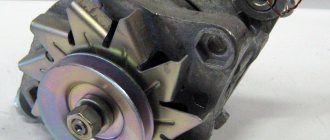
Where is the voltage regulator located? It is located, as we said a little earlier, on the generator itself and bolted to it; for clarity, we have attached a photo below, in which the generator removed from the car is clearly visible and the arrow to all this indicates the voltage regulator itself, the replacement of which we are talking about today In this article.
When should you change the voltage regulator? The regulator, the name itself even speaks for it, namely, it regulates the voltage in the on-board network and it should not exceed or fall below the norm, but if the voltage fluctuates (either high or low), then the regulator needs to be replaced, by the way, there is no way to check its functionality will not be difficult, for this you will need to use a 12 Volt test lamp, namely, connect the leads from it to both brushes of the regulator and at this time apply a voltage of 12 Volts (a battery is perfect for this) to the positive terminal, and apply a negative one to the negative one wire coming from the battery (the minus in the voltage regulator can be bushings, one of these is shown in the photo below in the detailed diagram).
Note! If after such manipulations the control lights up, then this indicates that the regulator is working, but this does not mean that it is completely working, and in order to make sure of this completely, do the same operation, but only not 12 volts in this In this case, apply 15 V and see the result, a normal working voltage regulator should not allow the lamp to light up, but if the lamp does light up, this indicates that this regulator is faulty and needs to be replaced!
PURPOSE AND TECHNICAL DEVICE
The voltage regulator relay has a specific task - to stabilize the current in the vehicle’s on-board network at the same level. In his work, he takes into account the following factors:
- Load on the network (total electricity consumption of already switched on devices);
- Temperature around the car and in the engine compartment;
- Rotor speed of the generating device.
The voltage regulator of the VAZ 2114 generator is also required to monitor the voltage that comes out of the generator in order to maintain the normal operation of all devices, since disturbances in the electrical network can provoke inaccurate sensor readings, at a minimum. Technically, it works like this: in the event of noticeable disturbances, it constantly monitors the current on the battery, and at the right moment simply turns off or turns on the voltage that is fed into the excitation winding of the generator itself.
Voltage control and stabilization - operation of the regulator
How to replace the voltage regulator on a VAZ 2113-VAZ 2115?
Note! The work of replacing this unit can be performed both on a removed generator (It’s even more convenient) and on an installed one (If you decide to remove it, then in this case, study the detailed article on this subject, and it’s called: “Replacing a generator on a car "), but if you do not want to remove anything from the car, then be sure to disconnect the minus terminals from the battery before starting work; how to do this, read the article: “Replacing the battery on a car", in paragraph 1 everything is described in detail!
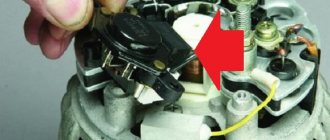
Removal: To remove the regulator, first you need to disconnect the terminals from the generator and the wire that is still attached to it (The terminals are disconnected by unscrewing the nut that secures them, and the wire is generally disconnected easily, pull it with your hand and it will be disconnected, more details on how to do all this, we indicated in the article to which a link is given just above, this article is called: “Replacing a generator on a VAZ”), as soon as everything unnecessary is disconnected, proceed to removing the cover, to do this, use a screwdriver to remove the seal as shown in the photo 1 and then, using a socket head with a knob, unscrew the three nuts that secure the cover (The nuts are also indicated in photo 1 with arrows) and remove the cover after that, as soon as the cover has been removed, remove the three spring washers from the studs so as not to lose them (see photo 2) and proceed to removing the voltage regulator, it is attached with bolts and the terminal is also connected to it with a screw, so unscrew the screw securing the terminal (see photo 3) and put it aside, then unscrew the two nuts on the sides that secure the regulator (see . photo 4) and completely remove it from the generator and check for serviceability (we already wrote how to check at the beginning of the article).
POSSIBLE PROBLEMS
If problems arise with the generator, for example, if the on-board voltage of the VAZ 2114 is low, then possible faults should be sorted out in the following sequence:
- Mechanical damage to the relay terminals;
- Oxidation of contacts;
- Complete absence or poor contact between the generator housing and the vehicle’s ground.
Therefore, if you have problems with the regulator, then the first thing you need to pay attention to is this terminal, which goes to ground.
Voltages must only be measured with the ignition on, or you will fail.
To make a correct comparison, you first need to measure the voltage at the positive terminal of the battery; it should be the same as at the regulator ground.
By the way, all electronic regulators that were invented back in Soviet times were free of most of these shortcomings. Their design was somewhat more perfect, but they were forgotten at one time and later moved away from their production.
Replacing the battery charging relay VAZ 2114 2110
Hello, visitors to our site! I want to tell you a story that happened two weeks ago. Arriving from work one day, I, as usual, opened the hood to see if everything was in order and discovered that the peephole on the battery was white.
Of course, this “eye” shows the condition of only one battery bank, but still I decided to check the voltage with a multimeter. I have a new battery, a little over a month old, and this peephole “tells” me that the battery needs charging. Taking a regular multimeter, I measured the voltage at the battery terminals with the engine turned off. The voltage was 12.3V. Then I started the engine and measured 13.7 at idle without load, and with the low beams, heater and radio on, only 12.8, and this is not enough to charge the battery, and the battery charging light did not light up (it lights up when you turn the key in the first position). After thinking a little, I decided to check the condition of the generator brushes.
Signs of a relay malfunction
The part often fails over time. It is initially of poor quality. Therefore, its service life may be short. Symptoms that indicate a faulty relay include:
- Difficulty starting the engine or inability to start the engine. These problems can be either constant or recurring. In this case, the battery is serviceable and charged;
- The heater works intermittently. The intensity of its work may change unexpectedly or it may stop functioning for a while. Sometimes the stove refuses to turn on at all;
- Windshield wipers and heated windows do not work well. The wipers and heating may operate intermittently or not turn on at all.
Replacing the battery charging relay
1. Disconnect the negative cable from the battery.
2. Turn off the minus generator
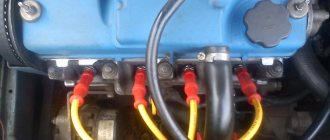
3. Unscrew the nut securing the “plus” of the generator and remove the plastic cover by bending the latches
4. Unscrew the two screws securing the voltage regulator (the generator has been removed for clarity) and remove it
The brushes must protrude from the voltage regulator by at least 5mm. My brushes protruded 1-1.2 cm.
Almost new, one might say. The brushes did not jam and were generally in good condition. Next, I cleaned the terminals of the battery itself and the “+” contacts or, as it is also called, the “B” output of the generator. I measured the voltage again - the picture was the same. The charge is bad. After weighing all the pros and cons, I decided not to disassemble the generator (if you decide to disassemble the generator, go here), but to replace the voltage regulator (despite the good condition of the brushes). This element in the generator is perhaps the cheapest. I bought it for 230 rubles. Having replaced the regulator and started the engine, I hastened to check the voltage. The long-awaited reading of 14.1V appeared on the multimeter. Having turned on the low beam, stove, speakers and heated glass, the device showed. 13.6V. The battery began to charge again. Next, I removed the battery and charged it at home. Now, two weeks later, all battery readings are normal. I hope this article will be useful to someone.
Similar articles
Checking the functionality of the regulator
When diagnosing the generator voltage regulator, it is necessary to determine what breakdowns may be revealed during inspection (in order to avoid further malfunctions and effectively carry out preventive procedures).
Malfunctions while driving the car
- The light on the panel and other light sensors do not light up.
- The battery is low/overcharged and the regulator button is dark/bright.
The breakdowns can be as simple as a loose belt, a burnt-out relay, or worn out brushes.
To check the device you will need the following tools:
- sets of keys and screwdrivers;
- various testers;
- lamp 12 Volt 3 Watt;
- wires for connection;
- regulating current sources.
Checking the voltage regulator of the VAZ 2114 generator is carried out together with brush holders in order to immediately check the entire mechanism. You should carefully examine the condition of the brushes, their fragility, mobility, and length.
Check without removal. Using a voltmeter, we measure voltage readings. The optimal result is 13.5 - 14.2 V.
If the data does not correspond to the norm, then there is a high probability of mechanism failure.
Before checking the voltage regulator and removing it from the car, you need to make sure that the fault lies in it and not in other components of the generator. How can I check this?
The first test option is diagnostics with the engine running using a voltmeter
What should be done? Start the engine and check the indicator light; if it does not go out and flashes brightly, it means there are problems in the generator. After a few minutes, when the engine increases speed and creates maximum conditions for the network load, we connect the meter and set 3500 rpm. Less than 13 Volts - the battery is completely discharged, when more - the regulator on the car needs to be replaced.
When you hear unusual noise from the unit, it means the bearings have failed, resulting in the drive belt being too tight. To adjust it, you need to turn off the ignition and release it. The deflection when pressed should not be less than two centimeters.
Installation and connection instructions
For Lada cars (except Vesta, XRAY)
, photo author:
2.
Remove the plastic casing of the generator. To do this, first disconnect the generator excitation wire. Then unscrew the nut from the stud (10mm wrench) and move the power wire to the side. Next, 3 latches on the plastic casing are unfastened.
3.
Remove the standard voltage regulator from the generator. To do this, unscrew two screws ("8" key) and disconnect the wire.
4.
Install a three-level voltage regulator on the generator instead of the standard one.
5.
Output 2 wires for the control module. The module itself should be mounted in conditions of reliable contact with the “ground” and as far as possible from the possibility of moisture ingress. For example, on a hairpin near the right headlight.
For Lada Vesta, XRAY cars (with Valeo TG12C209 generator).
This generator is no different from the previous ones, the only difference is in the voltage regulator. It communicates with the engine ECU via a “lin” interface. The task of this “lin” is to avoid loss of throttle response at power modes. By installing the TRN, we cut off the ability to control the regulator using the ECU!
For this generator there is no ready-made solution in the form of a TRN yet, so the design will have to be modified.
- three-level voltage regulator (article 67.3702-01)
- 2-pin block 904576 NORD YADA
- generator voltage regulator (leave the standard one (if the brushes are live) or ARV1103AD)
- wire for powering the regulator (2 meters)
2.
Remove the voltage regulator, open the cover and clean everything under it. Reinstall the cover.
3.
Isolate the negative brush from ground (for example, drill out the negative outlet, place washers). It is necessary to completely eliminate contact between the regulator and the generator.
4.
Solder the female connector to the brushes.
5.
Solder the male connector to the 3-level regulator. Also, connect an additional wire to the positive output, which is needed to power the regulator and rotor.
- Output “Ш” on the regulator goes to the negative brush.
- Output “+” - to the positive brush.
The “+” output needs to be supplied with 12V, which appears when the ignition is turned on:
Advantages of using a three-level relay and features of its installation
In practice, three-level regulators designed for the 9th and older VAZ models have become widespread. This is due to the fact that replacing the standard relay with a three-level one provides the following advantages:
- stabilization of alarm operation in severe frosts;
- increasing the brightness of headlights and interior lighting lamps;
- a sharp increase in the efficiency of the heater;
- increasing the speed of power windows.
Kits for VAZ “ten” and 14th models are quite common; there are also devices for “Volga” and “Gazelle”. Their use on these vehicles gives a similar effect.
A three-level relay-regulator is purchased in the form of a ready-to-install kit, which includes detailed illustrated instructions. The main elements of the kit are a contact group, a relay itself with a slide-type switch for selecting the stabilization voltage, and connecting wires.
Before starting replacement work, it is advisable to charge the battery and then disconnect its negative terminal.
The contact group of the new device is mounted directly on the seats of the previously dismantled old one; installation does not require the use of adapters and other auxiliary elements. The connecting wire is pulled through the generator cover (you may need to cut a hole in it to the required size), and the relay itself is attached to a free mounting stud with the terminals facing down. When installing, additionally check for reliable ground contact. After installing and assembling the generator, we check it.