Despite the simple design of the VAZ 2105 generator, the uninterrupted functioning of all electrical equipment of the car while driving directly depends on it. Sometimes problems arise with the generator, which you can identify and fix on your own, without visiting a car service center.
- Technical characteristics of the VAZ 2105 generator
Table: parameters of the generator 37.3701 (G-222)
- Rotor
- The battery discharge light is on or flashing
Video: generator noise on a “classic”
- Diagnostics with a multimeter
Video: diagnosing a generator with a light bulb and a multimeter
- How to remove the generator
Video: generator repair on a “classic”
- How to tension the alternator belt
Video: tensioning the alternator belt on a “classic”
Technical characteristics of the VAZ 2105 generator
Starting in 1986, 37.3701 generators began to be installed on “fives”. Before this, the car was equipped with the G-222 device. The latter had different stator and rotor coil data, as well as a different brush assembly, voltage regulator and rectifier. The generator set is a three-phase mechanism with excitation from magnets and a built-in rectifier in the form of a diode bridge. In 1985, the relay responsible for indicating the warning light was removed from the generator. The on-board network voltage was monitored only using a voltmeter. Since 1996, the 37.3701 generator has received a modified design of the brush holder and voltage regulator.
Until 1986, G-222 generators were installed on VAZ 2105, and after that they began installing model 37.3701
Table: parameters of generator 37.3701 (G-222)
| Maximum output current (at a voltage of 13 V and a rotor speed of 5 thousand min-1), A | 55(45) |
| Operating voltage, V | 13,6–14,6 |
| Engine-generator gear ratio | 2,04 |
| Direction of rotation (drive side) | right |
| Generator weight without pulley, kg | 4,2 |
| Power, W | 700 (750) |
Car modifications
VAZ-2105 . The base model was produced in 1979 with a 1.29-liter carburetor engine producing 63.6 horsepower. It was equipped with a 4-speed gearbox.
VAZ-21050 . The same model of the five, but with a 5-speed gearbox.
VAZ-21051 . Modification with a VAZ-2101 carburetor engine with a volume of 1.2 liters and a power of 58.7 horsepower, a 4-speed gearbox as in the basic version.
VAZ-21053 . Modification with a VAZ-2103 engine with a volume of 1.45 liters and a power of 71.4 horsepower. It was equipped with both 4 and 5-speed gearboxes.
VAZ-21053-20 . Modification with a VAZ-2104 injection engine with distributed injection, volume 1.57 liters and 82 horsepower. The gearbox is 5-speed.
VAZ-21054 . A special modification for the needs of no less special services, such as the traffic police, the Ministry of Internal Affairs and the FSB. It was equipped with a VAZ-2106 carburetor engine with a volume of 1.57 liters and a power of 80 horsepower. In addition, an additional gas tank and battery were installed.
VAZ-21054-20. Another special modification, but with a more powerful VAZ-21067 engine with distributed injection, 82 horsepower, which meets the Euro-3 environmental standard. The gearbox is 5-speed.
VAZ-21055 . A vehicle for taxi service was produced in a small batch with a VAZ-341 diesel engine with a volume of 1.52 liters and a power of 50.3 horsepower.
VAZ-21057 . The export version of the VAZ-21053 car was produced from 1992 to 1997 for countries with left-hand traffic, respectively, the steering wheel was located on the right. The engine complied with the Euro-1 environmental standard.
VAZ-21058 . The same right-hand drive car, based on the VAZ-21050, was produced from 1982 to 1984.
Lada Nova . Export modification of the VAZ-2105, produced mainly for the German markets. VAZ-2105 engine, 4-speed gearbox. Produced from 1981 to 1997.
VAZ-21059 . Another special modification of the car was equipped with a Wankel VAZ-4132 rotary piston engine, with a volume of 1654 cm3 and a power of 140 horsepower. This car was produced in a small batch for the needs of the traffic police, the Ministry of Internal Affairs and the KGB.
VIS-2345 . Semi-frame pickup truck, which was produced from 1995 to 2006 by VAZINTERSERVIS JSC based on modifications of the VAZ-21053 and VAZ-21054.
LADA-2105-VFTS . A sports car with a forced VAZ-2106 engine, using WEBER 45 DCOE carburetors. The engine capacity was 1.6 liters and the power was 160 horsepower at 7000 rpm. It was equipped with spur-cut 4 and 5-speed gearboxes, with cam clutches. In order to reduce the weight of the car, in 1986 the standard doors were replaced with aluminum ones.
What generators can be installed on a VAZ 2105
The question of choosing a generator for a VAZ 2105 arises when the standard device is not capable of providing current to the consumers installed on the car. Today, many car owners equip their cars with powerful headlights, modern music and other devices that consume high current.
The use of an insufficiently powerful generator leads to undercharging of the battery, which subsequently negatively affects engine starting, especially in the cold season.
To equip your car with a more powerful source of electricity, you can install one of the following options:
- G-2107–3701010. The unit produces a current of 80 A and is quite capable of providing additional consumers with electricity;
- generator from VAZ 21214 with catalog number 9412.3701–03. The current produced by the device is 110 A. For installation, you will need to purchase additional fasteners (bracket, strip, bolts), as well as make minimal changes to the electrical part;
- product from VAZ 2110 for 80 A or higher current. For installation, a suitable mount is purchased.
One of the powerful options for generator sets that can be equipped with a VAZ 2105 is a device from a VAZ 2110
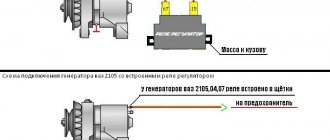
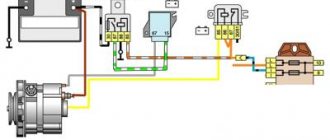
Connection diagram for the “five” generator
Like any other electrical device in a car, the generator has its own connection diagram. If the electrical installation is incorrect, the power source will not only not provide the on-board network with current, but may also fail. Connecting the unit according to the electrical diagram will not be difficult.
Generator circuit G-222: 1 - generator; 2 - negative diode; 3 - positive diode; 4 - stator winding; 5 - voltage regulator; 6 — rotor winding; 7 - capacitor for suppressing radio interference; 8 - battery; 9 — battery charge warning lamp relay; 10 — mounting block; 11 — battery charge indicator lamp in the instrument cluster; 12 - voltmeter; 13 — ignition relay; 14 - ignition switch
More information about the VAZ 2105 ignition system: https://bumper.guru/klassicheskie-modeli-vaz/elektrooborudovanie/zazhiganie/kak-vystavit-zazhiganie-na-vaz-2105.html
Color-coded electrical wires are connected to the VAZ 2105 generator as follows:
- the yellow one from connector “85” of the relay is connected to terminal “1” of the generator;
- orange is connected to terminal “2”;
- two pink ones to terminal “3”.
Fine for driving without lights during the day
Daytime is characterized by a reduced risk of accidents, since all approaching objects are clearly visible in conditions of unlimited visibility.
However, a motorist may receive a fine in cases where the vehicle does not have lights on:
- headlights, which are used to illuminate nearby inverter elements;
- fog lights;
- daytime running.
Most modern cars already have the function of automatically turning on the light mechanisms when the power unit starts operating. This feature not only virtually eliminates the possibility of receiving a fine, but also increases the level of traffic safety.
Older car models require manual activation of the lighting equipment. Drivers do not always notice the violation in a timely manner, for which they receive unexpected fines. This is explained by the fact that in the daytime it is quite problematic to notice unlit headlights. Often, traffic police officers do this earlier than vehicle owners.
The absence of lighting when a vehicle is moving is sanctioned by the state. The prescribed penalty is prescribed in Article 12.20 of the regulatory document of the Russian Federation, regulating the features of administrative proceedings. If the lighting elements are not turned on during the day, the driver will receive a fine of 500 rubles or a warning.
Generator device
The main structural elements of a car generator are:
- rotor;
- stator;
- frame;
- bearings;
- pulley;
- brushes;
- voltage regulator.
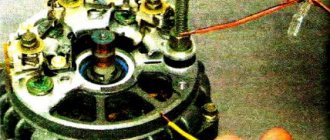
Design of the VAZ 2105 generator: a - voltage regulator and brush assembly for generators manufactured since 1996; 1 — generator cover from the slip ring side; 2 — bolt for fastening the rectifier unit; 3 - slip rings; 4 — ball bearing of the rotor shaft on the side of the slip rings; 5 - capacitor 2.2 μF ± 20% to suppress radio interference; 6 — rotor shaft; 7 - common terminal wire for additional diodes; 8 — terminal “30” of the generator for connecting consumers; 9 — plug “61” of the generator (common output of additional diodes); 10 — output wire “B” of the voltage regulator; 11 - brush connected to terminal “B” of the voltage regulator; 12 — voltage regulator VAZ 2105; 13 - brush connected to terminal “Ш” of the voltage regulator; 14 — pin for attaching the generator to the tensioner; 15 — generator cover from the drive side; 16 — fan impeller with generator drive pulley; 17-pole rotor tip; 18 — bearing mounting washers; 19 — spacer ring; 20 — ball bearing of the rotor shaft on the drive side; 21 — steel bushing; 22 — rotor winding (excitation winding); 23 - stator core; 24 - stator winding; 25 - rectifier block; 26 — generator coupling bolt; 27 — buffer sleeve; 28 — bushing; 29 — clamping sleeve; 30 - negative diode; 31 — insulating plate; 32 - phase output of the stator winding; 33 - positive diode; 34 - additional diode; 35 — positive diode holder; 36 — insulating bushings; 37 — holder of negative diodes; 38 — terminal “B” of the voltage regulator; 39 — brush holder
To know how the generator functions, you need to understand the purpose of each element in more detail.
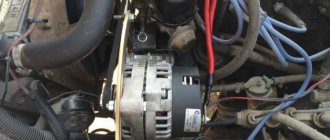
On the VAZ 2105, the generator is installed in the engine compartment and is driven by a belt from the engine crankshaft.
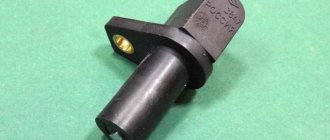
Rotor
The rotor, also known as the armature, is designed to create a magnetic field. On the shaft of this part there is an excitation winding and copper contact rings, to which the coil leads are soldered. The bearing unit, installed in the generator housing and through which the armature rotates, is made of two ball bearings. An impeller and a pulley are also attached to the rotor axis, through which the mechanism is driven by a belt drive.
The generator rotor is designed to create a magnetic field and consists of rotating coils
Stator
The stator windings create an alternating electric current and are combined through a metal core made in the form of plates. To avoid overheating and short circuits between the turns of the coils, the wires are coated with several layers of special varnish.
Using the stator windings, an alternating current is created, which is supplied to the rectifier block
Frame
The generator housing consists of two parts and is made of duralumin, which is made to facilitate the design. To ensure better heat dissipation, holes are provided in the housing. By means of an impeller, warm air is expelled from the device to the outside.
Generator brushes
The operation of a generator set is impossible without elements such as brushes. With their help, voltage is supplied to the rotor slip rings. The embers are enclosed in a special plastic brush holder and installed in the corresponding hole in the generator.
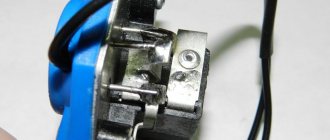
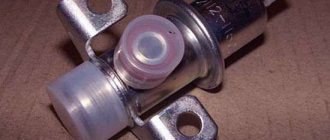
Voltage regulator
The relay-regulator controls the voltage at the output of the unit in question, preventing it from rising above 14.2–14.6 V. The VAZ 2105 generator uses a voltage regulator combined with brushes and fixed with screws on the back of the power source housing.
The voltage regulator is a single element with brushes
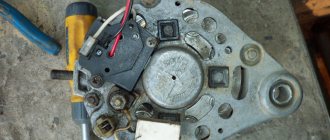
Diode bridge
The purpose of the diode bridge is quite simple - to convert (rectify) alternating current into direct current. The part is made in the shape of a horseshoe, consists of six silicon diodes and is attached to the back of the case. If at least one of the diodes fails, the normal functioning of the power source becomes impossible.
The diode bridge is designed to rectify alternating current into direct current from the stator windings for the on-board network
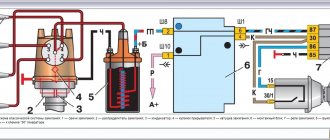
Operating principle of the generator set
The “five” generator functions as follows:
- When the ignition is turned on, power from the battery is supplied to terminal “30” of the generator set, then to the rotor winding and through the voltage regulator to ground.
- The plus from the ignition switch, through the fuse-link “10” in the mounting block, is connected to contacts “86” and “87” of the charge warning lamp relay, after which it is supplied through the contacts of the switching device to the light bulb and then to the minus of the battery. The light is on.
- As the rotor rotates, a voltage appears at the output of the stator coils, which begins to power the excitation winding, consumers and charge the battery.
- When the upper limit of the voltage in the on-board network is reached, the relay regulator increases the resistance along the excitation circuit of the generator set and keeps it within 13–14.2 V. Then a certain voltage is supplied to the winding of the relay responsible for the charge lamp, as a result of which the contacts open and the light goes out. This indicates that all consumers are powered by the generator.
How does it all work?
First you need to understand how everything works. So, on the VAZ-2107, the on-board network is powered from two sources - the battery and the generator. The first provides electricity to all consumers until the power plant is started. The battery itself is a storehouse of electrical charge, which it releases when needed.
A generator is a unit that generates electricity, but for this it is necessary that it perform a mechanical action (its rotor rotates). In order for the generator to operate and power the network, it is driven from the crankshaft via a belt drive.
Everything works simply: to start the engine, the battery energy is supplied to the power electric motor - the starter, as well as the ignition system. After the power plant starts, the generator will be driven by the drive, the generated energy of which will power all devices. It will also be supplied to the battery to restore the charge spent on starting the power plant.
Recharging the battery from the generator must be carried out without fail, otherwise after several starts of the power plant, the loss of electricity in the battery will be significant (the battery runs out), and it will simply not be able to start the engine.
In order to monitor charging, a warning lamp and a voltmeter are installed on the dashboard of the VAZ-2107. Thanks to these control devices, it is possible to detect that the battery is not charging.
If the entire circuit through which the battery is recharged is in good condition, then after turning on the ignition, the charge indicator lamp lights up, but after starting the engine and entering the operating mode, it should go out, which indicates that voltage is supplied to the battery. In this case, the arrow on the voltmeter should be in the green zone, indicating that the voltage parameters correspond to the norm. But if, after starting the engine, the lamp lights up and “blinks”, while the arrow may twitch, this indicates a malfunction.
It should be immediately noted here that it often happens that the battery icon is on when the engine is running, but the voltmeter shows that charging is in progress. In general, the behavior of this system can be very different - charging is not happening, it is, but control devices show the opposite, recharging periodically disappears, but then is restored. In this case, there is a possibility of undercharging or overcharging, which are detrimental to the battery. A weak battery will eventually lead to it being completely discharged over time and making it impossible to start the car.
Generator faults
The Zhiguli generator is a fairly reliable unit, but its elements wear out over time, which leads to problems. Malfunctions can be of various types, as evidenced by characteristic signs. Therefore, it is worth dwelling on them, as well as on possible problems, in more detail.
The battery discharge light is on or flashing
If you observe that the battery charge light on a running engine is constantly on or flashing, then there may be several reasons for this behavior:
- insufficient tension of the generator belt drive;
- open circuit between the lamp and the generator;
- damage to the rotor winding power supply circuit;
- problems with the relay regulator;
- brush wear;
- damage to diodes;
- break or short circuit in the stator coils.
The driver will immediately notice a signal of lack of battery charge, as the lamp begins to glow bright red on the instrument panel
More about the VAZ 2105 instrument panel: https://bumper.guru/klassicheskie-modeli-vaz/elektrooborudovanie/panel-priborov/panel-priborov-vaz-2105.html
No battery charge
Even when the generator is working, the battery may not be charged. This may be due to the following reasons:
- the generator belt is loose;
- unreliable fixation of the wiring to the generator or oxidation of the terminal on the battery;
- battery problems;
- problems with the voltage regulator.
If the battery does not receive a charge, it means that the generator or voltage regulator is faulty
The battery is boiling over
There are not many reasons why a battery may boil over, and they are usually associated with excess voltage supplied to it:
- unreliable connection between ground and the body of the relay regulator;
- the voltage regulator is faulty;
- battery is faulty.
Once I encountered such a problem when the relay regulator failed, which manifested itself in the form of a lack of battery charge. At first glance, there is nothing difficult about replacing this element: unscrew two screws, take out the old device and install the new one. However, after purchasing and installing a new regulator, another problem arose - battery overcharging. Now the battery received a voltage of more than 15 V, which led to the boiling of the liquid in it. It is impossible to drive for a long time with such a malfunction and I began to figure out what led to its occurrence. As it turned out, the reason came down to the new regulator, which simply did not work correctly. I had to buy another relay regulator, after which the charge returned to normal values. Today, many people install three-level voltage regulators, but I have not tried it yet, since there have been no problems with charging for several years.
Generator wire melts
Quite rarely, but it still happens that the wire running from the generator to the battery can melt. This is only possible in the event of a short circuit, which can occur in the generator itself or when the wire comes into contact with ground. Therefore, you need to carefully inspect the power cable, and if everything is in order with it, you should look for the problem in the power source.
The generator is noisy
During operation, although the generator makes some noise, it is not so loud that you think about possible problems. However, if the noise level is quite strong, then the following problems may occur with the device:
- bearing failure;
- The generator pulley nut has come loose;
- short circuit between the turns of the stator coils;
- noise from brushes.
Video: generator noise on a “classic”
Breakdowns and repairs
If you suspect that the generator on the VAZ 2101 is not working, check it yourself. It's done like this.
- Start the engine.
- Open the hood.
- Pull out the choke adjustment knob, bringing the engine speed to 1200–1300 rpm.
- Remove the positive terminal from the battery. If the engine stalls, the unit is faulty.
The fact that the engine stalls indicates that it is running only on battery power. If you notice a malfunction immediately after it occurs, and your battery is freshly charged, you can drive a dozen or two kilometers until the battery loses power. This will allow you to get to your garage or the nearest service center. But don't try to go far. You may end up in the middle of the road and have to ask for a tow or call a tow truck.
The most common cause of failure of a VAZ 2101 generator is low tension in the belt that drives its rotor. The belt tension is considered normal when the deflection in the middle of the shoulder between the crankshaft pulley and the water pump pulley when pressed lightly is 10–12 mm. You can easily check this parameter yourself. It changes when the engine is not running with the application of a small force with a mounting blade. Few people measure such a deflection with a ruler. Usually everything is clear to the eye.
Adjusting the belt tension is more difficult than identifying a deviation of a parameter from the norm, but the average owner of a VAZ 2101 is quite capable. Keep in mind that you should not overtighten the belt. This can lead to failure of the bearings in which the shafts of the VAZ 2101 generator and water pump rotate.
The order of work is as follows.
- De-energize the vehicle's electrical system. Remove the negative terminal from the battery.
- Using an open-end wrench, loosen the nut securing it to the adjusting bar.
- Using the paddle as leverage, tilt the unit away from the engine.
- Achieve the required deflection in the middle of the belt shoulder between the water pump and the crankshaft.
- Secure the generator. Tighten the nut on the adjusting bar.
Often the unit fails due to excessive wear of the brushes. Through them, excitation voltage is supplied to the armature, that is, the working surface of the brush constantly rubs against the contact surface of the rotor shaft and wears out. Worn brushes must be replaced. Any car enthusiast can perform this operation with his own hands.
The procedure does not require removing the unit:
- de-energize the vehicle's electrical system; remove the terminal from the negative terminal of the battery;
- unscrew the screws securing the brush holder; disconnect it from the device;
- make sure that the length of the working part of the brushes does not exceed 12 mm;
- replace worn brushes;
- return the brush holder to its place.
Generator belt
The flexible drive is designed to rotate the pulley of an electricity source, ensuring the functioning of the latter. Insufficient tension or a broken belt leads to a lack of battery charge. Therefore, despite the fact that the belt life is about 80 thousand km, its condition must be periodically monitored. If damage is detected, such as delamination, protruding threads or tears, it is better to replace it with a new product.
The alternator belt has a long service life, but if there is visible damage, the product needs to be replaced
Many years ago, when I first purchased a car, I encountered an unpleasant situation - the alternator belt broke. Fortunately, this happened near my house and not in the middle of the road. I had to go to the store to buy a new part. After this incident, I always carry an alternator belt in stock, because it does not take up much space. In addition, when I carry out any repair work under the hood, I always check the condition of the flexible drive and its tension.
The VAZ Five uses an alternator belt 10 mm wide and 944 mm long. The element is made in the shape of a wedge, which allows it to more easily engage with the generator pulley, pump and crankshaft.
How to tension the alternator belt
To tension the belt you will need the following tools:
- mount;
- head for 17 and knob.
The procedure consists of the following steps:
- Check the tension level of the drive. Normal values are those at which the belt between the pump pulley and the crankshaft pulley bends by 12–17 mm or by 10–17 mm between the pump pulley and the generator pulley. When taking measurements, the pressure should not be more than 10 kgf in the location indicated in the image. To do this, press with the thumb of your right hand with moderate force.
The belt tension can be checked in two places by pressing on it with the finger of your right hand. - If there is excessive tension or loosening, make adjustments.
- Loosen the upper fastener of the generator with a 17mm head.
- We insert a pry bar between the pump and the generator housing and tension the belt to the required values. To loosen the tension, you can rest a wooden block against the upper mount and lightly tap it with a hammer.
- We tighten the nut securing the generator set without removing the pry bar.
- After tightening the nut, check the tension of the flexible drive again.
How to replace the charging relay?
Important! First, as always, we turn off the ground, remove the negative wire from the battery terminal, then remove the yellow wire going from the generator to the relay, then use a Phillips screwdriver to unscrew it; Then we take it out together with the brushes: Now we need to carry out diagnostics. To do this, we test the voltage on the brushes with a voltmeter, and we power the relay itself from the battery, “simulating” the rectified current of the generator
At the same time, we apply () to terminal “B”, to the yellow wire, and connect (-), “ground” to the other terminal. We are familiar with the signs of trouble. If you don’t have a tester, you can take a 1-3 W, 12 V light bulb. When installing a new relay, you need to press it firmly during installation, since new, unworn brushes provide more resistance.
In conclusion, let me tell you about several other reasons for the lack of charging or imitation, and also give advice:
- If you have a VAZ 2107 injector, then it is strictly not recommended to reset the battery terminal for various “checks” while the engine is running, and especially to allow strangers near the hood for this purpose. This is very harmful to electronic “brains”.
- It is advisable for those who like to “light up” to be able to say a firm “no” if you have a VAZ 2107 injector.
- On the instrument panel, the connectors are not soldered to the board, but riveted. Therefore, in some cars in the cold, while the interior is cold, there is no contact with the charging lamp. It lights up, simulating a lack of current from the generator. After the interior has warmed up, contact is restored and the lamp goes out.
- The next reason for those who like to go to the car wash in the cold. When water gets into the relay and brush assembly and freezes there, there is no charging. The solution is to heat it with any powerful hairdryer.