Today, every car, regardless of type, is equipped with special protection for all electrical systems. This protection is called a fuse. They are installed so that in the event of a short circuit or malfunction, the system can turn off via a fuse, thereby protecting itself from breakdown. Fuses are used for every electrical circuit, from a small light bulb to an engine's ignition system. More important engine systems are equipped with special relays, they protect various pumps, electric motors and other powerful sources of electricity consumption.
The fuse is a small structure consisting of a plastic casing with a fusible element inside. If a short circuit occurs, the thin contact melts under the influence of current, which interrupts the electric current. The simplest electrical fuse is a thin copper wire inserted into a circuit. If the upper limit of the supplied current increases, the contact begins to melt and interrupts the flow of electricity. Here there is a description of all fuses and relays for VAZ 2113, 2114, 2115 models of injection and carburetor types, old and new models.
Why doesn't the cigarette lighter work?
Common causes of cigarette lighter malfunction include:
- The fuse has blown or its contacts have oxidized.
- Problems with contacts in the mounting block.
- Bulb burnout.
- Short circuit inside the node.
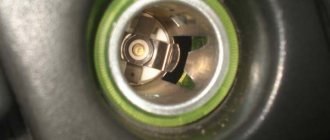
If the cigarette lighter does not work on a VAZ-2114, the heating coil may have burned out. In order for the part to fulfill its main purpose, it is enough to replace the head by selecting a suitable model.
If there are no positive changes, the cause of the breakdown should be looked for in the electrical connection diagram. When performing diagnostics, make sure that there are no burnt contacts inside and pay attention to:
- Integrity of wires on the body and at their connections.
- No signs of burning or dirt on internal parts.
- Serviceability of the socket plug.
- No overload.
In addition, you should evaluate whether the fuse for the VAZ-2114 cigarette lighter is damaged, since this is the most common cause of failure.
A socket burnout occurs when connecting faulty plugs or electrical appliances that consume a lot of energy. In addition, the connector stops working when installing fuses on the radio that are designed for heavy loads.
To assess the condition of the contacts, it is enough to inspect them for the presence of oxidation.
If blockages are detected, you need to remove them manually using any non-metallic objects.
Recommendations for care and maintenance
- Buy original fuses. Domestic or foreign, it doesn’t matter;
- Install strictly in accordance with amperage ratings. Unacceptable with lower or higher current strength. In the first case, this will lead to damage to the module, in the second - to breakdown of the unit, which is attached to the fuse;
- Carefully check the quality of fixation of terminals and limit switches on the board. If loose, tighten and press with pliers. A spark can cause a fire and melting occurs;
- If moisture gets in or condensation forms inside the mounting block, remove the cover, dry it, and if necessary, blow it with a stream of compressed air.
Carry out preventive and diagnostic work in the fuse box with the battery terminals removed in order to prevent a short circuit in the circuit.
The average service life of fuses is 40 – 60 thousand km. The service life of foreign analogues is 10–15% longer. Before replacing, read the instructions and get advice from service station specialists.
Fault diagnosis
Diagnosis of the cigarette lighter on VAZ-2114 and 2113 is performed at home using the following tools:
- Phillips and slotted screwdrivers.
- Soldering iron (40 W).
- Tweezers (curved and straight).
- Pliers.
- Tester for cars.
First you need to open the hood and remove the negative terminal from the battery (it is represented as a black wire) to turn off the power supply and prevent electric shock.
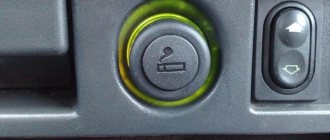
After this, you need to move the driver's seat to gain access to the part. Using a bright LED flashlight, assess the condition of the internal socket and make sure that there are no foreign objects, plates or fragments there. Any dirt can be removed using tweezers and two matches or a toothpick.
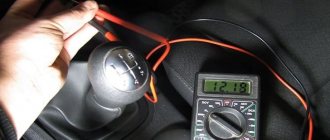
Next, the fuse is checked using a tester. The terminal with a minus value is connected to the vehicle ground, and the positive probe is fixed to the fuse. If the part is working properly, a characteristic sound will occur.
You should also inspect the soldering of the wires. The disconnected contact is soldered back. If “blackness” appears on the heating coil, you need to replace the “head”.
Recommendations from experts
We advise you to study some practical advice from craftsmen who have repeatedly faced the need to repair cigarette lighters on a VAZ 2114. The most difficult problems were complicated by the fact that the owners of the car tried to solve the problem on their own, in violation of many recommendations. But after the situation became even worse after a makeshift intervention, the breakdown had to be repaired by professionals.
- Hand twisting. The worst thing you can think of when replacing faulty wiring is manual twisting. Never do this, because in 80% of car fire situations this is how it starts. Be sure to use a soldering iron to create strong, reliable contacts, or even better, completely replace the old wiring with new one.
- When purchasing a new cigarette lighter for a VAZ 2114, use a tester. Moreover, this must be done on the spot, in the presence of the seller. Alas, the realities of our auto parts market today are such that a huge mass of spare parts are fakes or simply low-quality products. By checking the device immediately before starting repairs, you risk not only getting a fake, but also not returning the faulty cigarette lighter to the seller, since he will say that he never saw you and did not sell you anything. By the way, for this reason it is better to buy spare parts in trusted, certified stores.
- When working on any item that draws power from the battery, including the cigarette lighter, be sure to remove the terminals from the battery. Accidents are not uncommon, but you probably don't want to be one of them.
- Always be careful in your actions, carefully study the operating and repair manual for your car. This is the primary literature that allows you to do most of the repair work yourself, without the help of specialists. And if you are not confident in your abilities, do not take risks, do not experiment, but send your car to trusted, qualified technicians who will repair your car with high quality and with guarantees.
Where is the fuse for the cigarette lighter on a VAZ-2114
To fix the problem, you need to find out where the fuse for the cigarette lighter is located. In VAZ-2114 models, the safety element is installed in the mounting block. To find this compartment, you should follow these instructions:
- Remove the hood cover.
- Open the black plastic box that may be located on the side of the windshield.
- Find the element marked F7.
If there are no printed instructions for the VAZ-2114 and a diagram, you should find suitable information on the Internet. You can also remove the fuses one by one to find the blown element.
Which one can be installed instead of the burnt one?
When choosing a new fuse and cigarette lighter for VAZ cars, it is important to make sure that it has similar characteristics. If 20 is indicated on the PP body, then it can withstand voltage up to 20 A. When installing a more powerful element, the fuse will be able to cope with load surges, but the cigarette lighter will fail.
Various models of spare parts for VAZ are available for sale, including original components and Chinese analogues. Therefore, drivers are interested in which option is better to choose.
Experts recommend buying an original safety block for the VAZ-2114, since it was designed specifically for this car. Cheap copies are made from low-quality materials, and motorists repeatedly mention cases of how they stopped working for no particular reason.
The original part is sold at prices ranging from 300 to 900 rubles. The exact cost is determined by the manufacturer and additional functions of the device.
Interpretation of fuses and relays of injection models
The main electrical fuse module 2114-3722010-60 is located under the front engine compartment. This arrangement allows for quick access to all electrical systems of the car.
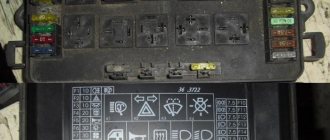
Block location
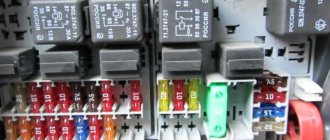
Please note that the location of the electrical fuse module may depend on the type of equipment and year of manufacture of the vehicle. As a rule, this is the upper right part of the engine compartment, under the front windshield. The mounting block is made of plastic in the form of a rectangular box. To protect against accidental opening, the box is equipped with special latches. To open the module, you need to snap off the two protective brackets and lift the top plastic protection. Under the cover are all the main control relays and electrical fuses of the vehicle.
To quickly remove the fuse, special plastic pliers are located on the plastic protection cover. With their help, you can very easily get any element. You need to grab the top edge of the plastic case with pliers and carefully lift the element.
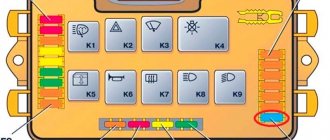
For the convenience of the user, on the top plastic cover there is a complete diagram, made in the form of a schematic image, which shows all the electrical fuses and relays indicating the current strength (A).
Fuse and relay diagram for injection models
Table 1. Explanation of fuses and relays 2114-3722010-60
| № | Current, A | Explanation of fuses |
| F1 | 10 | Rear fog lights, rear fog light indicator lamp |
| F2 | 10 | Turn signals and turn signal breaker relay. Alarm system. Hazard warning lamp |
| F3 | 7,5 | Interior and luggage compartment lighting systems (interior lamp, luggage compartment lamp, ignition key illumination). Brake brake lamp, on-board computer backlight lamp. Engine control lamp |
| F4 | 20 | Rear window heating control. Portable lamp connection socket |
| F5 | 20 | Relay for monitoring and turning on the sound signal. Cooling system engine switch fuse and relay |
| F6 | 30 | Control and relay switching on electric windows |
| F7 | 30 | Electric motor control - heating system, interior heater, windshield washers, headlight cleaners. Interior cigarette lighter, glove box lamp. Turn on the heated rear window. |
| F8 | 7,5 | Turning on the right fog lamp |
| F9 | 7,5 | Turning on the left fog light |
| F10 | 7,5 | Side light for the left side body, indicator light for turning on the side lights (on the display), lamps for illuminating the license plate and engine compartment, illumination lamp for switches, cigarette lighter, heater control levers. Instrument lighting switch. |
| F11 | 7,5 | Right side body marker light |
| F12 | 7,5 | Front right low beam headlight |
| F13 | 7,5 | Front left low beam headlight |
| F14 | 7,5 | Front left high beam headlight. Light indicator lamp. |
| F15 | 7,5 | Front right high beam lamp. |
| F16 | 15 | Body turn signals, relay-breaker for turn signals and hazard warning lights. Control relay and reverse lamps, indicator lamps for the on-board instrument control system, lamps for oil pressure, handbrake activation, brake fluid level, battery charge. On-board computer, engine generator winding. |
| F17-F20 | Spares | |
| № | Relay circuit | |
| K1 | Headlight cleaners | |
| K2 | Turn signals and hazard warning lights | |
| K3 | Windshield wiper | |
| K4 | Monitoring the serviceability of brake light lamps and side lamps | |
| K5 | Window lifters | |
| K6 | Sound signal | |
| K7 | Heated rear window | |
| K8 | High beam headlights | |
| K9 | Low beam headlights | |
Repair
Before carrying out repair work, it is necessary to prepare a place near the vehicle, ensuring that the door opens freely. Next you should stick to the following scenarios:
- The fuse has failed. To fix the breakdown, you need to find the location of the part by opening the hatch with the block. An important part is located to the left of the steering column and is a 20-amp fuse marked F4. Using a tester, you should evaluate its performance. If there is no voltage, you will need to purchase a new part.
- Connector burnout. If traces of burning are found, you should not buy a new fuse without understanding what caused the problem. At the diagnostic stage, it is important to check the condition of the contacts on the blocks when leaving the mounting compartment.
- Errors during operation. Some problems with the safety assembly are due to improper operation. Make sure the fuse plug is not pulled out or damaged.
- Bulb burnout. Replacing the element is quite simple. Before doing this, remove the device from the socket.
- Damage to the cigarette lighter core. Upon visual inspection, a number of damage to the core can be found. This part is not sold separately in auto stores, so the only option is to find it on the market from car enthusiasts.
Front fog lamp relay
Front fog lights are not standard equipment on the model and are equipped depending on the configuration. The relay itself (if there are fog lights) is located in the engine compartment on the left mudguard.
Front fog lamp relay
Important! To access the relay, you must remove the battery! Without performing this manipulation, it will be difficult to remove and check its functionality.
Replacing a faulty element is very simple. You need to take a Phillips screwdriver (with a short handle), unscrew the bolt securing the relay to the car body, and check the element for malfunction. If it fails, we buy a new one and put everything in the reverse order.
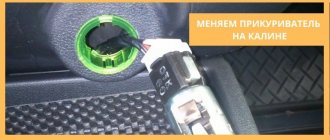
How to connect a new one
When figuring out how to remove the device and install a new one, you should consider the following algorithm of actions:
- After dismantling the negative terminal, it is necessary to remove the left plastic cover at the driver’s feet.
- Next, you should disconnect the contact blocks and remove the backlight bulb.
- Then you need to turn off the light filter and remove the old part from the center console using a screwdriver.
- Having completed the installation of the new part, you can proceed to assembly, starting with the installation of the backlight ring.
- At the next stage, the cigarette lighter is placed on the seat and connected to the batteries using a three-pin connector.
- All that remains is to tighten the screws responsible for fixing the facing plastic and connect the electrical wires.
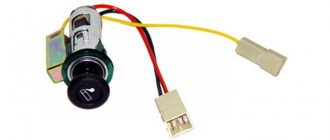
Connection diagram
Before carrying out any work to replace the cigarette lighter, you should familiarize yourself with the pinout diagram of the part on the VAZ-2114. It is necessary to adhere to the correct polarity, guided by the following wire assignments:
- Black - represents the negative terminal or ground that connects to the body.
- Red - is intended to supply voltage to the heating element and is connected using a 20 A fuse.
- Yellow is the backlight wire.
The procedure for dismantling and assembling the cigarette lighter is not complicated. The main thing is to figure out where this element is located and how to change it with your own efforts.
- VAZ 2114 alarm connection points
- Where is the fuse for the VAZ 2114 radio?
- Cigarette lighter fuse FF2
- Grant's cigarette lighter does not work
Decoding fuses and relays of block 2114-3722010-18
VAZ-2114, 2115, 2113 cars of the first models with a carburetor have certain differences in the fuse module.
Old style block fuse and relay diagram
Table 2. Decoding of fuses and relays of block 2114-3722010-18
| № | Current, A | Explanation of fuses |
| F9 | 7,5 | Right rear fog lamp |
| F8 | 7,5 | Left rear fog lamp |
| F1 | 10 | Front headlight cleaners at the moment of switching on, wiper contacts, headlight washer switch valve, headlight wiper switch relay contacts |
| F7 | 30 | Front headlight wipers during operation, winding of the relay for turning on the wipers, fuse for the interior heater, windshield washer, gearbox and timing controller for the rear window wiper, valves for turning on the front and rear washer, relay (winding) for turning on the engine cooling system, relay for turning on the rear window heating, glove box lighting, rear window heating control lamp |
| F16 | 15 | Turn signal indicators and activation of hazard warning lights in turn mode, indicator control lamp, reversing lights, gearbox and relay for activation of windshield washers, generator winding (at startup), control lamps for brake fluid, oil pressure, carburetor flap, hand brake. "STOP" display lamp, voltmeter and coolant temperature indicator |
| F3 | 10 | Interior lighting and rear brake light |
| F6 | 30 | Power windows, power windows on/off relay |
| F10 | 7,5 | License plate lights, engine compartment lamp, warning light on the dashboard (exterior lighting), instrument panel lights, cigarette lighter light, heating lever lights |
| F5 | 20 | Relay for turning on the cooling system fan (electric motor), sound signal. |
| F10 | 7,5 | Left front marker light Left rear marker light |
| F11 | 7,5 | Right front headlight, right rear |
| F2 | 10 | Hazard warning lamp, turn signals and hazard warning relay. |
| F4 | 20 | Rear heated glass, heating on, portable socket, cigarette lighter in the cabin |
| F15 | 7,5 | Front right high beam |
| F14 | 7,5 | Front left high beam Light switch |
| F13 | 7,5 | Left low beam |
| F12 | 7,5 | Right low beam |
| № | Relay circuit | |
| K1 | Headlight washers | |
| K2 | Hazard and turn signals | |
| K3 | Windshield wipers | |
| K4 | Monitoring the health of lamps | |
| K5 | Windows | |
| K6 | Sound signal | |
| K7 | Heated rear window | |
| K8 | High beam headlights | |
| K9 | Low beam headlights | |
Fuse installation diagram for VAZ 2115 (injector, 8 valves)
| Marking/amperage | What is he responsible for? |
| F (F-1) / 10 | Rear fog lights, headlight washer motor, fluid pump |
| F (F-2) / 10 | Turn signals. emergency gang |
| F (F-3) / 7.5 | Interior lighting, trunk lighting, on-board computer, clock |
| F (F-4) / 20 | Car socket, heated rear window |
| F (F-5) / 20 | Signal, cooling fan |
| F (F-6) / 30 | Window lifters |
| F (F-7) / 30 | Oven heater, cigarette lighter, heated rear window, glove compartment lighting |
| F (F-8) / 7.5 | Left side fog light |
| F (F-9) / 7.5 | Fog lamp on the right side |
| F (F-10) / 7.5 | Left-hand side lights, license plate lights, engine compartment lights |
| F (F-11) / 7.5 | Right-hand dimensions |
| F (F-12) / 7.5 | Low illumination on the right side |
| F (F-13) / 7.5 | Low beam on the left side |
| F (F-14) / 7.5 | Left-hand high beam |
| F (F-15) / 7.5 | High beam on the right side |
| F (F-16) / 15 | Hazard alarm, heater, brake light |
| F (F-17) / 7.5 | To the fuel pump, to the wipers, to reverse |
| F (F-18) / 25 | central locking |
| F (F-19) / 10 | Reservation |
| F (F-20) / 7.5 | Reservation |
The price of a complete power supply starts from 2300 rubles, melting elements from 100 rubles, a set from 400 - 550 rubles.
Additional power relay modules are installed in the central channel, under the dashboard. To get to the parts, first remove the plastic cover.
- Gasoline pump;
- Radiator fan.
Fuse box in the engine compartment
It is mounted on the battery shelf on the positive terminal side of the battery.
It contains fuses rated for currents greater than 30 A. Fuse diagrams for LADA Granta of different years of manufacture and their explanation are given below.
For cars assembled in 2011-2014
| Designation | Denomination, A | Protected circuit |
| F1 | 30 | Main relay, interior unit (fuse circuits F1 and F21 |
| F2 | 60 | Generator |
| F3 | 60 | Generator |
| F4 | 30 | Cooling fan |
| F5 | 50 | EUR |
| F6 | – | Reserve |
For cars assembled in 2015
| Designation | Denomination, A | Protected circuit |
| FF1 | 50 | Heated windshield |
| FF2 | 60 | Generator |
| FF3 | 60 | Generator |
| FF4 | 30 | Electric radiator cooling fan (equipped without air conditioning) |
| 40 | Electric radiator cooling fan (equipped with air conditioning system) | |
| FF5 | 50 | Electromechanical power steering |
| FF6 | 40 | ABS ECU |
For cars assembled in 2016, 2022
| Designation | Denomination, A | Protected circuit |
| FF1 | 50 | Heated windshield |
| FF2 | 60 | Generator |
| FF3 | 60 | Generator |
| FF4 | 30 | Electric radiator cooling fan (equipped without air conditioning) |
| 40 | Electric radiator cooling fan (equipped with air conditioning system) | |
| FF5 | 50 | Electromechanical power steering |
| FF6 | 40 | ABS ECU |
For cars assembled from 2022
| Designation | Denomination, A | Protected circuit |
| FF1 | 60 | Generator |
| FF2 | 60 | Generator |
| FF3 | 30 | Electric radiator cooling fan (equipped without air conditioning) |
| 40 | Electric radiator cooling fan (equipped with climate control or air conditioning) | |
| FF4 | 40 | ABS/ESP controller |
| FF5 | 25 | ABS/ESP controller |
| FF6 | 50 | Electric power steering controller |
Relay-breaker layout diagram
| Name | What is it responsible for/what does it provide? |
| K 1 | Headlight wiper relay |
| K2 | Turn signals, hazard warning lights |
| K 3 | Windscreen wipers |
| K 4 | Controlling the operation of dashboard lamps |
| K5 | Window lifters |
| K 6 | Sound signal |
| K 7 | Heated rear window |
| K 8 | Long range lighting |
| K9 | Low lighting |
Additional block
It is located at the bottom right of the center console, behind the protective cover.
Photo - diagram
Decoding the scheme
p, blockquote 22,0,0,0,0 —>
- Main relay (engine control unit)
- Cooling fan
- Fuel pump
- F1 - 15A Main relay (engine control unit, ignition module)
- F2 - 15A Constant power supply to the controller, relay for turning on the electric fan (winding), canister purge valve, air flow sensor, speed sensor, oxygen sensor (heating)
- F3 - 15A Fuel pump, fuel pump relay (contacts), injectors
Individual fuses and relays may be located outside the main units.
That's all. And if you have anything to add to the material, then write in the comments.
Source
Description of fuses
During the systematic operation of a technical device, due to weather conditions, fuses often fail, overheat, and become deformed.
To restore the performance of the car and its elements, it is necessary to replace the fuses (hereinafter referred to as modules) with new ones. The “update” process is not complicated, but requires care on the part of the repairman. Incorrect installation may damage the vehicle's electrical power system.
The VAZ 2109, as well as older models, has 16 modules and 12 relay switches preinstalled. This is in an old-style power supply unit. In the new PSU model, after 1998, the quantity also remained the same, although the craftsmen reduced the number by three modules.
- PSUs of the old type: they are marked 17.3722, structurally they consist of a plastic case, an engineering board to which the model wires and relays are soldered;
- New model power supply: 3722010-60, design in the form of a plastic case with pre-installed fuses.
Note to the driver!!! It is a misconception that the type of fuel injection system affects the PSU model. The mounting blocks for the carburetor and injector are the same.
Location: engine compartment, on the left side, under the windshield.