In this article, today we will look at the process of troubleshooting a VAZ-2114. Initially, the car did not start.
Let's get started:
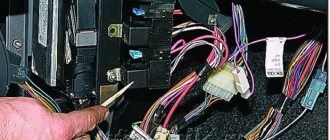
I couldn't hear the fuel pump running, so I decided to check the voltage on it.
I found out that there is no voltage at the fuel pump. The next step I checked was the fuel pump relay. It turned out to be serviceable, but I heard some strange clicking sound from the upper relay. On a VAZ-2114, the top relay is the main relay, which switches not only the fuel pump, but also other systems, such as the fan relay, speed sensor, oxygen sensor and others.
Replaced the relay with a known good one. To check, I took the relay from the mounting block, in the engine compartment. After turning on the ignition, the click of the main relay turned on indicated that it was working properly and the car started up.
At this point, the inspection of the VAZ -2114 can be considered closed. Replaced the main relay and the car started.
When working with the car’s electrical wiring, do not forget to disconnect the negative terminal of the battery so as not to burn something working.
Fuel pump fuse and its functions
The fuel pump safety device, not only on the VAZ-2114, but also on other passenger cars, is just a small element in the vehicle’s fuel system.
It has a relatively small size, but carries an important functional load. The main function of this element to protect the functions of the fuel pump is to open the conductive circuit of the automobile fuel system. This need arises in case of overload of electrical circuits. As soon as such an overload occurs, the fuse element melts as a result of the high temperature, and the electrical circuit becomes open.
The safety element is small in size, and its design is quite simple:
- the outer casing is made of plexiglass;
- inside the device there is a conductive element made of plates and fusible material;
- the body is marked in the form of the Latin letter “F” (this designation indicates that the safety device is intended for an electrical circuit with low power).
Thanks to the metal plates and the fusible material between them, the fuel pump fuse perfectly conducts electric current, but at a power that corresponds to the markings on the body of this part. If the power indicators in the electrical circuit are higher than the required value, the low-melting material immediately begins to melt, and the current-carrying circuit opens.
Thus, the fuel pump is saved from possible overloads.
Where is the fuel pump fuse on the VAZ-2114
In modern passenger cars, the manufacturer installs several special safety blocks in the current-carrying circuit at once in case of unforeseen situations that could damage the vehicle. This is done to reduce the risk of fire. Such fuses localize the entire electrical circuit to key areas where short circuits are most likely. Any vehicle has instructions that contain detailed diagrams of the location of all parts.
The VAZ-2114 also has a fuel pump safety device located under the hood. More precise location of this part:
- open the hood;
- look towards the windshield;
- there is a plastic box on the ECU;
- This box contains the fuse we need.
On the VAZ-2114 the fuse is marked as follows - Fuel Pump 15A.
Common mistakes
You can use our instructions in one case: when the fuel pump , but other systems are working properly. Sometimes the engine does not start for several reasons at once. And then you need to reduce the pressure like this: wait 5-6 hours, and do not turn on the ignition. Be careful!
Actually, the ramp is under pressure
You can find out about the presence of pressure in the standard way:
- Open the hood;
- There is a fitting on the fuel rail, closed with a plastic cap. They turn him away;
- The nipple cap can be used to unscrew the fitting plug. This action is performed carefully: the residual pressure has not disappeared anywhere.
Even if gasoline starts to gush out, do not try to tighten the fitting right away. Let the pressure drop a little.
Diagnostic connection and plug
Trying to fix a fuel pump is commendable. It will be possible to change its mesh. But the cause of the problem may also be a clogged fine filter.
The replacement filter (“can” 2112-1117010) gradually fails. On all fuel-injected cars, including the VAZ-2112, the fuel pump will not stop working even if the filter is completely clogged. Fuel is not pumped, but the engine does not burn out.
Fuel pump relay? Diagnostics VAZ 2114
Checking the fuel pump fuse on a VAZ-2114
Experts recommend regularly checking the fuel pump safety device on the VAZ-2114. The easiest way to get to this part is from under the hood, that is, from the outside of the vehicle. To do this, you must follow the following step-by-step instructions:
- Open the hood lid.
- Find the plastic box on the engine control unit.
- Open the small unit, which opens and closes with latches.
- Find the appropriately marked safety device (located at the top).
- Remove the safety element:
- for this you will need forceps, tweezers or a clamp;
- grab the safety device with a tool;
- pull the fuse towards you;
- remove from the nest.
- Perform a visual inspection of this device:
- cracks and chips on the body;
- burnt fusible materials inside;
- carbon deposits on the internal plates;
- contacts are damaged.
If the contacts of the safety device are intact, then it can still function. But in such cases it is not worth the risk; it is best to replace the damaged part with a new one.
Changing the fuel pump yourself
If the fuel pump in the VAZ does not pump, and all of the above system components are normal, it is necessary to clean the filters, and, if necessary, completely replace the unit.
Before starting work, you must completely drain the fuel from the gas tank. To do everything with our own hands, we need a screwdriver and a set of keys. Replacing the VAZ 2114 fuel pump is carried out according to the following algorithm:
- We de-energize the car by removing the “-” terminal from the battery;
- We take out the rear row of passenger seats;
- Unscrew the plastic cap that covers the pump;
- Remove the power wires from the device and disconnect the fuel supply hoses;
- We dismantle the main fastenings of the fuel pump; for this we need the 7th key;
- Now you can remove the fuel pump on the VAZ 2114 and remove the device.
It must be removed carefully, since the float sensor for determining the fuel level is a very delicate structure that is easy to damage. Inspect the fuel pump - if necessary, clean or replace the strainer, however, it may be necessary to completely replace the unit.
We study the signs of a fuel pump failure if it does not pump fuel
The non-pump is one of the key components of the VAZ 2114 fuel module. The gasoline pump helps ensure that gasoline is supplied to the engine at the required level of pressure.
Fuel pump for VAZ 2114
Any guarantees from the manufacturer with the actual service life of the fuel pump have little in common, since its durability directly depends on the operating conditions - even the highest quality VAZ fuel pump can quickly fail due to bad gasoline.
OPERATING PRINCIPLE AND DESIGN FEATURES
The VAZ 2114 fuel pump is located inside the car’s gas tank, which is why access to it can be problematic if you don’t know which side to approach. To free up access to the fuel pump, you need to remove the rear seat from the fourteenth, under which you will find a rectangular hatch hiding access to the fuel module.
In addition to the pump itself, the VAZ 2114 fuel module includes:
- A float sensor that monitors the fuel level in the gas tank;
- Chamber for fuel intake;
- Mesh filter for coarse cleaning.
The gasoline pump has a built-in electric motor, which pumps up the pressure of the pumped fuel. The motor itself is powered from the vehicle's on-board network. The VAZ 2114 gasoline pump is located so that even with a minimum level of fuel in the tank, it is constantly washed with gasoline, as this is necessary for normal cooling of the unit, which gets very hot during operation.
The main working element of a gasoline pump is a membrane, which during operation performs reciprocating movements. During normal operation, when the device is fully operational, the following pressure levels must be maintained in the fuel rail:
- For 1.5 l engine. – from 285 to 326 kPa;
- For 1.6 liter engine. – from 375 to 390 kPa.
As evidenced by reviews from owners of fourteenth VAZs, in practice BOSCH pumps have proven themselves to be the best.
Unlike domestically produced units, they cost almost 20-30% more, but at the same time they have an order of magnitude better build quality and reliability. The estimated cost of the fuel module for a 1.5 liter engine of the fourteenth is 2.5 thousand rubles, for 1.6 liters. – 2.6 thousand
However, rational savings are possible here - in most cases it makes sense to purchase a fuel pump separately, rather than the entire module, since, as a rule, the pump itself “dies”, and the remaining parts of the module remain in working order. Its cost, if taken separately, is 1-1.5 tr.
Main unit
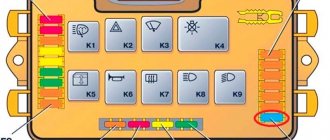
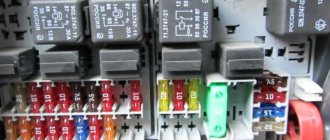
The main fuse and relay box is located in the rear part of the engine compartment, in the installation department, under a protective cover.
The current diagram for your vehicle can be printed on the back of the protective cover. Check your appointment!
Option 1
Scheme: 2114/ 2115 — 3722010, -3722020, -3722010-30, -3722010-38, -3722010-40, -3722010-48, -3722010-60, -3722010-68
Description of fuses
| F1 | 10A Rear fog lights, rear fog light indicator lamp |
| F2 | 10A Turn signals and turn signal breaker relay. Alarm system. Hazard warning lamp |
| F3 | 7.5A Interior and luggage compartment lighting systems (interior lamp, luggage compartment lamp, ignition key illumination). Stop lamp - brake signal, on-board computer backlight lamp. Engine control lamp |
| F4 | 20A Control of heated rear window. Portable lamp connection socket |
| F5 | 20A Relay for control and activation of the sound signal. Cooling system engine switch fuse and relay |
| F6 | 30A Control and relay for switching on electric glass lifts |
| F7 | 30A Electric motor control - heating system, interior heater, windshield washers, headlight cleaners. cigarette lighter , glove box lamp. Turn on the heated rear window. |
| F8 | 7.5A Turning on the right fog lamp |
| F9 | 7.5A Turning on the left fog lamp |
| F10 | 7.5A Side light of the left side body, indicator light for turning on the side lights (on the display), lamps for illuminating the license plate and engine compartment, illumination lamp for switches, cigarette lighter, heater control levers. Instrument lighting switch. |
| F11 | 7.5A Right side body marker light |
| F12 | 7.5A Front right low beam headlight |
| F13 | 7.5A Front left low beam headlight |
| F14 | 7.5A Front left high beam headlight. Light indicator lamp. |
| F15 | 7.5A Front right high beam lamp. |
| F16 | 15A Body turn signals, relay - turn signal and hazard warning light breaker. Control relay and reverse lamps, indicator lamps for the on-board instrument control system, lamps for oil pressure, handbrake activation, brake fluid level, battery charge. On-board computer, engine generator winding. |
| F17 - F20 | Spares |
Fuse number 7 at 30A is responsible for the operation of the cigarette lighter.
Relay purpose
- K1 - Relay for turning on headlight cleaners
- K2 - Relay interrupter for direction indicators and hazard warning lights
- K3 - Windshield wiper relay
- K4 - Relay for monitoring the health of stop lamps and side lights
- K5 - Window lift relay
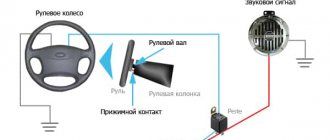
- K6 - Horn relay
- K7 - Rear window heating relay
- K8 - High beam relay
- K9 - Relay for low beam headlights
Option 2
Scheme: 2114/ 2115 — 3722010, -3722020,
-3722010-08, -3722010-10, -3722010-18
Fuse designation
| F9 | 7.5A Right fog lamp. |
| F8 | 7.5A Left fog lamp. |
| F1 | 10A Headlight cleaners (at the moment of switching on). Relay for turning on headlight cleaners (contacts). Headlight washer activation valve. |
| F7 | 30A Headlight cleaners (in operating mode). Relay for turning on headlight cleaners (winding). The heater fan motor is the heater fuse. Window washer motor. Rear window wiper motor. Rear window washer timing relay. Valves for turning on the windshield and rear windows. Relay (winding) for turning on the electric fan of the engine cooling system. Relay (coil) for turning on the heated rear window. Rear window heating indicator lamp. Glove box lighting lamp. |
| F16 | 15A Direction indicators and relays - turn indicator and hazard warning switch (in turn indication mode). Turn signal indicator lamp. Rear lights (reversing lamps). Gearmotor and windshield wiper activation relay. Generator excitation winding (when starting the engine). Brake fluid level warning lamp. Oil pressure warning lamp. Carburetor air damper warning lamp. Parking brake warning lamp. "STOP" light display lamp. Coolant temperature gauge. Fuel level indicator with reserve indicator lamp. Voltmeter. |
| F3 | 10A Rear lights (brake lamps). Interior lighting. |
| F6 | 30A Electric windows for front doors. Relay for turning on electric windows. |
| F10 | 7.5A License plate lights. Engine compartment lamp. Instrument lighting lamps. Indicator lamp for external lighting. Heater lever illumination display. Cigarette lighter lamp. |
| F5 | 20A Electric motor of the engine cooling system fan, and its activation relay (contacts). Sound signal and relay for its activation. |
| F10 | 7.5A Left headlight (side light). Left rear light (side light). |
| F11 | 7.5A Right headlight (side light). Right rear light (side light). |
| F2 | 10A Turn signals and relays - hazard warning light interrupter (in hazard warning mode). Hazard warning lamp. |
| F4 | 20A Rear window heating element. Relay (contacts) for turning on the heated rear window. Plug socket for portable lamp. Cigarette lighter . |
| F15 | 7.5A Right headlight (high beam). |
| F14 | 7.5A Left headlight (high beam). Indicator lamp for turning on the high beam headlights. |
| F13 | 7.5A Left headlight (low beam). |
| F12 | 7.5A Right headlight (low beam). |
Fuse number 4 at 20A is responsible for the cigarette lighter.
Relay
- K1 - relay for turning on headlight cleaners
- K2 - relay-interrupter for direction indicators and hazard warning lights
- K3 - windshield wiper relay
- K4 - lamp health monitoring relay
- K5 - power window relay
- K6 - horn relay
- K7 - rear window heating relay
- K8 - headlight high beam relay
- K9 - relay for low beam headlights
SIGNS OF PETROL PUMP FAILURE
A faulty fuel pump is quite easy to identify, since it is characterized by characteristic signs of failure. For example: while driving, the car suddenly stalls - after turning it on again, the engine begins to make uncharacteristic sounds, while the starter does not stop turning. After the car starts up, the picture repeats itself - the fourteenth engine stalls again. It is also possible that the car starts every once in a while - problems usually arise after sitting at neutral speed.
Let's determine the most typical signs of a fuel pump malfunction:
- The engine refuses to start. Of course, there can be many reasons for this problem - the same spark plugs, or the ECU, but the possibility of a fuel pump malfunction is also worth taking into account;
- The pressure level in the fuel relay differs from normal values;
- The motor is tripping. As a rule, if the fuel pump does not pump as it should, the engine begins to twitch quite noticeably because gasoline is not burned properly in the working cylinders;
- The engine growls at low speeds. One of the most truthful signs, which indicates either an immediate breakdown of the pump, or that the low-purity filter is clogged and the mesh needs to be replaced.
Symptoms of a problem
- The first sign indicating a breakdown of the fuel pump will be a banal refusal of the engine to start. Of course, such an indicator as an unstarted car is very general. In this case, it is worth checking the spark plugs, which may become oily and not produce a spark and the ECU.
- The second point is the pressure of the fuel system. If the fuel pump is OK, it creates a pressure of 3.2 bar. The fuel rail is characterized by the following indicators:
- for a volume of 1.5 l – from 285 to 325 kPa,
- for a volume of 1.6 l - from 375 to 390 kPa.
- A very common problem is when the signal does not reach the fuel pump after ignition. When you turn the key, you usually hear a slight vibration from the fuel pump, but here it doesn’t happen. Most likely the wiring has failed. We'll have to call her and figure out what's what.
- The engine is tripping. Like reason number one, this indicator is not a benchmark. It is believed that the signs of a malfunction of the VAZ 2114 fuel pump are represented by other obvious causes of malfunctions. However, if the fuel pump is not working properly, the engine begins to jerk (which is natural, fuel combustion in the cylinders occurs incorrectly), and operate intermittently out of the blue.
- The engine may jerk even before starting or at low speeds. This reason is closer to the truth: either the fuel pump or its mesh – a low-purity filter – is not working.
The fuel module, which includes the pump itself, is expensive - from 2,000 to 3,000 rubles. The inept owners of the fourteenth buy it entirely (together with the filter, fuel level sensor, float and intake chamber) and install it to replace the deceased. In fact, the price of a VAZ 2114 fuel pump is only 700-1000 rubles, you only need to take and install it, the rest of the module almost always remains intact.
Just don’t immediately run to the spare parts store and buy a new one! There are plenty of reasons for the breakdown, including those that may lie in the power system. Here are the main ones:
- Fuel pump fuse VAZ 2114
- Fuel pump relay VAZ 2114
- Poorly secured mass of the VAZ 2114 fuel pump
- Fuel pump motor VAZ 2114
- Contacts of the fuel pump system VAZ 2114
- The fuel pump itself
PRESSURE LEVEL
In order to get most of the picture of what is happening, it is enough to measure the pressure in the fuel rail. For this, it is necessary to use a pressure gauge that has a small measurement range (preferably up to 7 atmospheres), since devices with a large range can produce significant inaccuracies.
Rail pressure measurement
Under the hood of the fourteenth there is a pressure fitting; unscrew its cap and connect the pressure gauge to it. Normal indicators should be as follows:
- When the engine is idling – 2.5 kPa;
- At the moment of ignition - 3 kPa;
- With a pinched drain hose – 7 kPa;
- When gaining speed - 2.5-3 kPa.
If the pressure gauge needle does not move when the ignition is turned on, then the gasoline pressure regulator is most likely broken. When there is no change as the speed increases, the fuel pump itself has failed, but if the needle moves very slowly, which indicates that the pump is pumping, but poorly, the fuel pump screen is clogged.
Diagnostics
A malfunction of the VAZ 2114/2115 fuel pump can be caused by:
- malfunctions in the device’s power supply circuit;
- failure of starting and protection elements (relay and fuse);
- wear of electric motor parts.
Checking the electrical circuit
At the beginning of the diagnosis, you should check the electrical circuit of the fuel pump. To do this you will need:
- car tester (multimeter);
- crosshead screwdriver;
- two pieces of wire about 2 m long.
Checking the electrical circuit is carried out in the following order:
- Turn on the ignition without starting the engine. When the key is in the first position, a click should be heard, characteristic of turning on the relay, followed by a slight whirring of the pump electric motor. If there is no click, the relay is faulty or is not receiving power. If there is a click, but no buzzing, the wiring coming from the relay or the pump motor itself is faulty.
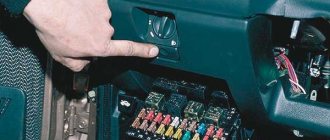
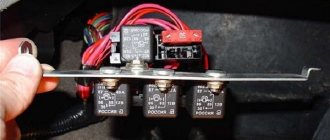
- Under the glove compartment, find an additional mounting block consisting of three relays and three fuses. The pump relay is located in the middle, and the fuse is located to the left of it. Remove the fuse from its socket, test it with a multimeter, and if the result is negative, replace it. When replacing the fuse, please note that it is rated for a maximum of 15 A.
- Set your multimeter to voltmeter mode. Connect one probe of the device to the relay terminal to which the pink wire fits, and the second to the car body. Turn on the ignition. The device should show the on-board network voltage in the range of 11.7–12.4 V. If there is no voltage, the problem may be a broken wiring or a malfunction of the ignition contact group. In this case, it is better to contact an auto electrician. If power is supplied, check that the relay is working. With the ignition on, use a screwdriver or a piece of wire to close the contacts to which the pink and gray wires go. This closes the circuit bypassing the relay. If the fuel pump works, replace the relay.
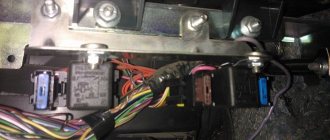
- Be sure to check the connection of the pump's negative wire to ground. Often it is the lack of “ground” that causes interruptions in the operation of the fuel pump. Remove the plastic trim from the center console near the parking brake handle. Under it there is a “negative” wire of the pump, screwed to the body with a self-tapping screw. Unscrew it, clean the contacts, screw it back and repeat the test.
- Then check the fuel module. Remove the rear seat, peel back the carpet and sound insulation. Unscrew the two screws securing the gas tank flap and disconnect the electrical connector on the fuel module cover. Using two wires, supply power to the pump directly from the battery. If the pump works, the wiring is faulty; if it doesn’t work, the pump itself is faulty.
Pressure check
If the pump is working properly, but the engine begins to operate intermittently, you should check the fuel pressure in the system. For this you will need:
- pressure gauge (can be a tire gauge with a measurement limit of 5–7 kPa);
- petrol-resistant hose with a diameter of 10–12 mm and a length of 50–80 cm;
- two clamps for a hose of the appropriate diameter;
- Phillips screwdriver;
- nipple cap;
- dry rag.
The verification procedure is as follows:
- In the engine compartment on the engine fuel rail, locate the pressure measuring fitting (on the right side).
- Remove the plastic cap (plug) from the fitting.
- Using the nipple cap, unscrew the spool valve from the fitting. When unscrewing the spool valve, fuel may spray out of the fitting. To remove it, use a dry cloth.
- Place one end of a gas-resistant hose onto the fitting and secure the connection with a clamp. Connect the other end of the hose to the pressure gauge fitting and also tighten the clamp.
- Ask an assistant to turn on the ignition. Wait a few seconds and watch the meter readings. With a working pump, the pressure gauge should show a pressure of 2.8–3.2 kPa for engines with a volume of 1.5 cm3 and 3.7–3.9 kPa for engines of 1.6 cm3. If the pressure is noticeably higher, the pump is faulty.
CHECKING WIRING CONTACTS
If the fuel pump does not work, do not rush to change it - perhaps the problem is in poor-quality wiring. There are 3 wires connected to the pump: to the gasoline level sensor, and positive and negative to power the motor.
No special tools are required to check the wiring - a regular 12-volt light bulb is enough. We connect the light bulb to the negative and positive wires of the pump, and turn on the car’s ignition - if the light blinks, then everything is fine with the wiring.
GROUND AND FUEL PUMP RELAY
In the fourteenth, the mass of the fuel pump is fixed under the dashboard, next to the handbrake lever, during use of which the mass can be touched and shifted from its normal position. To fix this, remove the plastic around the handbrake, clean the ground contacts and reattach it.
Next to the ground there is a VAZ 2114 fuel pump relay. The relay is necessary so that during ignition the required pressure level is immediately created in the system.
A few words about where the fuel pump relay is located: after removing the plastic around the handbrake, you will immediately find 3 different relays - one of them is from the fuel pump.
It is better to immediately replace a broken relay with a new one; it is not expensive.
How to change the pump
If it turns out that the relay for the VAZ 2114 fuel pump, the motor, the ground contact, and all other electrical elements of the circuit are working, all that remains is to replace the damaged pump with a new one.
You can do it like this:
- Disconnect the battery ground terminal.
- Drain the fuel from the tank.
- Remove the rear passenger seats.
- Remove the plastic cover covering the pump.
- Disconnect the wires and hoses going to the pump.
- Unscrew the fuel pump fasteners using a size 7 wrench.
- Remove the pump from the tank.
Installing a new fuel pump is done in exactly the same order, but in reverse order.
CHECKING THE FUSE
First, let's figure out where the VAZ 2114 fuel pump fuse is located: you can find it under the hood, on the windshield side. There is a drawer on the electronic control unit that needs to be opened. In the box we need a fuse that says Fuel Pump 15A above it. If the fuse for the VAZ 2114 fuel pump is blown, you need to install a new one.
The fuse blows due to incorrectly connected alarm contacts or the anti-theft system.
VAZ 2114 fuel pump fuse is on
Good afternoon I am dealing with the following problem: my VAZ 2114 fuel pump fuse is constantly on. One technician said that the mesh needs to be replaced, saying that it is clogged. Replaced it, but nothing changed. I don’t know what to do, the car still won’t drive. Could there be a problem with the spark plugs and wires? Is it worth going there?? Thank you!
There is no connection between the wires and the fuse. Install a fuse that blows at higher current levels. But you need to be extremely careful. In general, you need to look at the entire circuit and look for the location of the short circuit.
I checked the entire circuit, there doesn’t seem to be a short circuit anywhere, but I’m not good at electrical engineering, is it really possible to do without the help of a specialist?((
Arm yourself with a multimeter and measure the current in the open circuit of the fuel pump. The load should not exceed 6 A
If the VAZ 2114 fuel pump fuse is constantly on, it means there are problems in the car’s electrical circuit. The fuse is designed to protect more expensive parts, but constantly replacing it will not solve the problem in the circuit itself. Here we need to act more decisively.
Each such mechanism is designed for a certain current strength. If a breakdown occurs somewhere, it begins to break through to ground. To carry out diagnostics of all electrical wiring, it is necessary to have a multimeter that rings the circuit.
The main reason for a blown fuse
Why the fuel pump fuse blows, you need to start disassembling it starting with the electrical wiring. It is the vehicle wiring that often causes the fusible element to fail. Overloading the wiring can cause a specific device to short out, and in this case it is the fuel pump.
The cause of a breakdown associated with wiring can also be the constant presence of moisture in contact with the electrical circuit. Moisture leads to oxidation of the contacts, which causes an increase in current in the circuit due to the increasing resistance of the oxidized contact.
Each fuse is designed for a specific current in the circuit. The current strength is marked on them. It can be calculated for a protective element by dividing 220 V by the power of the device. It is also possible that a breakdown or break in the wire occurred somewhere, and it breaks through to ground.
To check the electrical wiring system, you need to “ring” it or examine it using a multimeter.
It also happens that the fuse looks like new, but there are problems with the fuel pump. This may be due to poor contact of the protection element with the terminals or a complete lack of contact.
Why does the VAZ 2114 fuel pump fuse light up?
You just installed a new fuse and it immediately blew?
Common situation. There is no way to do this without removing the fuel pump itself. Often malfunctions of this device lead to such troubles. The fuel pump tends to break down, and its motor often fails. It is worth dismantling the mechanism and checking its functionality. If it is faulty, replace it with a new copy. This will solve the problem with constantly blown fuses. If the fuel pump is working properly, check its wiring.
I’ll briefly tell you how I found a way out of this situation. On a normal weekday, I started the car and drove to work. After some time, I drove a maximum of 5-10 km, the car stopped. Afterwards the car started and stalled. I started digging around and discovered that the fuse had blown. Lucky, there was a spare. I installed it - literally 100 meters later it burned out too. There was no tester at hand, and that was the whole problem. In general, in the evening I was already digging into the wiring.
It turned out that there was a short in the wiring, which is located under the dashboard; there is a whole set of wires there. The wire going to the fuel pump is frayed. In general, he cured it, and then took them along a completely different path, so that such a breakdown would not occur again in the future. I advise you to do the same. Good luck!
Useful video
Additional information on this issue can be gleaned from the video below:
A frequent and unpleasant question: why does the fuel pump fuse blow out? Many, faced with this problem, begin to chaotically look for new fuses and insert the first one they come across. In such a situation, it is not always possible to find exactly the right fuse.
Having installed a new element, the car drives a couple of tens of meters and stops again. At the same time, during these meters traveled, the car manages to shake and shake quite a bit.
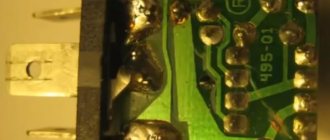
The very name “fuse” indicates that this small element protects a more expensive device from failure. If a fuse blows, the problem may lie in something more serious. Therefore, it is not advisable to insert another element instead of the desired one. The fuse consists of thin plates made of a certain material and they are of a fixed thickness.
A fusible element is soldered between the set of plates, which opens the circuit when overloaded. This entire structure is enclosed in a polymer mandrel.