If in your Lada Granta If you have electrical problems, the first thing you need to do is check the fuses and relays to find out the cause of the problem. Don’t be alarmed ahead of time; if you’re lucky, you’ll get away with simply replacing the faulty fuse.
If not, you may have to go to a car service center or troubleshoot the electronics yourself. Remember - the main thing in such cases is to fully understand the problem, do not waste time on this, because any car owner should know as much as possible about his car (especially a domestic one).
Dimensions on the grant do not light up
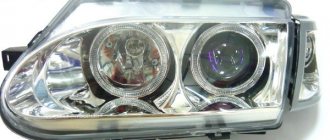
Daytime running lights are a type of optics used to identify a vehicle on the road at any time of the day. Since the installation of this lighting is mandatory in our country, our compatriots have many questions regarding their operation. Read more about in what cases the DRL lamp of a Lada Granta W21/5W is changed and how to replace it yourself.
Common DRL faults
What are the signs of a malfunction of Grant's DRL:
- The glow of the LED elements has become dimmer. If this problem appears on only one headlight, then it is necessary to check the wiring and the quality of the contacts, although the possibility of wear cannot be ruled out. If both lights begin to burn dimmer, then most likely the problem is that the optics are close to failure as a result of having reached the end of their service life.
- The running lights do not turn on. In this case, the problem may lie in the inoperability of the optics, poor contact with the electrical circuit or damaged wiring. The reason can also be found in a non-working switch or DRL activation button.
- The diode elements do not light up, but blink, and the light may disappear. Such problems are usually caused by poor contact between the optics and the on-board network or worn-out light bulbs (video author - Alexander Kordyukov).
What can cause daytime running lights to fail:
- failure to observe polarity when installing lighting sources;
- for some reason the turn signal channel stopped working;
- the safety element or relay has failed, it is necessary to check its functionality;
- filament burnout;
- wiring damage;
- failure or poor contact on the steering column switch or headlight switch.
Causes of extinguished reverse lights
A contact sensor installed in the transmission housing or inside the gear selector is used to control the operation of the lights when reverse gear is engaged.
When reverse gear is engaged, the handle closes the metal plates and supplies positive power to the lamp. When the speed is turned off, the rod is pushed out by the spring, breaking the electrical circuit.
If the reverse lights on your car do not work, the reasons are:
- The lamp protection fuse is damaged. In some vehicles, this component prevents damage to additional electronic devices. The filament burned out due to an increase in current above the rated current (for example, during a short circuit). When replacing, a fuse with identical parameters is installed; metal jumpers cannot be used.
- Broken or corroded contacts inside the shift lever position sensor. Repair of the device is not provided; the damaged switch must be replaced with a similar one.
- Damage or oxidation of wires from the contact group to the headlights. After checking the wires with a testing device, the damaged area is removed, and the connection points are protected from moisture and dirt with an insulator.
- Corrosion and burns on the wire contacts or on the sensor body. Metal surfaces are cleaned with sandpaper; in case of severe damage, parts must be replaced.
- Failure of negative power supply to the lamps installed in the rear lights. The malfunction occurs on domestic cars (for example, VAZ-2107 or VAZ-2108) due to the leaky design of the lampshades. To restore functionality, disassemble the device and check the condition of the metal jumpers.
- The lamp is faulty. If the car has 2 reverse gear indicators, in this case one lamp remains operational. To replace a light bulb, you must disassemble the light fixture or invert the plug (depending on the car model and manufacturer). After installing the new part, perform a test shift in reverse order.
Does it make sense to change working running lights?
Many car owners are interested in the issue of replacing standard DRL bulbs with more advanced ones, since the former are characterized by certain disadvantages:
- Dim lighting with yellowish tint. Firstly, in practice, such light often spoils the aesthetic appearance of the car as a whole, and secondly, its lighting does not have the best effect on the visibility of the car in front.
- Low service life of such lighting sources. So sooner or later you will have to face the need to replace light bulbs.
It is for these reasons that our car owners decide to replace traditional incandescent lamps with more advanced lighting sources. If you decide to install diode light elements instead of incandescent lamps, then when choosing, you should pay attention only to their base - replacing a light bulb involves using the appropriate connector (the author of the video is the City&Country Style channel).
It should also be noted that the main disadvantage of DRLs is that this type of optics is not fixed in any way in the current legislation, in particular, we are talking about lighting sources. Therefore, you must be prepared for the fact that you may encounter an inspector who wants to fine you for this. It must be taken into account that certain types of lighting devices must be manufactured in full compliance with GOST and standards. So if the technical specifications of the light bulbs being installed do not match those that should be installed, then this is fraught with possible problems in the future.
Checking the functionality of the sensor
Replacing the fuse is not difficult. But checking the condition of all wiring, ringing it and replacing it if necessary is a much more difficult task.
If we talk about restoring the functionality of the reverse lamps with our own hands, then we mainly have to deal with the switch.
To check it you need to do the following:
- remove the rear lamp switch chip;
- turn on the ignition;
- Using a piece of wiring, close the contacts of the sensor and the reverse gear to each other.
If at the same time the lamp lights up, then the reason lies directly in the limit switch.
In this situation, the simplest and most logical solution would be to replace a completely faulty sensor. Indeed, on many cars, replacing it is impractical, too complicated and virtually useless. It is not always possible to restore the functionality of the device. Although there are a number of examples when the sensor was simply disassembled, the contacts were cleaned, and everything returned to normal operation.
It is very difficult to say how long the restored switch will work. This could be for many years, or just a few days.
If everything is fine with the frog, then you will have to ring the circuit and look for the area where the voltage disappears. For these purposes, you will need to use a test light or a multimeter. The task is not for beginners, since we are talking about electrical circuits and working with car electrical systems. Here, for many, it will be more profitable and safer to turn to specialized specialists.
Replacement instructions
So, if you want to achieve a better glow and increase the service life of your optics, just change the lighting sources in it. As practice shows, the most popular option in this regard is to replace traditional halogen lamps with diode light sources. But before you begin this process, you need to understand that simply installing a diode instead of a halogen will not be enough .
After all, this process has certain features:
- Typically, for installation it is necessary to tear off the base previously installed on the diode element in order to transfer it to the required hole.
- Replacing Lada Granta DRL lamps also involves checking the polarity of the lighting sources in order to maintain the functionality of the safety element. If you do not do this, the fuse will fail in any case, thus de-energizing the safe operation of the on-board network.
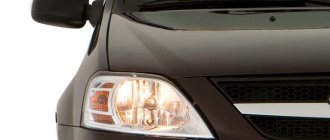
Car daytime running lights
The replacement procedure is as follows:
- First, you need to turn off the ignition, open the hood of the car and disconnect the terminals from the battery. This will allow you to turn off the device and ensure further safe operation when the power supply is de-energized.
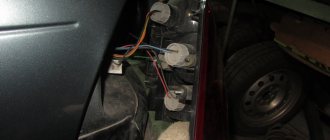
- Let's start the replacement with the light sources in the right lamp. To do this, pull out the cartridge; to do this, you need to rotate it counterclockwise.
- Then the failed lighting source must be removed from its seat; to do this, simply pull it towards you.
- After completing these steps, make sure that the antennae on the removed bulb correspond to the location of the contacts on the new one. The antennae themselves should fit into the mounts on the optics without any problems. Install the new lighting element at a 45 degree angle.
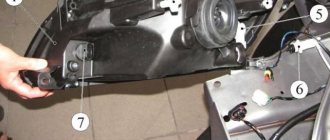
- Next, the lamps in the left headlamp are replaced. Here the procedure will be slightly different, since it has its own characteristics, in particular, it will be more difficult to reach the light bulb. Before changing devices, it is necessary to dismantle the air filter unit; to do this, disconnect all fasteners and clamps, as well as pipes. It will also be necessary to unscrew the pipe through which the coolant passes. The block itself is supported by three special clamps; they must be removed.
- After completing these steps, you will need to repeat all the replacement steps described above. Further assembly is carried out in reverse order. Now all you have to do is connect the battery and check the functionality of the optics.
Summing up
A reverse light that doesn't come on is just as potentially dangerous a problem as a reverse light that stays on all the time, even when the car is moving forward.
Therefore, such a problem cannot be ignored under any circumstances. Just like installing a flashing brake light for the sake of beauty. It may look impressive, but it confuses drivers significantly.
In some cases, you can find and eliminate the cause yourself. And without any problems. But there are also situations when the best solution is to visit an experienced auto electrician.
I have a Granta liftback and at some point both lights stopped coming on when I engaged reverse gear.
It is too stupid to think about burnt out lights, 2 lights cannot burn out at the same time, which means there may be a fuse or a reverse sensor on the gearbox.
I recommend starting diagnostics with the fuse:
Fuse F6 is responsible for the reversing lights. Pull the fuse and see if it's blown? I think it's unlikely to burn out. But it's worth checking.
If the fuse is intact, then the problem may be with the sensor. But this can also be checked.
First, the sensor on the 2181 box (cable box) is located above it, unlike the old box, where the sensor was below.
The sensor is located directly above the box. If you look at the box under the hood, you will see it. There are no options here.
Secondly, we remove the chip from the sensor and close the contacts with a regular paper clip:
Next, turn the ignition key and go look at the rear lights. No need to engage reverse gear 
Are you on fire? That's it, it means the problem is in the sensor, which means it needs to be changed.
To replace the sensor, we need the sensor itself and a key for 22. I had this regular key:
And of course you need the sensor itself:
Sensor marking: 2190-3710410. In the photo above is the original sensor that was installed on the 2014 Lada Granta liftback from the factory.
I go to the store and buy such a sensor with the inscription “OTK” for 85 rubles. Thanks to VAZ for the fact that all these sensors are available in any store and you don’t have to wait weeks for delivery.
Installing the sensor is simple: unscrew the old sensor, screw in the new one, and put the chip in place. There is a copper ring under the sensor, don't lose it.
Do I need to remove the air filter? Everything depends on you. I was able to reach right under the filter with my hands and rip off the sensor. Why rip it off? Because it is very twisted, be prepared for it.
Reversing at night will be a real challenge if the car's reverse lights are not on. Let's look at why the lamps stopped burning and methods for independently searching for the root causes. Most likely, knowing how to test the reverse light switch will be the most useful skill when troubleshooting.
Video “How to ensure bright DRL lighting in Grant without modifications?”
The video below presents recommendations for ensuring the brightest illumination of daytime running lights in a Lada Granta car (the author of the video is TheLadaGranta channel).
During operation of the vehicle, malfunctions may occur, for example, the dimensions, headlights or taillights, turn signals or daytime running lights (DRLs) do not light up. It is recommended to follow these instructions to find the causes of malfunctions.
The procedure for checking on Lada Vesta and XRAY cars is similar:
- The lamp has burned out. Check them and, if necessary, replace them with new ones.
- The fuse has blown. Check the serviceability of the mounting block (see relay and fuse diagrams for Vesta and XRAY).
- Break in the wiring. Check the wiring and reliability of contacts (see electrical diagrams for Vesta and XRAY).
- The additional body electronics unit is faulty (part number 231A08052R or 231A03142R, it is not on the XRAY). Replacing the block.
One of the reasons why the headlights do not light up is an attempt to replace the headlight bulbs with LED ones. Such tuning can damage an additional body electronics unit. Read what you can do in this case.
Most fuses are located in the mounting block inside the car. The serial numbers of fuses and relays are indicated on the housing of the mounting block. The purpose of the relay and the circuits protected by fuses are indicated by symbols on the inside of the instrument panel trim, which covers the location where the fuses are installed. The current strength for the fuses is also indicated there. Additional relays can be installed to the left of the Lada Granta mounting block.
Cars VAZ 2190, VAZ 2191 - 2011, 2012, 2013, 2014, 2015.
Cars Lada Granta Liftback, Granta Luxury, Granta Standard, Granta Norma were also considered.
Where is the mounting block located on the grant?
In the cabin. The fuse and relay mounting block is installed in the instrument panel on the left side.
1. Pull and remove the instrument panel trim
2. Using the number on the inside of the trim, we find the fuse for the faulty circuit.
3. Using tweezers, remove the faulty fuse
Sometimes the fuse thread remains intact, while its connection inside the fuse is broken. It is impossible to visually determine such a malfunction. In this case, you can assess the condition of the fuse using an ohmmeter or a test lamp.
Layout of fuses and relays in the mounting block.
Interpretation of fuses and relays in the mounting block of the Lada Granta.
Circuit breakers
Electronic engine control unit, cooling fan relay, fuel injectors
Possible reasons
If the reverse lamps do not turn on when shifting into reverse gear, whether it is manual or automatic, you need to look for the reason.
The light must be on. This will not only result in a fine, but can also lead to a serious accident or accident.
- Sensor malfunction. It is also a reverse switch, limit switch or frog. This controller is quite reliable and durable. But still, the possibility of its breakdown cannot be ruled out. Especially if the car was hit from behind, the headlight was broken and the lights were changed;
- Burnt out light bulb. Or maybe everything is outrageously banal. Over time, the light bulb has used up its resource, and therefore no longer works. It will have to be replaced;
- Fuse. Also, the signal may disappear if the sensor responsible for these lights burns out. This is a fuse link that burns out when the permissible voltage is exceeded. Since this fuse is responsible for several devices at once in most cars, in parallel with the reverse gear, other lamps, dashboard lights, etc. may not light;
- Open circuit. Here pins can break off, wires can fray, and more;
- Oxides and corrosion. Formed in places where the contacts of the circuit leading to the rear lights are connected;
- Ground contact. If the ground is bad, reverse gear may not function. This is also one of the reasons why the brake lights on a car do not light up.
Unlike the situation when the lamp is constantly on, there are many more potential causes.
But still, the most common problem is the failure of the reverse switch. It is also called a frog.
Where are the fuses for the Lada Granta?
The fuse box is located near the driver's left foot. To open the lid, pull the lower left corner of the lid (No. 1) and release the left locking point, then the middle one (No. 2) and the two right locking points (No. 3 and 6). Then release the top points (No. 4 and 5) and remove the cover.
Installing the mounting block cover is done in the following order: first snap the right side of the cover, then the lower ones, and then the upper ones. Make sure that the fastening elements of the cover are aligned exactly with the metal fasteners.
There are symbols on the plastic cover of the mounting block that indicate what each fuse (F) and relay (K) does.
Main reasons
- The fuse has blown. Both lamp bulbs are protected by one fuse link. Together with the lamps, the fuse will most likely protect some other circuits. Therefore, if your car’s taillights not only stop lighting, but also, for example, the dashboard backlight does not work, the first thing you need to do is check the fuse. You can find out which “socket” in the mounting block the lamp circuit goes through from the repair and operating manual for your car. In many cases, the main circuits are shown graphically on the inside of the fuse box cover.
Instead of a burnt-out insert, install only a fuse of the same rating. Installing a fuse link with a higher rating may cause the vehicle to catch fire. You can familiarize yourself with all the selection rules in the article “Classification of fuses for cars.”
- Limit switch faulty.
- Open circuit (breaking off pins in connectors, chafing wires).
- Formation of oxides, corrosion at the junctions of contacts, burning of pins.
- Poor ground contact of the lights. In case of problems with the general “mass”, brake lights and turn signals may also not work. It is extremely unlikely that both bulbs stopped lighting at the same time due to contact problems in the lanterns. But a bad ground can cause the reverse gear light to not light up on only one side. Of course, in this case it is worth checking the lamp itself.
Fuse and relay diagram
| Fuse | Current strength, A | Protected circuit |
| F1 | 15 | – Relay for turning on the engine cooling fan – Short circuit 2x2 – Controller (engine control unit) – Injectors – Ignition coil |
| F2 | 30 | Electric windows |
| F3 | 15 | Alarm |
| F4 | 20 | – Windshield wiper – Airbag |
| F5 | 7,5 | Ignition switch terminal 15 |
| F6 | 7,5 | Reversing light |
| F7 | 7,5 | – Canister valve – Mass air flow sensor – Oxygen sensor 1/2 – Speed sensor |
| F8 | 30 | Rear window defroster circuit |
| F9 | 5 | Side lights on starboard side |
| F10 | 5 | Side lights on the left side |
| F11 | 5 | Rear fog lights |
| F12 | 7,5 | Low beam on starboard side |
| F13 | 7,5 | Low beam on the left side |
| F14 | 10 | High beam on starboard side |
| F15 | 10 | High beam on the left side |
| F16 | 10 | Front fog lamp on starboard side |
| F17 | 10 | Front fog lamp on the left side |
| F18 | 15 | Heated front seats |
| F19 | 10 | ABS (Anti-lock Braking System) |
| F20 | 15 | – Horn – Trunk lock – Transmission – Cigarette lighter – Diagnostic connector |
| F21 | 15 | Electric fuel pump |
| F22 | 15 | central locking |
| F23 | 10 | Daytime Running Lights |
| F24 | 7,5 | Air conditioner |
| F25 | 10 | – Interior lighting – Brake light |
| F26 | 25 | Anti-lock braking system |
| F27 | – | Spare |
| F28 | – | Spare |
| F29 | – | Spare |
| F30 | – | Spare |
| F31 | 50 | Heated windshield |
| F32 | 30 | – Heater – Electric power steering |
Functionality check
If a malfunction is detected, the following checks must be performed:
- activation sensor;
- wiring harness.
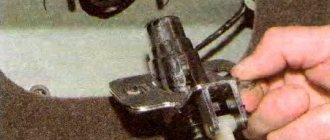
Frog sensor
The following algorithm is used:
- Place the vehicle on a control channel or overpass.
- Stop the engine and secure the machine with the parking brake or wheel chocks.
- Check the gearbox housing, the sensor is located on the rear wall. On some models, a speed sensor is installed nearby, which transmits a signal to the electronic speedometer.
- Remove the plug from the sensor connector and check the contacts.
- Use a piece of wire or a paper clip to short out the metal parts inside the washer.
- Turn on the ignition circuit. If the wiring is in good condition, the warning lights should light up.
If the lamps come on, this indicates a failure of the control sensor, which must be unscrewed from the crankcase and replaced. If the lamps do not light up, there may be a problem with the sensor or wiring.
To check the sensor, you should use an adapted lamp, up to 12 V, installed in a socket with patch cords. The lamp is connected to the sensor terminals when reverse gear is engaged and the ignition is on. If the lamp does not turn on, replace or adjust the sensor.
Circuit integrity
To check the continuity of the circuit, use a multimeter in wire test mode. When checking the wiring, be sure to remove the lamp or remove the cover to allow access to the lamp contact area. The meter is connected to the beginning and end of the wire; a buzzer sounds when the circuit is short-circuited. You can use a test light with a power cell shorted through a wire from the sensor to the ceiling. The damaged cable should be replaced with twisted copper wire of suitable cross-section.
Adjusting the gearbox switch
On some vehicles, you can adjust the position of the sensor depending on the position of the gearshift knob. There is a lock nut on the sensor body that needs to be loosened. Then reverse gear is engaged and a warning lamp is attached to the sensor contacts. The housing is screwed into the box housing until the contacts are closed and current is supplied to the filament. The sensor is fixed in a fixed position with a lock nut, then the wire plug is connected.
If the sensor design does not provide a locknut, the position is adjusted using washers. The thickness of the pack of adjusting washers is selected experimentally with the rear rotation speed turned on. Please note that too many washers will reduce the length of the threads that secure the sensor housing to the crankcase.
In automatic transmissions, the reverse sensor is combined with a neutral or park position indicator. An additional indication is required to allow the engine to be started only when the kinematic chain is open. A similar design is used on some transmissions, and there is also a switch in the selector that cannot be adjusted.
Algorithm for setting up a short sensor:
- Remove the plug and check the pin assignment on the label or on the vehicle's wiring diagram.
- Turn on the ignition and move the selector lever to the reverse position.
- Rotate the sensor until the warning lights go out and mark the position of the sensor housing relative to the crankcase with chalk. To check this, use an externally powered indicator light connected to the inverting terminals.
- Connect the lamp to the other contacts and slowly twist the housing until the filament clicks. Mark the position with chalk on the sensor body and box body.
- Set the switch to an intermediate position between the found positions. When set correctly, the stern lights turn on when the lever is moved to the R (reverse) position and the engine can be started in the P and N positions.
We gain access to the fuse box in the cabin
In the Lada Granta, the fuse box, or as it is also popularly called, the mounting block, is located to the left of the driver. To gain access to it, you need to lower the protective decorative plug down.
Removing the decorative plug
Location of the latches of the decorative plug of the mounting block
Removed from one mount
For ease of use, I recommend completely removing the decorative plug and putting it aside. To do this, you need to remove the chip from the trunk opening button. The chip can be easily removed; there are no latches that hold the chip in place.
Remove the chip from the trunk button
Also, the chip is made for fools; you won’t be able to put it on incorrectly, so you don’t need to remember its seating position.
Removing fuses and contact relay
To replace (remove) fuses and contact relays, the mounting block is equipped with special tweezers. For fuses - small tweezers, for contact relays - large tweezers.
How to replace reverse lights?
Replacing reverse lamps depends on the type of vehicle. For example, in a Lada Kalina station wagon, you need to unscrew 2 screws that hold the lamp in the trunk door opening. Then the housing slides out of the socket with force (the design includes additional plastic handles) and the insert is removed along with the wiring. In cars with a sedan body, to remove the lamp, unhook the valve on the trunk trim and unscrew the nuts with a long-head wrench.
On VAZ-2105 or 2107 models, the rear light is covered with a plastic cover located in the luggage compartment. To remove the cover, unscrew the nuts and then remove the circuit board with the lamps from the lampshade. The damaged element is removed from the socket for replacement, and the condition of the tracks and contacts is visually checked. Any oxidation found must be removed.
Fuse layout diagram in the mounting block
Mounting block diagram
Fuse box (painted numbers all day)
Clue. On the reverse side of the decorative plug, there is a diagram of the location of fuses and a contact relay in the mounting block!
| Fuse no. | Current strength, A | Protected electrical circuits |
| F1 | 15 | Controller, engine cooling fan relay, short circuit 2x2, injectors |
| F2 | 30 | Window lifters |
| F3 | 15 | Emergency Signal |
| F4 | 20 | Windshield wiper, airbag |
| F5 | 7.5 | 15 terminal |
| F6 | 7.5 | Reversing light |
| F7 | 7.5 | Canister valve, mass air flow sensor, DC1/2, speed sensor |
| F8 | 30 | Heated rear window |
| F9 | 5 | Side light right |
| F10 | 5 | Side light left |
| F11 | 5 | Rear fog light |
| F12 | 7.5 | Low beam right |
| F13 | 7.5 | Low beam left |
| F14 | 10 | High beam right |
| F15 | 10 | High beam left |
| F16 | — | — |
| F17 | — | — |
| F18 | — | — |
| F19 | — | — |
| F20 | 15 | Horn, trunk lock, gearbox, cigarette lighter, diagnostic connector |
| F21 | 15 | Gasoline pump |
| F22 | 15 | central locking |
| F23 | 10 | DRL |
| F24 | — | — |
| F25 | 10 | Interior lighting, brake light |
| F26 | — | — |
| F27 | — | — |
| F28 | — | — |
| F29 | — | — |
| F30 | — | — |
| F31 | — | — |
| F32 | 30 | Heater, EUR |
Contact relay diagram
| Relay | Description |
| K1 | Heater fan relay. |
| K2 | Power window relay |
| K3 | Starter relay |
| K4 | Ignition switch terminal 15 relay |
| K5 | Turn signal and hazard warning relay |
| K6 | Wiper relay |
| K7 | High beam relay |
| K8 | Horn relay |
| K9 | Low beam relay |
| K10 | Heated rear window relay |
| K11 | Controller relay (engine control unit) |
| K12 | Electric fuel pump relay |
Difference in trim levels: standard, norm, luxury
The mounting block is the same for all vehicle configurations: standard, normal, luxury. Depending on the configuration and equipment of the vehicle, some relays may be missing from the fuse block.
Principle of operation
It is not difficult to understand the operation scheme of the DZH. It is located in the gearbox and uses a switch at the end. When the gearbox selector moves while changing gears, the switch is either pressed or released, depending on the gear engaged.
If the sensor stops working, then the headlight, which indicates the beginning of backward movement, either stops turning on or begins to work incorrectly. The reasons for the malfunction of the DZH can be different:
- Lamps are burnt out or broken;
- The fuse has blown;
- Block contact failure;
- Oxidation of contacts.
Fuse box under the hood of a car
In the Lada Granta car there is another block of “powerful” fuses under the hood of the car. The fuse rating is from 30A to 60A, which is why this unit is called a power unit.
The fuse box is indicated by an arrow
To access the fuses, pull the protective cover upward. It can be easily removed. After finishing work, do not forget to return the cover to its place.
Block diagram in configurations: Standard, Norma
| Fuse no. | Denomination, A | Description |
| F1 | 30 | Low beam headlights or main relay, circuits protected by fuses F1 and F21 of the mounting block in the passenger compartment |
| F2 | 60 | Generator |
| F3 | 60 | Generator |
| F4 | 30 | Heater fan (heater fuse grants) |
| F5 | 50 | Electric power steering |
Block diagram in the Lux configuration
| Fuse no. | Denomination | Description |
| F1 | 50A | Heated windshield |
| F2 | 60A | Generator |
| F3 | 60A | Generator |
| F4 | 40A (in the configuration without air conditioning - 30A) | Electric radiator cooling fans |
| F5 | 50A | Electromechanical power steering |
| F6 | 40A | Anti-lock brake system (ABS) control unit |