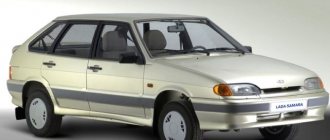
Breakdowns
If the rear headlight unit fails, it is often due to a broken bulb from a particular light, or a problem with the fuses.
A rarer type of failure is a broken wiring.
It should be understood that each element of the rear optics plays its own irreplaceable role, therefore it is necessary to maintain the required level of performance of the optics and promptly respond to emerging malfunctions.
Before long trips, be sure to make sure that all the lamps in your car are working properly. In the event of an accident caused by non-functioning taillights, do not count on insurance. She won't act.
Headlight installation
How to connect fog lights? The installation and connection procedure is described in detail below. Let’s make a reservation right away - if necessary, you can install xenon lamps in the fogs. Xenon in PTF will burn much brighter when compared with traditional incandescent lamps, but its cost will be an order of magnitude higher. Since the bumper on the VAZ 2114 does not have appropriate places for installing fog optics, the car owner will have to make them on his own.
All work on installing optics is carried out on the dismantled bumper. If you don’t know how to remove this body element, then you just need to unscrew the fasteners that secure it. The bumper itself needs to be cleaned; it is advisable to install it at the level of the lower air intake, under the headlight optics. Installation of lights must be done in specially designated places on the bumper - the so-called glasses.
These glasses must be marked in accordance with the dimensions of the optics themselves, after which the corresponding holes must be made in the bumper. The holes are cut using a jigsaw, and it is advisable to sand the sharp edges on them with sandpaper or a file. The PTF should fit into the hole as tightly as possible, so they must be securely secured with clamps. When the installation of the optics is completed, the bumper can be put back on the car.
Reversing lights
Lamps, which are a light-signal element that notifies you when you are reversing, can significantly increase the level of safety on the road.
The turning on of the rear lights indicates that the car is moving backwards, so you should be careful. Non-working lights can easily lead to accidents and collisions, for which you will ultimately be the culprit.
What is this?
3X headlights are white lighting fixtures. They turn on when shifting into reverse gear.
The main function is to ensure safety while driving. They signal other drivers about your maneuvers and illuminate the road when parking in the dark.
Replacement timing and choice of optics
In addition to the difficulties described above, which are familiar to motorists who drive long distances, there are more banal reasons related to the depreciation of the headlight itself. This mechanism does not have a specific shelf life, but the lamps “burn out” over time, and the reflector material and diffuser become unusable.
The last two elements have a shelf life directly related to the material from which they are made and the methods of car care. At the same time, even the best of them are still susceptible to the ingress of dirt associated with depressurization of the headlight structure.
IMPORTANT! If you have working headlights, but you still can’t see anything, visit a good car service center that has a light debugging stand. It may just be necessary to clean the structure and adjust it.
The choice of headlights is extremely important for the convenience of the motorist. To be more precise, it is not the manufacturer itself that is important (although it affects the characteristics of the light), but the identity of the lighting fixtures. If your car has standard headlights, but you decide to replace only one, then find the original ones. You should not take AUTO SVET or BOSCH, which are similar in appearance.
Choice of optics
From a technical point of view, the headlights will be the same, but the manufacturing technology of the optics differs from one company to another, and as a result, you will get two distinctly different headlights. Even if you don't care about the appearance of the car, don't forget about the properties of your eyes.
Human vision and the brain have a number of characteristics, and in this case they will manifest themselves in the fact that a more powerful headlight will create a “twilight zone” instead of a dimmer light. Consequently, there will be no improvement in visibility, and the brain will perceive the “blind spot” almost the same way if it did not exist at all.
Why don't FZH work?
There are several reasons why FZHs can fail. Let's try to understand them.
| Cause of malfunction | What to do |
| Lamp burned out | Replace the burnt out bulb with a new one, check the condition of the contacts |
| The fuse is broken | Check, replace if necessary. A fuse can lead to loss of functionality of the entire contact circuit |
| There is no ground on the board | The board is located under the lamp. Simple repair to fix the problem |
| The contacts have oxidized and become coated | Cleaning contacts is not difficult |
| The wiring is broken | You will have to diagnose the condition of the circuit, check the integrity of the wiring using a tester and a visual method |
| The contact on the headlight film has burned out | You will need to clean the contacts and replace the elements if necessary. |
| There is a breakdown in the gearbox mechanism | In such a situation, the issue of gearbox malfunction will have to be resolved. |
| The frog (sensor) has failed | Check the condition of the reverse sensor, replace the device if necessary |
There are a lot of reasons for the failure of the FZH, so the driver must know exactly how to eliminate this or that type of breakdown.
Block ZF
Removing the rear light board
To remove the board, you will need to perform a few simple manipulations:
- Open the trunk;
- Remove everything unnecessary from the space so that it does not interfere with your work;
- Remove decorative trim;
- Remove the plastic casing;
- Remove the back panel;
- Having gained access to the socket and the license plate lamp, you can remove the devices;
- Remove the reversing sensor mounting studs and the headlight itself.
Many people confuse the reverse sensor with the speed sensor, since these devices are located in close proximity to each other.
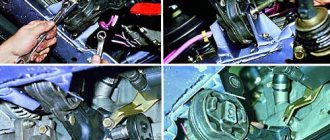
Dismantling works
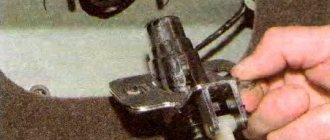
Checking the functionality of the sensor
If the taillights do not turn on, the culprit may be the reverse sensor, that is, a frog in the people.
Remove the contacts from the sensor and clamp them together, then turn on the ignition. If the light appears, the sensor needs to be replaced. If there is still no light, the integrity of the circuit is broken, but everything is fine with the frog itself.
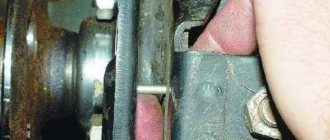
Replacing the sensor is quite simple:
- Place the car on a pit or overpass;
- Apply the handbrake;
- Remove the protection from the bottom, opening access to the gearbox;
- Remove the contacts from the old sensor;
- Place an empty container under the sensor and remove the frog. The container is needed because when the device is removed, oil will leak out of the gearbox;
- Remove the old frog, insert a new one in its place;
- Let the car sit for a while;
- Check the oil level inside the gearbox;
- If necessary, add oil to the required level;
- Reassemble.
Such repairs can be done with your own hands, and the cost will be approximately 250 rubles. This is exactly how much a new sensor for a VAZ 2114 costs now.
Problem with the light bulb
It is not uncommon for taillights to stop functioning normally due to the failure of the bulb itself.
- To replace it, you need to disconnect the block with wires and remove the contact panel from the flashlight. Here you just need to squeeze the side latches to remove the plastic panel;
- Apply a little pressure on the cartridge and unscrew it counterclockwise;
- Check the condition of the contacts and wiring;
- Screw in a new light bulb that matches the previously installed one;
- If necessary, before screwing in the new lamp, clean the contacts and test the wiring with a tester. There may be a break in the circuit, so a new light bulb will not work.
How to install a PTF: necessary materials and tools
Installation of fog lights, regardless of the chosen installation method, requires the presence of certain parts and tools, without which it is impossible.
What are the button and relay for?
In order to install fog lights on a VAZ, you need to assemble certain parts in advance or purchase a ready-made kit. The cost of such a set rarely exceeds one thousand rubles.
The PTF kit includes:
- wires with blocks and terminals for a specific VAZ model. There are three of them as standard: one connects the headlights, the second goes to the relay from the switch, and the third goes from the relay to the fuse box;
- fog lamp relay;
- power button;
- clips and ties that secure the wires;
- fog lights.
Which PTFs should you prefer? The headlights themselves are chosen by the driver to his taste, but the main thing when choosing is not to make a mistake with the power, so as not to overload the generator and the car’s electrical wiring. It is better not to purchase headlights with xenon: the generator has a certain power reserve, but is not designed for too high loads. Regular light bulbs will be sufficient.
The eternal problem is the rear light boards... - Lada 2114, 1.6 l., 2013 on DRIVE2
Good day to all! Well, I registered for the drive and, in order not to be a vegetable, I decided to write my first blog entry. We will talk about the most common problem of the Samar family, namely our favorite circuit boards in the rear lights. It all started trivially with the overexposure of stoplights with markers and turn signals, but one day (after hearing a horn from behind a parked car), I realized that something new had appeared. That’s right - when I pressed the brake pedal, the reverse light came on, which naturally put everyone behind me in an awkward position. Plus, this was also accompanied by annoying squeaking in the cabin. Chewy mole! I thought. We need to do something! Replacing the boards did not lead me to anything good, and the swear words were already over (and how I remembered the designer of this device with all his relatives). In short, it’s been decided - we need to install cartridges instead of circuit boards! I drove around half the city in search and finally found cartridges for turn signals 2106, bought all the necessary materials (wires, heat shrink, etc.) and off we go...
Having torn out all the old circuit boards for good measure, I began to try on the purchased cartridges in order to get a clear picture of how it should be. And he caught it!
Full size
how should the cartridges be positioned?
Having searched the entire Internet, I still haven’t found a suitable method for attaching cartridges. Alas, everyone advises to glue, solder, or do something else, but if you bother like that, wouldn’t it be easier to buy Osvara or something else? Moreover, the costs will differ slightly, but we still need to resolve this issue on a budget. In the end, the solution found itself! Having marked the places for the cartridges, I made holes with a small drill
Full size
But the seat diameter of the cartridges is approximately 16 mm, i.e. the hole needs to be enlarged... Well, it’s necessary! take a cone cutter and fuck off!
Full size
Surely someone will ask why the hell did he take the cutter? Why are drills banned? Why not take a feather one, etc. Well, or something like that... Why, why?.. Yes, because fishing and Perch - Baba! Well, I couldn’t find a 16mm drill bit, so I distorted it as best I could! By the way, in the end, I got a taste for the cutter bits and never regretted that I used them to make holes, since conical drilling on both sides (of course, when used carefully) gives a very good seat and the cartridges don’t need to be secured at all! almost tight! But it’s better to be safe than sorry, and I decided to secure them forever. NO GLUE IS NEEDED, THE OPTION IS BUDGET but at the same time reliable
Full size
These are the screws that will last forever)))
We take self-tapping screws and screw on all the cartridges
Full size
something like this
Next you need to connect and connect everything. The question is how? Easily!
I purchased acoustic wires with a cross-section of 1 mm, folders, female terminals in general, heat shrink for 4 and 8 (a must!). I also wanted to buy a crimp wrench, but when I saw it in a store for almost 500 rubles, a toad woke up in me and began to choke me like a bitch. You can do a great job of crimping it with pliers, I thought, and, in fact, I went... By the way, I almost forgot, you still need 2 six-pin chips, so as not to have to deal with twisting and not set up a collective farm! It’s not easy to find them in our city, but miracles happen to those who believe in them! In short, I found)) only one though. the second one has 8 contacts, well, it doesn’t matter)
Full size
here she is
Well, then everything is simple, we look at the pinout of the contacts using the old board, everything is connected simply... By the way! The bulbs for the turn signals in this design need to be shorter than the stock ones - otherwise they won’t fit and there will be no end to swear words!) I took these, but I plan to install other diodes
www.drive2.ru
Step-by-step creation of diode pads
As already mentioned, the most popular type of tuning is the use of LED overlays. For independent installation and creation of elements for decoration, you will need to prepare tools and some materials in advance:
- high-quality fiberglass;
- required number of LEDs;
- a sharp knife, preferably using a stationery knife;
- special epoxy-based adhesive;
- tape and paint material.
The manufacturing and installation process should be carried out in stages:
- Using tape, you need to completely cover the surface of the rear optical devices.
- Apply the required amount of tape to high-quality fiberglass fabric and thoroughly saturate the base with epoxy adhesive. Experts recommend applying the adhesive base in several layers, making sure that the layers are not too thick, and in the future it will be possible to correctly fix all additional overlays to the base. For the epoxy base to dry completely, you need to wait 12-14 hours, but it is best to read the instructions for using the glue before starting work.
- After the base has hardened, remove the blank from it to mark the outline of the future design, using a bright marker or tape.
- The resulting outline is carefully cut out with a knife or scissors.
- The cut profile must be puttied. After the putty has dried, the excess is removed with fine sandpaper.
- Primer and paint material are applied.
- If desired, you can apply varnish to protect the surface of the lining, but only after the paint and varnish material has completely dried.
- The finished LED attachments are installed on the rear lights, which completes the tuning process.
It should be noted that such overlays are quite easy to make yourself. You can decorate not only the taillights for a VAZ-2114 or another model, but also fog lights, and even the so-called turn signals, to give originality to your faithful four-wheeled friend.
Removing and installing VAZ 2114 headlights... or Thing No. 4 has arrived! — Lada 2114, 1.6 l., 2009 on DRIVE2
So... Let's start with the fact that little thing No. 4 arrived... (who doesn't know, read the logbook more carefully! :-)) I decided that I would send our official service through the forest with my crooked and, most importantly, inaccurate “specialists”! I also have to pay them money for it... Therefore, I install little thing No. 4 myself...) Oh, yes... I forgot to tell you what kind of thing No. 4 is... These are the well-known CHINESE (more about this later in the text) ProSport monoblock headlights with “angel eyes” . You can scold, swear and say - why are they needed, they shine like shit and so on, but they are too beautiful... The most beautiful, I would say! I’ll tell you why I decided to take it below... In general, a report on the installation of VAZ 2114 headlights (replacement). Lyrics: “how I swore, how I swore at myself that I took them... these beautiful Chinese toys...” Of the things that are most bad about them (a flint in the ointment): 1) The rings are not reliable, or rather the wiring in the headlights . All wiring. and ignition blocks for these neon rings. 2) All wiring is very flimsy and not reliable. Repeating myself! 3) Flimsy plastic and thin bendable metal. 4) There is no seat for the lamp in the lenses. The lamp can jump out - hence the crappy light, as many write. Let’s talk about the “honey” right away (in terms of appearance) - by the way, they shine no worse than their relatives, but only if everything is set up and the lamps are positioned correctly in the lens! I don’t know why everyone here was scolding their light so much?! So, a guide for those who have to change their original headlights to tuning ones:
For simplicity and convenience, I removed the plastic trim above the radiator.
Climbing underneath the front bumper, we look for the “cross” screw there that holds the lower eyelash of the headlight, it is located right under the turn signal almost... This screw holds the eyelash together with the headlight, because the eyelash is attached to the headlight with two clips. So we unscrew these bolts.
DO NOT REMOVE THE TURNER SEPARATELY! — in addition to the spring on the back of the headlight, it is also fixed with a latch from the bottom of the headlight... Here it is (the latch) in the photo.
Next, unscrew the bolt from the side of the radiator, which fastens the headlight and the middle frame above the bumper (the one that smoothly goes on the sides into the lower eyelashes).
Don’t forget to disconnect all 2 plugs (to the headlight and to the turn signal) and the hydraulic corrector. The hydraulic corrector is not difficult to remove - you clamp the curved clip and turn the corrector plug down and remove it from the socket.
Now, using a 10mm head, unscrew the 4 bolts at the back of the headlight. Then you will see that the headlight has only 3 bolts, and the 4th (if you look at the right headlight, then at the top right; and if at the left, then at the top left.) holds that same middle frame above the bumper. We repeat the operations with another headlight. P.S. With the right headlight it is more difficult to get there because of the air intake, we just pull it deep into the hood, it just snaps there!
In order not to scratch the paint anywhere and everything was neat, the two of us take out a little of the headlight from its seat, remove the fasteners of the middle frame from the joint with the headlight.
www.drive2.ru
Which modification is better?
H4 halogen lamps installed on the VAZ-2114 are divided into:
- Standard.
- Enhanced light beam.
- Improved visual overview.
- All-weather.
- Increased power.
They are two incandescent filaments for low and high beam lighting. Lamps with a power of 60/55W are considered optimal among them.
Standard H4 lamp
Such lamps are mounted on every car of this VAZ model.
Improved visual overview
Illuminated with white light familiar to the eye. Consuming the usual 55 W, they illuminate brighter, despite the bluish tint of the bulb.
They provide an excellent background light on snowy and dry roads. On a wet road it is better to use yellow fog lights. Doesn't blind oncoming cars. The service life of these does not differ from standard ones, despite the inflated price
. Manufacturers prefer lamps with a yellow or bluish tint.
All weather
All-weather yellow lamp
The lamps are specially coated with a yellowish tint, which allows the light to achieve the contrast of the area in bad weather, especially cloudy (foggy). Yellow light has less reflection.
Increased power
They are in demand among owners who do not particularly know the “subject of the dispute.”
High-power lamps lead to consequences such as blinding an oncoming car and causing an accident.
Manufacturing of diode rings
To create taillights with your own hands, you need the same epoxylin and strong glue. The basis is diode rings or tape. The body will be made from small and large reflectors, which can be found on the hardware market. The last element is the paint, which the motorist likes best. Most VAZ 2114 owners choose chrome paint.
- Diode rings must be installed in cylinders, which are best made from tin cans. Coffee or canned food cans are suitable for this.
Processed tin can
- They must be carefully cut out so that at the end something similar to a well appears. There should be two of them - internal and external. If a coffee can can serve as the basis for an external well, then the internal one can be made from an ordinary 0.5 liter plastic glass and then painted.
- Now simple Soviet cataforts should be installed in the internal wells. They should provide illumination according to the standard scheme: turn signals - orange, reverse - white, fog lights - red. After this, extra elements may remain from the large catafort, which will look great inside the module. The rest of the space can be decorated with any LED ring. Decorated wells look impressive, but you can’t see what they were made of
- The next procedure is to install the reflectors and LED rings. In order for them to hold securely, it is necessary to make stiffening ribs, as an option - epoxylin.
- You can put additional lighting on the plexiglass and secure it with epcosilin.
As a result, you should get such tuning yourself. Detailed visual aid for installing LEDs in VAZ optics:
Types of tuning
Tuning optics is not difficult, even if you are relatively new to this matter. The main thing here is to first decide which option for modifying the rear headlights you want to use for your VAZ 2114.
There are a few basic ideas that are particularly popular today.
| Tuning type | Peculiarities |
| LED overlays | A popular and affordable option. There are many ready-made overlays offered on the market, but you can also make them yourself. To create the overlay you will need fiberglass, LEDs and epoxy glue |
| Diode rings | This modification option involves a complete replacement of the rear optics with diode rings. To manufacture them, you will need serious experience in working with electronic devices. |
| Powerful lamps | This type of modification also involves the use of a tint film for headlights. Due to the tone, bright light will be better focused. But powerful lamps have disadvantages - they increase fuel consumption, load the generator and overheat the wiring. Since the engine power of the VAZ 2114 is not high, it is not entirely reasonable to use this option |
| Individual LED elements | The most original modification option, since it allows you to express your own imagination as much as possible. But you will have to spend time and effort creating a pattern of diodes and installing them |
From a cost-saving point of view, purchasing individual LEDs will be more profitable than purchasing finished products. But in this case, you must be sure that you will be able to get high quality devices. Otherwise, it’s better not to take risks and spend more money.