Comments: no Published: 12/06/2016
Rating:
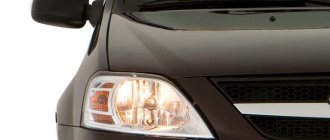
Car headlights are designed to provide a full view of the road at night. The proper condition of all lighting sources on the car is a necessary condition for safety while driving. Traffic regulations set very strict requirements for the serviceability of headlights. A driver who does not comply with them is subject to a fine.
To avoid troubles with the car inspection, the car owner is obliged to regularly inspect the lights on his car and, if defects or breakdowns are detected, promptly take measures to eliminate them.
Headlights on at night can save your life.
Headlights on a Lada Largus may have the following types of problems:
- burnt out lamps;
- broken lamps;
- cracks on the surface of the optics;
- dimming of lights;
- incorrect formation of the light beam, etc.
The reasons for these problems may vary. Clouding of the optics is caused by the matting effect of dust particles in the oncoming air flow; cracks and broken lamps are usually the result of a collision with an obstacle while driving. Scratches on the surface of the optics can be the result of driving on roads with bushes and trees with spreading branches growing on the sides.
Driving with headlights that have any of the above factors is unacceptable. To carry out repairs, you can contact a service station, where qualified technicians will provide you with the required assistance. But car service costs money - not all vehicle owners are ready to incur financial expenses.
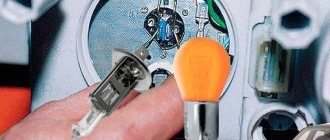
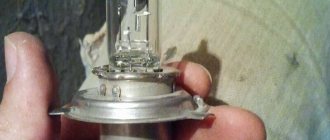
Burnt out bulb H4
If you want to avoid spending money, try doing it yourself. On Lada Largus cars, replacing lamps and lights does not cause any particular difficulties. And use the information you glean from this article as a guide.
See also:
How to replace Mazda 3 low beam bulbs
Changing lamps
First, let's look at how to replace the low beam bulb and replace the high beam bulb on the Lada Largus. Headlights on Lada Largus use one H4 lamp with a voltage of 12 V and a power of 60/55 W for low and high beam. Therefore, replacing the low beam bulb on a Lada Largus will automatically mean replacing the high beam bulb.
While working, follow the following algorithm:
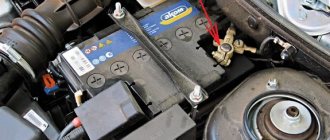
- To access the left light, you will need to remove the battery.
- Turn the lantern cover counterclockwise.
- Release the holder and remove the cover.
- Release another holder to remove the cable block.
- Hook the rubber cap on the edge and open it.
- Move the light bulb holder aside and remove it.
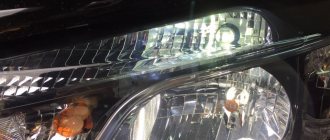
Replacing a low beam lamp on a Lada Largus
- Install the new product and follow the procedure in reverse order.
- As in other cars, in Lada Largus lamps are replaced on both sides, even if one fails. This is explained by the need for complete symmetry in road lighting. Therefore, do the same procedure on the right side.
Remember that you must hold the light bulb by the base - touching the bulb with your hands is strictly prohibited. Otherwise, the fat from your fingers will remain on the glass and will begin to evaporate during operation at high temperatures - its deposition on the optics will lead to clouding and poor visibility.
The change in dimensions looks like this:
- We unscrew the screws securing the fender liner and remove it;
- We unscrew the socket with the light bulb, turning it counterclockwise on the right, and clockwise on the left;
- We unscrew the burnt out product and screw in a new one;
- Then we proceed in reverse order.
We proceed in the same way with turning lights:
- Unscrew the screws and remove the fender liner;
- We turn out the cartridge;
- We change the light bulb and screw the socket back;
- We return the fender liner to its place.
Replacing a turn signal bulb on a Lada Largus
The situation with fog lights is similar:
- Remove the fender liner;
- We snap off the holder and disconnect the block;
- Turn the lamp 1/3 turn counterclockwise and remove it;
- Installing a new one;
- Then we proceed in the reverse order.
Some drivers manage to gain access to the headlights through the engine compartment without removing the fender liners and battery - this requires dexterity and some experience.
Replacing a fog lamp on Largus
See also:
Replacing low beam lamps in Opel Astra H, J and GTC
Tuning the headlights of Lada Largus
Improving the performance of lighting devices is divided into two types:
- modification of the headlight unit with low beam;
- PTF tuning.
The Lada Largus has enough headlights. But many car owners strive for the ideal, and they can be understood. LED and xenon lamps are now popular, but using them in reflector headlights is ineffective and dangerous for dazzling other road users.
The way out of the situation is to install bi-lenses. These are lenses in which low and high beam are combined. The main beam is activated by raising the lens curtain, but the light bulb remains lit alone without additional filaments.
The light quality of bi-lenses is much higher. They can be used with both xenon and LED light sources. The lighting will be even and have a clear cut-off line (CTB).
Lens installation is carried out in three stages:
- The headlight is removed from the car.
- Peel off the glass by heating it with a hair dryer.
- Remove the old lamp and install a lens in its place.
- They assemble the headlight and hide the ignition unit.
The second type of tuning involves installing fog lights with vertical lenses. A banal example can be seen in the photo:
These are ordinary LED PTFs, which have a clear STG and brighter lighting. Their effectiveness decreases when the road is wet and light reflects from the water on the asphalt.
Replacing the headlight
Now let's see how to remove the headlight on a Lada Largus if you need to replace or repair it:
- First, remove the wheel from the side where you are going to change the light.
- Unscrew the fastening screws and remove the fender liner.
- Disconnect the wires.
- Remove the block.
- While turning, remove the marker and turn signal cartridges.
- Open the hood, remove the lamp cover and remove the block.
- Disconnect and remove the hydraulic correction cable.
Removing the hydraulic corrector unit on the Lada Granta headlight
- Remove the front bumper to gain access to the light mounts.
- Unscrew the three bolts - use a ten-point socket to do this.
- Remove the headlight and install a new one in its place.
- Reassemble in reverse order.
Installing a new headlight on Largus
See also:
Rear additional lights for Lada Largus
Installing heater handles from Ford
Replacing low beam lamps in Moscow
The third version of round heater handles Handles from Ford. Who likes this style better, look for them on Ali Express using the phrase “FORD FOCUS 2 focus 3 Mondeo AC Knob Car 3PCS/LOT Air Conditioning heat control Switch knob for focus 2 focus 3.” It is worth considering that the fastening of these handles is different and the design will have to be modified.
We take the standard Largus heater handle and cut off the top, along with the base. We glue the separated ring with clamps onto the heater handles from Ford. That's all!
By the way, the mounting of the Largus heater handles is exactly the same as on Renault Duster, Logan, Sandero or Lada XRAY cars. Choose any you like and install without any problems! Let us remind you that on our website you can find other instructions for modifying the Largus stove, for example, a report on installing a protective mesh for the cabin filter. Which option do you like best? Post a photo of your solution.
Photo: RAlexey logbook
Keywords: stove Lada Largus | Torpedo Lada Largus | interior lighting for Lada Largus | air conditioner lada largus
3
1
Found an error? Select it and press Ctrl+Enter..
Lada 4×4 snow blower is sold in Germany for 2.4 million rubles.
Costs of maintaining a Lada Vesta with a mileage of 150,000 km when used in a taxi
Showed LADA CONNECT: car control via phone
What is the fuel consumption of Lada 4×4 (VAZ 2121 and VAZ 2131)
Stop signal
The principle of replacement is similar to the installation of the above-mentioned lamps, but it has its own nuances. Here, first, the trunk lid is opened and its decorative panel is removed. So, in order to replace the brake light, you must first of all clear the approach to the wing nuts.
After removing them, the entire headlight is turned out, which would be very problematic to do on your own. After all, you need to bring out its upper and lower parts at the same time so that they do not become a surprise. After unscrewing the screws, access to the lamp is open. The failed part is replaced, and all the previously listed steps are performed in the reverse order.
Sources
- https://FokSevmash.ru/servis-i-uhod/zamena-lampy-blizhnego-sveta-lada-largus.html
- https://CarsUp.ru/pro-elektriku/kak-pomenyat-lampochku-v-lade-largus.html
- https://www.zr.ru/content/articles/824373-zamena-lamp-v-blok-fare-lada-largus/
- https://voltage-stab.ru/zamena-avtolamp/kak-pomenyat-lampochku-blizhnego-sveta-na-lada-largus.html
- https://GlKey.ru/obzory/lampochki-lada-largus.html
- https://car-engine.ru/2021/08/29/%D0%BA%D0%B0%D0%BA-%D0%BF%D0%BE%D0%BC%D0%B5%D0%BD% D1%8F%D1%82%D1%8C-%D0%BB%D0%B0%D0%BC%D0%BF%D0%BE%D1%87%D0%BA%D1%83-%D0%B1% D0%BB%D0%B8%D0%B6%D0%BD%D0%B5%D0%B3%D0%BE-%D1%81%D0%B2%D0%B5%D1%82%D0%B0-4 /
- https://zsm-miass.ru/obsluzhivanie-i-uhod/largus-zamena-lampy-blizhnego-sveta.html
- https://LampaExpert.ru/avtomobilnye-lampy/neispravnosti/largus-zamena-lampy-bliznego-sveta
[collapse]
Tuning with “protection elements”
During a complete transformation of a car, it is worth thinking about its safety. Most often, the protection system concerns the rear and front bumpers. They are equipped with special elements made of stainless steel or polymer coated. These pads are used to prevent damage to the rear bumper from damage, for example when loading luggage through the rear doors. To protect the wheels from various stones and dust, wheel arch liners are used.
A rubber seal is installed on the rear doors of the car, which serves as a soundproofing element. To protect the radiator, you can install a special mesh (most often black or chrome is used), its cells allow air to pass through perfectly, and at the same time protect the radiator from various types of foreign bodies (stones, dust, insects).
Carbon film is an excellent element of protecting the body from minor scratches, which will also give a stylish look to your car. There is a huge selection of different colors and materials.
Thus, in order for your improved “steel” friend to serve you for a long time and reliably, tuning should be approached comprehensively. In any case, after tuning, the quality and appearance of the Lada Largus depend on the amount of money invested, as well as the skills and patience of the owner.
Dimensions
To replace the side light bulb in Largus, the socket of the old part is turned counterclockwise. The black and yellow wires connect it to the battery, so it turns off from them. A new part is installed in this place, and assembly is carried out in the reverse order.
You need to make it a rule to regularly change not only the lamps, but also monitor other lighting elements. After all, the process of reducing their brightness occurs slowly and the driver simply does not notice the deterioration in road lighting.
Independent replacement of low beam lamps on Lada Largus
A common problem among car owners is the bulbs in the headlights for near and far beams. They tend to burn out.
Lada Largus is no exception; its light bulbs are also not an endless element. At some point you will have to change them. But how?
Even the most experienced drivers may have this question, not to mention new ones. Specifically, now we will tell you how to change burnt-out low-beam light bulbs on a Lada Largus and teach you how to choose them correctly.
How to make the right choice
To begin with, let us draw your attention to the fact that the low beam bulb on the Lada Largus is a standard H4 halogen. It has two threads inside and performs two functions: it provides both low and high beam. They do not require dismantling or any other parts, so replacement and installation are very simple. The only thing you need is to purchase new lamps in advance, maybe also fuses and other elements, you also need to study the instructions.
Removing and installing license plate lighting
We prepare the car and disconnect the negative terminal of the battery.
The license plate light is integrated into the outer trim of the left rear loading door.
Using a screwdriver with a TorxT20 bit, unscrew screw 1 securing lens 4 of the license plate light to the trim of the left rear loading door.
We disengage the latch and remove the license plate light from the socket in the trim of the left rear loading door of the car.
Disconnect block 2 of the wiring harness from the license plate light 3.
Turn and pull the lamp towards you.
Installation
Install the license plate light in the reverse order of removal.
Step-by-step replacement instructions
After the burnt-out lamp is removed, you must perform the following steps:
- wear medical or clean fabric gloves;
- take the new H4 lamp by the base and insert it into the socket;
- Gently wipe the flask with a clean cloth soaked in alcohol;
- install the socket with the lamp into the socket and secure it with a lock;
- Replace the rubber boot and cover.
It is important to ensure that the protective elements are attached tightly, without distortions or cracks. During shaking and vibration, an incorrectly installed cover and boot will fall off and leave the cartridge without protection from external influences and moisture.
It is necessary to wipe the flask with alcohol, since halogen devices become very hot during operation. Traces of grease or sweat from the hands will form dark spots and will cause premature destruction of the lamp. This is an important point, so you need to prepare alcohol and clean rags in advance.