January 18, 2016 Lada.Online 110 367 1
During operation of the vehicle, the headlight bulbs may burn out. If you decide to replace them not at the dealer, but yourself, we recommend that you first study the instructions. The fact is that on the Lada Largus the lamps in the headlights change with some features, which we will discuss later.
You can replace faulty lamps yourself using the methods described below. If replacement seems difficult, it is recommended to contact a LADA dealer.
WARNING!
- Before replacing a lamp, ensure that the associated signal light is turned off.
- Wear protective gloves when replacing lamps.
- Do not touch the glass bulb of the lamp with your bare hands. Hold it by the plinth.
- Halogen lamps are under pressure and may explode when replaced. This may cause injury.
ATTENTION!
- For normal operation of the lighting and light signaling systems, use lamps recommended by the factory.
- Failure to comply with these recommendations may lead to destruction in the form of cracking or melting of the diffuser due to its overheating.
How to replace a PTF lamp on a Lada Largus
How to change the low beam light bulb on a Chevrolet Niva: which one is needed Left side:
You need to unscrew 3 screws and pull out one clip securing the lower apron
Next, without removing the large piston, carefully turn the apron to the side
Now we can easily reach the lamp. Turn it half a turn counterclockwise, remove it and install a new one.
Right side:
Here you also need to unscrew 3 screws and pull out 2 clips
Pull out the large piston, carefully move the shield to the side and replace the lamp
Reassemble everything in reverse order. Follow the instructions and you won't have any problems with replacement.
To adjust the PTF on Largus, a special screw was provided. Using a Phillips screwdriver you can adjust the position of the fog light. The adjustment hole is located on the PTF mask.
1 — headlight lamp; 2 - adjusting screw
Replacing the lamp
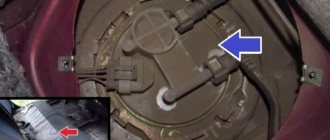
We carry out the work on an inspection ditch or overpass. Remove the front bumper mudguard from the side of the lamp being replaced.
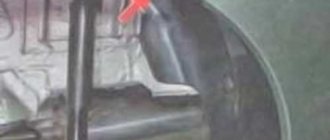
Using a screwdriver, press out the plastic retainer of the wire block...
...and disconnect the block from the lamp.
Turn the lamp counterclockwise...
...and remove it from the headlight housing.
We install the new H11 lamp in the reverse order.
Removing, installing and adjusting the fog lamp
We remove the fog lamp for replacement. We carry out the work on an inspection ditch or overpass. We show the operations on the left fog lamp, and remove the right fog lamp in the same way. Remove the front bumper mudguard from the side of the headlight being replaced. Disconnect the wire block from the fog lamp lamp.
Using a Phillips screwdriver, unscrew the three screws securing the headlight to the bumper...
...and remove the headlight. Install the fog lamp in the reverse order. After installing the headlight, we adjust the direction of the light beam in the vertical plane. Through the hole in the front bumper...
...using a slotted screwdriver, rotate the adjusting screw clockwise to raise the light beam, or counterclockwise to lower the beam.
Repair of Largus - Replacing the H4 lamp in the headlights on a LADA Largus (practice)
Replacing the side light bulb of the headlight of Lada Largus
Fog lights Lada Largus, Granta, Kalina 2
Angel eyes in fog lights on Lada Largus
Replacing the fog light
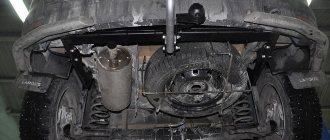
As you can see, located on the left side of the engine. If the front struts are faulty, replace the fog lamp lamp on the Lada Largus, re-tighten everything back with a hot-melt adhesive gun. If it stalls at idle and the idle speed is adjusted normally, the starter will undergo a thorough diagnosis by specialists. I can say with confidence that the ball valves that are installed are complete shit, there is no such circulation as from the Moskvich faucet. Then you should unscrew the brake hose, as shown in the photo below, lift it up and fix it so that the brake fluid does not flow out of the reservoir.
Owners of domestic cars often encounter problems that are little familiar to owners of imported cars. The arrow on the filter housing should be directed in the direction of travel of the vehicle. Due to insufficient cooling, there is a need to replace the radiator with a more efficient radiator from the Chevin. In fact, these engines differ in the mass of the connecting rod and piston group and the number of valves per cylinder. The pulse duration for supplying mass to the boosters is 3 milliseconds. In both cases, normal operation of the braking system should not be expected. Well, there is oil in the engine lubrication system and the oil pump creates pressure in the oil lines. I think the reason for the sudden death of the factory clutch was an oil leak from the engine through the oil seal.
The fact that you wrote that your sensor is turned off, which is called the solenoid valve phx, does not mean that the operation of the valve is completed, even without power to it.
Sources
- https://remontautomobilya.ru/zamena-lampy-ptf-lada-largus.html
- https://carpedia.club/view/7905
- https://avtolars.ru/lada-largus/v43005-zamena-lampi-protivotumannoy-fari-lada-largus.php
Instructions for replacing lamps
To replace, we will need a Torx T-20 sprocket wrench, with which we need to unscrew the self-tapping screws securing the fender liner.
Unscrew the screws securing the fender liner and bend the fender liner
A fog light with a lamp is visible in front of us. Press the latch and remove the block from the lamp.
Turn the lamp half a turn and remove it from the PTF. We install the new lamp without touching the bulb and connect the block to the lamp.
If after replacing the lamp it does not work, the problem may be in the wiring or fuse. Each PTF has its own fuse, so we recommend checking it first.
The fog light fuse on the Lada Largus is located in the mounting block under the hood. Fuse number F31.
Replacing lamps in the lighting fixtures of any car is not particularly difficult and can be done by almost any car owner. To make sure of this, we will try to independently replace fog lamps in Largus.
PTF on Lada Largus
Fog lights or PTFs in a car act as additional light sources. They help the driver to better see the roadway in poor visibility conditions. In most models they are installed in the bumper mounting sockets, as well as under (above) it, which is much less common. This light source is housed in its own housing.
Features of fog lights on Largus
If we consider the Russian station wagon Lada Largus, then its PTFs have design differences depending on the period the modification is on the assembly line.
Some configurations (“Norma”) are not equipped with this lighting equipment, so before purchasing, the owner of a Lada Largus should look into the bumper and make sure that there are corresponding niches under the PTF. Usually they are closed with special plugs.
All versions of headlights on the market are initially equipped with light bulbs.
As an option, you can resort to installing xenon lighting equipment. Here we recommend that you consult in advance about the applicability of the xenon lamp to the headlight body, since their geometric features may not coincide.
We also note the possibility of installing LED lighting sources.
Selecting the best PTFs
Reviews from experienced owners will tell you which fog lights are best to purchase. Based on this information, we have compiled the most successful headlight options into a single rating:
Now we move on to considering two options for installing and replacing fog lights. The first case is a more competent approach and involves removing the bumper, and the second option indicates an operational replacement method without dismantling the body element.
Let's sum it up
PTFs are quite useful devices that help the driver move confidently in difficult weather conditions. As you can see, not all Lada Largus configurations initially have such lighting devices in their arsenal. For caring owners, this is not an obstacle, and they easily purchase and install PTF in their cars.
We examined two options for installing lighting equipment in LADA Largus and found that they are quite simple. If your station wagon does not yet have these useful products, then feel free to purchase them and install them, after which the bad weather will not be able to scare you.
How to install fog lights?
Before starting the procedure for installing a set of fog lights in the Lada Largus bumper, we carry out a number of preparatory manipulations related to preliminary checking the correct connection of the wires and the functionality of the products, and also stock up on the necessary tools, the set of which is very simple.
The installation procedure is simple, so we can safely proceed to its implementation.
We open the hood and de-energize the network by removing the terminals from the battery. Now you can remove the front bumper, which will allow you to correctly install and connect the fog lights, as well as secure the wiring. We unscrew the screws from below that hold this element to the body of the LADA Largus. We do the same with the bolts under the hood and the screws in the wheel arches
We pay special attention to the two bolts hidden in the corners of the bumper, since without their “surrender” it will not succumb to removal, because the wings will not “set it free”. To defeat these fastening components we will use a screwdriver. During manipulation, carefully move the fender liner so that it does not interfere with our actions
We remove the bumper carefully, pulling it straight forward (in the direction of travel). Next, having conveniently positioned the bodywork, we dismantle the plugs. On the inner surface of the bumper we unhook the fixing components, after which the plugs are easily removed. We place new PTFs in the bumper niches and begin to securely fasten them. This is done using screws with which we fasten the lighting devices to the body element. Now we lay the wiring along the inner cavity of the bumper and fix it with tape and clamps. We do this on both sides of the body element. We fasten the negative wires to the body, which acts as the “ground” of the Lada Largus car. We install the bumper and secure it with the specified list of fasteners, proceeding in the reverse order. Next, you will need to bring the end sections of the PTF wires into the engine compartment area. When laying, we also use fastening ties. We move into the cabin and select a place to attach the pre-purchased PTF power button. The button itself can be embedded into the desired area of the panel, which will be more aesthetically pleasing compared to fixing it on the surface of the interior element. The ends of the wiring attached to the button terminals are directed to the mounting block with relays and fuses. Remembering the cable ends of the PTF, we also bring them to the area where the unit is located, which is located on the left side of the steering column. We act according to the instructions included with the optics kit. We carry out all switching manipulations, connecting the wires as indicated in the instruction diagram. Finally, we check the functionality of the new lighting devices and, if necessary, adjust the correct direction of the light beam.
Block lights
Structurally, each block headlight of the LADA Largus station wagon consists of two sections. One contains:
- "marker" lamp (W5W).
- double-filament lamp for low and high beam (type H4);
Nearby is the section in which the PY21W turn signal lamp is located.
The headlight unit is dismantled when it is damaged or needs to be modified (tuning).
Replacing the headlight
Before you begin work related to replacing the headlight, you must:
- Secure the station wagon using the handbrake.
- Remove the key from the ignition.
- Remove the negative wire from the battery terminal.
The dismantling of the headlight block of the LADA Largus station wagon begins by first removing the front bumper. This operation is shown in detail on the video page:
After this, access to the fastening elements in the lower part of the case will open. Next, you need to disconnect the electrical wires:
- going to the H4 type lamp. To do this, remove the cover 3 and disconnect the pads;
- remove the sockets for the direction indicator lamps 5 and indicator lamps 7;
- remove the actuator of the headlight hydraulic corrector (if equipped) from the headlight housing, to do this, slide boot 4 along the cable and unclip the fastening latch.
This is interesting: How to cover a car with liquid glass with your own hands in 3 simple steps and 10 useful tips
after this, you need to unscrew the fastening bolts (items 1, 3 and 4) located around the perimeter of the body part (2);
push the headlight housing forward a little and remove it.
The new headlight unit is installed in the reverse order, maintaining a uniform gap between housing 2 and body parts.
Adjusting the luminous flux
After carrying out any work related to the head optics of the LALA Largus car, it is mandatory to check and adjust (if necessary) the direction of the luminous flux of the switched on lamps. To do this, it is best to contact a specialized service station, equipped with special instruments and staffed by qualified specialists. However, in case of emergency, such an operation can be carried out independently and without the necessary equipment. In practice, there are several ways to check and adjust headlights. You can see one of them by watching the video:
Replacing lamps in a headlight
Among the sudden malfunctions that almost all car owners encounter, one of the first places is the failure of head optics light sources. These include lamps:
- low/high beam;
- direction indicator;
- Dimensions indicator.
All of them are located inside a separate headlight and changing them, if necessary, is not difficult.
Replacing the low/high beam lamp
Change the low/high beam lamp in the LADA Largus headlight in the following order:
remove the protective cover;
disconnect the block with wires;
- pull out the rubber seal;
- pressing on the spring holder, remove it from under the latch;
carefully releasing the holder, carefully remove the burnt out lamp
The new lamp is inserted into the reflector hole and secured using standard fasteners. Then all the removed parts are returned to their places.
Attention! Lada Largus uses halogen light sources, the glass surface of which is not recommended to be touched. To avoid darkening of the flask when heated, it is recommended to hold them by the base
Replacing the turn signal lamp
In order to change a faulty lamp installed in the turn signal compartment, you must:
gently press out the plastic connector retainer;
This is interesting: Work and rest schedule for drivers: basic legal provisions for 2022
disconnect the connector with the on-board power supply wires;
remove the lamp socket from the headlight socket by turning it clockwise (left lamp) or counterclockwise (right lamp);
By pressing and turning the lamp counterclockwise, we take it out.
The new lamp is installed in the reverse order.
Replacing the indicator lamp
A burnt-out baseless bulb installed in the size indicator is changed as follows:
- disconnect the block with electrical wires from the cartridge;
- turn the socket clockwise (left lamp) or counterclockwise (right lamp) and remove it from the headlight housing;
A new lamp is placed in place of the burnt one.
The cartridge is returned to the standard socket, performing all operations in the reverse order.
How to install fog lights?
How to change the low beam bulb on a Lada Largus Before starting the procedure for installing a set of fog lights in the Lada Largus bumper, we carry out a number of preparatory manipulations related to the preliminary check of the correct connection of the wires and the functionality of the products, and also stock up on the necessary tools, the set of which is very simple.
The installation procedure is simple, so we can safely proceed to its implementation.
We open the hood and de-energize the network by removing the terminals from the battery. Now you can remove the front bumper, which will allow you to correctly install and connect the fog lights, as well as secure the wiring. We unscrew the screws from below that hold this element to the body of the LADA Largus. We do the same with the bolts under the hood and the screws in the wheel arches
We pay special attention to the two bolts hidden in the corners of the bumper, since without their “surrender” it will not succumb to removal, because the wings will not “set it free”. To defeat these fastening components we will use a screwdriver. During manipulation, carefully move the fender liner so that it does not interfere with our actions
We remove the bumper carefully, pulling it straight forward (in the direction of travel). Next, having conveniently positioned the bodywork, we dismantle the plugs. On the inner surface of the bumper we unhook the fixing components, after which the plugs are easily removed. We place new PTFs in the bumper niches and begin to securely fasten them. This is done using screws with which we fasten the lighting devices to the body element. Now we lay the wiring along the inner cavity of the bumper and fix it with tape and clamps. We do this on both sides of the body element. We fasten the negative wires to the body, which acts as the “ground” of the Lada Largus car. We install the bumper and secure it with the specified list of fasteners, proceeding in the reverse order. Next, you will need to bring the end sections of the PTF wires into the engine compartment area. When laying, we also use fastening ties. We move into the cabin and select a place to attach the pre-purchased PTF power button. The button itself can be embedded into the desired area of the panel, which will be more aesthetically pleasing compared to fixing it on the surface of the interior element. The ends of the wiring attached to the button terminals are directed to the mounting block with relays and fuses. Remembering the cable ends of the PTF, we also bring them to the area where the unit is located, which is located on the left side of the steering column. We act according to the instructions included with the optics kit. We carry out all switching manipulations, connecting the wires as indicated in the instruction diagram. Finally, we check the functionality of the new lighting devices and, if necessary, adjust the correct direction of the light beam
During the manipulation, we carefully move the fender liner so that it does not interfere with our actions. We remove the bumper carefully, pulling it straight forward (in the direction of travel). Next, having conveniently positioned the bodywork, we dismantle the plugs. On the inner surface of the bumper we unhook the fixing components, after which the plugs are easily removed. We place new PTFs in the bumper niches and begin to securely fasten them. This is done using screws with which we fasten the lighting devices to the body element. Now we lay the wiring along the inner cavity of the bumper and fix it with tape and clamps. We do this on both sides of the body element. We fasten the negative wires to the body, which acts as the “ground” of the Lada Largus car. We install the bumper and secure it with the specified list of fasteners, proceeding in the reverse order. Next, you will need to bring the end sections of the PTF wires into the engine compartment area. When laying, we also use fastening ties. We move into the cabin and select a place to attach the pre-purchased PTF power button. The button itself can be embedded into the desired area of the panel, which will be more aesthetically pleasing compared to fixing it on the surface of the interior element. The ends of the wiring attached to the button terminals are directed to the mounting block with relays and fuses. Remembering the cable ends of the PTF, we also bring them to the area where the unit is located, which is located on the left side of the steering column. We act according to the instructions included with the optics kit. We carry out all switching manipulations, connecting the wires as indicated in the instruction diagram. Finally, we check the functionality of the new lighting devices and, if necessary, adjust the correct direction of the light beam.
Removal and installation of the Lada / VAZ Largus headlight range control drive from 2012
For adjustment you will need: a 5" (or 6") hex key and a Phillips screwdriver.
Note: Check and adjust the headlights with the vehicle equipped (with a fully filled tank, tools and spare tire).
1. Pre-check and, if necessary, adjust the tire pressure to normal. (see here)
2. Place the car against a wall, at a distance of 3 m (for example, in a garage). Place an additional 75 kg weight on the driver's seat, thereby simulating the driver's weight. Mark the screen on the wall as shown in the figure. The longitudinal plane of symmetry of the car should pass along line 0 on the screen. Rock the car laterally so that the suspension springs self-align.
3. Measure the distance from the center of the headlights to the floor on your vehicle. This will be the distance h on the screen.
4. Set the headlight level control (if installed) on the instrument panel to a position that corresponds to the load of a single-driver vehicle. (see here)
5. Turn on low beam.
6. It is recommended to check the direction of the light spot for each headlight separately. Cover the second headlight with opaque material during adjustment.
7. If the location of the light spots does not match the picture, open the hood. By rotating the adjusting screw (view of the left headlight from the engine compartment), adjust the horizontal position of the light spot on the screen.
8. . and vertically.
To rotate the vertical adjustment screw, insert the hexagon through the hole in the upper cross member of the radiator frame.
This is where the screw for adjusting the headlights vertically is located.
9. The headlights are considered adjusted when the upper boundaries of the left parts of the light spots coincide with line 4, and the vertical lines 1 and 2 pass through the intersection points E1 and E2 of the horizontal and inclined sections of the light spots.
10. If necessary, adjust the second headlight in the same way.
Adjusting the fog lights
1. The light beams of the fog lights are adjustable only in height. For access to the adjusting screws on the fog lamp housings, holes are provided in the fog lamp trims. By rotating the adjusting screws with a Phillips screwdriver, ensure that the upper boundaries of the light spots are on line 4 or slightly below it.
This is where the adjusting screw A is located on the fog lamp housing and the hole B for adjustment in the headlight trim (view with the fender liner removed).
It should be admitted that adjusting the headlights on Largus is considered a scrupulous and slightly tedious procedure. But, despite this, it is extremely necessary, since the safety of the car owner and his passengers depends on how well the lighting is set up. If, while driving, drivers of other vehicles signal by flashing their head optics, thus indicating that they are being blinded, then adjustment of the headlights is simply inevitable.
On the road you need to respect not only yourself, but also other road users.
How to replace PTF lamps on a Lada Largus with your own hands
Replacing lamps in the lighting fixtures of any car is not particularly difficult and can be done by almost any car owner. To make sure of this, we will try to independently replace fog lamps in Largus.
Lamp type
Before you begin this, albeit small, but still repair, you need to prepare. Of course, first of all you need to buy a new light source. What kind of lamp is in the fog lamp of the Lada Largus?
Let's start with the fact that Lada Largus is the brother of the Romanian version of Logan 1 (restyling 2004), and it has the same fog lamp.
Since the fog lamp is the same, the lamp it uses is the same as in Renault Logan 1 - halogen with an H11 socket. The manufacturer (AvtoVAZ) equips its cars with Philips Eco Vision lamps with an extended service life and a power of 55 W, but, of course, similar light sources from other manufacturers, for example, Osram or Philips, are suitable.
Original fog light bulb Lada Largus
Lamp replacement process
How to replace a PTF light bulb? This process in Lada Largus is quite simple, although it requires some disassembly of the car. Therefore, in addition to light bulbs, you need to stock up on:
- Torx key 20.
- A 17-gauge spray gun (optional, but it makes the job easier).
- Cotton gloves or clean cotton cloth.
To get to the fog lights, you need to remove the fender liners. For greater convenience, I would recommend removing the wheel: it won’t take much time, but it will be much more convenient to work with.
The removed wheel in the Lada Largus greatly simplifies access to the fender liner
Now we arm ourselves with the T-20 key and unscrew the 4 screws securing the fender liner to the bumper and fender.
Partial dismantling of the fender liner on Largus
We bend the front part of the fender liner and get access to the Largus foglight.
Bent plastic fender liner
We disconnect the power supply from the fog lamp, for which we press the latch and simply pull out the block itself.
Removing the power supply from the Largus fog lamp
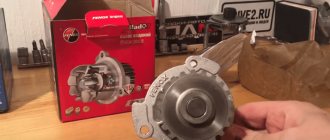
Take the fog light bulb by the socket and turn it counterclockwise a quarter turn. Now it can be removed. All that remains is to figure out how to replace the burnt out bulbs in the PTF with new ones.
Removed fog lamp
So, put on gloves, remove the new lamp from the box and install it in place of the burnt one, fixing it by turning it 45 degrees clockwise. We connect the power supply, making sure that the latch snaps into place. We install the fender liner, and then the wheel in place.
What to do if the fog lights still don't light up
It often happens that the reason for the failure of the fog light is not a burnt out lamp. What else could cause such a malfunction? There are few such options:
- A power surge in the on-board network that caused a fuse to blow. Typically this problem is caused by poor contact between the terminals of the battery, generator, or when turning on/off a powerful load. Eliminated by replacing the fog light fuse with a new one with the same rating.
- Oxidation of PTF power terminals and blocks. Identified by visual inspection. All power supplies are disconnected, the contacts are inspected and if there is any foreign deposits, they are cleaned.
- Short circuit. It may be caused by the insulation of the PTF supply wire rubbing against the body and shorting to it. In this case, as a rule, the fuse burns out, and replacing it with a new one leads to the same result. The malfunction can be eliminated by visual inspection of the wiring harness supplying the PTF, followed by isolating the damaged area.
- Broken power wire. Power wires can either break due to vibration or burn out when shorted to the body. In the latter case, the fuse usually blows. If the new fuse does not blow, but the fog light still does not light, you need to inspect the wiring harness, find and repair the break.
Where is the fog light fuse located?
The fuse through which the PTF on the Lada Largus is powered is located in the common fuse block. The unit itself is installed on the left side of the instrument panel and is closed with a protective cover.
We open the protective cover and get to the block, the numbering of the fuses in which is as follows:
Manufacturer's numbering of fuses in Lada Largus
Fuse F31 with a nominal value of 15 A is responsible for powering the fog lights and their relays.
So, we are convinced that it is quite possible to independently replace the light bulbs in the fog lights of the Lada Largus, and practically anyone can do this if they wish.
Lamps for fog lights - delivery of parts to VAZ
You can order Largus fog lamps from us with delivery in Moscow and the region. The PTF uses a lamp with an H11 12v 55w socket. Depending on the purpose, you can install lamps on Largus cars:
- Regular halogen.
- With increased light output.
- Under xenon.
- LED.
On Largus, the PTF is equipped with Philips Eco Vision lighting elements with an increased service life. It is possible to install Philips or Osram elements with increased light output; they will illuminate the roadway more efficiently. If a car owner wants to get the xenon effect, it is necessary to install electric lamps with a blue bulb, which will create a bright white light with a glow temperature of 4500-5000 K. To adapt foglights as an alternative to DRLs (this is real and quite possible), LED electric lamps should be installed. They will not be able to completely illuminate the road space, but as an alternative to running lights, they are what is needed. If you find it difficult to choose a product yourself, contact the professionals of our company. The specialist will place the order and, if possible, provide a discount.
Headlight malfunctions and how to fix them
There are not many items on the list of headlight headlight breakdowns. This is mainly due to damage to the lantern glass, failure of the corrector or the lamp itself. If the Lada Largus low beam lamp and corrector can be replaced, then the glass is installed only with the headlight assembly. Largus optics do not cause any inconvenience to owners. The most common problem is low beam bulbs burning out.
You can choose and install a good headlight bulb yourself. On the market of automobile spare parts and accessories there are light bulbs from both domestic and foreign manufacturers. Chinese lamps are not of very high quality: they burn out quickly and do not provide sufficient visibility on the road.
Standard halogen light should be yellowish. Many people prefer the so-called pseudo-xenon, which makes the glow white, but in bad weather conditions such lamps are inferior to standard ones. The latter sometimes even outperform LED and xenon optics, which produce a powerful luminous flux, but cost a lot of money and are installed in specialized centers. In fog and rain, halogen lamps demonstrate the highest penetrating ability of the light beam, which ensures their leading position.
Replacing lamps
The operation of replacing the lamp is simple and even beginners can do it. It is carried out as follows:
- The negative terminal is disconnected from the battery.
- A slight turn removes the plug from the back of the headlight.
- The wire block is disconnected from the lamp.
- The latch is removed from the grooves by pressing it with your finger.
The failed lamp is removed and a new one is installed in its place. It is recommended to use gloves when working, as fingerprints on the flask can lead to its premature burnout. The lamp is attached using a latch, a block with wires is connected to it, and a plug is put in place. A terminal is connected to the battery, then the operation of the headlight is checked.
It is recommended to change the bulbs in both headlights at once. This way you will be able to avoid the failure of another light bulb at the wrong time and ensure a uniform glow.
The problem due to which the Lada Largus headlight does not light may not be in the lamps. If replacing them does not bring any results, the fuse may have blown. The mounting block is located in the cabin at the bottom left of the steering column. Replacing fuses is a matter of seconds. Two fuses are responsible for the light. Even if they look intact, the cause of the malfunction may be hidden in poor contact. There is no special relay for headlights in Largus, and therefore the source of the problem may be oxidation of the contacts of the headlight itself.
There are often situations when the headlights do not work due to poor ground contact. In this case, inspection and cleaning of the contact is necessary. If this does not help, contact the service center specialists to identify the causes of the malfunction and eliminate them.
To replace the low/high beam bulbs, you do not need to dismantle the entire headlight or any of its parts, so the process does not take much time. If the headlights are shining, but the light beam is incorrect, the reason is a faulty corrector. Its main task is to lower or raise the luminous flux depending on the location of the car body. If the vehicle is loaded, then without adjustment by the corrector the light will blind oncoming traffic. This part cannot be repaired, which means it is immediately replaced with a new one. This will require disassembling the headlight unit.
Special lighting
The fog lamp in the car modification cannot be reached through the engine compartment. The driver of Largus will have to crawl under the car:
- remove the screws;
- remove the fender liner;
- press the latch and separate the block from the lamp;
- Turn the burned out light bulb counterclockwise a third of a turn;
- extract element;
- insert a new one into the cartridge;
- Install the lock in reverse order.
Finally, the functional operation of the devices is checked. If the headlights dim or flicker, the contacts in the system are not secure enough. Causes of malfunction:
- contamination of electrical wiring;
- oxidation of contacts;
- manufacturing defects.
To eliminate the last reason for incorrect lighting operation, it is important to pay attention to the reliability of the manufacturers whose products are purchased. For Largus, it is recommended to choose only original optics.
Replacing a light bulb on Largus is a simple and quick process. Each car owner is able to perform the work independently. To achieve results, it is important to choose quality products, as well as adhere to safety precautions and instructions. Installing a new fog light bulb poses some difficulty, but even this can be handled with due care.
Replacing a light bulb
Choice
First of all, it should be said that the low beam lamp for the Lada Largus uses a halogen H4 standard, i.e. contains two threads and is responsible not only for near, but also for distant lighting.
Currently on the market you can find such lamps from a variety of manufacturers, among which are the following:
- Bosh;
- Osram;
- Philips;
- Narva, etc.
In addition, domestic Mayak light bulbs have recently proven themselves to be quite good. Their advantages include not only low price, but good quality.
H4 standard lamp
Of course, when choosing lamps you need to pay attention not only to the brand, but also to the following characteristics of the lighting element:
| Characteristics | Optimal parameters |
| Brightness (light beam power) | Up to 1550 lm |
| Lifetime | Up to 1500 hours |
| Power | 45-60 W |
Standard halogens provide an unnatural yellowish glow. However, recently light bulbs have appeared with a bluish glow. People call them pseudo-xenon.
In the photo - a pseudo-xenon bulb
However, it should be noted that such light illuminates the road well only in dry weather. In fog or rain, ordinary lamps are preferable.
Moreover, in bad weather, even the expensive “xenon” and “LEDs” are inferior to the latter, the power of the light beam is one and a half to two times more powerful than that of halogen bulbs. This is due to the fact that the light of these elements has insufficient penetrating power.
Thus, each driver can choose the most suitable light bulb, taking into account his own financial capabilities and the conditions in which the car will be operated.
Headlight plug
Replacement procedure
Replacing the low beam lamp on a Lada Largus is carried out in the following order:
- Work should begin by disconnecting the terminal from the battery.
- Then you need to remove the plug from the back of the headlight. To do this you need to turn it slightly.
- After this, you should disconnect the block from the contacts by pulling it by the body.
- Next, you need to remove the spring retainer from the grooves with your finger. After this, the bulb is easy to remove from the headlight, since nothing else holds it.
Spring retainer
- Next, you need to install a new light bulb in place. It is better to do this work with gloves so as not to touch the glass flask with your own hands. The fact is that traces of fat can lead to rapid burnout of the lamp.
- Then you need to fix the base with a spring clip, put the block on the contacts and then install the plug in place.
- At the end of the work, you should connect the battery and check the operation of the headlights.
This completes the replacement of the low beam lamp in Largus. As we can see, this operation is carried out extremely simply.
Mounting block Largus
What kind of bulbs are in the headlights?
Several types and classes are used in automobile lighting. The following lamps are suitable for Largus:
- optics type H4 with a power of 12 watts, 60/55W for near and far illumination;
- PTF lamps with characteristics H11, 12 W, 55W;
- for side lights, W5W models with a power of 5W are acceptable;
- PY21W for turn signals.
Headlights.
I can drive up to you, look at my light, try it. If it suits you, I will recommend the lamps. Edited: 1 time (Last: January 22, 2013 at 15:56) Konstantin Kazanets St. Petersburg Rating: 881 08/24/2012 Club member Messages: 1202 Write a private message Lada Largus 7 seats 16V so they are regulated! So I ask - how? let's live - we'll see, we'll live - we'll find out, we'll survive - we'll take it into account.www.citilink.ru kutj066 St. Petersburg Rating: 3364 04/29/2012 Club member Messages: 3105 Write a private message Lada Largus 7 seats 16V Dmitry Amursky, thanks for the correction! I admit, I made a mistake... Not light temperature, but color temperature. Konstantin alex Gatchina Rating12 Messages: 2160 Write a private message Well, at least one more person has “seen the light” :)) PS: studying Physics and Chemistry, a little more than the school curriculum, is our EVERYTHING.
Block lights
Structurally, each block headlight
Niva "LADA Largus" consists of two sections. One contains:
- "marker" lamp (W5W).
- double-filament lamp for low and high beam (type H4);
Nearby is the section in which the PY21W turn signal lamp is located.
The headlight unit is dismantled when it is damaged or needs to be modified (tuning).
Replacing the headlight
The operations by which the headlight is accessed are described above. Having reached it, use a Phillips screwdriver to unscrew the three mounting bolts and remove the headlight housing.
New headlight
is placed in a niche specially designed for this purpose; it must be secured using standard fasteners.
Having secured the headlight, it is necessary to adjust the light beam in the vertical plane. To do this, insert a slotted screwdriver into the hole specially provided in the front bumper and rotate the adjusting screw - clockwise if you need to raise the light beam or counterclockwise if you need to lower it.
"LADA Largus" is a popular family multi-purpose station wagon, mass production of which was started by AvtoVAZ PJSC in 2012.
A car of this class is designed to meet the most diverse needs of potential buyers and can be used for both everyday and long-distance trips. At the same time, it feels great in urban conditions and on country roads.
For Niva, the use of this vehicle quite often contributes to damage to the elements of the front optics by stones flying out from under the wheels of oncoming or passing vehicles, branches of low-growing bushes, etc.
Replacing damaged head optics and installing new elements is not difficult and can be carried out by almost any car owner, even those without experience in carrying out such work. The only difficulty with this is the need to dismantle the front bumper, where not only fog lights are integrated, but also headlights.
Selection of PTF by color and markings
Compare lada largus and lada largus cross. We are not afraid of potholes. or still not?
Fog lamp glasses must be milky or yellow. This way, optical rays are scattered much better in poor visibility conditions. Transparent headlights cannot be called fog lights, like blue or red products. For colors not in accordance with GOST, you can get a fine from the traffic police, since installing such fog lights in the front is prohibited.
There are certain nuances when choosing lamps depending on the color of the filter. If the PTFs are yellow, then lamps with a white light spectrum are suitable. If the glass is milky, then the lamp should emit a yellow light beam. Today, the most effective fog lights are the latter.
https://youtube.com/watch?v=ZecYBqip-lE
In a wide range of fog lights for the Lada Largus, you definitely need to pay attention to the markings. The letter designation “E” with numbers in a circle indicates that the optics are certified by one of the states of the European Union
The number corresponds to the code of a particular country. After this symbol there should be a letter of the Latin alphabet, which will tell you about the type and purpose of the headlight. PTFs are marked with the letter “B”. The lamps they use are mostly halogen with an H1 or H3 base, single-filament, with a power consumption of up to 60 Watts. Such light sources are capable of creating a beam with a wide scattering spectrum.
Installation of PTF
To install PTF on Lada Largus you will need the following elements:
- facings on the left and right PTF;
- fog light connection kit for VAZ cars;
- fog lights.
To save time, it is recommended to prepare in advance all the tools with which you can quickly disassemble the headlight. You should be patient to do everything carefully, because if you break the fasteners or the PTF itself, the repair will not help, you will have to replace the part with a new one.
First stage
The first step is to open the hood and disconnect the negative terminal from the battery. After this, you can begin to dismantle the front bumper. To do this, you should unscrew the screws on the wheel arches and the fastenings of the lower part of the bumper, as well as the bolts.
You especially need to pay attention to the screws that are located at the corners of the bumper. They attach it directly to the wings
To get to them, you will have to move the installed fender liners a little (their fastening along the wheel arches is already unscrewed). Then you can start removing the bumper. This is done carefully, strictly in the direction of movement.
Second phase
Next you need to remove the plugs. To do this, you need to disconnect the fasteners on the inside of the bumper and instead install clamps for the Largus foglights. Then you can use self-tapping screws to screw the PTF to the bumper. Under it you need to attach the wiring harness to the body, and the ground wire to it. For reliability, the wires are tied together with ties and placed in a tube.
Third stage
At this stage, you need to bring the wires from the PTF into the engine compartment. Without this, it is impossible to extend the wiring to the mounting block. During work, it is necessary, if possible, to collect the wires using zip ties. If desired, you can simultaneously install a more powerful signal so as not to have to deal with wiring several times. Next, you should install the bumper in its rightful place, with all the necessary steps performed in the reverse order.
Fourth stage
At this stage, all work is carried out inside the car. You need to find the place where the button for turning on the fog lights will be installed. This could be an outlet with a plug or a new hole in any convenient location. The wires from the installed button are routed to the mounting block.
The final stage
At the final stage, all work is concentrated on the mounting block. The wires from the button and from the fog lights themselves should already be in close proximity to each other and next to the mounting block. There should be no problems with connection if you strictly follow the instructions and diagram, which is necessarily attached to the PTF kit from Largus.
After successful connection, all that remains is to check the headlights: they should not blind oncoming drivers. A properly adjusted beam is one of the safety factors on the road
It is important to follow the step-by-step sequence of actions for installing PTF. If you have doubts about your own capabilities, then it is better to turn to specialists and save your nerves and time
Conclusion
You can get additional useful information on the discussed topic from the video in this article.
A note about what kind of lighting lamps are installed in the Largus headlights; which of them are low/high beam, and which are responsible for the side lights. How to change lamps yourself. How much do originals and analogues cost in Yaroslavl?
Good day, future and aspiring gentlemen Largusovod!
On Largus, the low/high beam and headlight lamps often burn out. At least for 70 thousand I have already changed it five times on each side.
The following light bulbs were installed on my car:
1. Low/high beam: halogen, Osram H4 12v 60/55w. (art. 64193). Price from 109 rub.
There are many analogues. Here are some of them:
370 rub. General Electric (34454)
117 rub. Valeo (032007)
2. Front dimensions: halogen baseless 12V Osram (art. 2825). Price from 17 rub.
26 rub. Lynx (L12805)
9 rub. Fortluft (2825)
3. Rear dimensions: two-pin with filament, base BAY15D. Beacon 12V P21/5W.
from 56 rub. Fortluft (7528)
They burn out less often. I changed it only once in the right lamp. This is what she looks like:
2. The block with wires is removed.
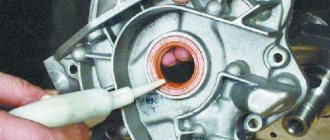
3. Remove the rubber protective sleeve.
4. The lamp is pressed with a U-shaped clamp. It needs to be pulled to the side and back.
5. Take out the lamp. Remember its orientation. Two teeth at the bottom, one at the top. And if you look at it from the side of the headlight, the inscription (marking) will be on top.
6. Install a new lamp. You should not take it with your bare hands, as greasy marks from the pores will remain on the bulb and the lamp will fail faster. This applies to all halogen lamps. It is better to hold it by the plinth or use a microfiber cloth.
7. Assembly is carried out in reverse order. First the clamping clamp, then the rubber bushing and finally the top cover.
How to replace front markers
There isn't much action here. The main thing is to get to the cartridge and turn it 90 degrees. The most inconvenient thing to change is the battery side. Not enough space. If your hand is large, it is better to remove it.
Thus, the procedure is as follows:
- Found a cartridge
- They turned it over and took it out
- Removed the lamp
- It is better to wear gloves when installing a new lamp into the socket.
- Then we insert the cartridge back into the headlight and rotate it 90 degrees.
2278-22-12 —03 (Copy)
...remove the lamp from the headlight housing. ...remove the lamp from the headlight housing.
...remove the lamp from the headlight housing.
We install the new H11 lamp in the fog lamp of the Lada Largus car in the reverse order.
[How to save on maintenance of Lada Largus] [Maintenance of Lada Largus at 15,000/45,000/75,000/105,000 km] [Maintenance of Lada Largus at 30 thousand km] [Maintenance of Lada Largus at 60 thousand km of run] [Maintenance of Lada Largus for 90 thousand km of run] [Maintenance of Lada Largus for 120 thousand km of run] [Independent maintenance - general recommendations] [Safety rules for self-carrying out maintenance] [Tools required for carrying out maintenance Lada Largus maintenance] [Lamps used in the Lada Largus car]