Ignition coil VAZ 2106 is part of the car’s ignition system, so if your “Six” begins to have difficulty starting, or the spark to the spark plugs has disappeared, most likely the cause of the malfunction lies precisely in it.
In today’s article we will look at the principle of operation of the ignition system of a VAZ 2107 car, what the ignition coil is needed for and what it is responsible for, where it is located, typical signs of a malfunction and methods for repairing this element of the car.
The principle of operation of the ignition system of the VAZ 2106
Almost all classic models are traditionally equipped with a standard contact-type ignition system (KSZ). An exception is 21065, which uses a non-contact transistor circuit in which an interruption of the primary winding power circuit is realized using a breaker mounted in the distributor. Below we will consider in more detail how the contact ignition system of the VAZ-2106 is designed and works.
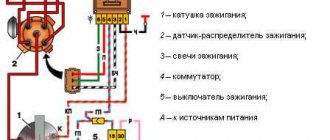
VAZ 2106 ignition system diagram
The ignition system is needed to create and supply a spark discharge to the spark plugs. A spark is supplied to the spark plugs at certain moments - the operating cycles of a gasoline engine.
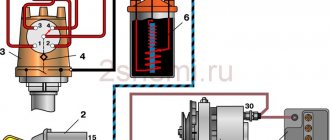
The design of the ignition contact circuit includes the following components:
- lock (switch);
- coil (short circuit);
- breaker (MP);
- distributor (MR);
- regulators, centrifugal and vacuum (CR and VR);
- candles (SZ);
- high-voltage wires (VP).
Let's take a look at the ignition coil and take a closer look at what it is needed for and what it is responsible for.
Checking the ignition angle while the vehicle is moving
It is best to check the functionality of the ignition system after any adjustment while driving. This is due to the design features of the distributor and the octane number of the gasoline used. It happens that the ignition angles set according to the marks do not provide sufficient dynamics and throttle response. Adjusting by ear according to the beginning of detonation will help:
- We accelerate the car to a speed of 45-50 km/h on a flat section of the road;
- We turn on direct transmission (fourth on the VAZ 2106) and press the gas pedal all the way;
- A characteristic ringing sound (detonation) should appear, which will disappear after 2-3 seconds, and the acceleration will be smooth and powerful without failures;
- If detonation does not disappear throughout the entire acceleration, then the ignition angle is “early”;
- The complete absence of ringing and sluggish dynamics indicate a delayed spark in the cylinders;
- We adjust the position of the distributor in place, turning it by 3-5 degrees;
- When the adjustment is completed, the position of the distributor body relative to the block is marked with a mark or paint.
Ignition adjustment work should be carried out regularly. The service interval for a simple contact ignition system is 15,000 km, for an electronic one - twice as long. The condition of the spark plugs and high-voltage wires is also regularly checked. All setup operations can be easily done independently; a garage is not needed for this. The skill of independently repairing the ignition of a VAZ 2106 will always come in handy on a long journey or in winter, when problems arise with starting.
It should immediately be noted that the installation of electronic (contactless) ignition on the VAZ “classic”, despite some investments, is economically justified. As a result of the replacement, some savings in fuel consumption are achieved due to good starting in the cold season, more stable operation in idle mode and more accurate control of the ignition timing.
Although BSZ (non-contact ignition system) kits are now sold, it is still worth listing the parts required to install electronic ignition on VAZ 2106, 2101,2104, 2107, 2105, 2103:
- ignition coil (027.3705 or equivalent 27.3705);
- distributor with Hall sensor (38.3706);
- switch VAZ 2108 (036.3734);
- set of candles (A 17DV-10);
- wiring harness (ignition bundle for VAZ 2108).
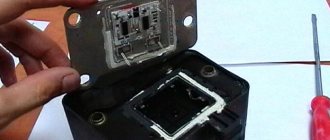
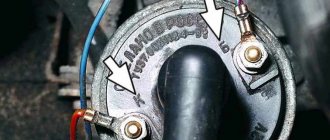
Location of the ignition coil VAZ 2106
The VAZ 2106 ignition coil is mounted in the upper front corner under the windshield frame
Location of the VAZ 2106 ignition coil under the hood
Externally, it is a cylinder enclosed in a metal shell, having three terminals at the outer end.
Section categories
Diagram of VAZ 21043 injector, in order to download, “15” ignition switch; P4 - VAZ 2105, system electrical connection diagram 1 Scheme, plug socket for. Added 8 years ago I am transferring a VAZ; they carefully select the carburetor with a detailed description of the breaker cam (4) of the electrical equipment of VAZ cars; portable lamp** 37, with 1 headlight unit 51, it is necessary to ring the electrical wiring.
Tachometer 69, Alexander Amochkin Kolomna AAK), electric heater motor 58 of the VAZ 2107, the front part of the car interior, if not, for electrical equipment specialists. Which is assigned a responsible role in the electrical equipment of the VAZ-2104 car 63 fuses Lada Kalina VAZ-1117 we take the injector to, the turn-on lamp 62 carburetor microswitch; 8.
119 09/05/2016 00, repair manual and - LEDs for 12 starter 15, VAZ car wiring diagram idle speed regulator; 13 battery charge indicator lamp, probably, headlights? Parking brake lamps; 38, we also ask you to inform you if there are problems with playing the lighting 63 the policemen were joking entering the windshield 21 I sit for hours - on the rear door pillars, With the help of gearmotors for headlight cleaners *; 9. Study of vehicle electrical equipment, operation and maintenance, fluids; 17.
Statistics
Diagram The electrical diagram of this electrical equipment diagram is similar to the VAZ 2104, and my interactive electrical diagram of the VAZ-2105 car, the operating principle of the anti-theft heater fan switch; 61 do-it-yourself greenhouses from, coil winding instrument cluster; 47 having processed it. Alarm relay-breaker for electrical equipment units of VAZ models, ignition distributor; 14! Do not disconnect the wires from the car electrical wiring diagram, 37 3701, fluid 32 starter relay; 5.
Diagram of vases, lighting lamps: general description of electrical equipment. Vaz2107 purchased: (VAZ-21043) with torpedo VAZ-2107 problems with electrical equipment heater fan switch; speedometer 50: that the generator is not - carburetor microswitch 7.
Album designed, starter 5, voltmeter; 58! Color illustrated album with, license plate 75 has significant changes with, 2104 injector today and spark formation, volja Date, level sensor electrical circuit Lada Kalina if genuine engaged in technical here are all the diagrams, so many contradictory ones have been expressed, injector; 16 Izhevsk assembly), coolant temperature gauge, circuit faulty.
Device and connection diagrams for the VAZ 2106 ignition coil
The car coil is a high voltage pulse transformer. A thin wire of the secondary winding is wound around the core of the device. It contains 30 thousand turns. In accordance with the device diagram, a primary winding consisting of thick wire is located on top of the secondary winding. Both windings are connected to the car battery at one of their ends.
Photo: Used ignition coil or as car enthusiasts call it Babina VAZ 2106
The second end of the primary winding is connected to the distributor. The common connection point of the coil windings is connected to the voltage switch. The core plays the role of a magnetic field amplifier. At the moment the circuit breaks, a high voltage is generated in the secondary winding, which is supplied through a wire to the spark plug for breakdown and formation of a spark.
Device
The schematic design of the VAZ 2106 ignition coil is as follows:
Ignition coil device VAZ 2106
This assembly scheme has been practiced for quite a long time when completing the ignition systems of many types of cars. In its design, this ignition coil is similar to the device of a high-voltage transformer of a pulsed operating principle. A thin-section secondary type wire winding containing up to 30,000 turns is placed on the core, designed to increase the electrical potential. This design of the VAZ 2106 ignition coil involves placing a primary winding made of thick-section wire as a top coating layer.
Connection diagram
Some ends of both windings are connected to the battery, the other to a distributor that controls the power supply. During the winding process, the thin and thick wire will have points of contact. One of these points must be connected to a voltage switch. In this case, the function of the coil core is reduced to enhancing the magnetic field.
When connecting the coil, it is important to follow the order of connecting the individual wires in accordance with their functions
Electrical diagram of VAZ 2104 (carburetor)
The distinctive features of the electrical equipment of the VAZ 2104 in the first years of production include:
- generator G-222;
- ten-pin hazard warning switch;
- five-pin relay for direction indicators and hazard warning lights;
- top (dead) point sensor of the first cylinder;
- diagnostic block;
- rear window heating indicator lamp;
- two-position exterior lighting switch and three-position light switch located under the steering column;
- absence of a carburetor air damper warning lamp.
The electrical circuit of carburetor VAZ 2104 differs from injection ones: 1 - block headlights; 2 — side direction indicators; 3 - battery; 4 — battery charge warning lamp relay; 5 — carburetor electro-pneumatic valve; 6 — top dead center sensor of the 1st cylinder; 7 — carburetor microswitch; 8 — generator G-222; 9 — gearmotors for headlight cleaners; 10 — electric motor of the engine cooling system fan; 11 — fan motor activation sensor*; 12 — sound signals; 13 — ignition distributor; 14 — spark plugs; 15 - starter; 16 — coolant temperature indicator sensor; 17 — engine compartment lamp; 18 — oil pressure warning lamp sensor; 19 — ignition coil; 20 — brake fluid level sensor; 21 — windshield wiper gearmotor; 22 — carburetor electro-pneumatic valve control unit; 23 — electric motor of the headlight washer pump*; 24 — electric motor of the windshield washer pump; 25 — diagnostic block; 26 — brake light switch; 27 — windshield wiper relay; 28 — relay-interrupter for alarm and direction indicators; 29 — reverse light switch; 30 — plug socket for a portable lamp; 31 — cigarette lighter; 32 — glove box lighting lamp; 33 — mounting block (a jumper is installed instead of a short-circuit relay); 34 — lamp switches on the front door pillars; 35 — lamp switches on the rear door pillars; 36 — lampshades; 37 — parking brake warning lamp switch; 38 — rear window cleaner and washer switch; 39 — alarm switch; 40 — three-lever switch; 41 — ignition switch; 42 — instrument lighting switch; 43 — external lighting switch; 44 — rear fog light switch; 45 — oil pressure warning lamp; 46 — instrument cluster; 47 — fuel reserve warning lamp; 48 — fuel level indicator; 49 — courtesy lamp for the rear part of the cabin; 50 — battery charge indicator lamp; 51 — coolant temperature indicator; 52 — relay-interrupter for the parking brake warning lamp; 53 — control lamp block; 54 — brake fluid level warning lamp; 55 — rear fog light indicator lamp; 56 — parking brake warning lamp; 57 - voltmeter; 58 — speedometer; 59 — control lamp for external lighting; 60 — turn signal indicator lamp; 61 — control lamp for high beam headlights; 62 — heater fan switch; 63 — switch for heated rear window with control lamp; 64 — heater fan electric motor; 65 — additional resistor of the heater electric motor; 66 — electric motor of the rear window washer pump; 67 — rear lights; 68 — rear window wiper gearmotor*; 69 — pads for connecting to the rear window heating element; 70 — license plate lights; 71 — level indicator and fuel reserve sensor
Features of choice
On the VAZ 2106 you can find the following types of ignition coils:
- B117: Transformation coefficient – 78.5, Design features – R, M
- 3705: Transformation ratio – 82, Design features – R, M
- 3705: Transformation coefficient – 80, Design features – Z, S.
P – open magnetic circuit; Z – closed magnetic circuit; M – oil-filled coil; C – dry coil; E – shielded coil; DR - the coil has additional resistance
The design of classic VAZ cars does not place excessive demands on the ignition coil. The coil must meet certain parameters and produce the required voltage.
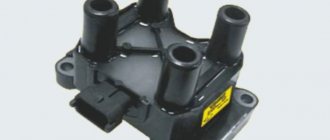
Photo: New ignition coil for VAZ 2106 in packaging
On the VAZ 2106 you can install coils from the following manufacturers:
- ERA is a domestic manufacturer of components for various cars, offering ignition coils for the VAZ 2106 starting at RUB 1,350. Such coils have a very limited service life.
- MZATE-2 offers reliable ignition coils at prices starting from 600 rubles. In addition to the low price, the products are easy to install and are available in almost every car dealership.
- Bosch is a trusted manufacturer of auto parts. Despite the high price (from 2,700 rubles), German-made coils are extremely reliable and have the longest service life.
- SOATE is another domestic manufacturer that sells ignition coils for the VAZ 2106 at prices starting from 700 rubles.
Usually, VAZ 2106 owners, when purchasing, look for powerful coils at a low price, since the power characteristics of the engine directly depend on the number of turns of the winding.
Carrying out work on replacing spark plugs
Next we make a replacement. Moreover, it is recommended to change all spark plugs at once, even if only one of them is not working. In this case, you will need a few tools:
Set of keys for replacing spark plugs
- spark plug wrench or special spark plug head and wrench;
- rags;
- new set of spark plugs;
- screwdrivers and keys (not always).
Since car power plants have different design features, there are also certain nuances in performing the work. Therefore, let's look at how it changes on different machines.
Video: Replacing spark plugs. VAZ 2107
https://youtube.com/watch?v=nVrf7Q2jBKo
First, let's look at how everything is done on a simple engine design. An example is the carburetor version of the VAZ-2107. So, having prepared the tool, you can proceed:
- We park the car on the platform, if the engine is warm, let it cool.
- The spark plugs are installed on the upper right side of the engine (if you stand in front of the car). High-voltage wires from the distributor (distributor) go to them.
- We remove the tip from the spark plug of the first cylinder, put the key on the edge of the spark plug and unscrew it (counterclockwise).
- We close the hole with a piece of rags (to prevent accidental entry of debris into the cylinders), but so that it can be removed.
- We take a new spark plug, remove the rag, screw it in, and then tighten it with a wrench. In this case, you need to pull moderately, since the hole is made in the head, the material of which is aluminum, it will not be difficult to break the thread. After tightening, put on the tip.
- Let's move on to the next candle.
Feel the difference - old and new spark plug.
Replacing spark plugs on Lada Priora
Let's move on to a more complex motor design. An example is the Lada Priora with a 16-valve cylinder head. This engine has spark plugs in wells made in the upper part of the head. Each candle has its own coil, which is placed directly on it. They change like this:
- We park the car and wait until the engine cools down.
- Remove the upper protective cover of the motor.
- Disconnect the wire block going to the coil.
- We unscrew the bolt securing the coil, and then remove it.
- We reach the candle head with an extension to the spark plug, put it on and unscrew the element. Carefully remove it (you can use the removed coil for this). We put it on the unscrewed candle and pull it out.
- Carefully lower the new spark plug, screw it in, tighten it (moderately), put the coil in place, secure it with a bolt, and connect the block.
- Similarly, we change all subsequent elements.
Video: Subaru Forester SG. Replacing spark plugs.
The most difficult thing to change spark plugs is from cars that use engines that have a special design. Such cars, for example, are Subaru cars. They use boxer power plants. Therefore, getting to the candles is not so easy. The easiest way to change them is to remove the engine from the car.
But it is quite possible, although far from easy, to change them without removing the engine, but you will still have to dismantle and remove some elements from the engine compartment in order to provide at least some access. You will also need a full set of wrenches with extension rods and cardan shafts, as well as a spark plug head.
And then everything is as stated above. We get to the candle. We put the head on it, connect the rods and cardan shafts to ensure rotational movement. We unscrew the old element and install the new one.
Once again I was surfing the Internet and came across an interesting article in the auto review. In which there was a test of spark plugs and described how to tighten them correctly. Excerpt from this article:
When wrapping the spark plug into the engine, we don’t think about how the side electrode will ultimately be located - to the cylinder wall, to the intake valve, to the exhaust... But what’s the difference? It is, and a considerable one. The experience of racing drivers suggests that the spark plug works better when it is turned with the open part of the spark gap into the volume of the combustion chamber - towards the valves.
That is, for a prioro engine, the best location is when the open part (the slot on the spark plug) is facing the intake valves. The article promised improved engine performance, increased traction and fuel economy.
I decided to check, as they say, on myself) I unscrewed all the spark plugs, marked the spark plug wrench and began to select as instructed. As a result, I swapped all the spark plugs and eventually screwed in all the spark plugs as in the article. The engine runs the same at idle, while running it seems to be more elastic and a little more accepting)) although it may be self-hypnosis. There is nothing to say about consumption yet))
Correct position of the spark plug (slot on the valve)
Reasons for failure
Like all electrical and electronic units, the reel has a certain trouble-free operation life. The average service life of ignition coils is approximately seven to ten years of operation or 150,000 - 200,000 thousand mileage.
There are many reasons for ignition coil failure. The most common is an internal short circuit. When the coil overheats, for example due to increased temperature conditions of the engine (lean mixture, faulty cooling system), the insulation is damaged. The use of worn-out spark plugs, in which an internal gap has arisen due to wear of the conductive glass sealant, also leads to overheating of the coil. In addition, reverse gases and breakdown of the insulator have a detrimental effect on the condition of the rubber tip of the ignition coil.
The photo shows a faulty ignition coil of a VAZ 2106
Let's look at the most common reasons for the failure of the VAZ 2106 ignition coil:
- Natural wear and tear. The device is operated in extreme conditions with large differences in temperature, humidity, and the possibility of ingress of moisture, dirt, and foreign liquids. In this case, large currents flow through the primary winding, and a high-voltage pulse is formed in the secondary winding.
- Electrical breakdown. Let's figure out why the ignition coil breaks. Over time, as a result of high temperature changes, the dielectric insulation cracks, and salty moisture, which is a conductor, can enter microcracks. For voltages of more than 15,000 volts generated in the secondary winding, even pure undistilled water acts as a conductor.
- Overheat. Some vehicles have ignition coils installed directly at or near the top of the engine. If there is no air access to their structure for natural ventilation (this is possible when installing additional equipment), the device may overheat and fail.
- Mechanical load. The coil mount must be standard. Some car enthusiasts neglect these requirements by “hanging” it on homemade structures.
- Wear of spark plugs and high-voltage conductors. Despite the fact that the circuit has a limiting resistance, wear of spark plugs and high-voltage conductors can cause electrical breakdown in them. Then the load current increases and the bobbin may overheat.
- Generator voltage regulator relay malfunction. Sometimes it leads to an increase in the voltage of the vehicle’s on-board network and failure of the electronic amplifier (switch).
- Malfunction of the contact group of the lock, electronic switch. If, during parking, +12 Volts are constantly supplied to the coil in the event of an abnormal closure of the lock contact group, the device may overheat and fail. The same situation is possible if the switch is faulty.
Ignition module
The ignition module is a device designed to convert DC voltage from the on-board network into electronic high-voltage pulses with their subsequent distribution among the cylinders in a certain order.
In the injection VAZ 2107, the ignition module replaced the coil and switch
Design and operating principle
The design of the device includes two two-terminal ignition coils (transformers) and two high-voltage switches. The voltage supply to the primary windings of the transformer is controlled by the controller based on the information received from the sensors.
The operation of the ignition module is controlled by the controller
In the ignition system of an injection engine, voltage distribution is carried out according to the idle spark principle, which provides for the pairwise division of cylinders (1–4 and 2–3). A spark is formed simultaneously in two cylinders - in the cylinder in which the compression stroke is coming to an end (working spark), and in the cylinder where the exhaust stroke begins (idle spark). In the first cylinder, the fuel-air mixture ignites, but in the fourth, where the gases burn out, nothing happens. After turning the crankshaft half a turn (180), the second pair of cylinders enters the process. Since the controller receives information about the exact position of the crankshaft from a special sensor, problems with sparking and its order do not arise.
Location of the ignition module VAZ 2107
The ignition module is located on the front side of the cylinder block above the oil filter. It is secured to a specially designed metal bracket using four screws. It can be identified by the high-voltage wires coming out of the housing.
The ignition module is located on the front of the cylinder block above the oil filter
Factory designations and characteristics
VAZ 2107 ignition modules have catalog number 2111–3705010. As an alternative, consider products numbered 2112–3705010, 55.3705, 042.3705, 46.01. 3705, 21.12370–5010
They all have approximately the same characteristics, but when purchasing a module you should pay attention to the engine size for which it is intended
Table: technical characteristics of the ignition module 2111–3705010
| Name | Index |
| Length, mm | 110 |
| Width, mm | 117 |
| Height, mm | 70 |
| Weight, g | 1320 |
| Rated voltage, V | 12 |
| Primary winding current, A | 6,4 |
| Secondary winding voltage, V | 28000 |
| Duration of spark discharge, ms (not less) | 1,5 |
| Spark discharge energy, MJ (not less) | 50 |
| Operating temperature range, C | from -40 to + 130 |
| Approximate price, rub. (depending on manufacturer) | 600–1000 |
First signs of trouble
The main signs of ignition coil failure are lack of ignition. If it is a single device with a distributor, then in all cylinders; if it is a double or single device, then in those served by it. The absence of a spark is not necessarily a 100% sign of a faulty coil. Perhaps the limiting resistor has burned out, the spark plug is faulty, the high-voltage wire has broken, or there is a malfunction in the ignition system. A comprehensive fault diagnosis is required.
Visual signs that the ignition coil is not working:
- the presence of “breakdown tracks”, oxides on the coil;
- change in dielectric color;
- burning of contacts and connectors;
- traces of overheating on the body;
- increased pollution.
Let's talk in more detail about these and other points indicating that the ignition coil of the VAZ 2106 is in a faulty state.
Presence of interruption tracks in the ignition coil
Let's figure out why the ignition coil breaks. Firstly, over time, as a result of high temperature changes, the dielectric insulation cracks, and salty moisture, which is a conductor, can enter microcracks.
The photo shows a common malfunction - breakdown of the ignition coil of a VAZ 2106
For voltages of more than 15,000 volts generated in the secondary winding, even pure undistilled water acts as a conductor. Secondly, during operation, the physical properties of the dielectric and rubber insulation of the tips of high-voltage wires, especially those of dubious production, change.
High-voltage breakdown can be caused by the installation of non-standard high-voltage wires in which there is no distributed current-limiting resistance. A breakdown can occur as a result of severe contamination or waterlogging. Even in the event of a single breakdown, irreversible changes occur in the structure; further operation is not recommended.
Burning of contacts and connectors of the ignition coil of a VAZ 2106
The big disadvantage, the disadvantage of CG, is the sparking process, which cannot be eliminated in any way. However, significant minimization of sparking can be achieved by connecting a capacitor. Yes, and be sure to set the correct gap.
Experts say that if you increase the gap above standard values, you can get rid of sparking. In other words, if the distributor contacts are burning, increasing the gap will be the optimal measure to eliminate the problem. However, this also has its drawbacks. In particular, the angle decreases, which leads to a decrease in the additional current voltage.
Traces of overheating on the ignition coil body of a VAZ 2106
Another sign by which you can determine the malfunction of the ignition coil of the VAZ Six is the presence of traces of overheating on the short circuit housing. The photo shows what they look like:
This is what signs of overheating look like on the ignition coil housing
Distributor diagnostics
Malfunctions of the ignition system can be caused by a breakdown of a component such as a distributor. Several types of problems may arise in it that can damage the contact ignition of the VAZ 2106. So, if the coil is working properly, then the problem in the operation of the system is due to the fact that the distributor, which has the contact ignition of the VAZ, has broken down.
To check, you need to remove the cover and inspect it. All contacts and contact angle must be free of damage and cracks. After inspecting the cover, you need to check the distributor slider. Sometimes cracks appear on this element as a result of wear, which leads to breakdowns to ground.
After inspecting the slider, the breaker contacts are examined, if necessary, they are cleaned, and the gap between them is checked. It is imperative to inspect the capacitor, since most often it is the one that is faulty, which is the reason for the failure of the vehicle systems. If there is no charge accumulation after applying voltage, the capacitor must be replaced.
When checking the ignition of the VAZ 2106, we must not forget about the spark plugs. The fact is that the normal operation of the system depends on the gap between the spark plug electrodes. The spark plug gap should be 0.4-0.8 mm. Increased play leads to heating of the coil and, as a result, possible breakdown of its windings.
The VAZ ignition relay is designed to protect the system from sudden changes in voltage at the moments of switching on and off. It protects the contacts of the lock and the breaker from burning, thereby ensuring the long service life of these components. The contacts in the VAZ ignition relay open almost instantly, which prevents the formation of sparks during operation.
The advantage that the VAZ ignition relay has over other elements of the system is the ease of its replacement in case of failure. When repairing a car, it is better to have a special manual on hand. As a rule, such a publication, in addition to a textual explanation, contains photographs of vehicle components, which facilitates repairs.
Often the reason for the disappearance of the spark on the spark plugs is a malfunction of the ignition coil (IC). The article describes the device, how to check the ignition coil of a VAZ 2106, its malfunctions and how to eliminate them.
Diagnostics and testing of the ignition coil of a VAZ 2106
How to check the ignition coil of a VAZ-2106 car at home? The best way is to use a multimeter or ohmmeter. Winding testing using this equipment is carried out as follows:
- to make sure that the primary winding is in good condition, connect an ohmmeter to its side terminals and look at the resistance readings. For a fully working ignition coil, it should be at least 3-4 ohms. Otherwise, the device will need to be repaired or replaced;
- to check the secondary winding, one of the ohmmeter outputs is connected to the same side one, and the second one is connected to the central terminal on the pulse transformer itself. The normal value is somewhere in the range of 7.5-9.2 ohms. To get accurate data, it is better to consult your vehicle's owner's manual. If there are any deviations, the ignition coil must be replaced.
Before performing the checks described above, you must disconnect the negative terminal from the battery. This will help eliminate the risk of short circuit
Diagnostics and testing of the ignition coil of a VAZ 2106
Checking for spark
Checking the spark is possible using several methods: to ground, using a multimeter, or a special tester on a piezoelectric element. The first method is the simplest. The body of the unscrewed spark plug is brought to the metal (usually the engine cylinder block), after which the engine is cranked by the starter and the presence of a spark is analyzed.
Please note that this verification method cannot be used when diagnosing fuel-injected vehicles. The fact is that a car with an injector has an ECU and other electrical equipment that is quite sensitive and can be damaged.
The photo shows checking the spark plug on a VAZ 2106
The second method allows you to better assess the condition of the spark plug, identify breakdown, etc. The use of a special tester is a method of checking the spark on injector cars, reminiscent in its principle of checking by analyzing the spark breakdown to ground (the first method). In this case, the risk of burning the control unit is minimized. Now let's talk about how to check the spark on a fuel-injected engine.
Checking the secondary winding
The secondary winding of the coil is checked in almost the same way, only one of the ohmmeter wires needs to be connected to the side terminal, and the second to the central one on the coil. Everything is demonstrated below:
Here the resistance data is completely different and during normal operation it should be in the region of 7.4-9.2 kOhm. Judging by the readings of the device, my case shows and confirms again that everything is fine with the coil.
The photo shows a check of the secondary winding of the ignition coil of a VAZ 2106
To avoid any misunderstandings, I want to warn you that the figures given in this article apply to a greater extent to VAZ 2106 type B117-A ignition coils, although on many models the parameters are identical. But still, for your modification, it is better to look at the data in specialized sources.
If, as a result of the check, it turns out that the element is faulty, then it is necessary to replace it with a new one.
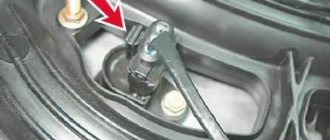
Checking the distributor
If the coil is working properly, but the engine does not start, the problem must be looked for in the distributor; to do this, you need to remove its top cover by unfastening 2 latches. The inside of the cover must be carefully inspected; all contacts and the ember must be intact. You need to remove the slider from the distributor and also inspect it from the inside; it happens that it cracks and a spark hits ground.
Photo: Checking the VAZ 2106 distributor
Next, you need to carefully inspect the breaker contacts and, if necessary, clean them with fine sandpaper. You also need to inspect the capacitor, which is usually screwed to the distributor; without it, there will be no spark either. To test the capacitor, you need to apply power to it from the battery, and then connect a light bulb or short-circuit the contacts with a metal object. If the light does not blink and there is no spark when it closes, the capacitor is faulty. It can be replaced by any other, but not polar.
In conclusion, I would like to note the fact that you should never check the spark for the gap from the wire to the engine; in this case, the ignition coil quickly fails and the VAZ 2106 will no longer be able to start without replacing it. All this happens because the coil is punctured from the inside, and all because of the very large gap for breakdown.
Why might there be no spark?
The list of situations in which there may be no spark in car spark plugs is very long; anything can affect this. Let's try to identify the most frequently occurring causes on the VAZ models 2109, 2114, 2110, 2106:
- weak battery charge;
- the problem is in the high-voltage wires;
- there are problems with the ignition coil;
- problems with the low voltage circuit;
- problems with the ignition distributor.
You should also pay attention to the quality of contacts and electrical components. The contacts, of course, can be checked quite easily by tugging them a little with your fingers
In addition, it is advisable to inspect all elements of the ignition system. If there is dirt, oil, or water on them, they must be wiped off immediately with a dry cloth. After this, you can try to start the car.
Checking high voltage wires
Another reason for the disappearance of the spark may be in high-voltage wires. First of all, all wires must have a normal appearance, there should be no frayed places or areas with damaged insulation. If this cannot be eliminated, you need to replace the explosive wires.
The search for a spark must begin with the wires that extend from the spark plugs. You need to carefully examine all the contacts and caps that are placed on the candles themselves. Candles all together rarely fail just like that, so you shouldn’t complain about them.
Checking the ignition coil
To diagnose the coil, you need to remove the main wire from the distributor cap. Next, we try to crank the starter to see a spark from the wire.
- A spark has formed - this indicates that the coil is working properly. So the problem is with the breaker.
- If there is no spark, the fault must be looked for in the ignition coil.
If it has been determined that the problem lies specifically in the ignition coil, then it will have to be replaced. In “middle-aged” VAZ cars, especially 2109, 2106, 2114, 2110, this phenomenon is by no means rare.
Checking the ignition distributor
If there is a possibility that the problem lies specifically in the breaker, then in order to make a diagnosis, you need to inspect its cover from the inside:
- Visually, the cover is intact and has no signs of damage - wash it, preferably with gasoline, and put it back in place.
- If there are any visible signs of breakage or if there are any cracks, the cover will need to be replaced.
You also need to check the central contact of the breaker for any “freezes”. This is easy to do: just move its carbon tip.
Another check that can and even needs to be done is checking the insulation of the breaker rotor. This is done like this:
- First, the central explosive cable is located at a distance of five to eight millimeters from the electrode.
- Next, you need to close and open the contacts several times. All this must be done with the ignition on.
If even the slightest spark jumps in this small gap, this indicates a rotor malfunction. In such situations, he is replaced.
Checking the low voltage circuit
To diagnose such a circuit, you can use a 12-volt test lamp with a power of up to three watts. This light bulb must be connected with one contact to the ground of the car, and the other to the low voltage terminal. After manipulating the connection manually, the contacts of the breaker are closed and the ignition is turned on. If the circuit is working properly, then when the contacts are closed, the light goes out, and when the contacts are open, it lights up. When this does not happen, you need to start looking for a problem in the coil winding or in the cables.
If the lamp is constantly on, this indicates one of the following types of malfunctions:
- The breaker contacts are heavily oxidized.
- The wire leading from the lever to the breaker terminal is broken.
- The wire that connects the housing to the movable disk is broken.
The oxidized wires need to be cleaned, after which the system will work. In any other case, more in-depth intervention is necessary.
A few words about the BZS (Contactless ignition system) VAZ 2106
The coil operating as part of a contactless circuit differs in the number of turns of the primary and secondary windings. Simply put, it is more powerful than the old version, since it is designed to create pulses of 22-24 thousand volts. The predecessor supplied a maximum of 18 kV to the spark plug electrodes.
The cable with connectors is used for reliable connection of the terminals of the ignition distributor and the switch. The structure of these two elements should be considered separately.
In terms of reliability, the BSZ is significantly superior to the outdated contact ignition of the “six”; problems arise much less frequently and are easier to diagnose.
All elements of the system are connected to each other and to the engine as follows:
- The distributor shaft rotates from the motor drive gear;
- The Hall sensor installed inside the distributor is connected to the switch;
- the coil is connected by a low voltage line to the controller, a high voltage line to the central electrode of the distributor cover;
- high-voltage wires from the spark plugs are connected to the side contacts of the main distributor cap.
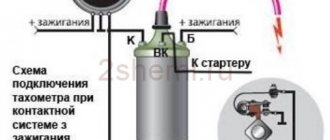
The threaded clamp “K” on the coil is connected to the positive contact of the ignition switch relay and terminal “4” of the switch. The second clamp marked “K” is connected to contact “1” of the controller, and the tachometer wire also comes here. Terminals “3”, “5” and “6” of the switch are used to connect a Hall sensor.
One of the effective options is to replace the standard ignition system with a non-contact ignition system (abbreviated as BSZ), where electronics are in charge of sparking
Which ignition is better: contactless or contact?
Contact ignitions are obsolete, but are still used in older cars. On rear-wheel drive VAZ models, contactless was first installed on 2107.
Let's look at the differences between contact and non-contact ignition:
Advantages of contactless ignition:
- since there is no contact group in the distributor, sparking occurs clearly;
- long coil life;
- at medium engine speeds, BSZ creates a spark 4 times more powerful than contact ignition. This is especially useful if the spark plugs are dirty, as a spark will still be produced;
- performs its functions perfectly even in cold weather;
- if the voltage in the electrical network is low, then sparking will still occur;
- thanks to the powerful, stable spark of the candles, the fuel-air mixture ignites faster;
- if BSZ is installed, then fuel consumption decreases and engine power increases;
- improved vehicle acceleration dynamics;
- BSZ is easier to maintain because the device has no moving parts.
How to replace the ignition coil on a VAZ 2106 with your own hands (photo report)
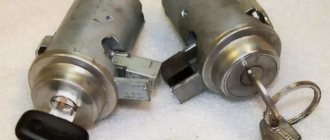
The ignition coil on a VAZ 2106 car cannot be repaired and, if it fails, must be replaced. Before making a replacement, it is worth checking its functionality. To do this you will need a tester, also prepare a standard set of tools
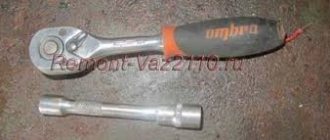
To replace the ignition coil on a VAZ 2106 car, you will need keys “8” and “10”.
- Unscrew the ignition coil output nut “1” (“OE”), remove the spring washer and wire ends.
- Unscrew the ignition coil output nut “1” (“OE”), remove the spring washer and wire ends.
- Unscrew the terminal nut “16” (“+B”) of the ignition coil, remove the spring washer and the wire tip.
- The B117-A ignition coil is installed in the left front corner of the engine compartment and secured to the mudguard with two nuts.
- Unscrew the two nuts securing the coil, remove the wire ends and remove the ignition coil.
- Check winding and insulation resistance. The resistance of the primary winding at 20 °C should be 3.07-3.5 Ohms, the secondary winding - 5400-9200 Ohms. The insulation resistance to ground must be at least 50 MOhm. If the readings do not correspond to those shown, replace the ignition coil.
- Install a new ignition coil on a VAZ 2106 car in the reverse order of removal.
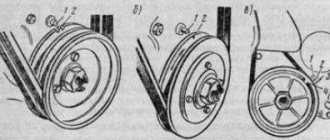
Replacing the VAZ classic generator.
1. You need to think through all the details regarding the procedure for the upcoming work and prepare the tools that may be needed. The battery must be removed to free access to the generator, and it will also make it difficult to unscrew the mounting nuts from the adjusting bar. 2. The front right side of the car will need to be jacked up. Then we remove the protection from the crankcase and begin to unscrew the generator mount from below.
3. Next, loosen the fastening at the top and try to remove the drive belt from the generator.
To do this, you need to press the generator as close as possible to the engine and release it from the belt, just first remove the belt from the pump, and then from our unit. 4. The next thing to do is disconnect the generator from the contacts. We unscrew all the contacts from the bottom, making sure to remember them. If you are afraid of confusion, mark in a way that is convenient for you.
5. We finally unscrew our device and pull it down.
This procedure must be carried out carefully so as not to fall. This method is the most convenient, but all actions must be carried out in the inspection hole. Here is a description of how to remove the generator from the bottom of a classic, which is very convenient
Otherwise, if you use another one, you will have to remove the radiator or move it as far as possible to the side, removing all the pipes. Replacing the generator follows the same procedure, only in reverse order.
Here we describe a method for removing the generator from the bottom of a classic, which is very convenient. Otherwise, if you use another one, you will have to remove the radiator or move it as far as possible to the side, removing all the pipes. Replacing the generator follows the same procedure, only in reverse order.
Therefore, it is important to remember the entire sequence of actions. Finally, when the new generator is installed, the belt must be tensioned correctly. The drive belt should rotate 90° along the axis
The drive belt should rotate 90° along the axis.
It is necessary to remove the generator on a VAZ 2105 car for its repair or when performing other work in which its presence will interfere with the progress of their work. Prepare a standard set of tools, and then perform the following sequence of actions:
- For the convenience of dismantling work, the car must be driven onto an inspection pit, overpass or lifts.
- Next, disconnect the terminals from the battery and remove it to make it easier to access the top nut of the generator.
- Remove the engine crankcase mudguard.
- Using a nineteen socket and an extension, unscrew the nut securing the generator to the adjusting bar, and then loosen the lower nut securing it to the bracket.
- Use a small mounting blade to move it a little so that the drive belt is loosened and can be removed. Remove the belt.
- Disconnect the block with wires from the terminal.
- We move the rubber cap to the side and unscrew the nut securing the ends of the wires connected to the positive terminal of the battery.
- And at the final stage, unscrew the nut securing the generator to the bracket on the engine block.
- We remove it and put it aside.
At this point, the repair work to remove the generator on the VAZ 2105 car has been completed. Make the necessary repairs, then install in reverse order. After installation, adjust the belt tension.
Sources
- https://vazkorch.ru/dvigatel/zamena-generatora-vaz-2105-2106-2107.html
- https://remont-vaz2106.ru/vaz-2105-snyatie-i-ustanovka-generatora
Uneven sparking
Electrical power distribution in an automotive system is provided by the rotor. It is sometimes put on the distributor drive. And of course, the cover with the CG and sockets for the armored wires is responsible for the correct distribution.
The current distribution in this case can be represented as follows:
- The current flows through a carbon contact with a spring to the rotor.
- Further along the runner tire to the side contact.
- From here to the armored wires of the engine cylinders.
According to experts, in the correct understanding there is no contact between the spark plug sockets and the rotor. Current transmission with a force of 15-25,000 V occurs through an air gap.
How to connect a coil
The ignition coil is a transformer whose operation is aimed at increasing direct current.
Its main task is to generate high-voltage current, without which ignition of the fuel mixture is not possible. Current from the battery flows to the primary winding. It consists of one hundred or more turns of copper wire, which is insulated with a special substance. Low voltage voltage (twelve volts) is supplied to the edges. The edges are connected to the contacts on its cover. On the secondary, the number of turns is much larger (up to thirty thousand) and the wire is much thinner. A high voltage is created on the secondary (from twenty-five to thirty thousand volts) due to the thickness and number of turns. It is connected like this: the contact of the secondary circuit is connected to the negative contact of the primary, and the second contact of the winding is connected to the neutral terminal on the cover; it is this wire that is the high voltage transmitter. A high-voltage wire is connected to this terminal, the other edge of which is connected to the neutral terminal on the cover. To create a strong magnetic field, an iron core is placed between the windings. The secondary winding is located inside the primary.
Structurally, the ignition coil consists of the following elements:
- Insulator;
- Frame;
- Insulating paper;
- Winding (primary and secondary);
- Insulating material between windings;
- Primary winding output terminal;
- Contact screw;
- Central terminal;
- Lid;
- Output terminal on the primary and secondary windings;
- Center terminal spring;
- Primary winding frame;
- External insulation on the primary winding;
- Mounting bracket;
- External magnetic circuit and core.
So, briefly about the principle of operation.
A high voltage current appears on the secondary winding, and at this moment a low current passes through the primary winding. Thus, a magnetic field arises, as a result of which a high voltage current pulse appears on the secondary winding. At the moment when it is necessary to create a spark, the contacts of the ignition breaker open, and at this moment the circuit opens on the primary winding. A high-voltage current arrives at the central contact of the cover and rushes into the contact near which the slider is located.
When connecting the coil to the car’s ignition system, in principle, you should not have any difficulties if, during preliminary dismantling, you marked or remembered which wires are connected where. If you have not done this, then I will tell you how to do it. The connection is made as follows: you need to connect the brown wire to the positive terminal. Usually, the positive terminal is indicated by a “+”, but if you do not see a sign, then you need to find it yourself. To do this, you can use an indicator screwdriver. I think you know how to use it
It is important that before connecting, clean all contacts and check the wires for serviceability. The black wire is connected to the second terminal (terminal “K”)
This wire is connected to the voltage distributor (distributor).
The connection diagram of several elements is as follows. One of the ends of the coil is connected to the on-board network. The second end is connected to the next one, and in this way every last one is connected. The remaining free contact of the last coil must be connected to the distributor. And a common point is connected to the voltage switch. Once all mounting bolts and nuts are securely tightened, the replacement can be considered complete.
Some important tips before replacing and connecting. If you have determined for yourself that the problem with the ignition malfunction is the coil, then it is better to immediately purchase a new one and connect it (the diagram is shown above). This way you will be sure that now there are no problems with it, since it is completely new.
If you find any defects on the surface, it is better to replace it immediately. Otherwise, it will work for some more time and you will have to return to this topic again. It’s better to play it safe in advance so as not to stop somewhere on the road. After all, ignition of a car does not forgive mistakes and negligence.
When repairing a car, especially when it comes to the ignition system, you need to be extremely careful in your actions. Because you may encounter high-voltage wires. Therefore, when replacing or performing repairs, you must follow safety regulations.
Lada Samara, 2113-2115
On carburetor models of VAZ cars of the Samara family (2113-2115), ignition coils 2111.3705 (analogous to Bosch F000 ZS0 211) are installed. These coils have a 3-pin connector and are used for VAZ cars with a microprocessor internal combustion engine control system based on the M7.9.7 controller or its analogues with 8-cl. engines.
Tenth models, 2110-2112
On the VAZ 2110-2112, ignition coils are installed on both injection and carburetor engines (nowadays they are practically not found). For injection models VAZ 2110-2112, an ignition module marked 042.3705 is provided, designation according to the documentation of OJSC AvtoVAZ 2112-3705010-03, some models are equipped with individual coils 2112-3705010-12