The question of why the window regulator does not work is often asked by Lada Kalina owners on specialized forums and service stations. There are many reasons for this phenomenon, due to the low reliability of the design. In some cases, the part can be repaired, but in others, all that remains is to remove the non-working window regulator and replace it with a new device. What can cause the mechanism to fail? How to make a replacement? Let's look at these points in detail.
Causes of malfunction
The main reasons why the window regulator does not work on Lada Kalina cars include:
- Stuck electric motor brushes. Such a malfunction is possible in case of overheating of the brushes, which do not tolerate sudden temperature changes. As a result of such a negative impact, the plastic socket melts, as well as loss of brush mobility. At the first sign of a problem, knock on the plastic door trim. If you delay this, then you won’t be able to correct the situation with little effort—you’ll have to interfere with the design of the product.
- The reason that the window regulator does not work is often the lack of thought through the electrical circuit of the mechanism. The weak link in the chain is the contacts, which cannot withstand the currents passing through them. As a result, the power windows of the Lada Kalina fail due to the lack of a unloading relay. This means that if the mechanism breaks down, repairs to the power windows and control panel may be required.
Practice shows that in most cases, it is not possible to repair the unit, or considerable effort must be made to do so. That's why the best solution is to install new window regulators.
How to remove a window regulator and install a new part
Start work on dismantling the faulty mechanism from the front doors, but to remove the window regulator, free the door from the trim.
To complete the task, do the following:
- Raise the glass to the top point and secure it with tape. It does not matter which window lifter the work will be carried out on - the sequence of work will be the same on any front door.
- Take a ten-size wrench and unscrew the pair of bolts that hold the glass in place. Also unscrew the lock handle screw from the inside.
- Disconnect the electric motor and wiring from the electric motor supply circuit.
- Unscrew the eleven nuts on the mechanism, after which you can remove the window regulator.
Video: Replacing the electric window and motor on the Lada Kalina and Grant
If the video does not show, refresh the page or style=”color:#CC3333″>click here
When performing work on the rear doors, the procedure will be almost identical. Do the following:
- Raise the glass to the top position and secure it according to the principle discussed above.
- Using an eight-socket wrench, unscrew the three nuts that hold the assembly in place.
- Take a ten key, unscrew a couple of screws and three more nuts.
- Remove the assembly through the hole formed at the bottom of the door.
- Remove the rear door window regulator of the Lada Kalina and inspect it.
- If the problem can be corrected without replacement, have the device repaired. If the breakdown is fatal, for example, the window lift motor or gear is broken, then installation of a new mechanism is required.
If the window regulator does not work, start by determining the cause of the breakdown, and then decide on the urgency of repairing the mechanism. If the malfunction is serious, the only solution is to remove the Lada Kalina window regulator for restoration work or a complete replacement.
The right window lifter on Kalina does not work
VAZ (Lada) Kalina I 2004 - 2013
The power window button stopped responding to lowering, both on the driver's and passenger's sides. Right front door. That is, the glass goes up, but there is no reaction when it goes down.
I tried swapping the two top right relays in the fuse box. What else can you see?
- Rear window rolls down tightly, Kalina – 3 answers
- Turn signals do not blink constantly in Kalina - 2 answers
- The car does not start, the relay clicks, VAZ Kalina – 2 answers
- Where is the ground terminal for the power windows and central locking located in Kalina? – 1 answer
- The window regulator does not work on Kalina - 1 answer
Most likely a wiring break. Remove the door trim and disconnect the glass window chip. and check the power supply and mass for lowering. Maybe the motor itself is to blame. But most likely the break is either in the corrugation between the door and the counter. Or even lower, maybe in the threshold, there is ESP wiring. Search
You can replace the button on the right door. It’s better to first check whether the lowering voltage comes from the left button to the right, whether it passes through the right button.
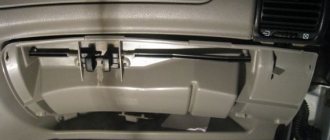
The funny thing is that you end up disassembling and reassembling the engine and that’s it. It feels like when closing the window, an impact occurs and the shaft gradually disengages. I suffered with both the right and left doors.
It is easy to check the serviceability of the button without disassembling the door. With the engine turned off, you press the button and if it is working properly, the light in the instrument panel will dim slightly.
- Are the DTOs the same in Lada Kalina? – 1 answer
- Heater radiator leaking in Lada Kalina - 2 answers
- What adapter for Lada Kalina diagnostics? – 1 answer
- No speed readings on Lada Kalina - 1 answer
- Speedometer does not work in Lada Kalina - 2 answers
- What pressure should be in pirelli 185/60 R14 82H tires? – 2 answers
- Error P0172 in Lada Kalina - 3 answers
- Lada Kalina does not gain momentum - 2 answers
- Lada Kalina heater radiator is leaking - 3 answers
- Is it possible to install a rear beam on Kalina from 2109 or 2110? – 1 answer
This is interesting: What to do if license plates and registration documents are lost or stolen?
The window regulator does not work on Kalina
The car does not start, the relay clicks, VAZ Kalina
Rear window rolls down tightly, Kalina
Where is the ground terminal for the power windows and central locking located in Kalina?
Photo report on replacing the electric window regulator
So, first of all you need to do the following:
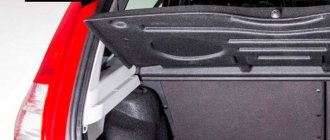
- Remove door trim
- Unscrew the bolts securing the door glass (two on each side)
To ensure that the glass is fixed and does not fall, you should not remove the sealing rubber bands, and you can also additionally lock it in the upper position (or at least with tape, the main thing is that it holds tightly).
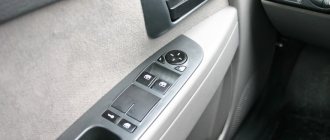
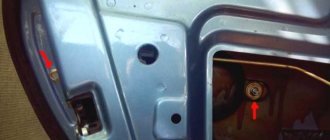
After this, disconnect the power plug for the window motor, as shown in the photo below, by pressing the latch slightly up.
Now, using a 10mm socket, you need to unscrew the 11 nuts securing the window regulator trapezoid to the door body.
When you unscrew the last nuts, hold the entire assembly so that it does not dangle inside the door.
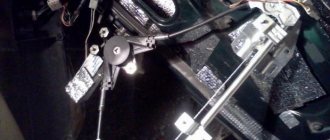
Then we push the pins inside and carefully remove the trapezoid assembly with the motor from the door hole. First, we tilt its right side, as shown in the photo below:
We carefully pull it out of the door, and then carry out further actions in the same way with the second bar and the motor.
Now the entire structure has been removed from the car and is as follows.
Replacing the motor
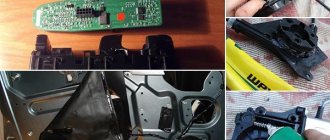
In order to replace the motor itself, first unscrew the three studs:
And after that, you need to use a flat-head screwdriver to unscrew the 4 fastening screws, which are clearly visible below.
Next, we carefully lift the motor with the cover so that the coil does not “unravel” and the cable remains wound, otherwise you can then struggle for a long time with threading it into place.
At first, the coil may remain on the motor, but then we carefully pry it off and install it in its place.
Now you can put the new motor in place by putting it on the reel and placing the housing until it is completely aligned with the housing on the trapezoid.
We can say that we close this entire structure until both parts are tightly connected, and tighten the fastening screws into place. After this, you can install in the reverse order. The price of a new motor assembled with a window lift trapezoid for Kalina is about 1,800 rubles for the original part. Everything can be purchased individually for half the price of the set.
Novel. My comment will most likely no longer be relevant for you, but I want to share the victory I won today, and maybe it will save someone a lot of nerves
I am writing a detailed report on the installation of rear ESPs on a Kalina Standard or Norma configuration.
For the rear ESP, I chose Granat rack and pinion windows. I used them on previous machines and my impression of their performance was very positive.
I purchased a set of rear ESPs for Kalina/Granta. Additionally, I purchased two ESP control buttons from Viburnum 921.3709 and two pads for them. It also required 8 meters of wire with a cross section of 1 mm2 in at least 5 different colors.
Actually photo of the kit: . The included buttons from the 2110 are not used.
Installation: 1. Remove the door trim according to the VAZ-1118 repair manual. 2. Remove the buffer of the window lifter handle 3. Using a socket 8, unscrew the three nuts securing the window lift handle (shown by blue arrows), fix the glass in the window opening, for example, by inserting a screwdriver between the velvet and the glass, and with a socket 8, unscrew the two bolts securing the glass (shown by a green arrow ). Using a 10 mm socket, unscrew the three nuts securing the window lift mechanism to the door (shown by red arrows). 4. Remove the window lift mechanism as shown in the photo: .
5. Install the rack and pinion window lifter by pushing it through the top hole. . we secure it with three 10mm nuts. Having temporarily connected power to the ESP, lower it so that the glass mounting holes are accessible and secure the glass with two 8mm bolts, but do not tighten them. Having connected the power to the ESP, lift the glass up and check that it is in the highest position. After this, tighten the glass mounting bolts.
6. Cut a hole in the door card to install the switch according to the template:
Installing the ESP switch:
7. Assemble the power window control wiring harnesses. The harness that comes with the kit is only suitable for installing independent rear ESP switches. I wanted to make the control according to the luxury scheme, that is, a full-fledged driver’s door module with 4 switches and one button for passengers on the door cards. I assembled the module on the basis of a luxury one (see diary). Therefore, I made all connections according to the following scheme:
We fix all the wires on the door so that it is neat:
That's basically it. A bonus to installing rear ESPs, in addition to convenience, was the absence of the need to periodically lift the sagging glass and the rear windows stopped rattling.
Hi all. It’s finally warmer, it’s spring, the cats are purring and you can start doing what you’ve been putting off since January - see what’s wrong with the power window on the right front door. I won’t write about how to remove power windows; there’s plenty of information already. For example, or watch the video:
I bought a power window drive:
Three nuts for 6, three studs for the power window and three washers (I knew that there would be dancing with a tambourine)
I see that the drive is not original, but the sellers assured me that it would fit and they don’t have any others. I took their word for it and started looking for a body and one piece, so as not to buy a complete trapeze and shell out money for it. What to call the thing to which the cable is attached and swings it back and forth - I don’t know... Either a washer, or a pulley... Let me have a washer 
In general, I had to buy an assembled trapeze; there are no spare parts for it in auto stores + Avito climbed all over it.
When I bought the trapeze, I saw that the cables did not intersect and were shuffling against the plastic body. I switched the cable and now everything is as it should be.
We transfer the cables carefully so that they do not jump out of their streams and do not pinch each other
If I can do it, you can do it too =)
The biggest pain is to manage to make a stretch and insert this washer into its place. But I inserted it, but it constantly flies out of there. It was decided to clamp it with a motor during installation and fasten it. Now comes the fun part. As it turns out, there are two types of electric window drives. Option 1. An electric drive that comes from the factory and fits perfectly:
Option 2. The electric drive that they sell to us is sold:
The further description will concern those who bought the second option and there is no opportunity to buy option one. How can we establish this miracle? It fits the fasteners of three studs, so there should be no problems with installation, but... If you are making a right-hand door, you need to buy an electric drive for the left door and vice versa. Because if you buy for the right door, the stud fasteners will not match. Next, swap the plus and minus wires in the chip.
If you do not reverse the polarity, when closing, your window will open and vice versa. These are the minor incompatibilities of this drive. Now we begin to adapt it. My right front door is broken, which means I need to have an electric drive from the left door. We measure and see this picture:
Because of the sides, the electric drive does not fit completely, but I did not sharpen the sides. Suddenly the electric drive comes on and I install a normal one, which should stand. It was decided to install washers so as not to break the housing ears when pulling the studs. Washers for 6, see photo above. Here's what happened:
We stretch everything and what we got:
We install the electric window in the door, connect the chips and enjoy the window. Ps: The glass does not touch the drive during operation
Reasons for failure
The window regulator consists of mechanics and electrics, and therefore the reasons must be sought in these parts. Let's look at where the problem may lie:
- A fuse has blown or a relay has broken.
The relay can be replaced with a jumper as in the photo. But remember that this is a temporary option, be sure to change the relay in case of breakdown
Tap to the left of the button, then try pressing the button. If it works, then the contact between the wire and the button is to blame.
All these reasons can lead to the fact that one or both window regulators may not work.
Troubleshooting Methods
So, when the window regulator stops working, it is necessary to find and eliminate the cause. Let's look at the whole process and steps step by step:
- The first thing you need to pay attention to is the fuse . In the block it is marked as F5. You need to take it out and look. If it burns out, it should be replaced with the same one with the appropriate marking.
- If the fuse is intact, then the problem is in the power supply and you need to look for a broken wire problem . We take out the fuse and use a tester to check whether there is voltage in the on-board circuit. To do this, you need to insert the probes into the sockets and see if there is power supply. If not, then you should check the wires, relays, and control unit.
Installation
As you can already guess, installing the window regulator is carried out in exactly the reverse order of dismantling it; the only thing is that you first need to treat the guide of the device with lubricant.
The installation procedure for the front lifts is as follows:
- We fasten the new device with nuts (11 pieces);
- We connect the wires and the motor;
- We find the bolt securing the inner handle of the lock and tighten it, using a key, tighten the glass fasteners.
- We remove the now unnecessary tape and check the work.
You need to look at how the window opens and closes, whether there are any distortions, whether all the screws are tightened well. If a mistake was made, what to do, you will have to repeat the work again. If everything goes well, you can praise yourself for a job well done.
The rear window lifters are installed in the same way, in the reverse order.
- Through the niche at the bottom of the back door, we put the device in place of the old one.
- Using a 10mm wrench, tighten the bolts and nuts.
- Using a size 8 wrench, secure the mechanism with three nuts.
- We remove the tape.
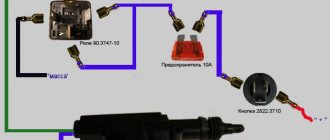
Let's look at the diagram for switching on power windows on the Lada Kalina
Diagram (click to enlarge)
The decoding of the notation looks like this:
2 — ignition switch;
3 — power window switch for the right front door;
4 — power window switch for the right rear door;
5 — gear motor for the power window of the right front door;
6 — gear motor for the electric window of the right rear door;
7 — gear motor for the electric window of the left rear door;
8 — gear motor for the electric window of the left front door;
9 — left rear door power window switch;
10 — left front door power window switch;
11 — relay for turning on electric windows;
A - to power supplies;
B - to the instrument lighting switch;
C - the order of conditional numbering of plugs in the power window blocks.
Is it the motor or the mechanics that is at fault?
If everything in the electrical part is functional, then it is necessary to look for the cause in the mechanical part. To do this, you will have to dismantle and diagnose the window regulator. Let's look at how to remove this node:
- We dismantle the door card.
Door card removed
It is worth inspecting the removed window regulator for damage.
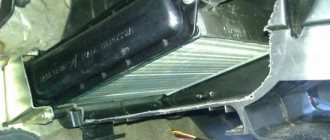
Removing the window motor
The most common malfunction is wear of the roller teeth or breakage of the traction cable. These parts need to be replaced, but often the entire mechanical part of the window regulator is replaced.
Diagnostics of the window lifter trapezoid
Lada Kalina dashboard diagram
1,2,3,4 — blocks of the instrument panel wiring harness to the blocks of the rear wiring harness; 5,6 — blocks of the instrument panel wiring harness to the blocks of the front wiring harness; 7 — block of the instrument panel wiring harness to the block of the wiring harness 8 — block of the instrument panel wiring harness to the block of the front wiring harness; 9 — lighting control module; 10 — ignition switch; 11 — on-board computer mode switch; 12 — windshield wiper switch; 13 — sound signal switch; 14 — light signaling switch; 15 — instrument cluster; 16 — evaporator temperature sensor; 17 — interior air temperature sensor; 18 — air conditioner switch; 19 — controller of the automatic climate control system; 20 — heater damper gearmotor; 21 — rear window heating switch; 22 — alarm switch; 23 — brake signal switch; 24 — cigarette lighter; 25 — electric amplifier control unit; 26,27 — blocks of the instrument panel wiring harness to the radio; 28 — backlight lamp for the heater control panel; 29 — illuminator; 30 — mounting block: 31 — heater electric motor switch; 32 — heater electric motor; 33 — additional resistance of the heater electric motor; 34 — glove box lighting; 35 — glove box lighting switch; 36 — control unit of the APS-6 automobile anti-theft system; 37 — driver airbag module; 38 — passenger airbag module; 39.40 — blocks of the instrument panel wiring harness to the blocks of the ignition system wiring harness.
KZ - additional starter relay; K4 - additional relay; K5 - relay-interrupter for direction indicators and hazard warning lights; K6 - windshield wiper relay; K7 - headlight high beam relay; K8 - sound signal relay; K9 - relay for turning on fog lights; K10 — relay for turning on the heated rear window; K11 — electric seat heating relay; K12 - air conditioning compressor clutch activation relay;
Instrument panel wiring harness - 11186-3724030-20.
conclusions
Thus, it can be seen that the reasons for the malfunction of the window regulator are quite simple to eliminate. If you find the reason, you can easily repair the unit yourself. On the Lada Kalina there are only a few reasons why the window regulator fails.
guys, this is wrong, open the keys on the door and look at the fit of the plates when the button is turned on
I had such a situation, I contacted repairmen. But after reading the article, it seems to me that I would have solved the problem myself. Thank you.
All descriptions are stupid. We need to be simpler. Usually stops working in the closed position. A common cause is clogged glass seals. You need to turn on the ignition and interior lighting. We press the window lowering button, at this moment the interior lamp should dim slightly. If yes, the electrical is fine, look for the cause in the mechanics. If it doesn't go dark, the reason is electrical, start by checking the fuse and beyond. According to mechanics, insert some card from the outside of the glass into the seal and move it in a circle, pouring water. If it doesn’t work after that, open the door, one presses the lowering button, and the other hits the glass with two palms on both sides of the glass simultaneously downwards, if after several attempts did not work - disassemble the door trim, loosen the electrical fastening bolts. engine window regulator and press the button. If it works, run it several times and tighten the bolts back. If not, replace or repair the window regulator.
That’s exactly how I cured it by disassembling and lubricating the mechanisms!
How many movements had to be made until they got to the bottom of the reason - the motor died.
Yesterday there was a similar situation. The SP on the passenger side stopped responding to buttons, and both from the driver's and passenger's consoles, it froze in the closed position. I got wildly upset and started scouring the Internet to know how to fix this problem. Prepared to disassemble the doors. In the morning I pulled out the K-2 relay from the fuse block, wiped the contacts, put them in place and..... Oh! Miracle SP came to life from both remote controls. I didn’t knock on the door, I say right away. Maybe it will be useful to someone. Viburnum Hech. 2014.
A similar “miracle”, I cleaned the contacts of K-2 with a blade. Thanks for the advice, it helped.
Inside the beet lifter control unit on the driver's side, the jumpers on the passenger window control button were broken. The jumpers were dismantled. The power window control button on the passenger side stopped working. The glass doesn't go down or up. What could it be?
Replacing gears yourself
If the window regulator lowers without problems, but rises with mechanical assistance, then you will need to look at the gears. Repairs are carried out using a set of screwdrivers. The door trim is removed. You will first need to remove the switch block. Then unscrew the 3 nuts that secure the gear motor.
The next step is to unscrew the 4 nuts securing the right side of the mechanism and the 2 bolts securing the glass. The wiring harness block is disconnected. If the right side of the window regulator is turned away, then the corresponding pillar is tilted to the left. The gear motor is dismantled. The screws of the gearbox cover are unscrewed and the cover is dismantled. Using a screwdriver, remove the gear. The housing is cleaned of dirt and previous grease. The bearing, worm and gear will need to be lubricated. The new assembled structure is installed in place. In this case, you need to install 2 gaskets between the gear and the window regulator housing.
The window regulator does not work on Kalina
The number of electric windows installed on the VAZ-2118 Kalina passenger car can be two (only on the front doors) or four (on all doors). It all depends on what configuration of the car its owner purchased.
This is interesting: Weak spark on candles
One of the most common malfunctions of electric windows on this make of car is the freezing of the commutator brushes of the electric motors that drive the side windows of the car. The whole point is that when the electric motor is running, the graphite brushes of the commutator heat up, and since they are not inserted into a metal socket, but into a plastic one, which begins to melt when heated, which leads to the brush sticking to this socket.
As a result, the brushes lose mobility and, having worn out a little, begin to not reach the commutator plates, and the force of the spring is not enough to tear the stuck brush away from the socket and press it to the commutator. In order to restore the operation of the electric window motor, sometimes it is enough to knock on the door trim 3-4 times, but if this technique no longer helps, then you will have to remove the door trim and disassemble the electric motor.
The second problem with the electric windows of the Kalina passenger car is that the contacts of the driver's control panel for all window lifts bear a fairly large load, since there is no unloading relay in the electrical circuit of this device. As a result, the driver's control panel sometimes cannot withstand such loads and fails.
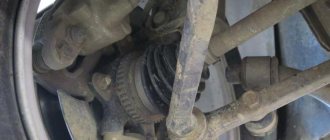
The driver of a Kalina car must be especially careful when using electric windows in the cold season , when wet glass freezes to the marigolds at subzero temperatures and, when trying to open it, can cut off the teeth of the plastic gear of the gearbox. In this case, you will have to change the gear motor assembly.
If the power windows of all doors do not work simultaneously, then first of all you will have to check the integrity of the 30 amp fuse F2, located under the hood of the car in the mounting block. If it fails, you will have to look for the location of the short circuit, which led to an increase in current in the circuit. When checking the integrity of the wire insulation, special attention will need to be paid to the places where the wires pass from the car body to the doors.
The electrical circuit of the power windows also includes a control controller; if it fails, you need to know that Kalinas are equipped with two different types of controllers that are not interchangeable.
Troubleshooting methods
As for troubleshooting, to find the cause of the malfunction, in any case you will have to remove the unit. The dismantling procedure may vary depending on the specific car and its design features.
So, how to remove and repair the module:
First you need to diagnose the state of the control buttons. To do this, press the button - if the device is working, then when you press it you should hear a characteristic click, it can be very weak, so listen carefully. If there is no click, then you need to check the position of the spring under the button. Unscrew the bolts or screws that secure the device to the door or center console of the car. Loosen the board itself and remove it from its mounting location. In practice, most mechanisms, especially if they were produced in China, are equipped with very weak switches that cannot withstand operation under constant loads. This means that during dismantling and disassembly you will be able to see traces of burning. If there really are traces, then to solve the problem you will need to install a relay on each control button, the current parameter of which should be 10 amperes. Please note that the relays themselves must have open contacts. As practice shows, most often the cause of the malfunction is poor contact with the wiring. If, as a result of removal, you notice that the contacts are damaged, then their functionality can only be restored by re-soldering. In some cases, it is difficult to detect damage to the contacts at first glance, so inspect them carefully, and you may even have to use a magnifying glass. Soldering of contacts is carried out using a soldering iron, an alloy of tin and rosin. If the soldering was completed successfully, then after that they will need to be treated with alcohol, and the circuit itself must be thoroughly dried. You should also visually check the condition of the connector. To ensure proper and uninterrupted operation of the mechanism, this connector must be free of traces of dirt and debris, as well as moisture, and oxidation is also not allowed. If all this is present, then it is better to replace the connector immediately, since cleaning in most cases does not give results. Or rather, it is quite possible to achieve efficiency, but usually not for long. To replace the connector, disconnect the car battery, and then disconnect all connected contacts. Remove the old connector and install a new one in its place, then reconnect all contacts
In order to ensure better communication, the contacts of the plate on the connector should be slightly bent, but do this carefully so as not to damage them. Sometimes the operation of the control module can only be restored by bending the contacts, but this happens extremely rarely. If you have completed all the steps described above, but the system cannot be restored and the power windows still do not work, then most likely it is time to change the microcircuit itself
Board failure is rare, but if this happens, then we can assume that the entire unit must be replaced. The purchase of a new device is made taking into account the car model, as well as the design of the failed module.