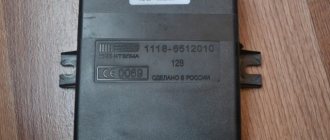
There is such a cunning electronics unit in the Berry-Kalinaya car, it’s called “Norma”. "How are you?" "Norm!"
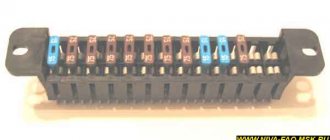
According to the plan of smart people, it should make the already difficult life of car owners easier. Which is what he does successfully. Scientifically, this block module is called quite cleverly - “SDU electrical package “NORMA”, which in translation will be “remote control system”. It looks very brutal - a black slender body, contours that cut off all attempts to ask questions. It has 25 legs, just short of a centipede).
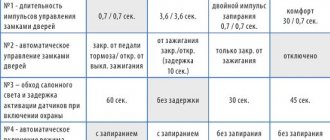
And his legs are not just any kind, but all filled with deep sacred meaning, which, despite all its sacredness, was nevertheless successfully documented and summarized in a single table:
And in light of what I wrote the day before, I actually really need this sign. Because it has a leg “13”, which will do the job of opening the trunk for me when an impulse is applied there with a potential close to “0”, ground, mass. And this impulse will push this diagram, which I hastily drew on a napkin while I was sitting in the dining room and eating cabbage soup, washing it down with compote during lunch:
In general, this is another small step towards a trunk opener...
Auto manufacturers today use many technological solutions to ensure more comfortable driving. One of such devices is CBKE. What is the central unit of body electronics Kalina 2 needed for, what functions does it perform and what malfunctions are typical for it - read in this article.
Description of CBKE
Unlike the first Kalin models, the second versions and Luxury equipment use an electrical package control unit instead of traditional relays to control the electronics. This device combines many functions, we suggest you familiarize yourself with them in more detail.
Functions
The electrical package control unit is designed to perform the following functions:
Typical faults
If the electrical package control unit fails for some reason, this can lead to the following problems:
Seats: too dirty upholstery and everything that follows from this
In the configurations of Luxury cars, starting from the 1st generation of cars, fabric was used for seat upholstery, which was too classy. VAZ was supposed to solve this problem in the spring of 2014. The new fabric, oddly enough, ended up not being much better than the old one. Advice from experienced people: you need to put covers on the seats.
Structure of the new upholstery fabric designed for luxury trim levels
By the way, leather cases conduct heat very poorly. In trim levels where heated seats are provided, there is no point in using such a solution - heating will proceed very slowly. The owner should be aware of this so as not to waste a significant amount on an expensive and useless addition.
The fabric of the covers allows dust to pass through in any case. You will have to clean the standard upholstery sooner or later, but with the use of covers, the interval between cleanings will be longer.
Let's ask ourselves how much of a brand the fabric of the standard upholstery actually is. If we talk about difficult operating conditions, then, according to reviews, you have to clean the seats once every six months. Make a choice.
Video “Independent repair of the control module”
- Malfunctions of the electric power steering on Kalina and their elimination
- Why does the fan switch sensor not work on Kalina and Priora and what to do about it?
- Changing the heater on Kalina is easy and simple: sleight of hand and nothing more
After restyling, instead of fuses and numerous relays, the Lada Kalina is equipped with a central body electronics control unit (CBEC). The device is available in “Lux” and “Norma” trim levels.
What tricks have they done with TsBKE?
Some time ago, the list of defects would have included the failure of the CBKE, that is, the body electronics unit. The firmware intended for the specified Grants/Kalina-2 unit has now been updated. As a result, we managed to get rid of the malfunction completely - the equipment itself cannot fail. But not everyone likes how the new firmware works - some owners experienced an incomprehensible defect when the reaction of the lamps to the actions of the warrior became “strange”. However, we have published a video where a corresponding example is given further, and you can evaluate the quality of the work of the Central Bank of the Russian Federation “live”.
The same unified TsBKE units are installed in different configurations of the “new Prior”, “Grant”, “second Kalina”. Previously, dealers simply changed this unit (we were talking about breakdowns in isolated cases), now the problem has been fixed, but, it seems, not yet completely.
In the “first Kalina”, by the way, electrical devices were controlled by individual elements (relays, toggle switches), each of which could theoretically fail, which would require its search and replacement. The design of "Kalina-2" is more modern, something is being updated in it, and the use of some components has to be abandoned. This was the case with the South Korean EUR. Now Russian amplifiers continue to be used.
Features of electrical equipment of Lada Kalina-2
Video, example of CBKE operation after update
Purpose and characteristics of TsBKE
The central unit of body electronics Kalina 2 controls:
- alarm system;
- windshield wipers;
- heated windshield and rear windows;
- heated side mirrors;
- lighting system;
- direction indicators;
- central locking;
- trunk opening drive;
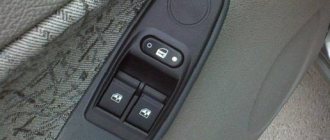
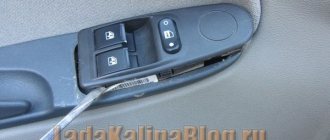
- electric windows;
- heated front seats;
- electric side mirrors.
When the alarm is turned on, an automatic check occurs, accompanied by a short flashing of the direction indicators. In security mode, the immobilizer light on the instrument cluster blinks. The security mode is disarmed by pressing the remote control button.
The central electronic unit automatically turns on the windshield wipers if:
- a signal was received from the rain sensor;
- sensitivity regulator in position from 1 to 4;
- The wiper switch is in the intermittent position.
If a malfunction is detected in the operation of the windshield wiper, TsBKE Kalina 2 switches it from automatic to manual control mode. When the windshield heating function is turned on, the body electronics monitor the on-board voltage and limit the heating duration to 6 minutes. When the voltage drops below 12 V, the CBKE switches off the heating mode.
When the voltage drops to 9.6 V, the central unit limits the operation of the rear window and side mirror heaters. This prevents the engine from going into emergency mode. When the voltage is restored to a level of 10.8 Volts, the heaters turn on automatically.
The driver is also assisted by body electronics when working with the lighting system. When the engine starts, the daytime running lights turn on, and when the engine stops, they turn off automatically. The low beam headlights and side lights turn on when a signal is received from the light and rain sensor. At the same time, the daytime running lights turn off. If during automatic diagnostics a malfunction is detected, the absence of a signal from the light sensor, then the TsBKE turns on the low beam and dimensions.
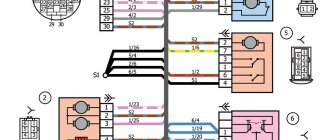
Wiring diagrams Kalina 2 hatchback (standard and norm)
| This section contains electrical equipment diagrams for the new Kalina (VAZ 2192) of the “Standard” and “Norma” trim levels. |
1 – right headlight; 2 – electric motor for washers; 3 – left headlight; 4 – starter; 5 – rechargeable battery; 6 – main fuse block; 7 – generator; 8 – sound signal; 9, 10, 11 – front wiring harness blocks to the instrument panel wiring harness blocks; 12 – air conditioning fan electric motor; 13 – electric fan of the engine cooling system; 14 – ABS hydraulic unit; 15 – right front speed sensor; 16 – left front speed sensor; 17 – front wiring harness block to rear wiring harness block; 18 – right fog lamp; 19 – left fog lamp; 20 – ambient temperature sensor; 21 – reverse lamp switch; 22 – air conditioning compressor; 23 – audible alarm signal; 24 – rear window washer electric motor.
Rear wiring diagram Kalina 2
1, 2 – rear wiring harness blocks to the instrument panel wiring harness blocks; 3 – right side direction indicator; 4 – left side direction indicator; 5 – hand brake sensor; 6 – rear wiring harness block to the tailgate wiring harness contacts; 7 – interior lighting unit; 8 – switch in the driver’s seat belt; 9 – trunk lighting; 10 – electric fuel pump module; 11 – right lamp; 12 – rear wiring harness block to the tailgate wiring harness contacts; 13 – left lamp; 14 – rear wiring harness block to rear left door wiring harness block; 15 – rear wiring harness block to rear right door wiring harness block; 16 – rear wiring harness block to the front right door wiring harness block; 17 – rear wiring harness block to the front left door wiring harness block; 18 – airbag control unit; 19 – rear wiring harness block to the front wiring harness block; 20 – block of the rear wiring harness to the block of the wiring harness of the parking system sensors; 21 – control unit and alarm unit of the safe parking system; 22 – parking system switch; 23 – speaker of the safe parking system; 24 – switch for interior lighting in the driver's door pillar; 25 – interior light switch in the right front door pillar; 26 – switch for the interior lighting in the pillar of the right rear door; 27 – interior light switch in the left rear door pillar; 28 – right seat electric heater switch; 29 – left seat electric heater switch; 30 – electric heater of the right seat; 31 – electric heater of the left seat; 32 – driver’s seat belt pretensioner; 33 – passenger seat belt pretensioner; 34 – central unit of body electronics; 35 – sensor for automatic glass cleaning system (rain sensor); 36 – rain sensor sensitivity regulator; 37 – rear wiring harness block to the instrument panel wiring harness block; 38 – right rear speed sensor; 39 – left rear speed sensor.
Possible breakdowns of body electronics and their elimination
CBKE allows you to free the driver from routine work and focus his attention on driving and managing the traffic situation. Despite this undeniable advantage, persistent failures of some nodes often occur. One of the most common malfunctions is the failure of turn signals and hazard warning lights. This most often manifests itself in the fact that the lamps simply burn continuously on the left side of the car. Before you begin repairing the TsBKE, you need to make sure that the lights are not burnt out, their contacts are not oxidized, the emergency stop button is working, and the wires are not charred.
The reason for the failure of the power windows may be a breakdown of the electronic control unit. There are other options: problems with the window regulator built into the driver's door, poor wire contact, incorrect installation of limiters.
You can repair the electronic unit yourself. To do this, you need to remove it from its regular place, open the cover and carefully inspect the circuit for the presence of soot or melted parts of the controllers. If you find obvious defects in the controllers, you should replace them and reinstall the software through a special connector on the electronic unit. In order to correctly replace burnt-out components, you need to have a “pinout” - information about connectors, wiring, input and output ports, various adapters and plugs.
Non-specific types of services
Even if the rules for safe operation of the vehicle are observed, the heater control unit may require servicing or replacement. This happens as a result of sudden switching of the heating knob of the Lada Kalina car. The operating instructions indicate that you must wait until the system warms up to a minimum, otherwise expensive repairs will be required.
From a financial point of view, the stove control unit will not be cheap, so its careful operation will save the family budget.
The heater control unit cannot be replaced independently due to the need to use special equipment. Much less often problems arise at the level of the engine control system.
The need to visit a service station will be caused by driving on a gravel road, an accident, or the result of unprofessional maintenance. The engine management system is responsible for fuel injection, so any deviations in its operation immediately put the car on hold. How long it will take to replace the engine control unit will be decided by the technician after an inspection.
It is cheaper, but repairs take much longer when the body electronics unit comes under attack. The problem can only be diagnosed in a service center. The duration is due to the fact that if the engine control unit can be replaced as a single whole, then part of the wiring must be changed along with the electronics.
Voltage surges or a simple short circuit can damage a certain sector. The light control unit will be the first to tell you about this.
Incorrectly working turn signals or emergency lights are the first sign indicating a failure in the electronic component of the car. There is no point in delaying a visit to the service center. Otherwise, the ESP unit responsible for dynamic stabilization will come under attack. Even with minor problems, the driver will notice a decrease in the lateral dynamics of the vehicle.
Lada Kalina requires regular maintenance as prescribed by the manufacturer. If the specified deadlines are met, each element of the system will work properly.
back Why the hood on Kalina does not open - do-it-yourself repair work
Next Brake pads Lada Kalina
Tags control unit, maintenance, electrical package
Replacement instructions
First you need to remove the instrument panel on the center console, then remove the lower part of the dashboard trim under the steering wheel. Now you need to unscrew the fuse box and turn it so that it takes a horizontal position. You need to stick your hand into the freed space until it comes into contact with the shelf on which the TsBKE is installed.
By unscrewing the fixing bolt, you can pull up the control unit and, after disconnecting the two electrical connectors, carefully pull it out. After dismantling the device, it is repaired or replaced with a new one. Installation of the device is carried out strictly in reverse order.
The introduction of modern technologies in the field of control of electronic equipment of a car makes the driver’s work easier, frees him from unnecessary loads and reduces the likelihood of road accidents. Along with the positive aspects of the implementation of CBKE, there are also a number of disadvantages associated with the unreliability of some nodes. Factory engineers are working hard on this problem. According to recent reviews from car enthusiasts, the number of malfunctions of the central unit of body electronics and the frequency of their occurrence are decreasing.
Thank you! I'll keep it on mind. While I'm shopping for parts, I'll try to implement the circuit that I posted two posts above. True, I didn’t find such transistors in our village, I’ll try to make them on kp505a.
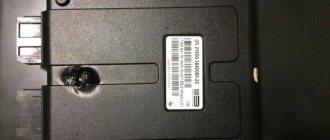
By the way, today I finally tore out this crap in about an hour. I took it apart, everything inside is perfect, no traces of anything burned.
| Sed user menu |
| View profile |
| Find more posts by Sed |
According to that scheme, I never did it. In short, I wanted to solder myself, but I realized that my eyes were not the same, my hands were not the same, so I was afraid to spoil it, so I took it to an electronics engineer, he dissuaded me from doing this, he said that when they did this, for some reason the percentage burned out after a while. In short, they soldered in a new key. Everything works, let's see what comes of it, it will probably burn out again. When I put it in its place, I realized Zen, I tightened the screw securing it in one second with an electric screwdriver with a flexible extension, having first pulled off the wiring harness with a piece of wire. I cut my hair and signed up for yoga.
| Sed user menu |
| View profile |
| Find more posts by Sed |
| Dimko user menu on Kalinko |
| View profile |
| Find more posts from Dimko on Kalinko |
| BigKot user menu |
| View profile |
| Find more posts by BigKot |
| Read the diary |
| Dimko user menu on Kalinko |
| View profile |
| Find more posts from Dimko on Kalinko |
| User menu Andrey710 |
| View profile |
| Find more posts by Andrey710 |
| Read the diary |
| View downloads |
| Dimko user menu on Kalinko |
| View profile |
| Find more posts from Dimko on Kalinko |
Admins, pin this topic to the header!
__________________ It’s better to be a good person who swears than a quiet, well-mannered creature © Faina Ranevskaya ********************************* ***************** **************** I don’t argue with fools and people may not understand the difference ©
| Angtar user menu |
| View profile |
| Find more posts by angtar |
| Read the diary |
Good day, I have a 2015 Kalina Cross, 1.6 8 cl. The left DRL lamp burned out, I bought a new one at the store and installed it, after that I lost my low and high beams, heated mirrors and rear window, turn signals and emergency lights, the power windows stopped working, and the DRLs also stopped working. I think that the problem is CBKE, but I haven’t seen similar symptoms anywhere on the Internet. For many people, their turn signals freeze and that’s it, but for me everything stopped working. Who knows, tell me, maybe someone has encountered this.
Added after 21 minutes Good time everyone, I have the following problem: the left DRL lamp burned out, I drove like this for a week and decided to replace the lamp with a whole one. As soon as I installed the lamp (a copy of the burnt-out one, standard), the high and low beams, DRLs, turn signals and emergency lights disappeared, the window regulators, wipers, heated mirrors and rear window did not work. in general, almost all electronics were gone. Can anyone advise what I should do? I have a Kalina Cross 2015. V. 1.6 8 valve
Hello all comrades! The weather in Tatarstan is very cool! Warm, no wind, in general paradise - after all, it’s only the end of October! I’m in the last season (Winter), I changed my shoes only in December, since there was no normal cold weather throughout November! “It was a lyrical digression” So, let's get to the topic! Today I visited our Kazan dealer, KAN-AVTOVAZ, to reprogram the TsBKE.
I came, they asked the mileage, I told them 4000 km... it mmmm means you are not under warranty, it means we won’t do anything more than the instructions, they said wait 5 minutes, now the acceptance technician will come, (his name is ROMA), I stop by, it means the car has been washed (! free!)… (thanks to them for this)
...and got to work, done in 5 minutes.
After the car got 4WD, +50 Mustangs in the engine decreased! XD “just kidding”... The beginning of the sound of the turn signals has changed (ttk-tk-tk) it sounds at the beginning, but it doesn’t bother me, I’m almost used to it! There were no other questions for them! Well done! On the way home, something happened to the car... (next entry)
Cars for sale
Lada Kalina, 2014
Lada Kalina, 2013
Lada Kalina, 2014
Lada Kalina, 2013
Comments 22
Can it be reprogrammed remotely? Is there no need to remove it?
Remotely. They put it in the OBD connector
Hello. What does the firmware provide and is there any point in doing it?
It's up to you! what gives? saves you and your car from a pulp and paper fire! since it is loaded with standard firmware! If you don’t go, then consider it *** and prepare 10-20 thousand for repairs! I didn’t want to go from the beginning either! I thought about it for a month, but then I went anyway! and in the LK2 group everyone wrote several times: something happened, the pulp and paper plant burned out, the wiring needs to be replaced. and there was an answer to that! he didn't go to programming!
I definitely need to go, I scored and now I’m at 15,000
Wow, not sour. I was on the firmware, like everyone else after the firmware, the turn signals began to grunt differently. Aposlya successfully sold the car to a friend...
but they didn’t let me into the workshop with the “programmers”. stood in the doorway watching
why do they do that? Don't know!
The main thing is that I never left the car. and this one is so important. and to hell with it they did the main thing
According to the law, they cannot not be allowed into the workshop) Decree of the Government of the Russian Federation of April 11, 2001 N 290 RULES FOR THE PROVISION OF SERVICES (PERFORMANCE OF WORK) FOR MAINTENANCE AND REPAIR OF MOTOR VEHICLES Article 31. The consumer has the right at any time to check the progress and quality of the provision of services ( performance of work) without interfering with the activities of the contractor. The Contractor is obliged to ensure that the consumer can stay in the production premises, taking into account compliance with the technological operating mode, safety regulations, fire safety and industrial sanitation. For the future)
so I was nearby, I saw everything. It’s just that this workshop is inside the main workshop, I stood in the doorway, watched, and did not leave the car during maintenance. And why quarrel over 5 minutes? It will only ruin your nerves and time?
I don't know, I wouldn't like standing in the doorway. Here you can easily walk around the “stations”, the diagnostician even measured the density of the electrolyte in the battery, although it’s not his responsibility) And there’s no need to swear - an extract from the standard - everything is clear, thank you, I’m off)
During maintenance they reflashed it. The maintenance itself did not leave the car, and this is all obvious, especially since it is necessary to warm up, otherwise I am already tired of standing, and 2 meters does not matter to me, anyway, indoors, not outdoors.
Auto manufacturers today use many technological solutions to ensure more comfortable driving. One of such devices is CBKE. What is the central unit of body electronics Kalina 2 needed for, what functions does it perform and what malfunctions are typical for it - read in this article.
Description of CBKE
Unlike the first Kalin models, the second versions and Luxury equipment use an electrical package control unit instead of traditional relays to control the electronics. This device combines many functions, we suggest you familiarize yourself with them in more detail.
Connection diagram of elements and outputs of the CBEK
Functions
The electrical package control unit is designed to perform the following functions:
- Alarm. If the car's anti-theft system detects a break-in attempt, thanks to the CBKE, it will transmit information about this to the car owner's control panel.
- Windshield wiper system control. Moreover, we are talking about both manual and automatic control (if the car is equipped with an electrical package control unit marked 21900-3840080-20).
- The device performs the function of controlling the windshield and rear window heating systems. This unit also controls the heating elements of the side rear-view mirrors.
- The electrical control unit also monitors the performance of the optics, both in manual and automatic control modes. In particular, we are talking about low-beam headlamps, side lights, and DRLs.
- Separately, we should highlight the function of ensuring the functionality of the high-range lighting.
- Turning lights, as well as light signaling.
- Vehicle interior lighting.
- The device monitors the performance and energy saving of devices belonging to the category of internal lighting of the car.
- Monitoring the state of the central lock, as well as performing the functions of locking and unlocking the locks themselves from the key, from buttons installed in the car interior, as well as in the doors.
- Another option is to open the luggage compartment lid using a button installed in the cabin.
- An equally important function is the control of electric drives, in particular, we are talking about power windows, as well as side rear-view mirrors.
- Heating system for driver and passenger seats.
- Luggage compartment lighting unit (video author - Vladimir Kostyuchenkov).
Typical faults
If the electrical package control unit fails for some reason, this can lead to the following problems:
- Failure to operate power windows. Of course, before disassembling the control module, you should make sure that the window regulators do not work precisely because of it. It would be logical to first check the safety element, as well as the lift control unit, which is built into the driver's door. In practice, it often happens that the cause of power window failure is poor wiring contact on the unit itself.
- The optics stopped working - low beam, turn signals, etc. In this case, the safety elements, light sources and steering switch are first checked. There is a possibility that the reason lies in a broken contact directly on the switch; if this is the case, then they should be re-soldered. If the reason is that the unit is not working, it will need to be dismantled and disassembled in order to find the burnt-out element and re-solder it. If soldering does not help solve the problem, the device will have to be replaced.
- Some of the equipment has stopped working, while the devices, as at first glance may seem, are in no way connected with each other. The fact is that the module itself includes many elements and controllers, each of them is responsible for performing certain functions. If two or more controllers fail at once, it can cause serious damage. For example, the optics, heated rear and front windows, the trunk door and the window regulator will immediately refuse to work. It is necessary to locate the failed controller and replace it by re-soldering.
- A fairly common problem that can occur is a break in the wiring of the unit. It is installed in a virtually inaccessible place, but if electrical work is being done, for example, installing an anti-theft system, then most likely the car owner will encounter a TsBKE. And if the wiring is damaged during the work, of course, this will affect the functioning of the device and, accordingly, the performance of certain functions.
- Oxidation of contacts on module connectors. If you encounter such a problem, we recommend paying attention to the humidity in the cabin. Often, oxidation at the outlets occurs precisely as a result of high humidity. The contacts can be cleaned, this is not a problem, but the problem of humidity must be addressed, since otherwise it can lead to failure of the microcircuit as a whole.
- Board failure. The most terrible problem for the car owner, because because of this the device simply will not be able to work normally. Accordingly, it will need to be replaced, and this, in turn, costs a lot of money (author - Alexander Fisher).
Where is the ecu on Kalina 2
Replacing the controller (ECU) and transferring it to Kalina
The controller is popularly simply called the brain, but in scientific short the ECU, that is, the Electronic Engine Control Unit, it performs all electronic functions in the car, starting from instrument readings (Thanks to it, you understand how many revolutions the engine gives at one time or another, and You also understand the speed, it’s only with the help of it that it is recognized, but also the sensor itself, which transmits this information to the controller) and ending with the very operation of the engine, and therefore if it fails, then all the instruments first of all stop giving readings to you and the car too it won’t start, but by changing it to a new one, the car will come back to life again and will drive as if nothing had happened, but it’s best to change it to exactly the same one as it was before, it’s just that all the controllers are configured for certain sensors and for certain engines , but still, if you want, you can put another sample, but you need to make sure that the connector for the wire block in it is exactly the same as on the old one and it is desirable that it has the same dimensions, in addition, you will either have to calibrate it online, or fill it a ready-made program (at your discretion and according to your financial capabilities), people also call calibration firmware so that you immediately understand what we are talking about.
Replacement features
Briefly about the procedure for replacing the control module on Kalina 2:
- First, the instruments are dismantled from the center console; there is nothing difficult about it.
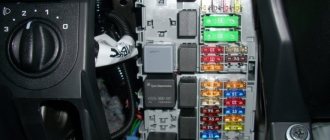
- Then the lower part of the center console trim is unscrewed, the trim is removed, and you gain access to the fuse and relay box.
- The mounting block with safety devices can be unscrewed, but it cannot be removed because it is connected by wires. You can rotate it a little so that it takes a horizontal position.
- You can stick your hand into the gap formed as a result of turning. Having done this, you will be able to feel the shelf on which the TsBKE is installed. A little to the left there is a bolt with which this module is fixed - you need to unscrew it.
- After this, through the top, through the instrument panel, you will need to disconnect the two connected connectors. After completing these steps, you can carefully dismantle the CBKE and remove it by slightly moving the fuse box. Please note that you should not pull the device too hard, since there are two more connectors on the other side that will need to be disconnected. When the wires are disconnected, the CBKE can be completely dismantled and repaired or replaced.
Photo gallery “Assistance in replacing CBKE”
Price issue
The cost of CBKE will vary depending on the modification. On average, such devices cost from 4,500 to 6,000 rubles.
Standard alarm remote control unit: dismantling and location
A couple of days ago, I received an email from a blog reader with a question about the remote control unit for the security alarm. I decided to write a short article to show where this module is located and how to remove it if replaced with a new one.
Where is the remote control unit for the security alarm on Kalina
This part is located under the rear seat, more precisely under the left half. In order to get to it, you must first raise the seat by pulling the cord:
And under the floor covering there is a part that interests us; in the photo below the approximate location is shown by an arrow:
Now below we will analyze in more detail the entire procedure, starting from removing the casing and ending with dismantling the module itself.
Removing and installing the standard alarm remote control unit on Kalina
Disconnect the negative terminal from your vehicle's battery.
To perform this repair, you will need a minimum of equipment and tools. The list of what you need is given below:
- crosshead screwdriver
- Head for 10
- Driver or ratchet
- Extension
So, first you need to unscrew the 4 bolts securing the plastic sill trim:
After this, freely remove this decorative trim:
Now you can start removing the floor covering, but there is no need to remove it completely. Simply lift it halfway to gain access to the alarm unit.
Now that you can remove it, you must first disconnect the plug with the wires. To do this, on the left side you need to press the plastic lock of the plug and pull it to the side:
In the end, this is the final result:
Now all that remains is to unscrew the two nuts securing the alarm unit itself through the holes, as shown in the photo below:
And the final step in this repair will be to remove the module from its seat:
If replacement is necessary, install this part in the reverse order of removal. This work is completed within 10 minutes and is not difficult.
Video “Independent repair of the control module”
How to properly dismantle the CBKE and how to subsequently repair it - detailed instructions describing all the nuances are presented in the video below (author - MultiAlexander9).
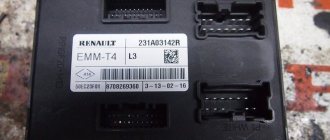
The electrical circuits of modern LADA cars are very different from previous AvtoVAZ models. Some of the relays have disappeared and instead they are replaced by an electrical package control unit (comfort unit), which is responsible for the operation of the ESP, central locking, turn relays, turn signals, etc.). Lada Vesta and XRAY use a similar TsBKE module (central body electronics unit).
Purpose and description
The central body electronics unit (CBEC) came from Renault and is located under the panel behind the glove box. The block is designed to perform the following functions:
- Access control system functions;
- Starter control;
- Control of relays of additional consumers;
- Control of the rear window heater and electric side mirror heaters;
- Windshield defroster control;
- Control of direction indicator and hazard warning lamps;
- Interior lighting control;
- Control of door sill lamps (for the “Lux” package);
- Trunk lighting control;
- Windshield wiper control (for “Classic” and “Comfort” trim levels);
- Energy saving control of vehicle interior lighting devices;
- Monitoring the state of the brake signal switch (BST);
- Monitoring the state of the clutch pedal position signal switch (CPPS) (for configurations with a manual transmission);
- Indication.
CBKE schemes
Electrical connection diagram for TsBKE on LADA VESTA: 2 – rechargeable battery; 3 – starter; 4 – rear left outer lamp; 5 – left headlight; 7 – rear window heating relay (K3); 8 – right headlight; 10 – rear outer right lamp; 13 – trunk light; 15 – fuse 60 A (F70); 16 – additional relay (K8); 17 – ignition switch; 26 – alarm switch; 30 – fuse 5 A (F20); 32 – left steering column switch (light alarm switch); 34 – fuse 60 A (F75); 35 – rear window heater; 44 – windshield heating relay 1 (K21); 46 – windshield heater; 47 – lampshade lighting of the glove box; 48 – switch for the glove compartment lamp; 51 – TsBKE (VSM controller); 58 – fuse 30 A (F61); 59 – left threshold lamp (installed on luxury equipment); 60 – right threshold lighting lamp (installed on the “luxury” configuration); 61 – relay of additional consumers (K2); 63 – fuse 10 A (F32); 84 – fuse 3 A (F43); 87 – left outside mirror; 88 – right outside mirror; 120 – additional starter relay (K23); 134 – brake signal switch; 138 – fuse 5 A (F15); 164 – air conditioner control panel (connection diagram for the “comfort” package); 185 – interior lighting unit with ERA-GLONASS interface module; 196 – fuse 5 A (F24); 200 – fuse 15 A (F11); 201 – fuse 15 A (F12); 202 – fuse 10 A (F13); 203 – fuse 10 A (F14); 204 – fuse 5 A (F17); 205 – fuse 5 A (F16); 229 – fuse 3 A (F49); 230 – clutch pedal position signal switch; 231 – windshield heating relay 2 (K22); 233 – fuse 5 A (F80)
- location of fuses F1-F59 and relays K1-K20 in the interior mounting block;
- location of fuses F60-F80 and relays K21-K28 in the motor mounting block
Electrical connection diagram of the TsBKE on LADA VESTA (Comfort package): 2 – rechargeable battery; 3 – starter; 9 – rear inner left lamp; 15 – fuse 60 A (F70); 16 – additional relay (K8); 17 – ignition switch; 20 – fuse 15 A (F1); 23 – rear inner right lamp; 28 – fuse 5 A (F74); 31 – reverse light switch; 33 – right steering column switch (windshield wiper switch); 51 – TsBKE (VSM controller); 63 – fuse 10 A (F32); 79 – electric motor for windshield wiper; 80 – washer motor; 120 – additional starter relay (K23); 198 – fuse 25 A (F40);
- location of fuses F1-F59 and relays K1-K20 in the interior mounting block;
- location of fuses F60-F80 and relays K21-K28 in the motor mounting block
After replacing the TsBKE, it is necessary to perform the training procedure (entering parameters) and automatic configuration of the TsBKE using the Grade-X diagnostic device. You can also view error (fault) codes using this device. You can get acquainted with the functionality of the CBKE in more detail, as well as its diagnostics, using the TI (device, fault diagnosis of the CBKE).
On the one hand, this functional device allows you to more finely tune the operation of the electronics. On the other hand, the unit has a complex structure, which makes independent repairs more problematic. If the TsBKE fails, you will have to contact the dealer, because It is unlikely that the necessary equipment for programming or diagnostics will be at hand.
Attention! It is impossible to retrain a CBKE taken from another vehicle.
Which implementation do you like best? The presence of a simple circuit, where there are turn relays, ESP, etc., or the presence of a central electronics control unit? Find other materials on repair, maintenance, modifications and tuning of these cars in the contents (XRAY crossover, Lada Vesta sedan).
Megapolis-Auto provides warranty and post-warranty support for professional anti-theft and security systems and AlarmTrade.
The company was awarded the status of "Industry Leader 2014"
Lada Granta Liftback [Almaz] › Logbook › Connecting the heated windshield via TsBKE.
The peculiarity of turning on the windshield heating through the TsBKE: - the heating is turned on for 6 minutes, - the heating is turned on only if the engine is running - the heating is turned on only if the on-board network voltage is more than 12.8 V. I repeated the entire switching circuit according to the principle diagram on the Granta Lux. I also added activation via an additional alarm channel
— so that you can turn it on remotely from home in the morning before leaving.
Diagram for turning on the heating (everything is taken from the circuit diagram for Granta Lux). I added activation via an additional alarm channel.
Necessary elements: - non-latching button. — two relay holders in the mounting block. - two 4-pin relays rated at 30A. — two 7.85 mm Lyra contacts for a large fuse (ordered here). - MAXI fuse 50A. — two contacts for connector XP1 TsBKE.
And so, first of all, we find the CBKE and remove the XP1 connector from it. This connector has two empty spaces for contacts - a signal from the button for turning on the heated windshield and control of the relays.
The XP1 TsBKE connector (black) has circles highlighting empty spaces for contacts.
Whatever contacts I tried to plug in there were either large or went inside (I tried from a cooler, from industrial connectors that I found). As a result, we came from the AUX cable of an old computer CD drive (Thanks to our neighbor NFadrenaline for recognizing the contact and for providing this cable)
These are the contacts from the AUX cable of the CD drive.
I inserted them into the connectors, tried to short-circuit one contact to ground briefly, a signal appeared on the second - yes! works. We can move on. And then this is what was done: - the contacts were installed in the mounting block for the MAXI fuse - the relay holders were installed - everything was connected according to the diagram (see above). — ran two wires to the button (the power-on signal and the wire for the light bulb in the button). — I ran a wire with a cross-section of 6 sq. mm to the windshield wires and another wire to the battery.
Contacts Lyra 7.85 mm for MAXI fuses in the mounting block.
Here I highlighted what I added to the mounting block: — 50A MAXI fuse. — Two relay holders.
How glad I was when I found a special place and a special bolt for connecting the ground of the windshield heater behind the ceiling lamp. Where was it connected?
This is where the button for turning on the heated windshield is located.
Outside -1*C. 10 seconds after turning on the heating.
In the end - HURRAY! Everything works: the heating is turned on both from the button and from the alarm key fob.
PS: Thanks again to comrade BlackNkZ for the idea and advice. PSS: Link to the blog where I wrote about replacing the windshield.