Recently a minor problem happened to my Kalina, but it still needed to be solved. The problem was the following - one of the buttons for the window regulator, namely the driver's door, was broken. But it didn’t break completely, it just started dangling, and this bothered me. And since Kalina is being dismantled in the garage, I decided to remove this unit and install it for myself.
But it, too, was not entirely intact - the central locking button on it was broken. In general, I tore this button out of my block and stuck it in a new one. Now to the point. To pull out the entire power window assembly, you will need one or two flathead screwdrivers in a pinch. We pry this module off from each side and remove it from the door trim, as shown in the photo below:
And we pull it out to the end so that we can get to the wires.
After this, you need to free yourself from the plug that goes to the two buttons. To do this, press two latches on both edges and simultaneously pull the plug back, thereby removing it.
You also need to disconnect the second plug, usually it is white, there is a small latch that you need to press with a screwdriver and also pull out the block.
As a result, the block is completely freed.
Now we take a new block, known to be good, and install it in the reverse order.
We connect the plugs and press them into place until they stop so that the module is securely fixed with its latches.
As for the price, it varies from 500 to 800 rubles for a standard unit with two buttons for the front doors without mirror control. If you have a joystick for mirrors, then the price there will be completely different.
Val April 07, 2014
From one edge, preferably from the back, carefully pry it up in the middle with a flat-head screwdriver and pull it out a little upwards. The rest you will see how simple it is. Just don't try too hard.
Just not in the back, there is a special hard shelf, but in the front, there are spring-like latches. Use a flat-head screwdriver to pry, not even pry, but insert, between the panel and the block and try to move the screwdriver a little back, press these antennae, and at the same time pull the block up.
It’s from behind that it pulls out for me.
odessit April 07, 2014
From one edge, preferably from the back, carefully pry it up in the middle with a flat-head screwdriver and pull it out a little upwards. The rest you will see how simple it is. Just don't try too hard.
Just not in the back, there is a special hard shelf, but in the front, there are spring-like latches. Use a flat-head screwdriver to pry, not even pry, but insert, between the panel and the block and try to move the screwdriver a little back, press these antennae, and at the same time pull the block up.
It’s from behind that it pulls out for me.
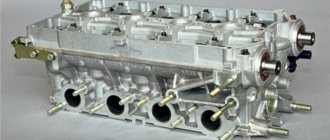
Here are the photos - the real one and the 3D model. The tapering part is the front, there are springs-tendrils, the wide part is the back, there is a rigid shelf, the door panel goes into it.
Please come in
or
Register
to see hidden text
Damn, the photo didn't upload, but you can see it from the model. With some effort, you can pull it out through the butt. But through in front is more correct.
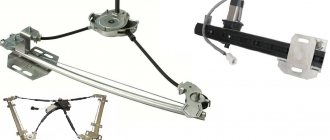
Types of lifts
- cable;
- rack and pinion;
- lever
Cable
The main advantage is high maintainability. Spare parts can be found in almost any store, and repairs can be done yourself. This advantage compensates for the disadvantages of the mechanism, namely wear of the cable, its pulling, low strength of the plastic guide heads and the susceptibility of the electric motor to overheating.
Rack and pinion
The principle of operation is that the rotational motion transmitted from the electric motor to the gears is converted into linear motion of the racks. Such window lifters are reliable, have a higher speed, and make less noise.
Flaws:
— the need to lubricate gears;
- the material from which they are made is plastic;
- plenty of free space inside the door.
Lever
The lever mechanism combines high reliability and small size. The electric motor in such a mechanism rotates a gear, which transmits rotation to one or two levers. The levers move the plate that holds the glass. The operating principle gives rise to the main disadvantage of such a device, which is the uneven speed of glass movement: the higher it is, the lower the speed.
The glass itself moves along guides. Within the doors, this role is played by gutters, and inside there are special rails.
Restoring the power window button
An electric window regulator (ESP) is a car device that allows you to raise and lower the door windows using a button. The ESP consists of a drive mechanism, a lifting mechanism and a control unit. Like any other systems subject to intensive use, electric windows have an increased service life - about 30 thousand opening/closing cycles.
This resource is sufficient for 10 or more years of uninterrupted operation, however, if handled carelessly and/or under the influence of other negative factors (for example, water ingress), the device may fail much earlier than the stated period.
Most often, problems arise in the mechanical part, that is, some part of the lift itself breaks. In this case, when you press the button, you will hear the sound of a running motor, but the glass will remain in place.
It is worth inspecting the lifting mechanism for damage to the guides along which the glass moves.
To fix this problem, you will have to replace the entire mechanism, since parts are rarely sold separately.
If the ESP electric drive itself at one point suddenly stops responding to the press of a button, you should not rush to a car service center. In this case, you can repair the power window yourself. You should start by finding the cause of the problem, and there may be several of them.
This is interesting: How to avoid falling asleep while driving: TOP 5 tips
Here are the most common:
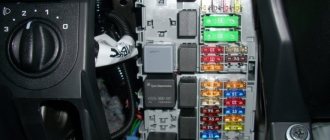
- The fuse has blown. If any electronic device in your car stops working, you should first look at the fuse box;
- The wires have broken or the contacts at the terminals have become loose. In this case, it is enough to restore the connection;
- The drive motor has failed. In this case, it will need to be replaced;
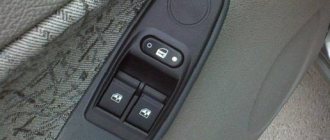
- The button itself is broken. If the driver's door power window button does not work or works intermittently , but the window rises properly from the main control unit, then the problem is in the button itself.
The most common problem with ESP buttons on cars of any brand is oxidation of the contacts.
Due to constant temperature changes, a layer of oxide forms on the copper plates, which is why the button first starts working once. To fix the problem, you need to disassemble the control unit and clean the contacts from traces of dirt or oxidation.
It should be understood that any cleaning gives a short-term effect; over time, the problem will certainly recur. For greater reliability, it is recommended to replace the button.
Similar products
Interaction between the signaling system and the central locking control unit
Do you like the store? Rate it on the Market!
Familyevich Evgen
Very good store, I recommend it!
Aminev Maxim
The best window lift store in Russia! :)
Latysheva Julia
Fast? placing and sending an order, complete and accurate information about the order.
Osipov Alexey
They called back right away and clarified the order. The order arrived ahead of schedule.
Safarov Oleg
Well done. You work quickly. And most importantly, the prices are reasonable. Keep it up!!
Nikolay Sotnichenko
Advantages:
Good order processing speed. Pleasant communication from employees. Flaws:
No.
Ruslan Lukoyanov
I am very pleased with the work of the store, everything is without deception and fast delivery. Keep it up!
Dorofeev Timofey
I definitely recommend the store. Very quickly and clearly. Other online stores could do it.
Vitaly Sukhovlovsky
Advantages:
Malenkin Roman
Ordered on Sunday, they called back within 10 seconds. Sent on Monday. Lightning-fast comrades! Well done!
Fedotov Nikolay
Advantages:
great store Disadvantages:
no
Comment:
fast, cheaper than in other stores, high quality.
Korolev Alexander
Very responsive sellers, after placing the order they immediately called back and discussed the order and sent it out the next day.
Sulin Vladimir
Excellent store, received the order clearly, shipped quickly, received it earlier than expected. The product corresponds to the order. Well done!
Bogumilov Valery
Advantages:
Everything is super, fast and high quality. Flaws:
No
Comment:
Thank you, well done, everything is high quality and fast.
Bobrovsky Igor
Advantages:
convenient, fast, no problems Disadvantages:
no
Comment:
They work quickly and ship quickly. Thank you!
Semyon Semyokhin
Advantages:
Quick response to orders, polite technical support, prompt assistance in questions that arise Disadvantages:
Not found
How to remove and connect the window lift button - using the example of LADA Kalina/Priora
Repairing the window lifter button on Kalina, Priora or Grant is not difficult. And no serious financial costs will be required, since the price of the “native” passenger door button is only 150 rubles. The cost of the control unit on the driver's door is about 600 rubles.
To remove the button on the passenger door or the control unit, you do not need to remove any decorative trim or door trim. There is no need to look for screws to unscrew them, since there are none.
- It is enough to carefully pick up the button or block with a flat screwdriver and simply pull it out of its seat. To avoid accidentally scratching the casing, it is recommended to wrap the screwdriver in a thin cloth.
- Then you need to disconnect the wire terminals to completely free the power window control module. Next, you need to tightly connect the terminals to the new button and return it to its place.
VIDEO INSTRUCTION
Design and types of window lifters
So, what is the SP device on Kalina:
- grooves designed to fix the glass itself;
- rails that allow it to move up and down;
- sealing elements, damper, and motion limiters;
- drive mechanism;
- a lifting device that ensures the transmission of vibrations of the movement of the drive element to the glass.
Connection diagram for SP on Kalina
Depending on the drive, SPs are divided into mechanical or “meat grinders”, in which the glass is lifted by turning the handle, and also electric. In the latter, the system is controlled using a button. This electrical circuit is based on a motor with a gearbox.
In addition, joint ventures are divided among themselves and according to the type of device used that sets the glass in motion. They can be rack and pinion, cable or lever. Each of these types has its own advantages and disadvantages.
How to fix stuck power window buttons on a Priora
If the power window buttons work every once in a while or get stuck , but at the moment it is not possible to purchase a new control unit, you can fix the problem as follows:
- We remove the control unit. To do this, you need to carefully snap off the 6 plastic clips on the body of the decorative cover;
- Let's disassemble the block. To do this, you also need to unclip 6 clips on the body of the unit itself;
- We take out the control board and clean it of any contaminants;
- We remove the buttons themselves by carefully bending the side fastenings with a screwdriver;
- We remove all dirt and debris from the paths using alcohol and cotton wool;
- Lubricate the working part of the button with silicone grease (this is not necessary, but this will make the button move smoother);
- We assemble everything in reverse order.
Replacing the power window button Renault Logan and Megan
VIDEO REVIEW
You can also replace the power window button block on Renault Logan and Megan cars yourself.
- All you need is a flathead screwdriver and a cloth or tissue.
- To remove the control unit, just carefully pick it up with a screwdriver and gradually pull it out of its seat. To avoid accidentally damaging the casing during dismantling, it is recommended to wrap the screwdriver in a thin cloth.
- Next, you need to disconnect the terminals with the wires, making sure that they do not fall inside the casing. Then you need to connect the new unit and install the buttons in place.
How to determine why the window regulator does not work
1. In the mounting block, check the power window fuse (F2, 25A) and relay (K2).
2. Remove the door trim and check the voltage at the power window motor terminals using a multimeter or a 12V test lamp.
If there is no voltage, then check the serviceability:
- power window buttons
- wiring (connector connection)
- electrical package control unit (central body electronics unit or CBKE), which is used in the “luxury” configuration.
If current flows to the electric motor, but the glass does not move, then we check:
- malfunction of the window lift motor (for example, the drive motor brushes are stuck/sticking, the plastic gear in the gearbox is worn out)
- The window lift cable is frayed
- glass is jammed (distorted)
The most common problems with power windows are:
- Window lift motor malfunction.
- Skewed, broken power window cable.
- Poor contact.
Let us remind you that on the website you can find solutions to other problems in the operation of the Lada Kalina 2, for example, squeaking clutch pedals.
Toyota Avensis › Logbook › Repair of the power window lock button
Hello to all users of such a beautiful car, tobish drivers of VENIKOV! I haven't been on DRIVE2 for long, but I've had the car for over a year. There haven’t been any big problems yet, but there are certainly some small things. After reading various useful things on the site, I decided to dig into something myself. This was the introduction. Now let's get to the problem. When you bought AVIC you didn’t notice everything right away. Once I tried to block the power windows, but they still worked. And my little prankster is growing up. I can't reach the button yet, but soon my hands will reach it. So I decided to climb in and see what can be done with the button and how it works. First, I went online to see how the door trim was removed. It turned out that there is no need to remove it; the control unit is removed separately.
Pull out the block and disconnect the connector
We remove the top panel and get the block itself. Next, to get to the button, we disassemble the block itself.
Here I started looking for the reason why the button does not lock. And I realized that I needed to take it apart further. The button is spring-loaded and held in place by two latches.
I had to tinker to get the button out without breaking the latch. Having received what I was looking for, I understood the principle of fixation. This is similar to fixing the refill of a disposable ballpoint pen for advertising purposes.
Here is the reason: the pin broke off. Apparently someone pressed the button very hard. Then I puzzled for a long time about what could be done. Is it really necessary to shell out a large amount of money on the assembled unit because of a small pin? Somehow it’s not ice. Well, I tried to restore the bar. I apologize that there are no photos of the broken bar, but here is the restored one.
Be sure to lubricate this strip and channels. I took a little bit of lubricant from each button with a needle. Well, I put everything back together in reverse order.
To be honest, I didn’t expect the button to work correctly. It's a collective farm after all. But after developing it, the fixation worked, not every time, but it’s better than buying a new block.
Installation
As you can already guess, installing the window regulator is carried out in exactly the reverse order of dismantling it; the only thing is that you first need to treat the guide of the device with lubricant.
The installation procedure for the front lifts is as follows:
- We fasten the new device with nuts (11 pieces);
- We connect the wires and the motor;
- We find the bolt securing the inner handle of the lock and tighten it, using a key, tighten the glass fasteners.
- We remove the now unnecessary tape and check the work.
You need to look at how the window opens and closes, whether there are any distortions, whether all the screws are tightened well. If a mistake was made, what to do, you will have to repeat the work again. If everything goes well, you can praise yourself for a job well done.
The rear window lifters are installed in the same way, in the reverse order.
- Through the niche at the bottom of the back door, we put the device in place of the old one.
- Using a 10mm wrench, tighten the bolts and nuts.
- Using a size 8 wrench, secure the mechanism with three nuts.
- We remove the tape.
Description of the power window control unit
What is the glass control module used for, what is its operation scheme, and in what cases is the system repaired? First, let's look at the purpose and operating principle of the device.
Purpose and device
The module itself is controlled using buttons located on the panel in the car interior, or by an anti-hug system if the ESP is supplemented with closers. If the latter are present, when the car owner sets the vehicle to security, the device automatically closes all windows completely. If the closers are multifunctional, then when the car is further opened, the windows will return to their original position. The module is equipped with buttons with which control is carried out.
If necessary, the car owner can block the control buttons on the panel, thus preventing the windows from opening and closing unnecessarily.
We invite you to familiarize yourself in detail with all the functions that the control unit performs:
- Controls the windows, as well as the sunroof, if available, if necessary or when the car alarm is activated.
- If we are talking about door closers, the driver will be able to configure the system in such a way that even when the alarm is turned on, the unit does not completely close the windows, which will ensure ventilation of the interior.
- The device will block the movement of the glass if necessary, for example, if the device encounters an obstacle while driving.
- If the unit has a movement blocking button, the driver can press it to block opening or closing. This is especially true if there are children in the vehicle.
- If the cable breaks during operation of the ESP, the module will automatically block the operation of the system and turn off the electric motor.
- In addition, the system will shut down if a short circuit occurs in the operation of the electrical circuit or motor.
This is interesting: How to get a car loan
Operating principle
As for the principle of operation, in general the system works according to a fairly simple principle. Voltage is created on ESP electric drives by pressing control buttons. Two wires are connected directly to the mechanism itself - blue and gray. When voltage is applied to the blue wire, the glass rises, and when voltage is applied to the gray wire, it lowers.
If the system uses closers, then first the impulse goes to them, and only then to the motor with the relay. Accordingly, if there is a closer, the system is supplemented with another module. All communication control mechanisms are installed under the trim of the driver's and passenger doors.
Possible malfunctions: signs and causes
All malfunctions associated with the operation of the system can be divided into mechanical and electrical.
You can determine the problem yourself:
- The device does not work, none of the glass reacts to pressing the buttons. There could be many reasons in this case. You should check the functionality of the fuse, the condition of the electrical connection circuit, and the contacts. All failed elements must be replaced.
- The unit allows you to control all windows except one or more of them. In this case, the fault may lie both in the block and in the wiring. The reason may be damage to the wiring; the circuit should be checked.
- The unit works, but the windows began to rise and fall much more slowly. In case of such a problem, the cause should be sought in the incorrect operation of the electric motor, since the module itself most likely works correctly (the author of the video is Vitaly Sidorov).
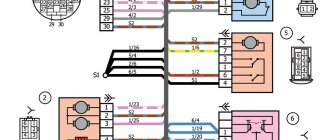
Connection diagram for ESP module for Kalina buttons and pinout
connection diagram for the Kalinamotor ESP module in the driver's door
- mass (only 1 can be combined inside)
- +12V for driver's window
- weight
- +12V for passenger window
- absent
- socket module ESP viburnum dimensions
- to the 3rd leg of the key in the passenger door
- to the 6th leg of the key in the passenger door
- Central lock key:
- socket of central locking module ESP Kalina closing
- weight
- absent
- dimensions
- backlight weight
- absent
- opening
The electrical package control unit (pictured below) Kalina Lux does not work. Or rather, it does not respond to my presses. It is illuminated, when I press the buttons, click, I hear a single short sound in the area of the speedometer/heater (you can hear it in the video below). This thing appeared in the morning, I walked away for an hour, everything worked. By evening everything stopped responding again and it’s been like this for the whole day. Neither the central locking, nor the mirrors, nor the power windows respond to my presses.. What's the matter? I disconnected the terminal for 15 minutes, it didn’t help, the alarm was starline.
Troubleshooting methods
As for troubleshooting, to find the cause of the malfunction, in any case you will have to remove the unit. The dismantling procedure may vary depending on the specific car and its design features.
So, how to remove and repair the module:
- First you need to diagnose the state of the control buttons. To do this, press the button - if the device is working, then when you press it you should hear a characteristic click, it can be very weak, so listen carefully. If there is no click, then you need to check the position of the spring under the button.
- Unscrew the bolts or screws that secure the device to the door or center console of the car. Loosen the board itself and remove it from its mounting location. In practice, most mechanisms, especially if they were produced in China, are equipped with very weak switches that cannot withstand operation under constant loads. This means that during dismantling and disassembly you will be able to see traces of burning. If there really are traces, then to solve the problem you will need to install a relay on each control button, the current parameter of which should be 10 amperes. Please note that the relays themselves must have open contacts.
- As practice shows, most often the cause of the malfunction is poor contact with the wiring. If, as a result of removal, you notice that the contacts are damaged, then their functionality can only be restored by re-soldering. In some cases, it is difficult to detect damage to the contacts at first glance, so inspect them carefully, and you may even have to use a magnifying glass. Soldering of contacts is carried out using a soldering iron, an alloy of tin and rosin. If the soldering was completed successfully, then after that they will need to be treated with alcohol, and the circuit itself must be thoroughly dried.
- You should also visually check the condition of the connector. To ensure proper and uninterrupted operation of the mechanism, this connector must be free of traces of dirt and debris, as well as moisture, and oxidation is also not allowed. If all this is present, then it is better to replace the connector immediately, since cleaning in most cases does not give results. Or rather, it is quite possible to achieve efficiency, but usually not for long. To replace the connector, disconnect the car battery, and then disconnect all connected contacts. Remove the old connector and install a new one in its place, then reconnect all contacts. In order to ensure better communication, the contacts of the plate on the connector should be slightly bent, but do this carefully so as not to damage them. Sometimes the operation of the control module can only be restored by bending the contacts, but this happens extremely rarely.
- If you have completed all the steps described above, but the system cannot be restored and the power windows still do not work, then most likely it is time to change the microcircuit itself. Board failure is rare, but if this happens, then we can assume that the entire unit must be replaced. The purchase of a new device is made taking into account the car model, as well as the design of the failed module.
Photo gallery “We carry out DIY repairs”
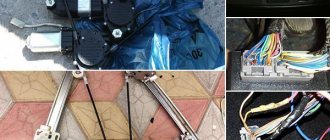
Design and types of window lifters
Kalina front window lift
Window regulators are a device designed to raise or lower car windows.
At the moment, there are a huge number of options for these devices, but the design, despite the differences in component parts for different models, is similar, it includes:
- grooves that hold the glass by the side edges
- so-called “rails” that ensure the movement of glass
- Seal and damper, glass movement limiters in the up and down direction.
A window regulator of any design consists of two main elements:
- drive unit
- a lifting mechanism that transmits vibrations of the drive movement to the glass, thereby ensuring its movement.
The drive is divided into two types:
- Mechanical, known to us from Soviet cars, where in order to lower or raise the window, you need to turn the window lifter handle.
- Electric, typical of modern cars, where to move the glass you just need to press the window button. The electric drive consists of a reversible electric motor with a worm-type gearbox.
In addition, window regulators differ depending on the mechanism of glass movement:
Each option has its pros and cons and technical features. All these device options have one thing in common: one day they fail; this problem especially often occurs in a model that is so popular today as the Lada Kalina.
There can be dozens of reasons why power windows malfunction, but the most common are the following:
- The commutator brushes of the electric motor, which is responsible for the glass movement process, freeze. This happens, as a rule, due to overheating of fragile graphite brushes, unstable to sudden temperature fluctuations, and this factor starts a chain reaction: overheating of the brushes begins to melt the nest, which is made of plastic in all Kalinas, and not of the best quality. For this reason, the brushes lose mobility, and the device can only be brought into working condition using a hammer. At the initial stage of the breakdown, it is enough to give a good knock or two on the door trim, but after a couple of weeks, this method stops working, and then you will have to disassemble the window regulator to repair it.
- Another cause of failure, typical of the Lada Kalina, as well as many other VAZ models, is the ill-conceived electrical circuit. The contacts cannot withstand the load placed on them, there is no unloading relay, which is why all the window regulators fail at once, and then it is necessary to repair not only the window regulators themselves, but also the remote control.
Window lifters Kalina
Solving the problem when in a VAZ Kalina
The central locking and power windows do not work. At the same time, it may not...
When it is impossible or too problematic to repair the device, it is more advisable to replace it with a new one. The following options are suitable for the Lada Kalina:
- electric window lifter Garnet VAZ – 530 rub.
- electric window regulator Ningbo – RUB 1,699
- electric window lift AUTO-GEO – RUB 3,300.
Of course, the price is directly related to quality, but if the budget is limited, then the domestic option is not bad.
Now let's talk about how to install window regulators yourself.