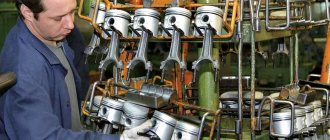
I don’t even remember at what mileage this knocking sound appeared in the box; it was especially audible when the car was tilted transversely to the right. Everything pointed to a known disease associated with a loose fit of the rear bearings of both shafts. I decided to carry out the repair by removing the box, since I also wanted to resolve the issue of the dry splined primary shaft, and at the same time look at the condition of the clutch and release bearing.
JANUARY 22, 2022. I ran about a thousand km, the knocking returned, not so loud, but still the same. Bottom line: all in vain, time and money!
Price tag: 746 ₽ Mileage: 103800 km
What affects service life
There is no clear answer regarding the frequency of replacing the input shaft bearing. Therefore, the procedure is carried out depending on the current condition. The wear rate of elements is influenced by several factors, including:
- The quality of the bearings used;
- Driving style;
- Conditions under which the vehicle is operated (weather, road quality);
- Frequency of visits to car repair shops or self-diagnosis of the car’s condition, etc.
Checking status
Let us say right away that it will not be possible to replace the bearing without removing the gearbox. Therefore, first of all, we get acquainted with the features of dismantling the gearbox, after which we proceed to further actions.
Make sure the bearing and its components are in good condition. To do this, check the following:
- There should be no cracks or defects on the shutdown plug;
- The bosses, which are used for mounting on the release bearing, should not show signs of severe wear;
- Check the spring bracket under the soldier. The casing contains a stand for fixing the fork. The spring bracket normally does not have any signs of defects or wear;
- The presence of signs of wear on a soldier is a bad sign.
The input shaft is a block consisting of drive gears. Some of them are made on the shaft, the other is pressed with great tension. That’s why we are talking about a non-separable design, where only the front and rear bearings are replaceable. If other components fail, the entire assembly must be replaced.
Differential.
The problem with these gearboxes is the destruction of the satellite or satellite axis, which almost always leads to a breakdown of the clutch housing, so check the satellite axis and the holes in the satellites. If there are significant gaps, it will clatter when releasing the gas and accelerating, and ultimately lead to destruction. Although recently there have been boxes in which the satellites are destroyed despite the absence of production visible to the eye. The satellite simply breaks and punches a hole in the gearbox. Alas, such quality.
In the differential box, you need to check the hole for the pinion axle; sometimes it is significantly worn:
You also need to inspect the inside of the differential box and the side gears; it happens that they are significantly worn out:
There may be scuffing and hardening of metal on the gears:
How to install a new element on the shaft?
A new part can be installed on the input shaft using press-fit technology. The bearing is generously lubricated with engine oil and then pressed in using a small hammer.
It is important that the tool is not only small, but also not heavy. Use a hammer to gently and evenly hit the inner ring of the part.
The shaft is pulled forward. After pressing, it is recommended to make sure that the part is working properly. A serviceable bearing rotates easily and quietly, without noise. After the replacement of the input shaft bearing (including the VAZ) has been completed, the gearbox is installed in its rightful place. All assembly work should be done in reverse order.
Disassembling the differential
Now you can start disassembling the differential. To do this, remove the locking ring:
We turn the box over, pull out the oil seal (hitting one edge of the oil seal will warp and then you can pry it up and pull it out), under it there is another retaining ring. It also needs to be dismantled; this ring is pressed by the differential spring washer. To make removal easier, you can clamp the differential gear and housing in a large vice. This will make it easier to remove.
Now the differential is held in place only by seating in the bearings. We put something under the box and knock out the differential, striking the shaft through a drift. In this case, you need to be very careful not to clog the slots. Or better yet, use a straightening hammer. Some people hammer this differential on a piece of wood until it knocks it out. The wide spring ring should be installed as shown in the picture; pay attention to this when assembling. It serves to ensure the required bearing tension. In general, there are two rings, the thin one is stuck to the gear:
We simply knock out the large bearing; in order to press out the small one, you need to remove the speedometer drive and the retaining ring:
We pull up the speedometer shaft with narrow pliers and then take out the gear:
Then we take out the retaining ring and knock out the bearing.
Replacement
Many people turn to a service station to replace this bearing. It is noteworthy that car services often refuse to perform such work. It’s understandable, because the procedure is painstaking, and you can’t get a lot of money for it.
Dismantling works
To do the job yourself, follow the instructions.
- You can often find advice about the need to completely disassemble the gearbox to replace the bearing. But this is optional. You can do without such complex manipulations.
- In any case, you will have to remove the box, so familiarize yourself with this procedure.
- Before removing the gearbox, remove the negative terminal from the car battery.
- All the chips are removed from the box, the wire from the speedometer is unscrewed.
- Next, the trousers of the vehicle exhaust system are dismantled.
- After this, you can completely remove the gearbox.
- At the next stage, the bell is dismantled. You can try to do without it, but then it will definitely constantly interfere with your work.
- Thoroughly clean the box from accumulated dirt.
- The bearing is secured using retaining rings. To remove them you will need a flathead screwdriver.
- The rings are pryed off and loosened a little, after which there will be no more problems with removal.
- To make it more convenient, arm yourself with tweezers that can be used to remove the ring.
- Using a flat-head screwdriver, pry the bearing by the ring groove, and at the same time move the input shaft slightly forward.
- Insert a pry bar between the gearbox and the bearing. It is unlikely that you will be able to do this without an assistant.
- You will operate the tools, while your friend will hold the pry bar.
- Your main task is to press out the bearing. To do this, precise, strong, but most accurate blows are applied to the input shaft.
- In the process of striking, the shaft must rotate.
- This work will take you about 20 minutes. But if you have a special puller at your disposal, you can speed up the work. Although it is really convenient to work with a puller only if you decide to disassemble the gearbox.
- Before installing a new input shaft bearing, be sure to lubricate the element with regular engine oil.
- Carefully press the component into place using gentle, light blows with a hammer. It is better to use a pipe of diameter or a stand.
- When pressing, apply blows to the inner race, in a circle, as evenly as possible.
- Once the bearing is pressed in, make sure it is seated properly. Scrolling should be calm, without obstacles.
- Reassemble the box in reverse order and install it on the car.
Location at checkpoint
Lubrication issue
Many people do this kind of work on their own, and quite efficiently. But their main mistake is that the bearing does not always need to be replaced. Sometimes just lubricant is enough.
- Check the bearing for dryness. There is no lubricant on it, as well as visible damage, then all extraneous sounds can be caused precisely by a lack of lubricant;
- Treat the element with high-quality lubricant. Plain motor oil is often used;
- Reinstall the old, greased bearing.
Lubrication can be accomplished in two ways.
- Digestion in lithol. It is recommended to use a water bath for this procedure.
- Injection. The method is safer. To perform it, you need to draw lithol into a syringe and pour it into the element. The process is long but effective.
When choosing a lubrication method, it is better to focus on safety rather than the speed of repairs.
The gearbox is a constantly working element of the car, which leads to the inevitable occurrence of malfunctions. Try to detect the failure of the input shaft bearing as early as possible and carry out repair or preventive measures aimed at preventing complications of the situation.
When to change and how to check the clutch - its service life may have come to an end
Good day, dear car enthusiasts! Each of us is always concerned about how long this or that part or car system will last. It `s naturally. Especially considering the quality of some products, the “skills” of workers, etc.
This issue fully concerns the car’s clutch. Very often on motorist forums there is a serious question about when to change the clutch, and how to know when the time has come to replace it. So let’s try to figure out together what the actual service life of the clutch is, and whether it exists at all.
Is there a certain clutch resource?
Whether or not you will be upset when you find out that the manufacturer does not indicate specific figures for clutch service life. If, for example, in the brake system, it is clearly stated that the thickness of the brake disc should be such and such, then why is this not applicable to the clutch?
The fact is that clutch wear depends on many reasons, and first of all, of course, on how the driver changes gears and in what mode the clutch is used.
And while clutch disc thickness cannot be measured the same way brake disc thickness can be measured with a caliper, there are ways to measure it. There are two of them.
- The first way to measure the thickness of the clutch disc is with a special measuring gauge. This method does not require dismantling the clutch; it is performed on a lift. But you are unlikely to use it.
- the second method is simpler to implement and allows you to determine the wear of the clutch disc in order to replace it. Replacing the driven disk is a procedure provided by the manufacturer, because The driven disk is a consumable part. The check is carried out as follows: with the engine running, you need to put it in high gear, accelerate it, and if the car does not stall, this means that the driven disk is worn out and requires replacement. It must be remembered that such a check of the thickness of the clutch disc is not technologically correct, but it is effective and allows you to determine the condition of the disc extremely accurately.
As already mentioned, the life of any clutch is determined by its operating conditions. Without going into technical details of the interaction of clutch parts, you should understand that basically the life of the clutch and the wear rate of the discs depend only on the driver.
A clutch of the same quality and manufacturer can last 5,000 km for one driver, and 100,000 for another. Participation in drag racing, frequent slipping, abrupt starting at high speeds, ingress of foreign liquids and objects, unqualified installation and adjustment clutch - all this reduces the life of the clutch.
Seller's comment
Special conditions: • Discount for purchases on credit up to RUB 15,000. • Discount for CASCO insurance up to 20,000 rubles. • Discount for trade-in up to 15,000 rubles. • Maximum discount of 50,000 rubles.
ID-1594/№44 The car is in excellent condition. Timely service. Careful operation. The salon is clean, well-groomed, and smoke-free. Pre-sale preparation and technical diagnostics have been carried out, no additional investments are required!
Call, or better yet, come right now! We are glad to see you! Become part of our large family of regular customers! UNIQUE OFFER FOR ALL CARS. When you return your car under the Trade-in program, an additional discount of up to 50 thousand rubles * According to our expert assessment, the mileage of this car is not confirmed.
The AUTO-FULL car dealership invites you to pick up your new used car!
Opening hours: Every day from 9-20.
Advantages of our car dealership: - Convenient free parking for our clients. — There are always more than 100 used cars on sale — Cozy customer area. Children's corner with photo studio. — Upon receipt of the warehouse, all cars undergo a thorough check and pre-sale preparation at 103 points. — Guarantee of legal purity for each car. — Applying for a loan within an hour using 2 documents. More than 10 partner banks. — Free test drive before purchase. — At your request, our manager will send you additional photos and videos in any convenient way. — Profitable exchange of your car using the TRADE-IN system. — Purchase of any cars, incl. pledged by any bank in the Russian Federation.
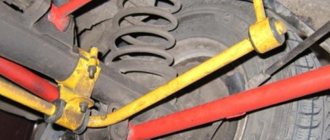
Unlike the front, it has undergone virtually no changes. Here, just like on the first Soviet G8s, a semi-independent beam is used. It is attached to the body on hinges (fortunately, there are no “crabs” in the design). A helical spring with constant stiffness is used as an elastic element. To dampen vibrations and prevent swinging, two shock absorbers are used.
Replacing the gearbox bearing
First, to carry out the replacement, the gearbox is removed. Next, you will need to completely or partially disassemble the box. To remove the box basket, you must first disconnect the negative wire of the car's electrical system and disconnect the speedometer sensor. In any case, you will have to disconnect the exhaust pipe (“pants”) of the exhaust gas system. Next, the wizard performs the operations described below.
The box is well cleaned of dirt, its body is checked for defects. The bearing on the shaft is secured with additional retaining rings. The master carefully pries out and unclenches the rings using a flat screwdriver. Among the list of special auto repair tools there is also tweezers for removing retaining rings. Next, you need to pry off the bearing with a screwdriver, while the shaft moves forward. A thin pry bar is inserted between the bearing and the box and the mechanic begins the operation of removing the gearbox input shaft bearing. The bearing is pressed in and needs to be knocked out - with precise, careful and, at the same time, strong blows. In this case, the shaft must rotate. This entire operation is performed by a master with the help of an assistant and can take quite a lot of time, usually up to 30 minutes. Also, the workshop can use a special puller for such cases.
Before replacing the old input shaft bearing, it must be carefully prepared. Preparation involves thorough lubrication. To press the bearing in, you can use a pipe of a suitable diameter or special tools. The worker drives the part into its proper place with precise, uniform and neat blows. After the technician makes sure that the bearing is seated properly (the shaft should rotate lightly and smoothly), the box is assembled in the reverse order and installed back on the car.
The bearing does not always need to be changed; sometimes you can simply lubricate it well. A gearbox is a vehicle component that operates constantly. That is, the smear on the bearing “burns” quite intensely. The reason for the “disappearance” of the lubricant, according to many car owners, is also the synthetic oil poured into the gearbox - it is this that “corrodes” and “washes” the lubricant out of the bearing.
There is no need to rush into purchasing this part (as with purchasing any parts). Its price is low, VAZ bearings cost about 300-500 rubles (you can find them cheaper in advertisements) and that is why purchasing can be difficult. Current traders and manufacturers prefer to sell cheap parts as “repair kits”. The most important thing is what was mentioned at the beginning of the article - the only sign of complete destruction of the bearing is jamming and knocking. If a “whistle” is heard, then most likely it will be enough for you to simply lubricate the part.
When the workshop knocks the bearing off the shaft, check it for grease. For lubrication, it is best to use regular good motor oil, for example, litol - a proven and reliable option. Lubricate the old (and new) bearing by syringing, carefully introducing oil into the working areas, or by dipping into lithol heated in a water bath. Lubrication using the first method takes longer, but the result is better.
Useful tips
If there is no oil on the bearing, but there is no damage to its surface, then you don’t have to replace it, but simply lubricate it and install it back. This is done if for some reason the required spare part is not on hand. Lubricate the gearbox input shaft bearing (including VAZ) in two ways. The first option involves boiling the part in lithol. It is best to carry out this operation in a water bath. But there is a safer option - lubrication using the injection method. To do this, lithol is drawn into a syringe and lubricant is filled into the bearing. But you need to take into account that such a process requires more time.
Issues of correct selection and replacement of gearbox bearings
As a rule, routine maintenance activities do not include operations to replace gearbox bearings - this is performed as necessary in the event of wear or destruction of parts. The need to carry out such repairs may be indicated by extraneous noises and even knocks from the gearbox, spontaneous switching on and off of gears, an incorrectly functioning or jammed clutch, and generally deteriorated transmission performance. In all these cases, it is necessary to carry out diagnostics, and if a malfunction is detected, replace the bearings.
Replacement bearings should only be of the types and sizes that were installed on the box by the manufacturer. It is best to select the required bearings using parts catalogs or specialized reference books, which indicate the catalog numbers and types of all bearings for this particular box, as well as acceptable analogues of parts. You can buy bearings separately, but in some cases - for example, to overhaul a box - it makes sense to purchase complete sets of parts for a specific model of the unit.
Replacing bearings in most cases requires dismantling and almost completely disassembling the gearbox (an exception is replacing the input shaft bearing in some gearboxes, for which the unit only needs to be removed from the vehicle, but does not need to be disassembled). This work is quite complex and requires the use of special tools (pullers), so it is better to trust it to specialists. If the box repair is carried out correctly and in accordance with the instructions, the unit will stop causing problems, increasing the controllability and comfort of the car.
Transmission oil Suprotek Atomium - a universal soldier in manual transmission
As discussed above, half of the problems with gearbox noise and hum are associated with low-quality transmission oil or insufficient filling. For vehicles with a manual transmission, it is recommended to use Suprotek Atomium transmission oil on a fully synthetic basis. This allows you to achieve stable operating properties throughout the entire service life. The peculiarity of this transmission oil is that it practically does not break down when heated, does not oxidize, does not burn at all and does not evaporate. In addition, the mineral impurities included in the composition absolutely do not enter into chemical reactions with wear products, fuel or other additives.
Changing the bearing of the manual transmission input shaft on a VAZ 2107 car
This bearing (PPV) is an important component of the box. If it malfunctions, the speed switch may become jammed (optionally, the release bearing fails completely).
Signs indicating a bearing failure.
In manual transmissions, bearing units act as support bearings. When they fail, the rotation of the shafts becomes difficult, multidirectional beats, extraneous noise and noticeable play occur.
External manifestations of a malfunction include:
- Strong bearing noise that increases when the clutch is disengaged;
- Difficulty switching gears;
- The gearbox spontaneously switches from one gear to another;
- When you press the clutch pedal, you can hear extraneous knocking noises.
Possible causes of PPV failure may be:
- Malfunctions of mating units. Such as clutch, axles, release bearing;
- Lack of lubrication or severe contamination of the internal cavity of the bearing;
- Aggressive driving style;
- Installation of a product of inadequate quality;
- Expiration of service life.
In order to clarify the occurrence of a malfunction associated specifically with the breakdown of the PPV, you can verify this by checking how easily it rotates and conducting a visual inspection (integrity of the races, separator, condition of the raceways).
If the product is externally in good condition, measure its clearances in different directions (axial, axial) to determine the actual play.
Removing the faulty PPV bearing
The work must be performed by driving the car onto a lift or onto a viewing hole. If it is impossible to fulfill this requirement, you should use strong supports (stops) and a jack. However, this is quite dangerous.
Before starting work, stops are installed, neutral gear is set, and the car is put on the handbrake.
The “-” terminal from the battery is disconnected.
After this, you can proceed directly to dismantling, according to the following work algorithm.
- Remove the cardan shaft from the coupling;
- The intake pipe of the manifold (another name, exhaust), which is held on a three-bolt connection, is dismantled.
- Unscrew the working cylinder from the gearbox.
- Disconnect the wires connecting the rear dimensions, then the ground cable.
- The speedometer cable is dismantled, after which the lower housing is removed from the clutch.
- The rocker lever used to change gears is dismantled. Why do you need to remove a special plastic sleeve with a screwdriver?
- The bolts securing the box are unscrewed.
- The back of the box rests on a traverse. To complete dismantling, you need to unscrew a couple of nuts from the studs.
Do not forget to first lay a block between the engine and its protection. Otherwise, after removing the box, it may sag.
We remove the starter and remove the box. Please note that on a VAZ classic, you can dismantle the bearing that we are going to change (PPV) without disassembling the box. However, you still have to remove the clutch bell. Having approached the bearing Open: 6-50706AU Closed: 6-180502K1US9, remove the retaining ring (with round pliers). The bearing assembly is removed. The small fixing (retaining) ring located in the groove of the cage, which secures the bearing to the shaft, is removed. The product to be removed is pressed from the neck.
Bearings Lada Granta
List of bearings used in the Lada Granta car that can be easily replaced
To view information on a specific bearing, simply click on the number.
| Knot | Bearing number | Quantity | Imported analogue |
| Differential box (right and left supports) | 7207 | 2 | 30207 |
| Front wheel bearing | 256707 | 2 | — |
| Gearbox shaft bearing (rear support) | 180305 | 2 | 6305 2RS |
| Gearbox secondary shaft bearing | 464706 | 5 | K32x37x27 |
| Clutch release | 520806 | 1 | — |
| Rear wheel bearing | 256706 (ball - higher rotation speed) 537906 (roller - higher load capacity) | 2 | — |
| Transmission input shaft (front support) | 42205 | NJ205 | |
| Transmission output shaft (front support) | 42305 | NJ305 |
It should be noted that in the vehicle documentation, bearing numbers are often indicated with a lot of additional (and often long-outdated) letter designations, which you can ignore. The same applies to accuracy class 6. Nowadays, quality standards are implemented in such a way that bearings with a declared class 6 from one manufacturer can be an order of magnitude worse than the zero class of another.
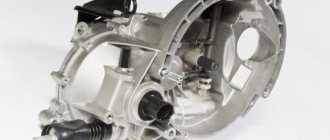
AVTOVAZ’s developments do not stand still, and in 2013 the company’s management, together with the design department, decided to switch to a new type of cable-driven gearbox. These gearboxes are installed on Lada Granta and Kalina 2 cars.
Appearance of the gearbox
Try our service station selection service
Creating an application is absolutely free and will take you no more than 5 minutes
In any gearbox, as in almost every mechanical device with rotating parts, there are up to 12 or more rolling bearings. Read all about gearbox bearings, their types, design and characteristics, as well as the correct selection and replacement of these parts.
Recommendations
Comments 20
I forgot to add that the rear bearings in the housing cannot just turn, they are clamped by a plate. There is no tight fit, only clamping with a plate, again, the factory tolerances are violated, everything must be measured during the assembly process, and the plate must be new, and tighten the screws with an impact screwdriver; do not tighten them to the required torque by hand.
Everything that is written here about the checkpoint is all at the level of speculation, and not knowledge of the technical part. Think theoretically, when the car is parked and the engine is at idle, then only the input shaft rotates in the gearbox, and only two bearings work with it. Roller front and ball rear. The ball knocks on very rare occasions, this is if he is really fucked up, mostly he howls. But the roller one makes a knock if it is of poor quality. It would take a long time to explain the nature of the knock; it has to do with the clutch disc and wear on the splines of the shaft and disc, and again the quality of the workmanship. Sometimes the gears on the secondary shaft jangle, they rotate, but the shaft stands still. At the factory they don't bother with quality. If all tolerances are met, the gearbox will work quietly, but for this you need to have several sets of gears and bearings, and select all this, which is impossible at home. The main couple howls as they walk, there’s nothing you can do about it. To reduce the howling, use additives, I poured VMP Auto.
Hi, what kind of thread locker is this? Do you have a number?
there are plates fixing the shafts, SKF bearings come from the factory to the 2181 gearbox
If the bearings start turning again on the outer race, everything will come back again. It's not even a matter of new bearings; the old ones turned out to be no worse than the new ones. The fit in the body of the box itself is simply loose. Therefore, the output was placed on a clamp.
Release bearing Lada Granta
Multithumb found errors on this page: There was a problem loading image https://mars.wb63.ru/upload/iblock/841/841ca9a759e5a47b28a3c3ae5fcc9f9b.jpeg There was a problem loading image https://mars.wb63.ru/upload/ iblock/841/841ca9a759e5a47b28a3c3ae5fcc9f9b.jpeg
Release bearing Gearbox 2181, Clutch release clutch Gearbox 2181 - replacement in Lada Granta
Well, I was struck by the death of the release bearing with a mileage of 23 thousand km, also known as the clutch release clutch of the gearbox 2181. Judging by people's reviews, this bearing does not last more than 30 thousand km. Everything was fine in the evening
The next day in the morning, while squeezing the clutch, I noticed that it was somehow not being pressed correctly, I thought, maybe it seemed, and after 20 - 30 km the clutch disappeared altogether
With the car running, I could not turn on the first and rear, 3,4,5 turned on with difficulty, and after a while they did not turn on. But with the car turned off, all transmissions were switched on. Having opened the hood, I pulled the clutch fork, it dangled as desired in different directions, i.e. was not fixed. Having reached the garage under my own power (25 km), I began to find out the reason. I disassembled and removed everything unnecessary that interfered with removing the box. We unscrewed and separated the box from the engine and supports, hung it by the CV joints (in this position it is problematic to install it later, it is better to read a repair book). The problem became immediately clear - the release bearing had died. Among other release bearings, I chose a roughly similar one - the Priorov one, but it still needed to be installed somehow, and for it to still work. In the 2181 gearbox there is a release fork similar to a fork from a cornfield, based on this I decided to also buy a release bearing spring from a cornfield (or from a VAZ 2101) that secures the bearing to the fork.
on the left - Grantovsky, on the right - Priorovsky bearing
modified Priorov bearing sits on the shaft
The spring is installed in the bearing groove and fixes the fork on the other side, i.e. the fork is clamped by a spring, if something is not clear, then read the manual for replacing the release bearing in the field.
Well, that’s all, actually. I put the box back, assembled everything, and connected it. Works great. Don’t forget to lubricate the shaft where the bearing sits and the splines with a lubricant like lithol, but not too much because if you overdo it, then when the shaft rotates, lubricant can splash onto the clutch disc, and it will slip. After these procedures, the clutch pedal became a little softer, and the gears shifted better. I drove more than 100 km, everything is fine, time will tell how long it will last. Well, everyone decides for themselves to change the original 2181 release bearing every 30tkm or less, or install another one with modifications. The release bearing should last for the entire service life of the clutch, i.e. operating time to failure is at least 800 thousand “off-on” cycles of the clutch, which is equivalent to a car mileage of 100,000 km, and a bearing that falls apart up to 30 thousand km.
Replacing the Lada Granta clutch release fork
The clutch release fork on a Lada Granta is replaced in case of mechanical damage (deformation, cracks on the surface). To carry out repair work, remove the gearbox from the car, prepare a standard set of tools and perform the following sequence of actions:
· Remove the clutch release bearing.
· Remove the protective rubber cover of the clutch fork; to do this, carefully pry it up with a flat-head screwdriver and remove it from behind the collar. If the casing is damaged, the rubber has dried out or lost elasticity, we replace it with a new one.
· From the inside of the clutch housing, using pliers, squeeze the petals of the clamp and from the outside, using a flat-head screwdriver, remove the plastic bushing of the clutch fork axle.
· Lifting the fork slightly, remove its axle from the bushing and remove it together with the lever.
· Remove the spring clip from the fork by squeezing its ends.
· If necessary, replace the worn metal axle bushing.
· Carry out the necessary repairs, after which we carry out the installation in the reverse order.
Symptoms of malfunctions
Signs of failure of this element are strongly related to the installation location. The gearbox input shaft bearing is installed on the input shaft, and behind it there is an oil seal. In various transmission models, the bearing itself can act as an oil seal. So, paired with a release valve, this part experiences almost the entire load from the car engine. To find the problem bearing, you need to dismantle the transmission. Symptoms of failure of this element are similar to how any other bearings become unusable. In case of serious breakdowns, characteristic sounds resembling a howl are heard from the gearbox. This sound can be heard when the clutch is released and the car is stationary. But the input shaft bearing can also whistle while driving. It is very rare to hear characteristic knocking sounds - they indicate complete destruction of the unit.
There are also problems with engaging or not disengaging the clutch. The reasons for this type of gearbox operation lie in this bearing. A malfunction often occurs if a part is jammed. In difficult situations, it may be necessary to replace the input shaft. Often, whistling and humming are heard when there is no lubricant in the bearing. This issue can be resolved by lubricating the part. But first you need to remove it from the gearbox. The transmission will make a howling noise if the bearings are chipped or cracked, or if one or two rollers are destroyed. If characteristic knocking noises are heard, this indicates complete failure of the part. The knock will be made in any gear. If you do not replace a worn or damaged part in time, then the element may become seriously “welded” to the shaft. As a result, you will have to change the input shaft bearing and the shaft itself.
Why does noise appear in the gearbox on a Lada Kalina - when you squeeze the clutch, the noise disappears
Car : Lada Kalina. Asks : Makar. The essence of the question : the problem is noise in the clutch, what should I do?
When starting the car when it is cold, a noise is noticeable. As it warms up the noise disappears. But if you immediately depress the clutch pedal, the noise disappears. What is this? I'm afraid that I might get in the way. They told me it was a release.
This is especially noticeable on a cold engine.
The problem is relevant not only for Kalin, but also for the tenth family, Prior, Grant.
Causes of noise in the gearbox
- The most important thing is the release bearing .
A damaged release bearing with traces of rust and no traces of lubricant.
The gearbox input shaft bearing can be replaced only after dismantling the gearbox itself.
To avoid unnecessary problems, you should get into the habit of checking the oil level in the gearbox a couple of times a year. When inspecting the dipstick, pay attention to its integrity. The trouble is that when you engage second gear, an incorrectly inserted dipstick (inserted crookedly) may rub.
A typical breakdown of the clutch fork at the point where the lever attaches to the shaft.
The release bearing is usually replaced along with the clutch disc and basket.
The resource depends on the initial quality of the part and the operating characteristics of the vehicle. If you have to drive frequently in traffic jams, the risk of bearing failure is high.
You can drive with a buzzing release for quite a long time, but eventually the bearing will still crumble or jam.
The hum appears because the bearing rotates when the engine is running . But no effort affects it. Therefore, even a slight play can cause extraneous sound. It is not possible to lubricate the bearing - it is a closed type and access to it is problematic. Only a complete replacement will help.
When the clutch is depressed, a load is applied to the bearing, therefore, the backlash decreases. For this reason, the sound may disappear.
- But this can be observed only in the early stages of the destruction of the part. Subsequently, a metallic crunch appears. Often the bearing falls apart into several parts.
All that's left of the release. By the way, these fragments can seriously damage the clutch basket.
Replacing the release bearing
To replace the release bearing, at a minimum, you will have to be patient and drive the car into the inspection hole.
To replace the release bearing, you will need to remove the gearbox.
The work is complicated - it is necessary to disconnect the rocker, dismantle the clutch drive, starter, and attachment to the body.
The drives are disconnected one by one, and the differential mechanism is fixed using any guide. After this, the gearbox fastenings to the engine block are unscrewed and the box is removed.
Other
A humming sound due to a broken bearing on the input shaft can only be eliminated after removing the box and replacing the element . Adjustment will be required. But in practice, extraneous sound rarely appears for this reason; more often it is the fault of the release valve . Also, a hum can be observed from the gearbox due to low oil level or quality. In this case, it must either be topped up or replaced .
Friction clutch device
The manufacturer installs the same clutch on the Lada Granta as on the Lada Kalina. The mechanism consists of a flywheel with a basket attached to it. The task of the latter is to continuously press the disk with linings made of friction material - this is how the torque from the engine is transmitted to the transmission. A cable-type clutch means that when the pedal is pressed, the cable connected to the clutch fork becomes taut, the paddles stop pressing the disc, and torque from the engine is not transmitted to the gearbox.
The clutch on the Grant has one disc; it is frictional with a central spring in the form of a diaphragm. It is located in a special aluminum crankcase and combined with the gearbox in one housing, attached directly to the cylinder block. For clarity, you can see a detailed drawing of the device.
Lada Granta clutch device
- Drive cable.
- Outer braid of the cable.
- The end of the cable braid is lower.
- Dust cover.
- Metal leash.
- Fork bracket.
- Bearing sleeve.
- Release bearing.
- Casing.
- Diaphragm spring.
- Disk (master).
- Flywheel.
- Friction material linings on the disc.
- Disk (slave).
- Damper spring.
- Rotation vibration damper.
- Disc hub (driven).
- Central spring.
- Cable end.
- Automatic cable tensioner housing.
- Sleeve.
- Fastening the cable braid.
- Pan (crankcase).
- Gearbox input shaft.
On the Lada Grant, the clutch does not require additional adjustment during its entire service life - this is what is written in the car’s operating manual.
Interesting Facts
Let's look at the interesting facts that we managed to learn about the new Lada Granta gearbox:
- The VAZ-2181 gearbox will not be installed on the Priora, since the designers considered that it would not be cost-effective to redo the entire design of the power units.
- The cost of Lada Grant and Kalina 2 increased by 5000-7000 rubles. with the introduction of a new gearbox into the car.
- According to reviews from car owners, the first copies of cable-driven gearboxes were not entirely successful and had quite a lot of flaws: vibration became audible after 70-80 thousand mileage, howling of the gearbox, increased wear of parts, etc. Based on this, the manufacturer made adjustments to the design and improved the characteristics, but many car owners had a negative impression of the VAZ-2181 cable-driven gearbox.
- The AVTOVAZ plant continues to develop and modernize a new gearbox, which will become the second generation of cable gearboxes. It is planned to install it on the 2nd generation Lada Granta, which is currently under development. The designers promise to take into account the experience gained during the development of the first generation and not allow such an oversight a second time.
Specifications
The body of the Grant is sedan, hatchback, liftback, curb weight = 1160 kg, maximum permitted weight = 1560 kg.
The LADA Granta in-line petrol engine has 8 valves with a volume of 1.6 liters, in the full configuration - Luxury - possibly 16 valves, model 11186 or 21116. The power system is distributed fuel injection. The “Norma” package has 8 valves with a lightweight ShPG (connecting rod and piston group), which gives higher power. And more torque, due to this 87 hp are achieved.
The engine complies with the EURO 4 environmental standard.
Engine control system with electric throttle and electronic gas pedal. The ignition system is electronic non-contact with microprocessor control. The fuel used for normal engine operation must be at least AI-95.
Vehicle transmission
It was decided to use a cable drive for the clutch. The transmission can be either manual with five steps or automatic. The car has front-wheel drive, a dual-circuit brake system with a hydraulic drive and a vacuum booster. The front wheel brakes are disc, the rear wheels are drum. Front suspension is MacPherson strut, i.e. independent. Rear suspension on 2 trailing arms. Which are connected by an elastic cross beam with coil springs and a hydraulic pipe shock absorber. The “luxury” equipment has an ABS system (anti-lock braking system).
The steering wheel rim is injury-proof with tilt adjustment. The steering rack has an electric booster.
The exhaust system has a catalytic converter.
| Options | Standard equipment | Standard equipment |
| Maximum speed, km/h | 164,5 | 167 |
| Acceleration time to 100 km/h, s | 12,5 | 11,8 |
Design and differences of a cable-driven gearbox
Unlike a conventional gearbox, the cable-driven gearbox has received some improvements and upgrades.
VAZ-2181 gearbox with cable drive
In order to understand how everything works, let’s compare a standard gearbox labeled VAZ-2180 and the new VAZ-2181:
- To reduce the vibration generated by the traction drive gearbox, cables from the manufacturer Atsumitec were installed.
- To reduce the effort for shifting 1st and 2nd gears, the manufacturer installed multi-cone synchronizers.
- The clutch size has increased to 215 mm.
- Due to changes in the transmission design, the starter had to be positioned along the engine rather than the gearbox.
- To facilitate gear shifting, it was necessary to reduce the bevel angle of the synchronizer teeth from 125 degrees to 100.
- To eliminate oil leaks, the designers moved the gear selection mechanism to the top. But this nuance gave impetus to the development of a new switching scheme and design changes.
- The volume of lubricant poured has decreased from 3.3 liters to 2.2 liters.
- A selector plate is installed, which allows you to change gears more clearly.
- The transition from mineral oil to semi-synthetic oil has been completed.
- To prevent accidental reverse gear, a special lock was developed.
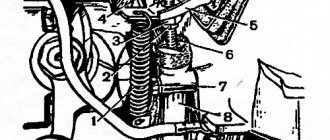
The main elements and components that go into the design of the new gearbox can be seen in the figures below:
Gearbox diagram and decoding of its main elements
- main drive drive gear;
- secondary shaft;
- input shaft;
- fifth gear shift fork;
- third and fourth gear shift fork;
- reverse light switch;
- clutch housing;
- gear shift mechanism;
- central lock.
VAZ-2181 box synchronizer device
1 – first gear gear; 2 – intermediate rings; 3 – blocking ring; 4 – synchronizer clutch; 5 – synchronizer clutch hub; 6 – clamp; 7 – second gear gear.
Gear selection mechanism
1 – gear selector levers; 2 – selector grid pin; 3 – selector grid; 4 – reverse locking mechanism; 5 – central three-dimensional plate.
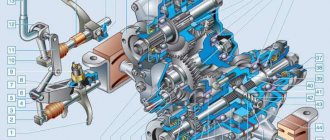
Full view of a cable-driven gearbox
Thus, the manufacturer decided to improve and modernize the gearbox, which was unreliable and had a lot of problems. Due to the new improved system, vibration in the body and gear knob has been reduced. The gears switched on, started more clearly, and the huge backlashes disappeared.
Replacing Grant cable gearbox bearings without removal — search on DRIVE2
Replacement of rear bearings of gearbox 2181 - Lada Granta.
Review from the owner of Lada Grant
- with your own hands.
I decided to carry out the repair by removing the box
, because I wanted...
I decided to carry out the repair by removing the box
, since I also wanted to solve the issue of a dry splined primary shaft, and at the same time look at the condition.
Replacing the Grant clutch. — Lada Granta, 1.6 l., 2013.
Granta
normal, engine 186, gearbox
2181, mileage 31t. with kopecks, 3 years like from the assembly line.
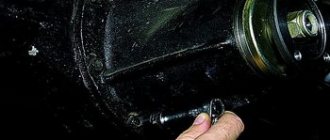
10, unscrew the lower flywheel screen (three bolts with a key *10*) last, before removing the box
, so this bolt (see photo below) is not convenient to unscrew and the screen itself.
P O P U L A R N O E:
Antiradar circuit.
Converting the valve from a washing machine to 12 volt DC power supply
Electric valves are required to automatically control various hydraulic systems. Finished products are quite expensive. Let's look for a cheaper solution.
Recently, amendments to the traffic rules were introduced in Russia, one of which is: driving during the day with low beam headlights, fog lights or daytime running lights . Now you need to drive with lights on during the day. Driving with low beams or fog lights on additionally creates a load on the generator, reduces the service life of the lamps, and also increases fuel consumption (more than 0.5 liters per 100 km). Therefore, it is better to drive during the day with the running lights turned on, the light-emitting element of which is LEDs , which consume much less power than incandescent lamps. You can buy DRLs, or you can make them yourself from scrap materials.
Source