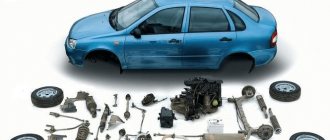
02/04/2022 11,339 VAZ 2110
Author: Ivan Baranov
The gearbox of any vehicle, like any other unit, requires periodic repairs. If a unit breaks down, not every motorist is ready to go to a service station and pay money for its repair. Therefore, now we will tell you how to disassemble the VAZ 2110 gearbox, what nuances should be taken into account when dismantling the box. You can also watch a repair video.
[Hide]
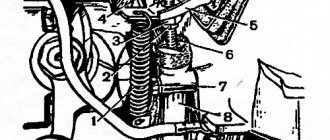
Gearbox device for VAZ 2107
In general, the five-speed transmission has the same functions as its predecessors: it varies the direction and magnitude of torque from the engine. The differences are that the five-speed has 6 speeds, including 1 reverse speed.
Inside the gearbox housing there are:
- two types of shafts with different numbers of gears - primary and secondary;
- levers responsible for changing gears.
If any malfunctions are detected, it is recommended to remove the box based on the manufacturer's instructions.
Repairing the box
In the event that this kind of adjustment work did not bring much results, you will have to remove and disassemble the gearbox of your VAZ 2110
The main attention should be paid to the gears, as they are most often knocked out. This is especially true for first and second speeds.
It will also be important to check the latch. There are three latches in total in the gearbox.
The very first of them is very long and is responsible for 1st and 2nd gears. Next comes the clamp for third and fourth gears, and the shortest of the clamps is intended for 5th gear
There are three latches in total in the gearbox. The very first of them is very long and is responsible for 1st and 2nd gears. Next comes the clamp for third and fourth gears, and the shortest of the clamps is intended for 5th gear.
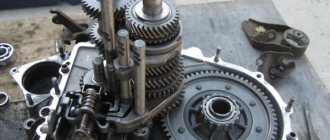
complete gearbox assembly
Often, VAZ 2110 owners voice a problem regarding the switching or departure of first gear. Most likely, the reasons lie in the following:
- synchronizer problems;
- damage to the retainer spring when the lever dangles and the gears are switched on randomly;
- damaged rod and fork.
A common problem is when the second gear is reluctantly engaged, or it is simply knocked out. The most likely causes of the problem:
- poor engagement of the gear and clutch that engages the gears;
- wear of gear teeth and coupling;
- problems with the clutch.
Work on dismantling the five-speed gearbox VAZ 2107
Installing the car on a lift (you can use an overpass or a pit) is preceded by disconnecting the battery and removing the radio panel:
- Remove and disassemble the gearbox rod.
- Remove the cover from the gap where the lever attaches and remove the foam filling.
- Remove the exhaust pipe from the exhaust system.
- Move the starter, disconnect the speedometer wire.
- Unscrew the bolts holding the cardan and remove it.
- The clutch cylinder is removed using the same method.
- After this, the gearbox is removed from the car. To do this, it is best to invite assistants who will support the mechanism while you unscrew the mounting bolts. At this stage, it is also advisable to drain the transmission oil.
After all these steps have been completed, we repair the VAZ 2107 gearbox.
Transmission service
A guarantee of trouble-free operation of the gear shift unit is monitoring and timely replacement of lubricants. The plant fills with TM-5-9p oil, which needs to be changed every 60,000 km due to loss of viscosity. This simple procedure will take no more than half an hour if you have:
- 4 liters of GL-4 gear oil with viscosity 75W90;
- funnels;
- 17″ key.
The next steps are:
- Open the hood and remove the dipstick from the gearbox.
- Unscrew the drain plug.
- Drain the used oil into a container.
- Screw in the drain plug.
- Place a funnel in the dipstick hole.
- Fill with new oil.
- Insert the dipstick.
Causes of gearbox failure Causes of gearbox failure Before changing the oil, you need to warm it up by driving in normal mode for 15 minutes. The lubricant level is controlled by a dipstick - it should be between two marks. Experienced technicians advise replacing a new car after 3,000 km due to the appearance of metal particles in the oil after grinding in new parts.
Repair process
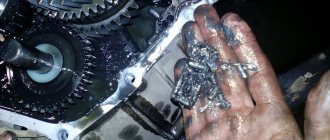
When starting to repair or tune the gearbox, try to wash all accessible surfaces with kerosene as thoroughly as possible.
Next, you should carefully unscrew all the fastening bolts, sequentially releasing the parts.
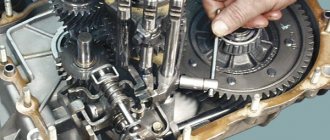
Each gear is disassembled separately, and it is important to carefully check not only the gaskets, but also the seals. Correcting and diagnosing breakdowns includes replacing gaskets, this is a prerequisite; oil seals are usually changed if they are very worn.
The disassembled VAZ 5 mortar box must be washed again, after which all parts are checked again for faults and, if necessary, replaced with new ones. Most often you have to replace a worn gear or bearing.
To replace parts, you can buy a ready-made gearbox repair kit, designed taking into account the most frequently occurring faults in five-speed gearboxes. Also, before disassembling the transmission, prepare the necessary tools: an impact driver, a three-jaw puller, wrenches of different diameters and a torque wrench. Also for maintenance you will need fixing glue, a set of gaskets and seals, preferably a repair kit.
It should be noted that, like any gearbox, the VAZ 2107 5 mortar requires periodic maintenance to prevent malfunctions while driving.
After all the parts have been checked and replaced, you can begin assembling the gearbox, carrying out all the steps in the reverse order. If the parts have undergone too much wear and replacement of individual components no longer helps, a complete replacement of the gearbox on a VAZ 2107 may be necessary.
Thus, it is quite possible to carry out maintenance and repair of the VAZ 2107 gearbox yourself, the main thing is to follow all the requirements of the dismantling instructions and follow the drawings during assembly.
The VAZ 2107 is equipped with two types of gearboxes, one of which is four-speed and the other five-speed. Sooner or later, these devices begin to malfunction, as a result of which it becomes almost impossible to drive a car. In this material, we will find out what the repair of both types of gearboxes on a VAZ 2107 is, what are the differences between these two mechanisms, and when repair work is required.
How to dismantle a car wheel
A tire puncture is a very common phenomenon and almost every car owner has encountered it. This malfunction does not cause problems if there is a tire service station nearby, where repairs will be carried out quickly and inexpensively. But it’s not always possible to seek services from such a service point, but you need a car and don’t have a spare tire or it’s already in use. In this case, you will have to do the repair yourself.
Restoring the integrity of the tire directly depends on its type. Tubeless products can continue to be used, but provided that the element that punctures it remains in the tire. Of course, there will be an air leak at the puncture site and the tire will have to be pumped up periodically, but you can drive. Additionally, the tubeless can be repaired using “first aid kits” for recovery. They allow you to carry out repairs even without removing the wheel from the car.
But it is impossible to repair tube wheels without disassembling them. To repair a puncture in the chamber, it must first be removed, and this is the main problem. Note that even with tubeless tires, the highest quality repairs can only be performed on the inside of the tire, and to do this it must be removed from the rim.
Nuances of the work
Disassembly would not be a problem if not for one feature. During the operation of the car, the tire at the point of contact with the rim is gradually “welded” to the metal. And this nuance causes the most problems during disassembly.
Video: do-it-yourself home tire fitting
At tire service stations, special presses are used to break the “weld,” so all the work looks very simple. In field or garage conditions, rubber tenaciously “holding” to the metal can cause a lot of trouble. But it is still possible to solve the problem.
So, the main task when disassembling a wheel is to separate its edge from the disk, along the entire circumference and on both sides. The rest of the disassembly process is not complicated and is very easy and quick, but safety precautions must be observed.
Transmission repair: when to do it
Repair of the VAZ 2107 gearbox may be required in the following cases:
- Excessive noise is produced when the box operates. This noise is caused by increased wear of bearings, gears and synchronizers.
- It becomes difficult to change the transmission. The reasons for this consequence are hidden in the wear of the lever, the lack of lubricant inside the box, and the deformation of the gearbox lever. Also, the cause of this phenomenon may be jamming of the blocking cracks or damage to the coupling splines.
- Spontaneous transmission shutdown. The reasons for this consequence are wear of the ball holes on the rods, jamming of the clamps, blocking rings and the synchronizer itself.
- Oil leakage occurs. Repair of the VAZ 2107 gearbox must be carried out when oil leaks are detected on it. The causes of leakage can be either serious damage or simple wear of oil seals and seals.
In any case, disassembling the gearbox will be required if one of the above symptoms occurs, which will allow us to identify the exact cause of the malfunction and eliminate it. If even the slightest malfunction of the gearbox is detected, it is necessary to begin repairing it, which will prevent unforeseen consequences in the form of complete failure of the gearbox.
Features of repairing a gearbox on a VAZ 2107
The design of the gearbox is no more complicated than the design of the engine itself, but in order to carry out repairs correctly, a certain sequence must be followed. We will find out in more detail in what sequence the disassembly and assembly of the gearbox is carried out.
- Initially, the gearbox should be removed from the vehicle. We will not consider how to remove the gearbox, since there is appropriate material for this. One has only to note that first you need to drain the oil from the gearbox. We will begin repair work immediately.
- The box is dirty and oily, so it is recommended that you take your time with the repair and clean the outer surface of the product.
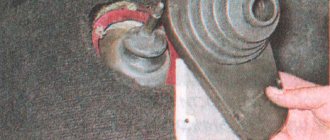
- Using a screwdriver, you need to pry off the cover of the fork, which is used to disengage the clutch. The fork is moved to the side. To remove the plug, you need to rotate it 90 degrees and remove it from the hole.
- The gearbox disassembly scheme is common for both 4 and 5 mortars. You need to unscrew the clutch housing mounting nuts, then unscrew and remove the spring washers. These washers are located directly behind the nuts.
- When the fasteners are removed, you can continue to disassemble the gearbox. To do this, you need to pull the crankcase, disconnecting it from the main device.
- There is a sealing element behind the crankcase that also needs to be removed. If the gasket is worn, it should be replaced. There is a spring washer on the shaft, which also needs to be removed.
- Using a “10” wrench, you need to unscrew the 10 nuts securing the crankcase cover. After unscrewing all the nuts, remove the spring washers located behind these nuts. The cover also needs to be removed.
- Behind the cover there is a seal, which should also be removed by prying it off with a screwdriver.
- The photo below shows the nuts that need to be unscrewed. These nuts secure the rear engine mount to the gearbox housing. Behind the nuts there are washers that must be removed, as well as a cushion complete with a cross member.
- Do-it-yourself disassembly of the gearbox continues with unscrewing the speedometer drive nut. After unscrewing this nut, it is necessary to dismantle this drive.
- The VAZ 2107 transmission is a mechanism with a set of gears and forks through which the vehicle moves. Having turned the gearbox over to the other side, you need to remove the reverse light switch.
- The bolt securing the fork, which is responsible for switching third and fourth gears, is unscrewed.
- You need to turn on the first transmission using the gearshift lever on the VAZ 2107.
- At the same time as first gear is engaged, fourth gear must also be engaged. Using a screwdriver, move the synchronizer clutch to the side to connect it to the gear.
- You may ask, why is it necessary to engage 2nd gears at the same time? This is done in order to block the rollers from turning.
- The retaining ring is dismantled by prying it with a special puller on the secondary shaft.
- Using chisels and a hammer, bend the locking plate securing the flange nut.
- The nut must be loosened by 2-3 turns, which will allow the coupling centering ring to be removed. After moving the ring, you need to screw the nut.
- Using a special kind of puller, you need to dismantle the coupling ring.
- After removing the ring, it is necessary to dismantle the centering ring seal.
- Now you can use a wrench to unscrew the nut.
- There is a retaining ring behind the nut that also needs to be removed.
- Using another puller, it is necessary to dismantle the flange.
- The gearshift lever must be set to the neutral position, and then the sealing collar must be pulled up.
- Behind the cuff there are nuts that need to be unscrewed. After unscrewing them, the lever or rocker is dismantled.
- Behind the scenes there is a seal that must be removed.
- The gearbox on the VAZ 2107 is further disassembled by unscrewing the two nuts securing the exhaust pipe.
- There is a bolt behind the bracket that should also be removed.
- To remove the back cover of the box, you need to unscrew the 5 outer nuts.
- Another nut secures the cover from the inside, so after unscrewing the 5 outer nuts, you should proceed to the last one - the inner one.
- It is necessary to disconnect the back cover and the box housing, which requires moving the back cover. The fastening nut is unscrewed, and then the washer is removed.
- After unscrewing all the nuts, it is necessary to remove the rear cover from the crankcase, rocking it. The crankcase cover will come off on its own.
- After removing the cover, it is necessary to remove the inner ring from the secondary shaft. Behind the ring is the speedometer drive gear, which must also be removed.
- The cover of the clamps is found, after which the two bolts securing it are unscrewed. After removing the bolts, you must remove the cover.
- There is a gasket under the cover that needs to be removed.
- The spring clips are removed.
- The gearbox must be turned over, thereby removing the retaining balls.
- You need to find the drive gear retainer ball and remove it. The oil deflector washer also needs to be removed.
- You should continue further if two gears are engaged at the same time. With two gears engaged, it is necessary to unscrew the bolt securing the 5th gear gears. As you guessed, this procedure is performed for the VAZ 2107 5 mortar gearbox.
- The fastening of the 5th gear shift fork, as well as the reverse gear, is unscrewed. After unscrewing, you must remove the plug.
- By holding the rod of the 5th gear, as well as the reverse transmission, you need to remove the rod from the crankcase and the shift fork.
- The gear block of the 5th gear and reverse gear is dismantled manually.
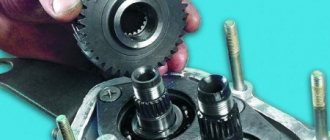
- The gear bushing is removed in the same way from the secondary shaft.
- Once the bushing is removed, you will need to remove the gear, ring gear, locking ring and synchronizer clutch for the five-speed transmission.
- The 5th gear synchronizer clutch hub is removed.
- The reverse control gear is also removed.
- From the inside, the intermediate shaft bearing is pressed out. To do this, you will need to take a hammer and a punch, and apply light blows.
- Next, the bushing is removed from the secondary shaft. It is also necessary to remove the outer ring from the rear bearing.
- Using a puller, you need to unclench the locking ring and remove it.
- Two gears are engaged at the same time - first and fourth. The bearing securing bolt is unscrewed.
- Place a screwdriver between the outer side of the ring and the shaft gear, thus removing the bearing ring together with the balls.
- The rear inner ring is pressed out.
- The intermediate shaft is removed.
- The locking block of the transmission rod 3 and 4 is removed.
- Crackers vary in size, so remember their location.
- The shift rod 3 and 4 of the transmission is removed.
- The 3rd and 4th gear shift fork is removed.
- The bolt securing the fork 1 and 2 of the transmission is unscrewed.
- The transmission rod 1 and 2 is removed.
- The locking block 1 and 2 of the transmission is removed.
- The fork for selecting these gears is removed.
- The complete input shaft is removed.
- The needle bearing is removed.
- It is necessary to unfold the locking plate until it disengages from the groove.
- The reverse gear axis is removed.
- The intermediate ring is removed.
- The key is removed from the groove of the secondary shaft.
- The intermediate bearing is removed.
- The secondary shaft is recessed into the inside of the crankcase, thereby removing it.
- Using a hammer, it is necessary to press out the secondary shaft bearing.
- The sealing gland is removed.
- The bearing from the 5th gear can be removed with a screwdriver, using it as a lever.
Adjustment
Removing and installing the gearbox of a VAZ 2110, 2111, 2112
On a VAZ 2110, it is not that rare that the gears engage poorly or are knocked out. A mechanism for adjusting the speed selection drive is provided specifically for this purpose.
Adjustment may be necessary if:
- the box was recently removed for repairs;
- one of the gears falls out;
- the speeds do not engage well or simply get knocked out when the car is moving.
If you have one of these problems, try making adjustments first. Its sequence:
- Under the bottom of the VAZ 2110, find and slightly loosen the nut on the bolt that tightens the clamp that secures the rod designed to control the gearbox;
- Use a screwdriver to slightly move apart the grooves in the end of the rod and the resulting gap on the clamp itself. This is necessary to ensure easy movement of the rod in relation to the gear selection rod. Place the rod in the neutral position;
- Release the shift knob from the cover in the cabin;
- Align the lever using a special template. This is done like this: install a template in the window of the rear speed lock bracket lining. After this, insert the lever axis stop into the groove of the template, pressing it without unnecessary force in the transverse direction;
- Then adjust the axial play of the rod in the rear direction, and its axial play by turning to the left;
- Install the clamp, not reaching a few millimeters from the end of the rod. Then tighten the clamp thoroughly with the bolt.
If the described adjustment did not help you, you need to remove and disassemble the VAZ 2110 gearbox
Pay special attention to the fact that the gears with which the first and second speeds are engaged often knock out. Don't forget to check each fastener
They are made in the form of springs, there are three of them. The first clamp is long, it is responsible for first and second gears. Second is medium, for third is fourth gear. For the fifth, the shortest clamp is used.
Causes and symptoms of bearing failure in manual transmissions
Power steering for VAZ 2110: replacement, repair and much more
The design of the “Seven” gearbox is designed for many years of service. Usually the driver carries out the first and even the second major overhaul of the engine, and only after that does the need to repair the gearbox arise.
In addition, the “seven” itself has acquired a reputation as a “workhorse” throughout its long history. The machine really serves faithfully for many years, but this does not mean that each of its mechanisms will not wear out over time.
If we talk about malfunctions of the VAZ 2107 gearbox, then most often drivers complain about three defects: the inability to engage the desired gear while driving, the gear being knocked out and a strong crunch in the box.
In the early years, the VAZ 2107 was equipped with a four-speed gearbox, and since the early 1990s, a five-speed gearbox
It is very difficult to drive a vehicle if the driver cannot change gear. On the one hand, the shift lever moves to the desired position, but, on the other hand, switching as such does not occur. Or the lever cannot be set at all to the desired speed switching position.
In any case, the problem lies precisely in the box:
- Some of the moving (hinge) elements of the shafts are very worn out - it is recommended to carry out a major overhaul of the gearbox;
- wear of the blocking rings on the synchronizer - replace the rings with new ones;
- the synchronizer spring is stretched or broken - replace the spring;
- severe wear of the gear splines - only complete replacement of the gear will help.
The problem is that the lever works, but the gearbox doesn't.
The malfunction may be associated with different elements of the box:
- jamming of the hinge on the gear shift lever - it is necessary to remove the lever skirt, clean all connections and lubricate them;
- breakage of the lever - it is impractical to carry out repairs; it is easier to immediately replace the lever with a new one;
- the clutch does not work correctly - in this case, the entire blame cannot be placed on the box; it is quite possible that after adjusting the main elements of the clutch, the gear will not be knocked out;
- The forks in the box are bent - it is recommended to replace the entire set of forks.
The driver sets the lever in the desired position, but it comes back
The driver may not experience problems with shifting gears, but while driving, hear a loud knocking, crunching and grinding sound in the gearbox cavity:
- the bearings on the shafts are broken - replacement is recommended;
- The gear splines are badly worn - the entire gear needs to be replaced;
- minimum oil level in the cavity of the box - you need to add lubricant and make sure that there is no leak;
- malfunction of the shafts (they began to move along another axis) - replacement of bearings on both shafts.
Unusual sounds in the gearbox are the first sign that the gearbox needs checking and repair.
Bearing units in a manual transmission perform the function of rolling bearings, therefore, if the rolling bearing is faulty, there will be difficult rotation of the elements, an imbalance will appear, as well as radial and axial runout, backlash, noise, and knocking.
Signs of bearing failure in a manual transmission are as follows:
- The bearing hums, the noise increases when the clutch is disengaged;
- Difficulty switching gears;
- Spontaneous transmission shutdown;
- A knocking noise is heard when pressing the clutch pedal.
Reasons for failure:
- Expiration of product service life;
- Poor quality ball bearing;
- Wear or runout;
- Aggressive driving style and gear shifting;
- Insufficient amount of lubricant on the bearing or its absence;
- Dirt or abrasive particles getting inside the ball bearing;
- Malfunction of adjacent components (releaser, clutch, secondary or intermediate axle).
After removing the axle from the axle, you need to make sure that the part is faulty. To do this, check the ease of rotation of the part, and also do a visual inspection, namely, the presence of damage to the rings, cage, as well as defects in the raceway. If the product is in good condition, it is advisable to take measurements of the axial clearance and radial clearance, as shown in the video.
Repairing a gearbox by hand, how to bring spare parts into the desired form
- If it is necessary to replace the rod hinge, remove the protective cover on it, and then unscrew the bolt securing the hinge. For strength, a special glue TB-1324 was applied to the bolt. Therefore, before assembly, it is necessary to clean the bolt and apply this glue to the surface.
- Check the magnet, if it is intact, just clean it of dirt. If small cracks are found or if it does not magnetize well, it should be replaced.
- Clean the surfaces of the gearbox housings, clutches and rear cover from sealant.
- Using transmission oil, lubricate all rotating elements.
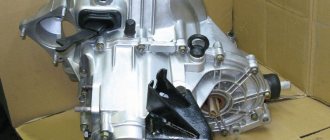
Removal and installation of gearbox 2108,2110,2112,2118, Kalina
Removing and installing the gearbox, replacing the VAZ clutch.
GENERAL INFORMATION Recommendation Remove the gearbox with an assistant.
EXECUTION ORDER
Remove the battery, drain the gearbox oil and remove the starter
Disconnect the block with wires from the speed sensor by squeezing the spring clips.
Remove bolt 1 securing the ignition module bracket to the gearbox and two bolts of the upper gearbox mounting to the engine. Bolt 2 (front of the car) is short, bolt 3 is long.
At the bottom of the car, disconnect the block with wires from the reverse light switch.
Remove the two bolts securing the torque rod bracket to the gearbox.
Loosen the bolt of the gear shift rod clamp and disconnect the rod from the gear selector rod hinge by sliding it back.
Remove the wheel drives. Tie the plug inserted in place of one of the drives with a rope or wire so that it does not fall out when removing the box. The right drive does not need to be completely removed. It is enough to disconnect it from the gearbox and, moving it to the side, hang it from the body.
To make it easier to remove the box, unscrew the two mounting bolts and disconnect the left ball joint from the steering knuckle
Unscrew the nut of the lower right mounting of gearbox 1 to the engine (engine side)
Please note that on models with a fuel injection system, an intake pipe support bracket 2 is installed under this nut, which must be removed from the stud. If necessary, loosen the upper nut securing this bracket.
If necessary, loosen the top nut securing this bracket.
Unscrew the three fastening bolts and remove the lower cover 1 of the clutch housing 2.
Remove the bolt from the lower left mounting of the gearbox to the engine. Suspend the engine using a hoist or board.
From the bottom of the car, unscrew the nut securing the left power unit support.
Unscrew the two nuts securing the rear power unit mount to the body.
Unscrew the two bolts securing the rear support of the power unit to the gearbox, holding the nuts from turning with a second wrench, and remove the support.
By inserting a screwdriver between the clutch housing and the cylinder block, slide the gearbox off the guide bushings. Be sure to hold it while doing this.
selection of differential bearing adjusting ring
Differential bearings must be mounted with a preload of 0.25 mm (for control 0.15-0.35 mm). The tension is ensured by selecting the thickness of the adjusting ring 13 (see Fig. 3-7), installed in the gearbox housing socket under the outer ring of the differential bearing.
Note. Select the thickness of the adjusting ring when replacing one of the following parts: differential box, differential bearing and clutch or gearbox housings.
Determine the thickness of the adjusting ring using tool 67.7824.9517 in the following sequence: press the outer ring of the tapered roller bearing 3 together with the adjusting ring 4 (Fig. 3-24) into the gearbox housing;
Note. The installation ring 4 has a constant thickness of 1.25 mm.
Press the outer race of the other differential bearing into the clutch housing. At the same time, be careful not to mix up the outer rings of the differential bearings; install the differential into the gearbox housing and, covering it with the clutch housing, tighten at least three nuts, equidistant from each other, securing the gearbox housing to the clutch housing (tightening torque 24.5 Nm (2.5 kgcm)). Then turn the differential to self-install the bearings 2-3 turns; install support mandrel 2 on the differential box and secure indicator 1 with extension using a universal holder. Install the indicator leg on the support mandrel with a preload of 1 mm, and in this position fix the indicator and set its arrow to zero; move the differential from below and watch the indicator;
WARNING When measuring the axial movement of the differential, do not rotate it so as not to distort the measurement results.
Using the formula S = A + B + C, calculate the thickness of the adjusting ring of the differential bearings, where: S is the thickness of the adjusting ring;
A is the amount of axial movement of the differential; B - the amount of preload of the differential bearings; C is the thickness of the installation ring (constant value). Example.
The indicator reading when moving the differential is 1.00 mm. The preload of the differential bearings is 0.25 mm, the thickness of the mounting ring is 1.25 mm. S = 1.00+ 0.25+ 1.25 = 2.50 mm. After determining the thickness of the adjusting ring, disconnect the clutch housing and gearbox, remove the differential, press out the outer bearing ring from the gearbox housing using a puller 67.7801.9526 and install the selected adjusting ring instead of the adjusting ring 4. Press in the outer ring of the differential bearing using the mandrel 67.7853.9575 and install the differential into the gearbox housing and, covering it with the clutch housing, tighten the nuts securing the gearbox to the clutch housing. Check the moment of resistance to rotation of the differential with a dynamometer 02.7812.9501. To do this, pass the tip of the dynamometer through the hole in the differential box (for the wheel drive shaft) until it wraps around the pinion axis. Turn the dynamometer handle several turns clockwise and use the scale to determine the moment of resistance to turning. It should be: for new bearings 147-343 Ncm (15-35 kgf.cm), for run-in bearings at least 30 Ncm (3 kgf.cm).
Rice. 3-24. Scheme for selecting the thickness of the differential bearing adjusting ring: 1 - indicator; 2 - support mandrel; 3 — differential bearing; 4 — installation ring; 5 - mandrel
Something bad happened and a VAZ 2110 gearbox needed to be repaired. Unit repair is required when:
- It is difficult to switch gears off and on.
- automatic switching off of gears.
- noise occurs when shifting gears.
- transmission oil leak.
The reasons for the breakdown may be different, perhaps the oil was not changed in a timely manner or the mechanism has simply exhausted its resource.
How is a VAZ 2110 gearbox repaired? Do-it-yourself VAZ 2110 gearbox repair, video.
Design features
If you have a “ten” with an 8-valve engine, then the design provides two side and one rear support;
On a 16 valve engine there are two side mounts, one lower and one upper.
It is important to note that 8 valve engines on the 10 have a rear engine mount, while on the 16 valve there is none. But such motors can boast of having additional supports
Regardless of the design, the replacement procedure is performed using a similar method.
Malfunctions
In fact, it is quite easy to detect failed airbags, since engine vibrations will immediately increase.
If the power unit is working normally, but the body is shaking, vibration is felt on the steering rack, pedals, and dashboard, then there is no doubt that the engine mounts are worn out.
The vibration peak occurs when the engine starts and when it is turned off. If the rubber elements are completely worn out, then a knocking noise will begin to appear. It is caused by contact of engine elements with the supports.
To make sure the cushions are worn, turn on the engine, lift the hood, and visually inspect the supports and cushions. By placing your hand on the engine, you will tactilely feel an increase in vibrations compared to the normal behavior of the car.
There may be several reasons for problems.
| Causes | Peculiarities |
| Deformations | Deformation of elements can occur during the life of the pillows, under mechanical or temperature influences |
| Loss of elasticity | Rubber does not have a large margin of strength, so it ages over time. This effect increases when exposed to temperature changes. |
| Delamination and cracking | The pillow can literally fall apart and creep apart when exposed to chemically aggressive substances. |
Is replacement required?
If you find that the rear airbag or any other airbag has begun to wear out, you should under no circumstances delay repairs.
In addition to the discomfort of the driver and passengers when the car is moving, you risk delaying the breakdown until the moment when destructive processes begin in the operation of the gearbox and power unit.
When starting to repair engine mounts, you should think about whether it is worth changing the cushions separately, or replacing the mounts as a whole.
If the support is not damaged, it is not necessary to replace it. That is, in such situations it is enough to simply replace the pillow. A set of new pillows for a VAZ 2110 today costs about 1.3 thousand rubles. A set of supports will cost you 2.5 thousand rubles.
Doing the work yourself or contacting a service station is your choice. But you should know that you will be charged at least 300 rubles for replacing one pillow.
Product delivery options
Note! Below are the shipping methods available specifically for this product. Payment options may vary depending on the delivery method.
Detailed information can be found on the “Delivery and Payment” page.
Parcel by Russian Post
Available payment methods:
- Cash on delivery (payment upon receipt)
- Using cards Sberbank, VTB, Post Bank, Tinkoff
- Yandex money
- QIWI
- ROBOKASSA
Shipping throughout Russia. Delivery time is from 5 to 12 days.
Parcel by Russian Post 1st class
Available payment methods:
- Cash on delivery (payment upon receipt)
- Using cards Sberbank, VTB, Post Bank, Tinkoff
- Yandex money
- QIWI
- ROBOKASSA
Shipping throughout Russia. Delivery time is from 2 to 5 days. More expensive than regular delivery by Russian Post, approximately 50%. Parcel weight up to 2.5 kg
Express Parcel EMS
Available payment methods:
- Cash on delivery (payment upon receipt)
- Using cards Sberbank, VTB, Post Bank, Tinkoff
- Yandex money
- QIWI
- ROBOKASSA
Shipping throughout Russia. Delivery time is from 3 to 7 days. More expensive than regular delivery by Russian Post, approximately 100%.
Transport companies
Available payment methods:
- Using cards Sberbank, VTB, Post Bank, Tinkoff
- Yandex money
- QIWI
- ROBOKASSA
Delivery is possible to any locality where there is a representative office of the transport company. Delivery time is from 2 to 10 days. Sending large parcels is approximately 50% more profitable than by Russian Post.
Pickup from our warehouse
Available payment methods:
- Cash upon receipt
- Credit, installments
- Using cards Sberbank, VTB, Post Bank, Tinkoff
- Yandex money
- QIWI
- ROBOKASSA
Pickup times must coincide with store opening hours.