Even if you follow all the instructions that can be found in the car operation and repair manual, replacing a VAZ 2109 gearbox is not easy. The reason is that removing the gearbox requires many step-by-step actions to disassemble and reassemble vehicle systems and components.
If you decide to go to a service station, the gearbox will be removed in literally one hour, but the cost will not please you (removal and installation of gearboxes for front-wheel drive cars averages 1,500-2,000 rubles ). It should also be noted that the manufacturer’s auto standards for removing a VAZ 2109 gearbox are 4.2 hours, but doing this task yourself will most likely take a whole day, or even two.
Signs of a faulty VAZ 2109 gearbox
- noise in the gearbox;
- difficult gear shifting;
- spontaneous transmission shutdown;
- “crackling” when the gear is engaged;
- increased noise when disengaging the clutch.
These signs may indicate a serious breakdown of the gearbox, which will require replacement.
It should be remembered that the gearbox of the VAZ 2109 (aka VAZ 2108 and the rest of the family) weighs a decent amount from 32.7 to 33 kg. The piece of iron is heavy. And if you also take into account that you need to remove the box from a level above your head, then you should calculate your strength, especially if you work alone. It is necessary to prepare a place for the box in advance so that you do not have to lift the gearbox from the bottom of the inspection hole.
Step-by-step instruction
The gearbox weighs relatively little - 27 kg, but it is still not easy to remove it with your own hands, so invite an assistant. All work is carried out after installing the machine on the ramp or above the pit. Additionally, the car still needs to be jacked up and placed on supports so that the wheels are in the air.
First of all, remove the mudguard, the motor crater protection and disconnect the battery. Further:
- drain the gearbox oil;
- remove nuts from wheels and drives;
- remove the clutch cables and also the speedometer;
- disconnect all the ball joints by tightening the bolts holding them to the knuckles;
- dismantle the longitudinal tie;
- pull out all the drives included in the gearbox (you will need the help of a friend), remove the central nuts and remove them completely;
- unplug and remove the starter.
After this, all that remains is to disconnect the gearshift linkage and the gearbox itself from the engine (it is held in place by four nuts). But before this action, the power unit must be secured.
It is either hung out, leaning on the spar (or rather, on its glasses) or propped up from below with a jack.
The gearbox still needs to be disconnected from the body supports, and only then can it be removed. This is done in this way: the box is rocked a little and moved away from the engine by 10 cm - this is enough for the primary shaft to leave the disc and clutch basket. In order not to damage the latter, you must act very carefully.
The gearbox is installed in place after all problems and malfunctions associated with it have been fully eliminated.
Before the reassembly process you should:
- make sure that all elements affected by the dismantling process are in good condition;
- check the alignment of the clutch;
- Renew the lubricant on the splines of the release and input shaft bearing flanges.
When installing a gearbox on a car, the following scheme is used:
- the power unit is lowered on a jack or stretcher with a slope of 15 degrees;
- the box itself is lifted and inserted until it stops (do not try to tighten the engine and gearbox with bolts until it sits tightly in its designated place);
- tighten all four elements securing the gearbox to the engine;
- install “pillows” (supports) under it;
- attach the clutch cable and adjust its tension (its pedal is normally located a centimeter above the brake);
- return the previously removed starter together with the rear speed sensor to its place;
- install the flywheel protective housing;
- screw the speedometer cable and ground wire;
- connect the shift gear mechanism - its lever is aligned according to the marks made during dismantling;
- assemble the drive, install ball joints, couplers;
- put the car on the wheels and tighten the bolts on them;
- tighten the drive nuts;
- add fresh oil.
Replacing the VAZ 2109 gearbox
To replace the VAZ 2109 box you will need:
- wrenches 8, 10, 13, 15 mm;
- torque wrench, 13mm socket;
- jack;
- container for draining oil;
- place for repairs (inspection pit or overpass);
- flat screwdriver.
The side gear is fixed using a technological plug used when transporting the differential, or using an old internal CV joint. Otherwise, the loose side gear may fall into the gearbox housing.
Install the gearbox in the reverse order of removal, tightening the bolts and nuts to the correct torques, taking into account the following:
- Before connecting the wheel drive shafts to the side gears, make sure that the retaining rings on the internal joints are replaced with new ones. This is very important, since when installing old rings, spontaneous separation of the wheel drives and side gears is possible when the car is moving;
- Before installing the gearbox, apply a thin layer of transmission oil to the splined end of the input shaft and CV joint-4 grease to the outer surface of the clutch release bearing clutch guide sleeve. Then center the clutch driven disc using mandrel A.70081.
After installing the gearbox, adjust the full travel of the clutch pedal and the gear shift control drive in the following order:
- working from below the car, with the tie rod clamp loosened, set the rod to the neutral position;
- With a raised decorative cover, install the gear shift lever so that its lower part is perpendicular to the floor of the body, and the handle is located from the right seat at a distance equal to 1/3 of the distance between the seats. In this position, tighten the tie rod nut. Then fill the gearbox with the recommended oil.
When connecting the shift drive to the gearbox, make sure that there is no twisting or deformation of the corrugations of the protective cover. Setting the gear shift lever to the required position.
VAZ 21099 - how to remove the gearbox
The gearbox on a VAZ 21099 car must be removed to perform various repairs, both the gearbox itself and others in which its presence will interfere. This range of work is most conveniently carried out together with an assistant. Prepare a standard set of tools and perform the following sequence of actions:
- After driving the car into a pit, remove the engine protective pan.
- Next, unscrew the bolts securing the ground wire from the gearbox.
- Next, you need to disconnect the cable from the clutch lever. To do this, loosen the lock nut and unscrew it, unscrew the adjustment itself.
- Immediately in the engine compartment, disconnect the supply wires from the starter traction relay, unscrew the nuts and remove the battery wire from the stud.
- Remove the starter by unscrewing the three nuts securing it.
- Next, unscrew the nut of the tie rod of the gearshift lever drive and disconnect it from the tip of the gearbox hinge.
- Immediately disconnect the flexible speedometer drive cable from the box and the power wire from the car's reverse light switch.
- Next, we move to the front part of the body and loosen the nut of the rear brace fastening to the front suspension arm. Then unscrew the front three bolts securing the brace and move it to the side. We do the same on the opposite side.
- Disconnect the tie rod end from the steering knuckle; to do this, use pliers to remove the locking pin, then unscrew the nut securing the pin, install the puller and press it together.
- Remove the two nuts from the ball joint bolts to the lower arm.
- Next, using a small mounting spatula, remove the front wheel drive shank from the gearbox and install a special plug in its place so that the differential gears do not move.
- Remove the clutch housing protective shield, which is secured with three bolts. Then loosen the three bolts securing the crankcase itself to the cylinder block.
- Next, you need to prepare the car for removing the box. To do this, we place a wooden block across the engine compartment somewhere in the area of the supports of the front pillars, first install short bars on the supports themselves and a long one on them, and using a strong rope we hang the power unit by the eyeballs.
- We unscrew the nuts of the bolts securing the rear and left engine mounts and remove the bolts, while the power unit itself will be in a suspended state.
- Next, unscrew the three nuts securing the engine mount to the gearbox.
- And finally we unscrew the bolts securing the clutch housing to the cylinder block and, together with an assistant, carefully lower the box to the floor and pull it out from under the car.
At this point, the repair work on removing the gearbox on the VAZ 21099 car has been completed. Carry out the necessary repair work and then perform the subsequent installation in reverse order.
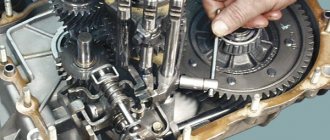
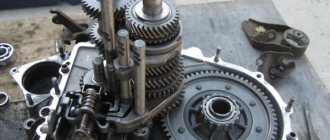
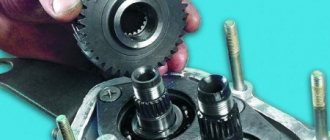
Disassembly
Having removed the gearbox, you can proceed directly to the main thing - disassembly. This will allow you to change damaged elements as you work, identify existing faults and solve problems on your own.
Article on the topic: The oxygen sensor on the VAZ 2114 gives errors: we clean the lambda probe with our own hands
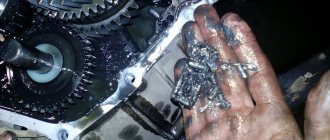
Jewelry work
When disassembling the box into parts, be sure to pay attention to the condition of the elements. If you detect faults in time and replace gearbox components, you can get by with inexpensive but very effective DIY repairs.
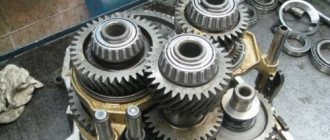
Disassembled gearbox
What needs to be done after dismantling the box?
Most often, the gearbox on a VAZ-2109 is removed for maintenance and replacement of worn parts, so it is important to keep it in working condition during dismantling. First of all, you need to think about maintaining the desired position of the parts by inserting a chopper instead of grenades. After the necessary work has been carried out, you need to take care of the performance of the remaining parts. It is necessary to carefully check their performance, otherwise the gearbox may need to be removed again.
Source: motorsguide.ru
Let's look at typical failures and malfunctions of the Lada Kalina and how to eliminate them
A little history. The Lada Kalina is a budget B-class car. Mass production of this car at the AvtoVAZ plant began in 2004.
In September 2012 The second generation of Lada Kalina was presented at the Moscow car showroom. The second generation included a station wagon and a hatchback. The sedan was released as the Lada Granta model. In March 2013, a modification with a liftback body appeared on the Lada Granta.
Modifications:
- Lada 117 – station wagon (Combi), 1117
- Lada 118 – sedan;
- Lada 119 – hatchback;
- Lada 119 Kalina Sport – hatchback, sports version.
- Lada 118 Granta – sedan, with a liftback body.
Engines:
- 4 l, 16 valves, model 11194 volume 1.4 l., power 98 l. s., torque 120 Nm/3000
- 1.6 l model 21114, 8 valves, model 21114, power 89 hp. With. torque 127 Nm/4200-4800;
- 6 l model 21126, 8 valves, volume 1.6 l., power 87 l. s., torque 145 Nm/4000 (Lada118 Granta).
Selecting a contract manual transmission
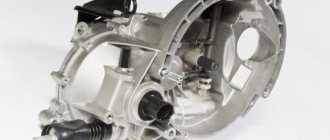
Gearbox for VAZ 2108, 2109, 21099 cars
A popular option for purchasing original spare parts for a manual transmission at a low price is purchasing contract parts or replacing the entire unit. If a manual transmission is being repaired, you can wait until the service finds factory components. But if it is necessary to replace the manual transmission, the driver will have to leave the car in the service center. If the workshop does not have the original box, the waiting time may be longer.
Contract manual transmissions are supplied assembled from automotive services in the USA, Japan, Korea, and Europe, which dismantle cars. The unit undergoes customs clearance and arrives at car services. The cost of original units is 50-70% lower than market prices.
Advantages of contract boxes:
- Great resource. In most cases, contract manual transmissions are units removed from the car after an accident. The vehicle for the contract unit always indicates from which vehicle the unit was removed and the mileage.
- Original components. The price of repairing a manual transmission in developed countries is very high, and it is much easier for car owners to get insurance and purchase a new car, and for an insurance company or service department to disassemble the car and sell it for parts, than to carry out repairs. Therefore, the option of buying a cheap contract transmission with all original parts is much more profitable than buying a new Chinese-assembled manual transmission.
- A manual transmission, unlike an internal combustion engine, is not a numbered part; after replacement, you will not need to register the unit with the traffic police.
The only drawback of contract units is that the required unit is not always available. The owner will need to either order and wait several months, or buy a new manual transmission if it is not possible to troubleshoot the existing one.
Video about changing gears on a manual transmission:
High-quality oil is the key to reliable operation of the gearbox
How to remove a gearbox with your own hands
Despite the unpretentiousness of domestic cars, their units require proper care and prevention. For proper operation of the gearbox, high-quality oil is necessary. The best option for the VAZ 2114 gearbox is mineral oil. Its only drawback is the high price. Of the synthetic and semi-synthetic options, it is better to choose the first one.
When using it, you need to clean the seals in time. Oil category GL-4 is the most suitable type for the VAZ 2114. To ensure reliable and uninterrupted operation of the unit, it is necessary to check the oil level at least 3 times a week. The easiest way to check is to use a dipstick. To do this, you need to place the car on a flat surface.
15-20 minutes after stopping, pull out the dipstick, wipe it dry and insert it back. Then remove the dipstick and record the oil level, which should be at the maximum level. If the amount of oil is insufficient, top it up and check the level again. Due to the fact that the fifth gear is located higher than the others, it often lacks lubrication.
Experts recommend maintaining the oil level slightly above the maximum mark, which will extend the life of the gearbox. It is better to entrust the oil change to specialists, because the gearbox is one of the main units of the vehicle. You can carry out the procedure yourself, but you should adhere to the following recommendations.
- In case of replacing oil of one brand with another, the box must be flushed.
- Place the machine on the inspection hole.
- Remove the cap and clean it.
- Clean the breather and its holes with a brush.
- Prepare a container for draining and unscrew the dipstick.
- Tighten the plug and fill in new oil through the dipstick socket.
- Screw the dipstick and put on the cap.
The price of a gearbox for a VAZ 2114 with all parts and oil is quite high. There is no point in indicating a specific figure, since the price is constantly changing
But you shouldn’t skimp on this important device: not only the operation of the engine, but also the safety of the driver and passengers depends on the reliable operation of the gearbox. To save money, you can purchase a used box. But it is better to buy such a unit from a reliable supplier, otherwise there is no guarantee that the parts will not contain hidden defects and malfunctions
But it is better to buy such a unit from a reliable supplier, otherwise there is no guarantee that the parts will not contain hidden defects and malfunctions.
Timely repairs and preventive measures allow VAZ 2114 owners to extend the service life and maintain the quality of the gearbox. This approach is the optimal solution for the uninterrupted operation of the unit and the engine as a whole. You should not neglect basic rules, such as timely oil changes, tightening fastening elements and eliminating minor problems.
We have collected a huge selection of videos about repair, tuning and maintenance of VAZ cars
Share photos and rate photos of other users
Video “Removing the gearbox”
This video shows the step-by-step process of removing the transmission.
1200 rub. for the photo report
We pay for photo reports on car repairs. Earnings from 10,000 rubles/month.
Even if you follow all the instructions that can be found in the car operation and repair manual, replacing a VAZ 2109 gearbox is not easy. The reason is that removing the gearbox requires many step-by-step actions to disassemble and reassemble vehicle systems and components.
If you decide to go to a service station, the gearbox will be removed in literally one hour, but the cost will not please you (removal and installation of gearboxes for front-wheel drive cars averages 1,500-2,000 rubles ). It should also be noted that the manufacturer’s auto standards for removing a VAZ 2109 gearbox are 4.2 hours, but doing this task yourself will most likely take a whole day, or even two.
Source
What is a box and what is it for?
Let's figure out what it is and what it is intended for:
- A gearbox is needed to convert (change) the rotating (torque) moment that is transmitted to the drive wheels
- And also change the direction of torsion (rotation) of the wheels (providing reverse motion of the car)
- In addition, the gearbox makes it possible to disconnect the driveshaft from the crankshaft (and drive wheels)
- When the engine itself is idling (during starting, warming up and coasting)
- Manual transmission - as in our case (has an abbreviated name - manual transmission, as well as a common name - mechanics)
- The mechanics is a kind of multi-stage cylindrical gearbox, which provides for manual gear shifting
- According to the number of steps, four-speed, five-speed, six, seven and more speed gearboxes are distinguished (reverse gear is not taken into account)
- The main advantages (advantages) of a manual transmission are the simplicity of its design, operational reliability, the ability to be controlled manually in all driving modes and an affordable price.
- It is thanks to these qualities that the manual transmission is the most common type among gearboxes today.