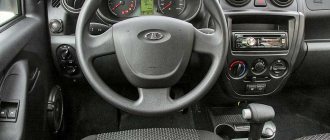
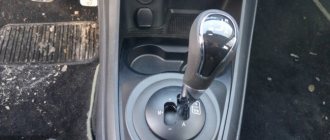
The Lada Kalina car is equipped with a cable gearbox and a corresponding gear selection mechanism. There is no adjustment, so the accuracy of gear engagement directly depends on the condition of the drive cables. When the cable stretches over time, the clarity of gear selection is disrupted and play in the lever appears. With a strong stretch, it is already quite difficult to turn on the desired speed. On a Lada Kalina, replacing gearbox cables is one of the simplest operations, requiring a minimum of tools and special skills.
Replacing the clutch cable
In the cabin under the instrument panel..
. Using an “8” wrench, unscrew the nut securing the cable sheath bracket to the pedal assembly bracket.
Use a slotted screwdriver to pry up the spring clip. . and remove it from the groove of the clutch pedal finger.
Remove the eye of the housing of the automatic cable length adjustment mechanism from the clutch pedal pin.
We remove the upper part of the cable from the pedal assembly bracket. In the engine compartment.
. Pull the cable forward and remove the cable guide from the groove of the clutch release fork lever.
Rotating counterclockwise, unscrew the leash from the threaded end of the cable.
Remove the rubber protective cover from the cable end.
We remove the end of the cable sheath from the hole in the bracket on the gearbox. In the cabin, remove the cable sealing cover from the hole in the front panel.
. and pull the cable into the cabin. Before installing the cable...
. check the condition of the plastic bushing on the pedal pin. We replace the worn bushing with a new one and apply grease to the pin. We install the cable in the following sequence: - thread the cable through the hole in the front panel from the passenger compartment into the engine compartment; — install the sealing cover into the hole in the front panel; — put the automatic cable length adjustment mechanism on the pedal pin and fasten it; — screw a plastic leash onto the threaded end of the cable so that the end of the cable tip is flush with the end of the leash; — insert the leash into the groove of the clutch release fork lever; — adjusting the clutch drive To do this, pull the cable forward by the threaded end until it stops, overcoming the force of the clutch pedal spring, and hold the cable in this position.
Using a caliper, we measure the distance from the end of the plastic leash to the clutch release fork lever, which should be 27 mm. If necessary, rotate the leash to achieve the required distance. When removing the load (releasing the cable), the leash should adhere to the fork lever without play. After this, press the clutch pedal three times to activate the automatic cable length adjustment mechanism. The full pedal travel should not exceed 146 mm.
Let me start with the fact that I successfully overwintered the 3rd winter, the only trouble that happened to me in March was a tire puncture with a self-tapping screw) It would seem that it doesn’t happen to anyone, what nonsense. But when I changed it for a spare tire, on a slippery March road, the jack flew out, bending the threshold and successfully included 4500 in the budget for straightening and painting) After such adventures, I bought myself a diamond-shaped peregrine falcon, it takes up more space in the trunk, but also inspires more confidence)
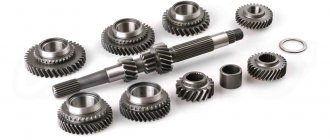
Comparison of manual transmission 2180 and manual transmission 2181
The difference between the two boxes is significant:
- Instead of rigid rods, a cable is used (Japanese company Atsumitec). Due to this, vibration on the body and gearshift knob is reduced.
- Multi-cone synchronizers were installed in 1st and 2nd gears. This increases the service life of the components and reduces the effort when engaging gears.
- The clutch diameter was increased to 215 mm. In this regard, it was necessary to use a different crankcase, and place the starter not along the box, but along the engine.
- The bevel angle of the synchronizer teeth was reduced (from 125 to 100º), as well as the preload force (from 150 to 70 N). This made switching easier.
- The gear selection mechanism has been newly developed (Schaeffler Group).
- The gear selection mechanism was moved from bottom to top. This made it possible to eliminate oil leaks and make gear shifting easier in cold weather.
- The design of the gear selection mechanism includes a selector plate, providing a clear gear shift pattern.
- The mechanism includes a lock to prevent accidental reverse gear.
- The oil volume in the gearbox decreased from 3.3 liters to 2.2.
- From the factory, the gearbox is filled with semi-synthetic instead of mineral water.
Causes of wear
Most often, a cable break occurs on those machines that are used in harsh conditions. Also, those cars that are in use every day are susceptible to this. However, a break can also happen on an ordinary, ordinary car, even if it has low mileage.
This cable wears out not only due to hard use, but also due to inept or aggressive driving. This especially happens to drivers who start at high speeds. One of the reasons for increased wear is the constant presence of your foot on the clutch pedal. As a result, the clutch slips and then fails.
Schemes and design of manual transmission 2181
Main elements of the VAZ-2181 gearbox:
1 – main gear drive gear; 2 – secondary shaft; 3 – input shaft; 4 – fifth gear fork; 5 – fork for selecting third and fourth gears; 6 – reverse light switch; 7 – clutch housing; 8 – gear shift mechanism; 9 – central lock.
Device of synchronizers of VAZ-2110 (A) and -2181 (B) boxes:
1 – first gear gear; 2 – intermediate rings; 3 – blocking ring; 4 – synchronizer clutch; 5 – synchronizer clutch hub; 6 – clamp; 7 – second gear gear.
Gear selection mechanism:
1 – gear selector levers; 2 – selector grid pin; 3 – selector grid; 4 – reverse locking mechanism; 5 – central three-dimensional plate.
Installing a new cable
Replacing the clutch cable on the Lada Kalina 1118 is performed as follows. Installation of a new element must begin from inside the car. First of all, the cable is inserted into the engine compartment. Then install the housing of the clutch disc lining compensation mechanism onto the pin and secure it with a locking bracket. The cable sheath seal is then installed in place.
When to change cables
The first sign of the need to replace these parts is unclear engagement of one or more gears. The driver has to catch the desired position of the lever in order to move it from neutral forward or backward. You can verify that this is the problem with a simple test. With the engine off, grasp the gearshift knob with two fingers and lightly rock it, first left and right, then back and forth. Even a slight play, in which the lever moves without resistance and then needs to be moved with force, indicates that the cables are stretched and need to be replaced.
Adjusting gearbox cables Kalina 2
Lada Kalina 2. Noise in the gearbox
Noise in the gearbox (noise disappears when the clutch is disengaged)
| Possible causes of malfunction | Troubleshooting |
| Low gearbox oil level | Check the oil level in the box, if necessary, add oil to the level of the lower edge of the filler hole |
| Wear of bearings, gear teeth and synchronizers or their breakdown | Replace worn parts |
| Insufficient oil level in the gearbox | Add oil. Check and, if necessary, eliminate the causes of oil leakage |
| Poor quality gearbox oil | Change oil |
| Axial movement of shafts | If necessary, replace the parts that retain the bearings or the bearings themselves. |
| Wear of the reverse spline shaft axis bushings | Replace spline shaft bushings |
| The input shaft bearings are heavily worn | Replace or repair the transmission |
Transmission noise (noise when driving in a certain gear)
| Possible causes of malfunction | Troubleshooting |
| The gears of the corresponding gear are worn or damaged | Repair or replace transmission |
Sometimes when you engage or disengage the clutch, you hear a noise in the clutch. To eliminate noise, you should check and, if necessary, restore the reliability of the engine mounting with the gearbox. Clutch noise can also be a result of sticking or increased wear on the clutch release bearing. If a bearing is found to be faulty, it should be replaced with a new one. Noise in the clutch due to increased runout of the heel of the release levers
Noise in gearbox after replacing clutch
There is no noise at idle. The noise occurs while driving and disappears when the clutch pedal is depressed.
Adjusting gearbox cables Kalina 2
My car is 30t. I took it - it was 20. There are traces of the box being rebuilt (the sealant is sticking out). At 10t everything was fine, but now after a long traffic jam or if you turn the engine at 4000, the gears start to shift hard. All. If you leave the car for 2 hours and then go, then everything is fine. You can drive for a week without spinning or stuck in traffic jams and not feel anything. Once I seemed to hear the familiar chugging noise of the input shaft bearing at idle, but then I didn’t hear it again. I do not know what to do. I'm going 2200 km to Crimea in a month. Will it arrive?
There were thoughts: 1. change the oil. What is the best oil right now?
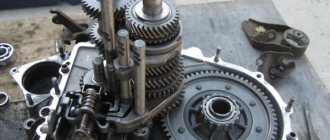
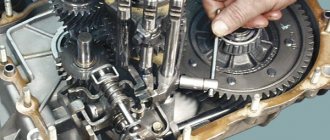
Lada Kalina gearbox repair
Inside a VAZ 21118 car, like any other, there is always a gearbox. For a model such as Kalina 1118, this device is a mechanical type design, which is equipped with one reverse stage, as well as 5 forward stages.
Gearbox from Lada Kalina.
In Lada Kalina, the gearbox is structurally combined with a differential, the main gear. Transmission differential repair should also take this into account.
The mechanism body of the VAZ Kalina car is presented in the form of three aluminum copper crankcases:
- Back cover.
- Box.
- Clutch.
Special sealants are applied between them when assembling and repairing the gearbox.
Technical features of the gearbox
The drive gear block is engaged by the input shaft. This is important to consider when repairing a gearbox. As for the input shaft itself, a constant clutch is created for it with the front gear elements that perform similar functions.
When repairing the secondary shaft, we must remember that it has a hollow structure. It is thanks to this that the oil reaches the driven gears without any problems.
Inside the mechanism you can also find driven bearings and synchronizers. When replacing the backstage on your own, this part can also be replaced. This also requires repairing the gearbox driveshaft.
The design of the gearbox is such that repairs cannot be done without the use of special circuits. In this case, the radial clearance on the roller bearings is no more than 0.07 millimeters.
Repairing the gearbox is also a rather complicated process. Especially considering that 0.04 millimeters should not exceed the same figure, but for ball analogues.
Location of the checkpoint backstage on the Lada Kalina.
The oil sump is responsible for supplying oil. It is located in the area of the front bearing, fixed behind the output shaft. Major repairs often affect such details. If you select the desired thickness of the rings, it will be possible to adjust the tension indicator. The dimensions of the seals are easy to find in the instructions; these parts can be replaced without problems, even at home.
When repairing the gearshift knob, you must remember that the driven gear of the gearbox on this machine is attached to the differential flange. Through the saloon, the atmosphere is combined with the box itself, located at the top of the structure we are considering.
Lever repair is not the only operation that needs to be carried out from time to time. Sometimes it is necessary to replace bearings; this is done when extraneous noise appears. A gearbox repair kit must be purchased if excess noise becomes noticeable when pressing or releasing the clutch pedal.
All control drive elements of the Lada Kalina gearbox.
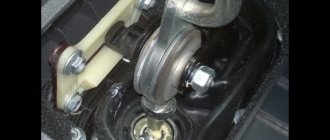
The repair manual says that the box is controlled using a drive, which consists of several elements:
- Switch rod.
- Spherical bearing.
- Lever arm.
According to the manual, cable structures are always equipped with jet traction, then the gears do not turn off on their own. One of the ends of the rod is connected to the lever, and the other to the motor. If the seals of the internal joints are faulty, it is necessary to carry out independent repair of the gearbox. But before replacing them, you need to completely change the oil. The front wheel drive is completely disconnected.
Servicing the gearbox involves using a screwdriver to remove the necessary parts. But you will need to purchase a mandrel with the necessary parameters in order to carry out the pressing.
Three axes are present on the shift system. One axis is equipped with a three-arm lever for selecting and disengaging gears. There is no gearbox on the second axle, but there are brackets that block rotation. After every 75 thousand kilometers, this design is completely changed. Gearbox lever play should also alert you, as should failure of other parts.
Removal and installation of the gearbox
Servicing the gearbox assumes that the mechanism will have to be removed and its position changed. Before doing this, you need to install the vehicle itself on the lift. The ignition must be turned off completely and the parking brake must be used.
How to repair a gearbox? To do this, disconnect the minus terminal from the battery. The hood must be opened completely. Any manual on gearbox repairs writes about this.
The oil filler cap is also removed. It is necessary to install the previous item after the screen is removed. The gearbox requires loosening the clamp responsible for fixing it. The inlet pipe hose must be disconnected from the corresponding sensor. Gearbox lever play requires the same actions in practice. Then you need to unscrew the air intake nut.
The repair progress further depends on the specific malfunction.
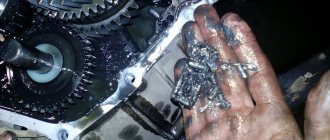
Gearbox Lada Kalina after dismantling and disassembly.
The gearbox can be installed in its original place after the 1st speed repair is completed. SHRUS-4 lubricant is applied to the outer surface of the corresponding bushing in the clutch in a very thin layer. This will also help if the gearbox is loose. The pin fixing bolts are removed from the steering knuckles.
Gearbox lever jammed
In any case, it is necessary to remove the last fastener after the bolt nut securing the left suspension arm has been unscrewed to the body bracket.
Repairing a box cushion is not complete without many of the steps described above.
After this, all that remains is to remove the lever. Another rather important element is the gearbox fork; its condition must also be monitored.
You will need to drain all the remaining oil into the container. A complete gearbox repair also involves removing such parts as the wheel drive from the gears of the differential axle shafts. The plugs are placed in the place where the gears used to be. After the gearbox adjustment is completed, they usually proceed to installing the left suspension support and brackets for the rear of the car.