Grant's engine mounts serve as a load-bearing element that distributes the load from the weight load of the body and power unit. Engine supports increase the strength characteristics of the suspension and also increase the rigidity of the body. One of the functions of pillows is vibration suppression. It is recommended to replace internal combustion engine supports every 100,000 km on domestically produced vehicles, including Grant.
FakeHeader
Comments 19
So think about it now. One has an effect, the other does not. It's like they're on different cars.
Yes, it seems to me that it’s really impossible to feel the difference.
I also carried out the same operation, I just installed the stock original pillows, well, the Grant ones didn’t inspire confidence in me; they were too soft. And I got the original pillows, no matter the price, as it happens EVERYWHERE for 590 rubles, the gearbox pillow is 300,
I did the right thing by changing it, especially since the gearbox cushion looked like it was definitely asking for a replacement! Strange, when replacing the gearbox support, I immediately noticed that the low-frequency noise in the cabin had become significantly smaller and the vibrations had decreased. Maybe because my gearbox torque rod has been removed. But when I changed the side supports of the engine to Anvis, the impressions were twofold: at idle the vibrations decreased a little, and when driving, sometimes I began to feel how the engine was moving on these supports (this is especially felt during sharp acceleration and on uneven roads). This is how the pies turned out...)
Structurally, I only like the rear gearbox cushion, and the side ones are very loose, unlike the Kalinov ones, the emphasis on them is more powerful than on the Grant ones, this is exactly what gives the engine telephony.
I agree about the Grant side airbags. In my opinion, this design solution for the pillows is due to the fact that the Grant engine already has a light piston engine - therefore there is less vibration from it. and if you put thin supports on a viburnum with a heavy piston engine, the fine-frequency vibrations will naturally decrease, but most likely there will be a feeling of engine rocking, without additional upper support from the extension of the cups...
This is exactly what I wanted to say, but you described it in more detail, well done! It seems like the only comments on my page are negative about these supports, but where I didn’t read everything they said that this is the solution to all problems with vibration. I expressed my opinion. On viburnum the Kalinovskie ones are better!
Useful tips
Motorists recommend replacing the support in warm weather. In winter, the pillow becomes very dull, and can only be removed after preheating (using a hairdryer or blowtorch). If the support does not come out, it is recommended to use VD-40 type lubricant or its equivalent from. Regular lubricant will not work for this.
Often dust and moisture enter the cavity of the old cushion, resulting in corrosion processes occurring on the cylinder. It is not possible to remove the pillow. If you are replacing the rear support, pay attention to the direction indicated by the arrow on the part. It must be installed in the direction of travel of the vehicle. Otherwise, there is a risk that the element will not withstand the load and will break.
How to replace engine mounts on a VAZ 2170-VAZ 2172?
Note! In this article we will only consider the process of replacing additional pillows, if you are going to change the main ones (And the lower ones are usually the main ones), then study the article entitled: “Replacing the lower engine mountings on dozens”, it describes the entire replacement process !
Replacing the optional bottom cushion:
This support can be removed very simply, first you will need to remove the crankcase protection from under the bottom of the car, after which you will have full access to the lower support (Cushion), it is on just one bolt and is attached to the bolt that comes with a nut; to unscrew a regular bolt, you need It will be easy to take a wrench and then unscrew it completely, but in order to unscrew the bolt that goes with the nut, you will need to stock up on two wrenches and hold the nut with one wrench (Or vice versa, the bolt), and with the other, unscrew the bolt (Or, conversely, the nut) and after doing this operations, the support can be removed from the vehicle.
Note! The same bolt that comes with the nut is indicated by an arrow and is located in the right corner in the photo just above. The new support (Cushion) is installed in the reverse order of removal. When installing, you will need to press on the engine by hand so that the holes come together and the bolts can be screwed in and thereby securing the pillow!
Replacing the optional top cushion:
This cushion is also not difficult to remove, it is attached in the same way to one bolt with a cage nut (This nut is indicated by a green arrow in the small photo and most importantly, when you unscrew the bolt, do not lose this nut, be sure to hold it) and to another bolt , but only at the end of which a regular nut is screwed in (the approximate location of this nut is indicated by a blue arrow, and its bolt is shown in red), when these two bolts are removed, you can remove the upper support and put a new one in its place.
Additional video clip: If you suddenly want to understand what kind of airbags are generally installed on 16 valve cars of the tenth family and the Priora family, and also if you suddenly wonder how they can be distinguished from each other, then in this case, watch the video clip just below :
Note! Always remember one thing, we do not recommend removing several cushions that secure the engine at once (Only if you do not remove it), otherwise, when all the cushions are removed, the engine simply will not be attached to the body with anything other than Moreover, if one pillow has been removed and you decide to also remove the second one so that you can install both of them later, we don’t recommend doing this either, because it will be difficult to combine the pillows with the bolt holes, it’s best to change one at a time and after replacing, move on to the others immediately , if true and they must be replaced!
We determine the condition of the supports visually
The above signs will not always indicate a malfunction of the engine mounts. So, if impacts are observed in the front part of the body, you need to visually inspect the element. We already know where he is. So, open the hood and look at the condition of the rubber buffer.
There should be no breaks or cracks on it. For better convenience, it is recommended to use an inspection hole (especially if it is a front and rear support). Move it from side to side. There should be no play between the cylinder and the silent block. If so, signs of engine mount failure have been confirmed. The part must be replaced.
Design features of the LADA Granta engine cooling system
The LADA Granta engine cooling system is liquid (with forced circulation of liquid), sealed, with an expansion tank. The system is filled with ethylene glycol-based coolant (antifreeze), which does not freeze at ambient temperatures down to -40 'C.
The design of the cooling system of all engines installed on Lada Granta cars is fundamentally the same and is described using the example of a car with a VAZ-21116 engine.
Location of elements of the LADA Granta cooling system:
Rice. 1. Location of the main elements of the Lada Granta cooling system: 1 - water pump (located under the timing cover); 2 — radiator of the cooling system (located under the upper cross member of the radiator frame); 3 — electric radiator fan (located under the upper cross member of the radiator frame); 4 — thermostat; 5 — coolant temperature sensor; 6 - expansion tank
A centrifugal water pump provides forced circulation of fluid in the cooling system of the Lada Granta, is installed on the front plane of the cylinder block and is driven by a timing belt. The pump has sealed bearings that do not require replenishment of lubricant. The pump cannot be repaired; if it fails (liquid leakage or bearing damage), it is replaced as an assembly.
A thermostat with a solid heat-sensitive filler maintains normal operating coolant temperature and reduces engine warm-up time. The Lada Granta thermostat has a main and additional bypass valve. At a coolant temperature of up to (85±2) °C, the thermostat is completely closed and the liquid circulates through a small circuit, bypassing the radiator, which speeds up engine warming up. At temperatures above 85 C, the thermostat begins to open, and at 102 ° C it opens completely, ensuring fluid circulation through the radiator. An electric fan with a plastic impeller ensures air purging of the radiator at low vehicle speeds, mainly in urban conditions or on mountain roads, when the oncoming air flow is not enough for cooling the radiator. To increase operating efficiency, the fan is installed in casing 7 and attached to it at three points through rubber pads. The casing, in turn, is attached to radiator 3 at four points. The electric fan is controlled by the engine control unit, which receives information about the coolant temperature from sensor 5 (see Fig. 1), located in thermostat socket 4.
The radiator is tubular-plate, aluminum, with plastic tanks, two-way, with a partition in the left tank. At the bottom right there is a drain plug 6. The tanks contain inlet and outlet hose pipes to the engine water jacket, as well as a hose pipe connecting the radiator to the expansion tank.
The expansion tank serves to compensate for the changing volume of coolant depending on its temperature. The tank is made of translucent plastic. The “MAX” and “MIN” marks are applied to its walls to control the coolant level; on top there is a filler neck, hermetically sealed with a plastic plug 1 with two valves inside (inlet and outlet), assembled in a single block. The exhaust valve opens at a pressure of 110 kPa (1.1 kgf/cm2), ensuring an increase in the boiling point of the coolant and preventing intense vaporization. When a liquid cools, its volume decreases and a vacuum is created in the system. The inlet valve in the plug opens at a vacuum of about 3 kPa (0.03 kgf/cm*) and allows air into the expansion tank.
Note
The serviceability of the valves of the expansion tank plug is very important for the normal operation of the cooling system, but often when problems arise (coolant boiling, etc.), car enthusiasts pay attention only to the operation of the thermostat, forgetting to check the valves. Leaking of the exhaust valve leads to a decrease in the boiling point of the coolant, and its jamming in the closed state leads to an emergency increase in pressure in the system, which can cause damage to the radiator and hoses
The interior heater radiator is also included in the cooling system using hoses.
Step-by-step instructions for replacing the thermostat on a Lada Granta
Before starting work, you need to prepare a tool: a TORX T30 wrench, a 13mm socket and a Phillips screwdriver. After this, proceed as follows.
- The car is placed on a level area with the engine cooled down. Raise the hood cover.
- Remove the plug from the expansion tank.
- Remove the plug from the bottom of the radiator and drain the coolant into a clean container. The plug is screwed back in.
- Disconnect the connector with wires from the coolant temperature sensor.
- Use a Phillips screwdriver to loosen the hose clamps.
- The hoses are removed from the thermostat pipes.
- Unscrew the nut securing the wire shorted to ground on the upper stud of the vehicle body.
- Remove the nuts and washers from the remaining two studs.
- The thermostat is pulled off the studs.
- Remove the old gasket from the engine seat and install a new gasket.
- To ensure a good fit, the gasket can be lubricated with engine oil or a thin layer of sealant applied to it on both sides.
- The new thermostat is installed in the seat by threading the pins through the holes in the beads of the vehicle body.
- Put on the washers and the tip of the ground wire.
- The nuts are tightened with a wrench on studs.
- The vehicle pipes are lubricated with engine oil.
- Put on the hoses and secure them with clamps.
- Having unscrewed the top radiator cap, fill in coolant until the level in the expansion tank is between o and “max”. The plug is screwed back in.
- Start the engine and check that there are no coolant leaks in all connections of the cooling system.
- Once the operating temperature is reached, screw in the expansion tank cap. Previously, this is not done so that air pockets leave the system.
vote
Article rating
Main engines
As the main engines, AvtoVAZ offers customers a choice of the power units already mentioned just above. Let's talk about each of them separately.
VAZ-11183-50
The eight-valve VAZ-11183-50 engine is an improved VAZ-2111 with a power of 82 hp, which is installed on Grant sedans and hatchbacks. The work carried out to improve the unit has increased its environmental friendliness and reliability, the level of engine torque and its elasticity have significantly increased.
The disadvantages of the VAZ-11183-50 include increased noise and the need to adjust the valves from time to time. In addition, this motor may not warm up to the required temperature due to a malfunction of the thermostat (the thermostat in such a situation must be replaced).
In addition, instability in the operation of the motor is often observed, for which there may be several reasons. For example, such instability is often associated with the burnout of one of the valves, with a violation of the integrity of the gasket, or with a malfunction of the ignition module. However, bending of the valves due to a broken timing belt will not occur.
| Number of cylinders: | 4 |
| Cylinder displacement, l: | 1,596 |
| Compression ratio: | 9,6-10 |
| Rated engine power at a crankshaft speed of 5200 rpm: | 60 kW.-(82 hp.) |
| Cylinder diameter, mm: | 82 |
| Piston stroke, mm: | 75,6 |
| Number of valves: | 8 |
| Minimum crankshaft speed, rpm: | 800 — 850 |
| Maximum torque at 2500-2700 rpm, N*m: | 120 |
| Cylinder operating order: | 1-3-4-2 |
| Octane number of gasoline: | 95 (unleaded) |
| Fuel supply system: | Electronically controlled distributed injection |
| Spark plug: | A17DVRM, BPR6ES(NGK) |
| Weight, kg: | 112 |
VAZ-11186 (VAZ 21116)
VAZ 21116 is another representative of eight-valve engines with 87 hp. under the hood. It is a modified and improved VAZ-21114 engine, which is distinguished by a lower noise level and noticeable fuel economy. They are equipped with Grant's Norma vehicles.
If we compare the VAZ 21116 with the VAZ-21114, we should note a noticeably increased level of environmental friendliness, and the power has also increased significantly. The disadvantages of the engine include a more modest resource than, for example, that of the VAZ-11183. Its pistons are much lighter than those of its predecessor, but this circumstance led to the appearance of two more disadvantages.
Lada Granta 8 valve: main faults
Even taking into account the fact that the internal combustion engine of the Lada Granta 21116 is not the most complex unit structurally, certain problems associated with certain engine malfunctions may still arise during operation.
Main malfunctions and methods for their elimination:
The internal combustion engine begins to malfunction (dips occur, loss of power). Most often, this problem is associated with burnout of one of the valves or failure of the ignition coil. The problem is solved by restoring old parts or replacing them with new ones.
Grant engine mounting pads
To replace the power unit suspension mounts on a Lada Granta VAZ 2190, you will need: a TORX E14 socket, 17" wrenches (socket and socket), 19" wrenches, a jack or a similar lifting mechanism. The power unit (engine and gearbox) is mounted on two rubber cushions on the right and left, fixed through brackets on the engine and gearbox housing, and one rear cushion (also rubber), fixed through a bracket on the gearbox housing. 1. Hang the front part of the car on supports or lift the Lada Granta VAZ 2190 on a lift. 2. Remove the engine protection (see “Removing and installing the engine protection”).
3. Before removing the rear engine mount, place a jack under the gearbox housing.
4. To replace the rear support cushion, unscrew the left one.
5. and the right nuts securing the pillow to the body.
6. Remove the three bolts securing the rear support bracket to the gearbox housing.
7. and remove the bracket together with the pillow.
NOTE: It is necessary to remove the rear cushion together with the bracket because the bolt securing the engine support cushion to the bracket is difficult to access on the car.
8. Clamp the bracket in a vice, remove the bolt securing the pillow to the bracket.
9. and remove the rear engine mount cushion.
10. Install the rear engine support cushion on the Lada Granta VAZ 2190 car in the reverse order of removal, orienting it during installation so that the protrusion on the bracket is installed between two protrusions on the inner race of the support cushion.
11. and the longer arm (shown by the arrow) of its outer race was directed towards the right side of the car.
12. Before removing the left engine mount cushion, install a jack under the gearbox housing.
13. Remove the two bolts securing the left engine mount to the bracket.
14. Remove the bolt and unscrew the two nuts securing the engine mount to the body side member.
15. and remove the left engine mount.
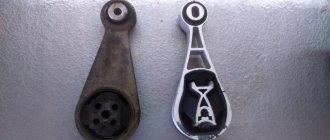
Please note that the cushion of the left support, although similar in appearance to the cushion of the right support, differs from it in the design of its attachment to the bracket. The holes in the inner race of the left engine mount are threaded, and the same holes in the race of the right engine mount are smooth.
16. Install the left engine mount cushion on the Lada Granta VAZ 2190 in the reverse order of removal.
17. Before removing the right support cushion, install a jack under the engine.
18. Remove the bolt and unscrew the two nuts securing the right engine mount cushion to the body side member.
Source of the article: https://7road.ru/drugoe/opora-dvigatelya-granta.html
Removing the left support
Remove the left mudguard of the engine compartment (see “Removing the mudguards of the engine compartment”) and install a height-adjustable stop under the gearbox housing.
Using the E-14 head, unscrew the two screws securing the support to the gearbox bracket.
Using a 17mm socket, unscrew bolt 1 and two nuts 2 securing the support to the body side member...
...and remove the support.
Left power unit support. We install the left power unit support in the reverse order. We tighten the nuts, bolt and screws securing the support to the prescribed torques (see “Appendices”).
Technological process for replacing a steering wheel
After the airbag is removed, you can begin to remove the steering wheel. So, let's consider the technological process:
- Using a marker or other available means, we make marks on the steering shaft and wheel. This is necessary in order to return the steering wheel to its previous position.
- To secure the slip ring, insert a stopper.
- Using a 24mm socket with an extension, unscrew the nut that holds the steering wheel.
- With light blows from the left and right on the rim of the steering wheel from the side of the instrument panel, we knock it out of the slots.
- Now you can completely remove the steering wheel.
If you need to change the position of the steering wheel, then you should align the wheels straight and put the steering wheel on the splines. We drive a few meters and look, if everything is satisfactory, then we assemble it in the reverse order, if not, we remove the steering wheel and set it as needed.
Airbag malfunctions
You can tell that the airbags have become unusable by the amount of engine vibration. If it operates in normal mode, and the body begins to rattle, transmitting vibration to the steering rack, pedal block, and instrument panel, you can be sure that the reason for this is the wear of the pillows.
The greatest vibration is usually observed when the engine starts, as well as when it is turned off. When the rubber cushions are completely worn out, a knocking noise may appear caused by the contact of the engine elements and its supports.
Which model to choose
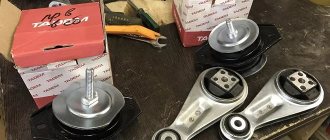
Manufacturers of auto parts offer to buy motor mounts for Granta of various models. In the catalogs of online stores there are modifications identical to factory parts and finished parts. In the finalized samples, the damper configuration has been slightly changed: this change reduces the swaying of the power unit while driving and allows it to be more securely fixed in the engine compartment.
Original spare parts are offered by , which is a manufacturer and supplier of parts for AvtoVAZ, and also sells spare parts at retail. and Anvis offer improved motor mounts with an increased service life, a modified damper and an improved powder paint coating, which protects the part from the formation of rust spots.
The average price range for a set of engine mounts for Granta: 1600-1900 rubles. “Experienced” people note that VAZ parts are unified, i.e. “Grant” supports can be installed on Kalina without any problems.
Typical faults
If the car is operated for a long time under conditions of severe loads or temperature changes, then all this does not have the best effect on the condition of the engine mounts. Over time, rubber loses its elasticity. In addition, the pillow may delaminate or crack, or even collapse. But it is worth considering that the service life of these parts is quite long - more than 100,000 km. The supports are subjected to high loads when the vehicle starts and during braking. If the car owner likes to drive fast enough, with sharp jerks at the start, then the supports will not last their intended period. Also among the typical faults is the breakdown of a metal aluminum bracket. This often happens when hitting a different obstacle. If there are oil leaks in the engine, it will definitely get onto the rubber part of the support. This lubricant can corrode the silent block and the support will fail. Coolant also does not have the best effect on the rubber part of the cushion. Breakdowns in the system must be eliminated immediately.
Airbag replacement technology
To dismantle the Lada Granta airbag, you will need a 5 mm rod and a flat-head screwdriver. So, let's get down to the process itself:
- As with any repair, you need to disconnect the minus terminal.
- Using the rods, you need to tighten the cushion clamps. This is done through special holes, the marks of which are on the side of the steering wheel.
- After the clamps are clamped, the assistant must pull the module towards him and remove it from the steering wheel mounting mount.
- Now we disconnect the “plus wire” of the sound signal.
- In the same way, we perform the operation with the “negative wire” to turn off the sound signal.
- Using a screwdriver, pry up the wire retainer and then unclip it.
- Now you can completely dismantle the pillow.
- Installation is carried out in reverse order.
The nuances of replacement and what should be prevented
As with any car repair for the Lada Granta, when replacing the airbag and steering wheel, there are nuances that need to be taken into account. So, what is worth considering when performing dismantling work:
- Before you begin removing the airbag, it is imperative to disable the control module. If this is not done, then the probability of the airbag triggering when turned off is 99%.
- When the power is turned off, you need to wait until the activator capacitor discharges. The manufacturer recommends doing this after 1 minute, but as practice shows, it may take up to 3-4 minutes, so you should wait 5 minutes.
- Never allow water, oil or other liquid materials to come into contact with the cushion module.
- When installing the airbag, you should be outside the triggering area.
- After installing the airbag, you should turn on the ignition by reaching under the steering column.
Compliance with all the listed nuances will protect against airbag deployment and harm to a person, since in practice there have been cases when neglect of safety precautions became fatal for car service workers.
Removing the rear support of the Lada Granta power unit
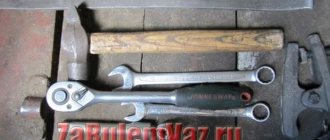
Tools:
Parts and consumables:
Notes:
The power unit supports must be removed when dismantling the engine, as well as for their replacement in case of rubber ruptures or its separation from the metal parts of the support, which can cause knocking when starting the engine and when driving over uneven surfaces.
Location of power unit supports:
1 – left support;
2 – right support;
3 – rear support.
Carry out the work on an inspection ditch or overpass.
1. To remove the rear support of the power unit, install a height-adjustable stop under the gearbox housing.
Note:
When performing work on an overpass or inspection hole, an adjustable support can be made from a regular jack and a block of a suitable size.
2. Using a 19 mm socket, unscrew and remove the bolt securing the support to its bracket.
3. Using a 17 mm spanner, unscrew the two nuts securing the support to the body.
4. Remove the rear power unit mount.
5. Install the rear power unit mount in reverse order.
Note:
When installing the support, its taller tab should face the right side of the vehicle.
6. Tighten the nuts and bolt securing the support to the prescribed torques.
Source
Engine of new modification 21116
Thanks to the efforts of the employees of the scientific and technical center of OJSC AvtoVAZ, a new modification of the 8-valve 1.6-liter engine was released. This is engine 21116. The engineers followed the same path as in the case of engine 21126 for the Priora fret - they lightened the connecting rod and piston group by 39%. Thanks to this, the new engine has increased torque throughout the entire external speed characteristic from 120 Nm to 140 Nm! Power increased from 59.5 to 64 kW. In addition to the power characteristics, there are several other positive aspects - by reducing mechanical losses, it was possible to reduce such negative phenomena as noise and vibration during operation, and the service life was increased by at least 20,000 km. Now let's look a little deeper. Engine 21116 is four-stroke, with distributed fuel injection, overhead camshaft. The connecting rod and piston group is installed by Federal Mogul. Among the innovations are oil nozzles for more intensive cooling of the pistons. The timing drive was also changed somewhat, as a result of which it was necessary to use new spacers on the crankshaft, a new toothed pulley, an automatic belt tensioner and some other parts. The ignition system also did not stand aside - now it does not have ignition coils, although in general it corresponds to that of the 21114 engine. The cooling system has a splash and is under pressure, with forced circulation, no innovations have been identified here.
This power unit is already beginning to be installed on some Lada Kalina and Lada Priora cars.
In the near future, it will be possible to fully appreciate the new engine modernization when the Lada Granta goes on sale.
Lada Granta car engine
The first Lada Granta sedan cars had 2 configurations - standard and norm. Under the hood of the grant, an 8-valve engine with a volume of 1.6 liters is installed. There are two modifications of it - 80 hp. and about 90 hp. This power unit accelerates the Grant to 100 km/h in 12 seconds, which is not bad for a budget car. Combined cycle consumption is no more than 7.3 liters per 100 km. In the suburban cycle, consumption drops to 5.5-6 liters. at a cruising speed of 100-110 km/h. With all this, the engine complies with the Euro-4 eco-standard, and work on the development of Euro-5 is gradually beginning. With the appearance of the “Lux” configuration on the Grant, a version of the engine from Renault coupled with an automatic transmission will be available. Such an engine will have a power of 98 hp.
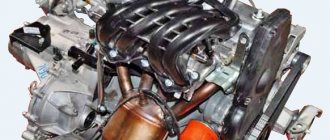
Removal and installation of the Lada Granta engine (VAZ 11183, 21116)
We dismantle the engine if it is necessary to overhaul or replace it.
We carry out the work on an inspection ditch or overpass.
Relieve the pressure in the power system (see “Replacing the fuel filter”).
Disconnect the wire terminal from the negative terminal of the battery.
We drain the engine oil (see “Replacing the engine oil and oil filter”) and coolant (see “Replacing the coolant”).
We disconnect the additional muffler pipe from the catalytic collector (see “Removing the additional muffler”).
Disconnect the tip of the fuel supply hose from the fuel rail tube (see “Removing the fuel rail and injectors”).
We remove the air filter (see “Removing the air filter and air intake”) and the air supply hose to the throttle assembly (see “Removing the air supply hose to the throttle assembly”).
Disconnect the vacuum brake booster hose and the tip of the canister purge solenoid valve tube from the receiver fittings (see “Removing the receiver”).
Disconnect the engine management system wiring harness connector from the coolant temperature sensor connector (see “Removing the coolant temperature sensor”).
We disconnect the cooling system hoses from the cover and thermostat housing, and also disconnect the tip of the “mass” wire from the cylinder head stud (see “Removing and checking the thermostat”).
Using the “8” head, we loosen the tightening of the clamps securing the three hoses of the cooling system to the pipes of the pump supply pipe... ...and remove the hoses from the pipe pipes. We remove the generator (see “Removing the generator”).
Using a 13mm socket, unscrew the three bolts securing the generator bracket...
...and remove the bracket (there are mounting sleeves in two holes). We disconnect the engine management system wiring harness connectors from: the fuel injector wiring harness connectors and oxygen concentration sensors; connectors: throttle control unit, ignition coil, crankshaft position sensor, knock sensor, low oil pressure warning sensor, canister purge valve, vehicle speed sensor (see the corresponding chapters: “Engine”, “Power system”, “Engine management system” ").
We move the wiring harnesses away from the engine to the side. We remove the gearbox (see “Removing and installing the gearbox”) and the clutch (see “Replacing the “basket” and driven disk of the clutch”).
Place soft material on the lower part of the windshield (you can use fabric folded several times). Raise the hood to a vertical position so that its rear edge rests on the fabric under the windshield. We fasten the chains of the lifting device to the engine on the right side with a standard eye, and on the left side with a bolt screwed into the hole in the cylinder block intended for fastening the clutch housing.
Having tightened the chains, we remove the stop from under the engine that supported the engine when removing the gearbox. Holding the engine, unscrew the three bolts securing the bracket for the right support of the power unit to the cylinder block...
...with a 13" head - the upper fastening bolt...
...and with a “15” head – two bolts of the lower bracket fastening (one bolt is not visible in the photo). Before removing the engine, it is necessary to check that all hoses, tubes and wires are disconnected from the engine and laid aside.
Raise the engine using a lifting device...
...and take it out of the engine compartment. We install the engine on the car in reverse order.
Video on the topic “Lada Granta. Removing and installing the engine"
Source
Malfunctions, causes, elimination
The first drawback of Lada Granta engines, as already mentioned, is the bending of the valves when the belt breaks. To avoid this malfunction, it is necessary to change it in time and visit service centers for maintenance. Then the valves will not bend, since the updated belt will last for another 100 thousand kilometers.
Young people are trying to tune the power units of cars produced by the Lada Granta plant. This includes increasing engine power. To do this, they do chip tuning, that is, they program the electronic brains of the engine, or install a turbocharger. All this leads to the rapid depletion of the engine’s vital reserves and affects its operation. A tuned engine loses 50 thousand kilometers, which it would have covered if it had been left aspirated. And that's the minimum.
Other problems are hidden in the malfunction of hydraulic valve lifters. This is also a common malfunction that car owners have to deal with. This can only be solved by installing new hydraulic pushers.
Forgetting to regularly replace filters leads to system contamination. Crumbs from used engine parts appear and travel through the oil system. It acts as an abrasive on the pistons and wears them out. The solution to this problem is to regularly replace the filter elements, especially for oil and fuel filters.
The knocking sound of the crankshaft main bearings is a concern for car owners. In this case, you need to make sure that the oil pressure in the engine is normal. Tighten the flywheel mounting bolts.
If everything is fine with the bolts and oil, then you may have to replace the crankshaft bearings or grind the journals, or reduce the clearance in the thrust bearing. As a last resort, replace the crankshaft.
When should you change the power unit mounts on a VAZ 2110: signs and reasons
Before you change the engine mounts of a VAZ 2110 car and watch a video of this process, you need to study the signs that indicate a breakdown of the rubber-metal mounts. The main symptoms characterizing problems with damper units:
- Vibrations transmitted to the steering wheel and pedal unit when idling.
- Extraneous noise in the cabin when moving on an uneven surface.
- A characteristic knocking sound in the engine compartment during acceleration and braking.
When drawing conclusions after your observations, you should not confuse vibrations on the steering wheel during braking, which are associated with defects in the brake discs or pads. To be more convincing, you need to open the hood and inspect the power unit supports. If you place your palm on a running internal combustion engine, you can feel changes in its operation.
Many years of experience in operating the Lada 2110 allows us to assert that the reasons for the failure of damper cushions are the following factors:
- Deformation phenomena on the rubber support due to mechanical and temperature influences, as well as due to exhausted service life.
- Cracking and delamination of rubber from exposure to chemically active components.
- Loss of elasticity caused by temperature changes.
Premature failure of the damper support can be caused by the owner’s excessive enthusiasm for such extreme techniques as sudden starts and emergency braking. Suspension parts are already subject to serious stress while driving, and a sporty driving style further increases the risk of their failure.
Engine support cushions for VAZ 2190 GRANT
LADA GRANTA 2190 engine mounts are necessary for attaching the engine to the subframe and suppressing vibrations from the internal combustion engine to the body, as well as for damping transverse or longitudinal torsion of the engine. There are three types: rubber, hydro-mounts and electro-hydraulic. The causes of failure may be wear of non-metallic elements, which in some cases causes an oil leak from the VAZ 2190 GRANT support pad. The Automania-shop.ru store will always help you find parts at low prices with a guarantee and delivery. Selection for a car by car make or VIN. Catalog with numbers and photographs
How many pillows does a viburnum engine have?
Good day. Why I created this topic: 1. I recently changed the front struts and the mechanic said that the generator was about to hit the front beam, and on bumps it could touch it. 2. The lever at XX constantly vibrates a little (not rattles, but shakes), although XX is very smooth! and the car doesn't wobble. Worth extra. support on the gearbox through thick rubber to the body. 3. The mileage of the car is 100 t.km - the side supports have not been changed. Only the top guitar was changed. It is worth changing the supports/cushions. If so, which ones to choose? Thanks in advance.
Well, it’s probably best to take pillows from Balakovo. I can’t say anything about the support on the driver’s side, but on the passenger side there should be 7 mm between the rubber band and the piece of iron. If the piece of hardware is just lying on the rubber band, then the support has sagged and needs to be replaced. In general, there is a recent topic on pillows... I wrote there about replacing the pillow with photos.. https://www.autolada.ru/viewtopic.php?t=177452 read it there towards the end
I'll get into the topic. My top guitar (rubber band) is cracked.. is it worth changing it? Can you feel the difference?
If it is cracked, but not completely torn off, then there is no need to replace it yet. After restoring a torn guitar, I felt the difference. When starting, the engine jerks much less
(it's a damn thing to pull out the engine).
I read the entire topic and learned a lot. But my main incentive to replace the cushion is that when they removed the racks they said that the generator was hanging very close to the beam and could hit it on bumps.
PS Maybe I’m exaggerating about vibration, if everyone still vibrates.
Source
Self-diagnosis of suspension
If it is impossible or unwilling to visit a car service center, it is possible to determine the malfunction yourself. An independent check of the condition of the engine mounts is carried out using the following devices:
- hydraulic or pneumatic jack. This device facilitates easier access to the pillows being tested;
- special safety support. A wooden block is most often used in this capacity;
- a mount or a fairly strong stick that acts as a lever.
It is recommended to carry out subsequent manipulations in the following order:
- the car is driven into a garage or other room. A necessary condition is a flat floor surface;
- use a jack installed under the front wheel to lift the car. For rear-wheel drive vehicles, the lifting device is located under the rear wheel;
- the support is installed under the engine so as to ensure that there is no load on the engine mounts. After making sure that the car is stable, the jack is lowered.
Using a tackle, position yourself under the car and conduct a visual inspection. This inspection method makes it easy to examine engine mounts for signs of malfunction acquired by the engine mounts during operation.
Even an inexperienced car enthusiast can see symptoms of support delamination, cracks and tears in the product, and also independently determine that the gasket has failed as a result of excessive hardening of the rubber. In such cases, it is strongly recommended to urgently replace the engine mount.
To detect possible play at the junction of the engine with the front beam of the car or the body, a visual inspection is not enough. Here you will need to use a pry bar. A similar lever is used to deflect the engine in different directions. The absence of play indicates the serviceability of the supports; repair of the cushions is not required.
You can eliminate this symptom as follows:
- jack up the car again;
- remove the safety support;
- check the quality of fixation of the engine mount and, if necessary, tighten the fastening with a wrench or ratchet.
In this way they get rid of the backlash.
Which model to choose
Manufacturers of auto parts offer to buy motor mounts for Granta of various models. In the catalogs of online stores there are modifications identical to factory parts and finished parts. In the finalized samples, the damper configuration has been slightly changed: this change reduces the swaying of the power unit while driving and allows it to be more securely fixed in the engine compartment.
Original spare parts are offered by , which is a manufacturer and supplier of parts for AvtoVAZ, and also sells spare parts at retail. and Anvis offer improved motor mounts with an increased service life, a modified damper and an improved powder paint coating, which protects the part from the formation of rust spots.
The average price range for a set of engine mounts for Granta: 1600-1900 rubles. “Experienced” people note that VAZ parts are unified, i.e. “Grant” supports can be installed on Kalina without any problems.
Signs of failure of the Lada Priora engine mount
VAZ cars are practically no different structurally from cars of any other manufacturers. The same applies to the design and location of parts such as engine mounts. Signs of a malfunction (including Priora) can be identified by characteristic engine vibrations. This occurs at idle and at higher speeds. The engine will jerk unnaturally.
Vibrations on the car body at idle and while driving indicate that the engine mounts are out of order or damaged. Signs of malfunction (Ford Focus 2 as well) may be different. Ford Focus cars use two supports. The right one is hydraulic, the left one is the gearbox support. In case of damage, it is recommended to replace both elements.
Engine and automatic transmission mounts
Novice car owners often wonder why the automatic transmission jerks when driving. There are many reasons for this. Can the automatic transmission jump due to faulty engine mounts? Yes maybe. Sometimes the car's behavior changes. Therefore, if extraneous vibrations, shocks, hums, or characteristic noise are noticed, then it is best to check the supports.
The car engine is quite heavy and subject to vibration, so it must be secured against any displacement during operation. If the fastening points are rigidly connected to the body elements, they will fail very quickly, since when driving over uneven road surfaces, the fastening points will absorb significant alternating loads.
"Mazda Demio"
Signs of a malfunction of the left engine mount of the Mazda Demio are knocking and vibrations. The supports bear a heavy load. It is worth carefully monitoring the condition of the airbags; a faulty part can damage the engine. This car has three airbags: left, right and bottom. The second is located near the engine oil filler neck. The left support is located under the battery. The lower one is located directly opposite the junction of the engine and automatic transmission. The methods for diagnosing a malfunction in this case are the same as for any other cars - this is a visual inspection and checking for play.