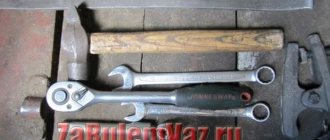
Tools:
- Ratchet wrench
- 8 mm head
- 17 mm head
- Torx head E14
- Curved box spanner 8 mm
- Adjustable stop or jack
Parts and consumables:
- Wood block
- Left and (or) right power unit supports (if replacement is necessary)
Notes:
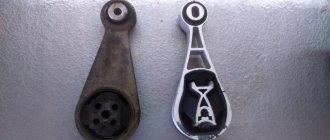
The power unit supports must be removed when dismantling the engine, as well as for their replacement in case of rubber ruptures or its separation from the metal parts of the support, which can cause knocking when starting the engine and when driving over uneven surfaces.
Location of power unit supports:
1 – left support;
2 – right support;
3 – rear support.
The work required to remove the supports is completely identical, but the left and right supports are not interchangeable. Carry out the work on an inspection ditch or overpass. An example is given for the left support.
1. Remove the left engine compartment mudguard.
2. Install a height-adjustable stop under the gearbox housing.
Note:
When performing work on an overpass or inspection hole, an adjustable support can be made from a regular jack and a block of a suitable size.
3. Using the E14 head, unscrew the two screws securing the support to the gearbox bracket.
4. Using a 17 mm socket, unscrew bolt 1 and two nuts 2 securing the support to the body side member.
5. Remove the left power unit support.
6. Install the left power unit mount in reverse order.
7. Remove the right engine mount in the same way.
8. Tighten the nuts, bolts and screws securing the supports to the specified torques.
Grant's engine mounts serve as a load-bearing element that distributes the load from the weight load of the body and power unit. Engine supports increase the strength characteristics of the suspension and also increase the rigidity of the body. One of the functions of pillows is vibration suppression. It is recommended to replace internal combustion engine supports every 100,000 km on domestically produced vehicles, including Grant.
Which model to choose
Manufacturers of auto parts offer to buy motor mounts for Granta of various models. In the catalogs of online stores there are modifications identical to factory parts and finished parts. In the finalized samples, the damper configuration has been slightly changed: this change reduces the swaying of the power unit while driving and allows it to be more securely fixed in the engine compartment.
Original spare parts are offered by , which is a manufacturer and supplier of parts for AvtoVAZ, and also sells spare parts at retail. and Anvis offer improved motor mounts with an increased service life, a modified damper and an improved powder paint coating, which protects the part from the formation of rust spots.
The average price range for a set of engine mounts for Granta: 1600-1900 rubles. “Experienced” people note that VAZ parts are unified, i.e. “Grant” supports can be installed on Kalina without any problems.
FakeHeader
Comments 19
So think about it now. One has an effect, the other does not. It's like they're on different cars.
Yes, it seems to me that it’s really impossible to feel the difference.
I also carried out the same operation, I just installed the stock original pillows, well, the Grant ones didn’t inspire confidence in me; they were too soft. And I got the original pillows, no matter the price, as it happens EVERYWHERE for 590 rubles, the gearbox pillow is 300,
I did the right thing by changing it, especially since the gearbox cushion looked like it was definitely asking for a replacement! Strange, when replacing the gearbox support, I immediately noticed that the low-frequency noise in the cabin had become significantly smaller and the vibrations had decreased. Maybe because my gearbox torque rod has been removed. But when I changed the side supports of the engine to Anvis, the impressions were twofold: at idle the vibrations decreased a little, and when driving, sometimes I began to feel how the engine was moving on these supports (this is especially felt during sharp acceleration and on uneven roads). This is how the pies turned out...)
Structurally, I only like the rear gearbox cushion, and the side ones are very loose, unlike the Kalinov ones, the emphasis on them is more powerful than on the Grant ones, this is exactly what gives the engine telephony.
I agree about the Grant side airbags. In my opinion, this design solution for the pillows is due to the fact that the Grant engine already has a light piston engine - therefore there is less vibration from it. and if you put thin supports on a viburnum with a heavy piston engine, the fine-frequency vibrations will naturally decrease, but most likely there will be a feeling of engine rocking, without additional upper support from the extension of the cups...
This is exactly what I wanted to say, but you described it in more detail, well done! It seems like the only comments on my page are negative about these supports, but where I didn’t read everything they said that this is the solution to all problems with vibration. I expressed my opinion. On viburnum the Kalinovskie ones are better!
What is needed to replace engine mounts on a Grant
In addition to a new set of pillows, the car owner will need:
- A garage with a pit, an overpass, a jack - everything with which you can get convenient access to the lower part of the Lada;
- A can of WD-40 for convenient dismantling of “stuck” old parts;
- ring wrenches “17”, “19”; universal wrench with a set of socket heads.
The jack must be placed under the crankcase to provide sufficient support for the engine so that it will not be torn off the body mounts. To make it easier to replace the right support, the jack can be moved under the gearbox bracket, and the left one - under the gearbox housing.
Do I need to change
There are no recommendations for replacing pillows depending on their service life, but once you determine that they are faulty, you should not delay replacing them. Vibration processes can not only worsen the comfort of the driver and passengers, but also lead to destructive processes in the engine or gearbox itself.
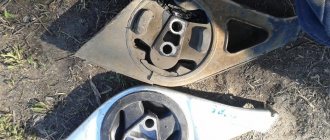
Having decided to repair the engine mounting elements, you need to decide whether you will change the cushions themselves or the mounts assemblies. In principle, if the metal support itself is not damaged, it can be left, replacing only the pillow.
The price of a set of pillows for a VAZ 2110 costs around 1,300 rubles. The cost of a complete set of supports is about 2,500 rubles.
For the work of replacing engine mounts or mounts at a service station, you will be charged at least 300 rubles for each.
Algorithm for replacing Grant engine mounts
Replacing a Grant engine mount requires the car owner to perform the following sequence of actions:
- Removing the plastic protection of the engine compartment. In particular, you only need to unscrew the mudguard;
- Removing the left and right body mount mounting nuts to gain access to the rear support;
- Removing the bolts securing the rear support bracket to the gearbox housing. By unscrewing three bolts, you can dismantle the bracket along with the pillow. After removing the bracket, you need to disconnect the support from it. Without dismantling the bracket, access to the pillow is impossible;
- To separate the support and bracket, it is recommended to place the latter in a vice and carefully unscrew the only fastening bolt;
- Take a new support out of the package and screw it to the gearbox bracket. In this case, the longer arm of the part with the fastening eye should be directed towards the right wing of the car. This completes the replacement of the rear support;
- Removal/installation of the left and right sides is carried out in the same way. You only need to change the position of the jack to provide access to the components;
- Remove the bolt securing the old side support;
- Remove the two nuts that secure the bracket to the side member;
- Remove the bolts (2 pieces) that secure the pillow to the bracket;
- After removing the used support, install a new one and assemble;
- Perform the same manipulations with the remaining side cushion.
Before changing the Lada Granta engine mounts, study the car's operating manual and suspension diagrams to remember the location of individual components and parts. The right and left side supports, although similar, are not identical and can only be mounted on a certain side. Before repair work, mark the spare parts so as not to mix them up during replacement.
Engine mounts for Lada Granta and Kalina VAZ models have been reviewed...
Greetings, VAZ 2190 car enthusiast!
Today's video is dedicated to rubber engine mounts on Lada Granta and Kalina VAZ models.
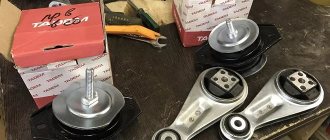
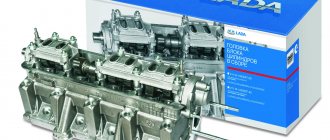
Let's look at the Grant engine mounts manufactured by Balakovo on the hood of my car, packed in a cardboard box.
In the middle lies the rear engine mount, catalog number: 1118-1001033-10RU. “Engine mount rear support.” Designed for Lada Kalina and Granta vases.
Rubber support for gearbox 1118-1001033-10RU rear, new type
Preparatory work before adjusting valves
I would like to note right away that the adjustment is made on a cold engine. If the engine was started before adjustment, it is recommended to cool it to +20 degrees. The temperature can be controlled on the instrument panel. If, say, the car sat in the garage overnight and the engine temperature dropped to +15 degrees, then there is no need to warm it up to +20 - this is insanity (I adjusted it exactly at +15 degrees).
Go ahead. Before you begin adjusting the 8 valve engine on the Lada Granta, it is necessary to carry out a number of preparatory work.
1 Step. We hang up the right front wheel and engage 5th gear.
At the first stage, you can immediately jack up the right front wheel (so that it can be easily turned) and engage fifth gear. This will make it more convenient to “turn” the engine to rotate the camshaft and align the marks on the camshaft pulley and the plastic timing case. Don't forget to keep the car stationary. To do this, put the car on the handbrake or place chocks under the rear wheels.
Photo 1: Jacking up the front right wheel
Step 2 Remove the valve cover and upper timing case
To remove the valve cover of the Lada Granta, you must first disconnect:
- support bracket for the intake module (plate with 3 nuts);
- crankcase ventilation tube (the thinnest one);
- upper crankcase ventilation hose;
- lower crankcase ventilation hose (the thickest);
- Unscrew the 2 nuts securing the valve cover and carefully remove it.
At the same time, unscrew all the spark plugs (to make it easier to rotate the camshaft) and unscrew the top part of the plastic timing case. It is secured with four 5mm hex . The photo below shows the procedure.
Photo 2: Unscrew the support bracket, disconnect the pipes, unscrew the spark plugs
Photo 3: Remove the timing case and unscrew the valve cover nuts
Photo 4: Removing the valve cover
3 Step. Aligning the marks on the camshaft pulley and the plastic timing case
Turning the front right wheel clockwise (preliminarily jacked), we align the mark on the camshaft pulley with the mark on the inside of the plastic timing case (timing mechanism), as in the photo below.
Photo 5: Aligning timing marks
In this position, valves 1, 2, 3 and 5 remain unclamped, available for gap measurement and subsequent adjustment.
Photo 6: Measuring gaps on 4 valves at once
Although the camshaft cams of all adjustable valves are in different positions, this does not interfere with adjusting the clearances. The image below schematically shows how, at different cam positions, the clearance remains the same.
Photo 7: Schematic illustration of different cam positions at which the clearance remains unchanged
4 Step. The size of the gaps on the intake and exhaust valves of the Lada Granta
According to the information letter of JSC AVTOVAZ No. 44-12, the manufacturer recommends setting the following clearances on 8 valve engines:
- for intake valves: (0.25 ± 0.05) mm;
- for exhaust valves: (0.40 ± 0.05) mm;
Removing the rear support
We carry out the work on an inspection ditch or overpass. To dismantle the rear support of the power unit, we install a height-adjustable stop under the gearbox housing.
Using a 19mm socket, unscrew the bolt securing the support to its bracket...
...and remove the bolt.
Using a 17mm spanner, unscrew the two nuts securing the support to the body.
Remove the rear support of the power unit. We install the rear support of the power unit in the reverse order. When installing the support...
...its taller foot should be facing the right side of the car...
...and between the two protrusions 2 on the inner frame of the support there should be a protrusion 1 on the support bracket. We tighten the nuts and bolt securing the support to the prescribed torques (see “Appendices”).
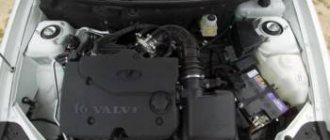
Design features of the LADA Granta engine cooling system
The LADA Granta engine cooling system is liquid (with forced circulation of liquid), sealed, with an expansion tank. The system is filled with ethylene glycol-based coolant (antifreeze), which does not freeze at ambient temperatures down to -40 'C.
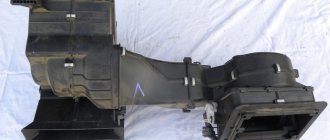
The design of the cooling system of all engines installed on Lada Granta cars is fundamentally the same and is described using the example of a car with a VAZ-21116 engine.
Location of elements of the LADA Granta cooling system:
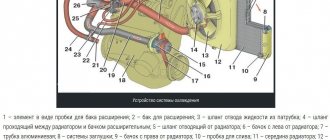
Rice. 1. Location of the main elements of the Lada Granta cooling system: 1 - water pump (located under the timing cover); 2 — radiator of the cooling system (located under the upper cross member of the radiator frame); 3 — electric radiator fan (located under the upper cross member of the radiator frame); 4 — thermostat; 5 — coolant temperature sensor; 6 - expansion tank
A centrifugal water pump provides forced circulation of fluid in the cooling system of the Lada Granta, is installed on the front plane of the cylinder block and is driven by a timing belt. The pump has sealed bearings that do not require replenishment of lubricant. The pump cannot be repaired; if it fails (liquid leakage or bearing damage), it is replaced as an assembly.
A thermostat with a solid heat-sensitive filler maintains normal operating coolant temperature and reduces engine warm-up time. The Lada Granta thermostat has a main and additional bypass valve. At a coolant temperature of up to (85±2) °C, the thermostat is completely closed and the liquid circulates through a small circuit, bypassing the radiator, which speeds up engine warming up. At temperatures above 85 C, the thermostat begins to open, and at 102 ° C it opens completely, ensuring fluid circulation through the radiator. An electric fan with a plastic impeller ensures air purging of the radiator at low vehicle speeds, mainly in urban conditions or on mountain roads, when the oncoming air flow is not enough for cooling the radiator. To increase operating efficiency, the fan is installed in casing 7 and attached to it at three points through rubber pads. The casing, in turn, is attached to radiator 3 at four points. The electric fan is controlled by the engine control unit, which receives information about the coolant temperature from sensor 5 (see Fig. 1), located in thermostat socket 4.
The radiator is tubular-plate, aluminum, with plastic tanks, two-way, with a partition in the left tank. At the bottom right there is a drain plug 6. The tanks contain inlet and outlet hose pipes to the engine water jacket, as well as a hose pipe connecting the radiator to the expansion tank.
The expansion tank serves to compensate for the changing volume of coolant depending on its temperature. The tank is made of translucent plastic. The “MAX” and “MIN” marks are applied to its walls to control the coolant level; on top there is a filler neck, hermetically sealed with a plastic plug 1 with two valves inside (inlet and outlet), assembled in a single block. The exhaust valve opens at a pressure of 110 kPa (1.1 kgf/cm2), ensuring an increase in the boiling point of the coolant and preventing intense vaporization. When a liquid cools, its volume decreases and a vacuum is created in the system. The inlet valve in the plug opens at a vacuum of about 3 kPa (0.03 kgf/cm*) and allows air into the expansion tank.
Note
The serviceability of the valves of the expansion tank plug is very important for the normal operation of the cooling system, but often when problems arise (coolant boiling, etc.), car enthusiasts pay attention only to the operation of the thermostat, forgetting to check the valves. Leaking of the exhaust valve leads to a decrease in the boiling point of the coolant, and its jamming in the closed state leads to an emergency increase in pressure in the system, which can cause damage to the radiator and hoses
The interior heater radiator is also included in the cooling system using hoses.
Removing the left support
Remove the left mudguard of the engine compartment (see “Removing the mudguards of the engine compartment”) and install a height-adjustable stop under the gearbox housing.
Using the E-14 head, unscrew the two screws securing the support to the gearbox bracket.
Using a 17mm socket, unscrew bolt 1 and two nuts 2 securing the support to the body side member...
...and remove the support.
Left power unit support. We install the left power unit support in the reverse order. We tighten the nuts, bolt and screws securing the support to the prescribed torques (see “Appendices”).
Removing the right support
When replacing the right support of the power unit, remove the right mudguard of the engine compartment (see “Removing the mudguards of the engine compartment”) and install an adjustable stop under the engine oil pan.
Using a 17mm socket, unscrew two nuts 1 and bolt 2 securing the support to the body spar (for clarity, shown with the fender liner removed). Lowering the power unit slightly on the stop...
...using the E-14 head, unscrew the two screws securing the support to the cylinder block bracket... ...and remove the right support of the power unit. The right powertrain mount is similar to the left, but they are not interchangeable. We install the right power unit support in the reverse order. Tighten the nuts, bolts and screws securing the support to the prescribed torques.
When should you change the power unit mounts on a VAZ 2110: signs and reasons
Before you change the engine mounts of a VAZ 2110 car and watch a video of this process, you need to study the signs that indicate a breakdown of the rubber-metal mounts. The main symptoms characterizing problems with damper units:
- Vibrations transmitted to the steering wheel and pedal unit when idling.
- Extraneous noise in the cabin when moving on an uneven surface.
- A characteristic knocking sound in the engine compartment during acceleration and braking.
When drawing conclusions after your observations, you should not confuse vibrations on the steering wheel during braking, which are associated with defects in the brake discs or pads. To be more convincing, you need to open the hood and inspect the power unit supports. If you place your palm on a running internal combustion engine, you can feel changes in its operation.
Many years of experience in operating the Lada 2110 allows us to assert that the reasons for the failure of damper cushions are the following factors:
- Deformation phenomena on the rubber support due to mechanical and temperature influences, as well as due to exhausted service life.
- Cracking and delamination of rubber from exposure to chemically active components.
- Loss of elasticity caused by temperature changes.
Premature failure of the damper support can be caused by the owner’s excessive enthusiasm for such extreme techniques as sudden starts and emergency braking. Suspension parts are already subject to serious stress while driving, and a sporty driving style further increases the risk of their failure.