The main purpose of a stove heater is to maintain a given temperature in the car interior, as well as to ensure an uninterrupted supply of oxygen inside.
Type of ventilation: supply and exhaust.
Heating circuit of Lada Granta: control is carried out by mechanical regulators that change the air flow speed and the direction of the damper. In order to prevent unpleasant odors from entering the cabin, a cable-type air flow intake switch is pre-installed.
Heater for Lada Granta - troubleshooting methods and instructions for replacing the device
The stove belongs to the heating, air conditioning and ventilation system of a car. The purpose of its work is to maintain a given temperature and humidity conditions, ensuring comfortable conditions for being in the car and an influx of fresh air. The type of ventilation system in Grant is supply and exhaust. The stove is controlled by simple controls that allow you to change the speed of air flow, its temperature and the direction of blowing: onto the windshield, into the legs, etc. To isolate the interior from unpleasant odors and faster warm-up in winter, an air intake switch for the stove is provided from outside or from the inside.
Interior ventilation
To ventilate the interior, set the ventilation and heating control unit controls to the following positions.
- Turn control knob 2 to the minimum temperature position (see Fig. 1 and 2).
- Place the regulator handle 4 opposite the pictogram.
- Open the nozzles on the instrument panel.
- Set the desired air supply speed with switch 1.
- If the windshield fogs up, set the regulator handle 4 opposite the pictogram.
Characteristics of the Grant stove
The standard heating, air conditioning and ventilation system ensures the creation and maintenance of a comfortable microclimate in the car. Its main functions are:
- interior ventilation;
- preventing moisture condensation on glass;
- preventing glass from icing;
- heating the interior to a comfortable temperature;
- air conditioning in the cabin.
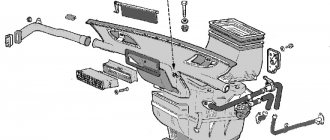
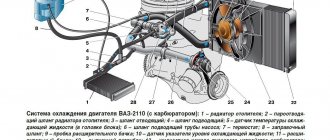
The Lada Granta heating system is a single complex consisting of a large number of components and assemblies. The operation diagram of this system and its structure are shown in the figure.
Heating and ventilation system Lada Granta.
- Windshield blower pipes.
- Dampers for distributing air flows between the windshield and the passenger compartment.
- Deflectors on the dashboard.
- Leg warmer pipes.
- A damper for distributing air flows between the areas of the windshield and passenger compartment, as well as the driver’s and passenger’s feet.
- Stove radiator.
- Air filter.
- Recirculation gate.
- Fresh air intake pipe.
- Air intake pipe from the passenger compartment.
- Electric fan.
- Air conditioner evaporator.
- Drainage.
- Temperature regulator slider.
According to the Lada Granta heater diagram, the air entering through intakes 9 and 10 is supplied through the air conditioner evaporator to the mixing zone by fan 11, having previously been cleaned by filter 7. When the air conditioner is turned on, the heater is turned off and cold air enters the zone selected by the driver through dampers 14, 5 and 2. If it is necessary to warm up the interior, the air conditioner is turned off and air is supplied inside through the heater radiator 6. The heating time can be adjusted by changing the rotation speed of fan 11.
The rotation speed of the electric fan is adjusted by connecting additional resistors to the circuit of its electric motor. The connection is made through the air speed regulator located on the center console. It has five positions: four speeds and a zero “off” position.
Unlike previous AvtoVAZ models, the Lada Grant does not have a valve that regulates the amount of heat passing through the radiator. The air temperature is regulated by a damper gear motor.
Heater radiator: responsible for heating the interior
It’s hard to imagine a modern car without a standard set of devices and options, thanks to which driving the vehicle becomes as convenient as possible, and staying in the cabin is comfortable and safe. The functions of maintaining a favorable temperature regime in the car are assigned to the heating, air conditioning and ventilation system, which, depending on the situation, can heat, ventilate or cool the air in the cabin. At the same time, one of the key components of the heating system is the stove, which includes a radiator that acts as a heat exchanger. The air entering the car interior is heated by the radiator, and it is heated by the liquid that cools the engine.
How does the Lada Granta heating system work?
Structurally, the Lada Granta heating system consists of:
- an air duct directing the flow to the left deflector (deflector is a device for enhancing traction);
- heat exchanger covers;
- seal;
- stove radiator;
- air duct to glass;
- stove body;
- central air duct;
- an air duct directing the flow to the right deflector;
- recirculation shutter rods;
- fan shell;
- directly from the fan;
- a resistor that regulates the operation of the fan;
- main air duct;
- distribution valve rods;
- regulating device;
- a device that directs air to the feet of passengers;
- thermostat shutter rods.
Troubleshooting methods
Heating the car interior directly depends on the proper functioning of the engine cooling system, since the air entering inside is heated when passing through the radiator of the Lada Granta stove. It is necessary to check the coolant level in the expansion tank: a decrease in the amount of antifreeze leads to impaired circulation and insufficient heat exchange. This result may also be due to a leak in the valve on the expansion tank plug.
Insufficient heating occurs due to a malfunction of the thermostat or pump in the engine cooling system. The cause of unsatisfactory performance is sometimes an air lock in the heating system. To eliminate it, with the engine warm, remove the heating hose from the throttle valve assembly. Then you need to create excess pressure in the expansion tank - unscrew the cap and blow into it. In this case, coolant containing air bubbles will flow from the removed hose. Similar actions must be performed with the second hose. This operation should be carried out with great care: antifreeze on a warm engine has a temperature of about 90°C, and when removing the hoses you can burn your hands.
The stove stops heating due to a malfunction of the gear motor that controls the damper that regulates the air temperature. Replacing the VAZ 2190 heater gearmotor can be done with your own hands, however, this is a rather labor-intensive procedure that requires professional experience. The part is located under the hood of the car, and to remove it you will need to dismantle the seals, frill, wiper arms and trapezoid. When replacing a nano gearmotor, it is recommended to check its performance by applying voltage to the corresponding terminals from the battery.
Important elements of the stove design are the heater radiator and the fan that supplies air to it. The heat exchanger must not be dirty, otherwise it must be replaced or repaired.
Additional Tips
However, it also happens that the problem with heating the interior consists only of some small mistakes. Therefore, before you start disturbing the service center workers, check whether all the dampers on the stove are set in the required position. It wouldn’t hurt to tug the hot air damper a little.
Often, car owners do not particularly monitor the condition of their car, which can result in various problems. For example, the stove heats poorly or cold air comes out of it. Why? This means something was overlooked somewhere. But don’t be afraid, you can carry out the repairs yourself. But first you need to find the cause of the breakdown.
Check the refrigerant level
You need to start by checking the antifreeze or antifreeze. Such an inspection should be carried out as often as possible; this can save you from many problems in the future.
Attention. If a leak is discovered, you need to place a sheet of cardboard under the engine overnight, and in the morning you can determine the problem area
But keep in mind that this method only works if the leakage is severe. Otherwise, a more thorough inspection will be necessary.
Let us remind you that in the previous article we told you how to clean injector nozzles with your own hands. This procedure is especially relevant today, when the quality of fuel leaves much to be desired.
First you need to check where the leakage is possible.
1. Check how intact the expansion tank is.
2
Pay attention to the thermostat connections, which have three hoses carrying fluid.
3. Inspect the coolant inlet and outlet hoses to the passenger compartment opposite the engine.
4. Inspect the cooling radiator.
Attention. If the leak is small, then you can simply let the engine cool and run your fingers along the bottom of the pipe joints.
1. Tighten the clamps.
2. Replace hoses if cracks are visible.
3. Add antifreeze and check how the stove now works.
Attention. If your car is not the newest, it is better to use antifreeze as a coolant, since it is less fluid, unlike antifreeze
Blockage in the system
Often an antifreeze leak is accompanied by a “plug” in the cooling system. Then the coolant enters the radiator irregularly, causing the heater to weaken.
To solve this problem, you need to open the tank, remove the radiator cap, warm up the engine, step on the gas, and raise the speed to 3500 rpm. Then the blades will direct the liquid at a higher speed and the plug will come out.
The problem with a poorly functioning stove may lie in the thermostat. When the engine warms up, there is a damper inside it that opens at a certain temperature. When this happens, fluid flows through the radiator, cooled by the fan. Over time, the damper can deteriorate, causing the engine to overheat and the heater to blow cold air.
The thermostat is located at the bottom left of the engine. Three pipes go to it. When the arrow on the gauge reaches the red mark, touch the thermostat (with a glove). If the hose that comes from it is cold, then the damper is broken.
Attention. You can revive the thermostat using a handy method: take the key to 17 or 19 and lightly tap on the bottom
There are many channels in the radiator that can become clogged, resulting in reduced heat transfer. You can purchase a new radiator or clean the old one.
Attention. It is recommended to clean the circulation regularly every 2-3 years
The heater tap can easily jam. With the first frost the problem can be identified. In this case, the tap simply does not switch to heating mode. Here, only replacing the tap will save you.
If air does not flow from the drainage system at all, then either the damper cables have fallen off or the motor has burned out.
Video. Why doesn't the stove heat up?
Sometimes it is enough to add coolant.
How to change a heater
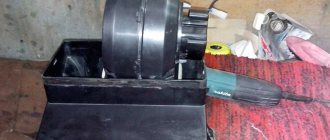
Replacement of the Lada Granta stove is carried out in accordance with the technological regulations of the manufacturer. But experienced car enthusiasts offer their own schemes for replacing this device, which are successfully used during repair work. First, you need to clear the space under the hood of the car: unscrew the battery terminals and bolts and remove it, remove the throttle body pipes, air ducts, and remove the air filter. After this, you can drain the antifreeze from the engine cooling system.
Work in the interior begins with dismantling the decorative cover of the handbrake: you need to unscrew two screws and release the tunnel fastening on the driver and passenger sides. Now you need to remove the gas pedal by unscrewing three bolts and disconnecting the contact group. Then you should remove the brake pedal mounting pin and press on it, freeing up space for further work. To access the heater radiator, remove the plastic side cover of the dashboard. To dismantle the heat exchanger, cut the pipes in two places.
The cut-off part of the pipes should be pulled out into the engine compartment, then bend the brake pedal and pull the old radiator into the cabin. After installing the new heat exchanger, its pipes are pushed into the cabin from the engine compartment, put on the radiator pipes and securely tightened with new clamps. Further installation of the removed parts occurs in the reverse order. Then the battery is installed and coolant is added.
Work on removing and installing the radiator yourself
Let us immediately make a reservation that it is better to carry out such work not alone, but together with an assistant. It is also worth noting that there are no differences between replacing the stove radiator on a Grant with and without air conditioning.
First you need to give yourself access to unhindered implementation of this manipulation. To do this, you will need to move to the space under the hood and disconnect the 2 battery terminals. Then the fasteners holding the battery are unscrewed and it is removed out.
If you are going to add antifreeze after replacing the unit, drain the coolant from the system before starting work. Then move into the car interior and remove the gas pedal; this is necessary for the smooth removal of the overall radiator housing.
Next, you will need to work with the brake pedal, namely, remove the finger of the specified pedal and press it. In addition, to gain access to the radiator, you will need to unscrew the plastic side cover of the dashboard, which is located to the right of the gas pedal.
After gaining access to the node, proceed to sawing - perhaps the most crucial moment in the whole work. The top tube is cut first at the bend, after which it, together with the pipe, is pulled into the free space under the hood. Next, a similar procedure is performed in relation to the lower tube. After sawing is completed, press the brake pedal and pull the radiator into the passenger compartment.
Now you can begin installing the new unit, the tubes of which should first be covered with foam rubber (for their more reliable fixation). Then you will need to install the radiator in its proper place and put the pipes on the pipes located near the engine.
When carrying out this manipulation, you will need outside help - one person will have to be in the car, while the other will be engaged in putting on the pipes from the engine compartment. When carrying out installation and landing, it is recommended to use a sealant, and one additional clamp is installed on each of the tubes.
After the radiator installation is completed, coolant is poured into the system, and the gas and brake pedals, battery and air filter with pipe are returned to their rightful places. Replacement completed successfully.
Rules for using a standard heating system
The car's operating manual outlines the basic principles of operation of the ventilation, air conditioning and interior heating systems. To quickly warm up, you need to switch the damper to the air recirculation position and the fan speed to the “maximum” position. In this case, the car windows must be closed. You should not drive in this mode for a long time, as this can lead to fogging of the windows.
The main reason for the accumulation of condensation is the difference in temperature inside and outside and high humidity. To prevent the windows from fogging up, you need to warm them up by pointing the heater deflectors at them and dry the air by turning on the air conditioning. However, when the vehicle is driven under heavy loads (for example, on long climbs) with the air conditioning turned on, the engine may overheat, so in such conditions it is necessary to monitor its temperature. Condensation is usually the result of luggage blocking the vents.
Incorrect operation of the ventilation and heating system may be caused by a malfunction of the temperature sensor located in the interior lamp. It is not recommended to drive with the windows open in hot weather with the air conditioning running.
The vehicle's ventilation, air conditioning and heating system creates conditions for normal and comfortable driving in any climate zone. AvtoVAZ engineers developed and implemented a simple and reliable heating concept for the Lada Granta model. But for the system to operate effectively, certain rules must be followed, which will help avoid unexpected breakdowns.
Dashboard lighting for VAZ 2107: what lamps are needed and how to replace them
In order to replace the lamps in the lighting fixtures of your car, it is not at all necessary to go to a service station and pay a highly qualified specialist. All operations can be done independently with minimal effort and money. Today we will talk about replacing light bulbs in the dashboard (DP) of a VAZ 2107 car.
Location of lamps on the instrument panel of the VAZ 2107
Before we start replacing the light bulbs, let’s see where they are located on the PCB board and what the VAZ 2107 is responsible for illuminating or indicating.
- Fuel level.
- Instrument lighting.
- The direction indicators are on.
- Engine control controller malfunction.
- Exterior lighting is on.
- Emergency oil pressure.
- The parking (hand) brake is on.
- High beam headlights are on.
- Battery charge indicator lamp.
Removing the instrument panel and preparing for replacement
To change the lamps in the instrument panel, the latter will have to be removed. It cannot be said that the PP can be removed with one movement of the hand: the designers of the VAZ 2107 made dismantling a little more difficult than on other cars of the VAZ family. Nevertheless, dismantling the PP is quite feasible in a garage or even a parking lot. In this case, the operation does not require any special knowledge. The tools we will need are:
- small flat screwdriver or knife;
- crosshead screwdriver.
I think all this will be found in the trunk of any VAZ 2107, and we can get started. First of all, we remove the plastic handles from the heating control knobs by prying them off with a flat screwdriver.
Removing the handles from the interior heating system of the seven. We unscrew the nut securing the daily counter reset button (marked with a red arrow), and push the button itself inside the shield.
Now you need to unscrew the screw that is located under the plug and secures the decorative trim. Remove the plug using a flat-head screwdriver and unscrew the Phillips screw.
After this operation, the right side of the panel will move away so that you can get to the flexible speedometer control shaft.
The shaft is removed with bare hands: simply unscrew the nut securing it.
Now remove the instrument panel from the clamp that secures its left side and pull it out slightly to get to the vacuum hose connected to the econometer. It can also be removed with bare hands, but be careful not to tear it.
It remains to disconnect the three power connectors of the instrument panel and the three wires on the VAZ 2107 heater switch. Before disconnecting, it is advisable to mark them so as not to confuse them when assembling the panel.
We remove the decorative trim along with the PP and unscrew the four self-tapping screws securing the shelves (two on each, I marked them with red arrows) to the decorative trim, and the instrument panel can be removed.
What kind of lamps are needed?
Before disassembling your VAZ, it makes sense to drive it to the nearest auto store and stock up on new light bulbs. But which ones to buy? Judging by the first photo, the backlight and indication lamps have different sizes. The choice is simple: if the backlight bulbs have burned out (position 2 in the same photo), then you will need AMN 12-3-1 (T3W) bulbs. If they are indicator ones, then A 12-1.2 (Wl.2).
You can purchase backlight lamps for VAZ either together with sockets or separately. In the second case, the burnt out light bulb must be removed from the socket and a new one installed in its place.
Dashboard illumination lamp VAZ 2107 with and without socket included
LED light bulbs
If you are tired of changing light bulbs in the power supply of your VAZ or are just a fan of modern tuning, then you can install LED light bulbs instead of incandescent ones, since the industry also produces those that have the same standard size, base, socket and operating voltage.
LED lights for the dashboard illumination (left) and indication for the VAZ 2107 car
Important! The battery charge indicator lamp cannot be changed to LED - the battery will not be charged properly
Replacing warning lamps and backlight bulbs
We lay the VAZ 2103 dashboard on a smooth soft surface face down and see the backlight and indication lights (see the very first photo).
I hope that before removing the dashboard, you found out which bulbs burned out and, using the recommendations above, purchased new ones of the right type.
As I already indicated above, backlight lamps can be sold both with sockets, ready for installation, and without them.
Elements of the Lada Granta heating system
Let's look at the design of the Lada Granta stove in the “Norma” configuration:
- radiator;
- three air pipes supplying flow to the left/right/central deflectors;
- control module;
- radiator housing;
- rubber seals;
- fan;
- fan housing;
- cables, mechanical rods of dampers;
- regulator resistors.
Heater radiator In the modification with a pre-installed air conditioner, the list is supplemented by a separate air duct, evaporator, and heater unit housing.
Block system in the electrical network
The network is powered by a battery that generates a voltage of 12 V. The device is recharged while the engine is running and directly from the generator unit. Their switching is carried out using a relay regulator, the functionality of which includes the ability to maintain a constant voltage regardless of the engine speed at the moment.
Wiring in a car electrical network involves switching all present collectors. The cables are equipped with copper cores, of which there can be several in one wire. The cores are covered in polyvinyl chloride insulation. The wire responsible for the “ground” of the LADA Granta car is connected directly to the body.
The structure of the on-board network is block-based. To ensure convenience and clarity, the manufacturer’s electrical circuit diagram is divided into the following blocks:
- front part of Lada Granta;
- ignition system;
- dashboard;
- wiring in the rear of the car.
All nodes are electrically connected.
Next, we will specify the diagram responsible for the front part. Here you can find the presence of designations for such consumers (version “Norma”):
- battery;
- starter;
- generator unit;
- front optics;
- direction indicators;
- horn;
- fan built into the cooling system;
- motor of the pump module washing the windshield;
- fuses.
Checking at a car dealership
First I checked the inlet and outlet pipes: both were hot. I made an appointment with an official dealer at the car showroom. I arrived, inspected the car, measured the air with instruments. When the engine temperature is 100 degrees. At the outlet of the stove the air came out at 48 degrees.
We checked it on a similar car. His engine temperature was 84 degrees, the outlet temperature was 68. The difference was 20 degrees between mine and the neighboring car. The technicians thought for a long time and decided that the heater radiator was clogged.
At that time, the mileage was 10,500 km, and only 6 months had passed since the purchase. We washed the radiator, but this did not give any results - the Lada Granta's stove heated very poorly. They sent me home.
Air conditioner piping
Pipelines connect all elements of the air conditioning system into a single sealed circuit. Pipelines and their mounting flanges are made of aluminum alloys. Protect metal sections of pipelines from dents and kinks. Any narrowing of the pipeline flow area leads to a decrease in system performance. To connect the moving elements of the air conditioner, the pipelines in some areas are equipped with flexible inserts (Fig. below) made of synthetic materials.
Rice. Design of the flexible insert hose: 1 - outer protective sheath; 2 — fabric cord of the load-bearing frame; 3 - plastic sealing layer; 4 - internal oil-resistant layer. O-rings made of neoprene are installed at the joints of the pipelines. When repairing an air conditioner when sections of pipelines are disconnected, the O-rings must be replaced. Tighten the threaded connections of the pipelines to the recommended torque. Weak or excessively tight tightening leads to deformation of the sealing surfaces and leakage of refrigerant. Now you have basic information about the elements used in the air conditioning system of a Lada Granta car and how to care for them. Specialized information on the method of filling the air conditioner with refrigerant and detecting leaks in the system will be discussed in other articles
Summer is coming, and that means hot days will begin, torment will begin. The feeling is especially unpleasant when you get into a car that has been parked in the sun, and HEAT comes out of there! Not a car, but some kind of sauna! In addition to this heat, the smells of plastic and other materials basking in the sun are simply exhausting. Hot seats, steering wheel - am I in hell in the flames of hell? Rather, you press on the gas so that a fresh breeze comes in and eases the suffering. Bliss. Until the first traffic light...
And nearby you can see a foreign car, from where a satisfied face is staring out, not even suspecting that there is heat all around - “Tashkent”. It’s immediately clear that this lucky guy has a working air conditioner. Are we second-class citizens? NO! After all, you can also attach this miracle machine to our VAZ-BINs, which gives freshness and coolness!
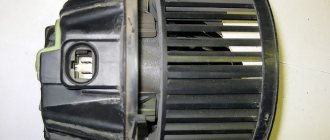
How does a stove fan work?
The main task of the fan is to take air flow from the outside and deliver it to the deflectors.
The fan is activated by a mechanical button, to which a 12 V power supply is supplied. In the Lada Granta version, the fan operates at one of three speeds. The driver selects the most optimal mode depending on the temperature inside the cabin.
Additional resistors Grants
Without resistors, the fan operates at one speed with a stable rpm. There are a total of 3 resistors installed on the board.
When the lever is moved to the first position (three resistors), the fan rotates at the first speed, the very minimum. Transfer to the second position - second speed (two resistors). Transfer to third - third speed (one resistor). The detailed diagram of the stove is shown in the photo.
Air distributor flap
Installed to regulate the air flow coming from the fan to the glass for blowing through air ducts.
Often, deformation and bending of the plastic body under the influence of temperature leads to flow leakage and depressurization.
Temperature control flap
Regulates the supply of warm air flow from the stove heater to the car interior. The wider the damper is open, the greater the throughput of the “channel”, and vice versa, the narrower it is, the less.
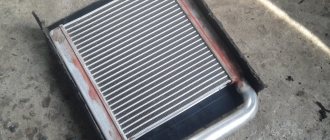
Heat exchanger Grants
Its main purpose is to heat the air flow entering the cabin. The heat exchanger is connected to the power unit through two rubber pipes: supply and return for fluid circulation.
The standard location is the central part of the dashboard of the car interior.
Air temperature sensor inside the car
Structurally installed inside a plastic interior lighting lamp. To avoid overheating, the sensor is equipped with a forced airflow system.
The installation is designed so as not to distort the actual temperature readings.
Pipes
Rubber pipes literally permeated the entire cooling, stove heating, and air conditioning system. Without their help, it is impossible to connect sections of highways with each other. Fixation method: with clamps, metal ties.
We carry out diagnostics
If it is cold outside and the interior cannot warm up properly, then you need to check the operation of the cooling system, which has a direct effect on heating the interior.
To do this, you need to open the hood and, with the engine not warmed up, check where the coolant is located.
If its level in the tank is between the minimum and maximum marks, then everything is in order. But, when this level decreases, problems with the tightness of the cooling system are possible, and this leads to a decrease in pressure inside the system. If the problem is not corrected, the stove will not be able to warm the air in the cabin effectively enough.
Thermostat
This is a native Luzar thermostat
Thermostat location under the hood
You can verify the presence of this particular breakdown by the fact that the car, while stuck in traffic jams, begins to overheat very quickly. In addition, when moving along the highway at a stable speed, the engine loses its temperature too quickly, if we talk about the cold season. However, even if these “symptoms” are not observed in your car, this does not mean that the thermostat is working properly. It is quite possible that its defect lies only in tangible problems with the interior heater.
For even more complex cases, you can check the pipes that connect to the heater radiator. Normally, one should be hot and the other just slightly warm. If the second of the pipes is very cold, this will indicate that the stove radiator in your car is clogged.
And for the most extreme situations, when none of the above helps, and there is very severe frost outside, you can simply block the radiator’s air supply with any dense object, such as cardboard or plastic.
If the cooling system of the Lada Granta is working properly, then the reason for the poor operation of the stove may lie in the functioning of the air temperature regulator damper.
Blown-out air temperature regulator (either the slider or the cable with the mechanism to which the regulator transmits tension may be faulty)
The fuse box is indicated by an arrow
Also check whether the heater fan turns on. If it remains motionless, then you need to check the condition of the 30A fuse. It can be recognized by its green color and F4 index (in the picture above). It is located in the additional concentration of power fuses. It is located under the hood, near the expansion tank of the cooling system.
If everything is fine with this fuse, then most likely the problem lies in the electric fan motor itself. You can get to it only through a special hole, which will become accessible after removing the glove compartment lid.
If the fan operates at maximum speed and the air does not flow well into the cabin, then the problem is a clogged cabin filter; it needs to be cleaned, or better yet, replaced.
Resistor block
There are cases when the cooling fan is constantly running, thereby preventing the coolant temperature from reaching operating limits. In other words, the coolant that should heat the heater radiator is cold, and the radiator cannot give off heat.
This problem arises due to the fact that the first Grant models were not equipped with an engine temperature indicator, and the driver started driving with an engine that was not warmed up. This is especially noticeable when trips are short.
Heating system control
To adjust the fan speed mode, the regulator has a gradation scale. The car owner independently selects the optimal fan rotation mode.
Heating system regulator in the cabin
Failure of the regulator blocks the operation of the entire vehicle interior heating system.
Interior ventilation and heating system of Lada Granta: checking, adjustment
The type of interior ventilation and heating system is supply and exhaust. The operating temperature of the interior heating fluid is in the range from 90 to 94°.
Warm (hot) air is supplied to the cabin by an electric fan. The feed speed is adjusted by a special regulator, which accelerates (reduces) the rotation speed of the impeller.
The electric motor has four positions:
Stove motor
Air intake follows from the outside through air intakes under the frill in the engine compartment. A filter is pre-installed to clean the flow. Filling: synthetic material.
Air is exhausted through a ventilation window in the rear of the car, behind the bumper.
The heater module is installed in the central part of the dashboard, under the panel. During engine operation, the liquid heats up and circulates along the circuit (water jacket).
The amount of air that comes from outside is regulated by the driver. The flow distribution is also controlled by a damper using a cable drive.
Diagnostics of the stove heating system
- We place the car within the perimeter of the repair area and open the hood.
- Let's start the engine.
- Turn the regulator counterclockwise to the blue sector.
- Using the lever, we alternately activate the first, second, third fan speeds.
If the fan does not change speed, then the cause of the malfunction is in the resistors.
If the fan does not activate, then there is a fault in the power circuit.
We carry out diagnostics using a multimeter.
- We activate the stove heater damper; if no changes occur, then the damper drive is faulty.
- After the engine has warmed up to a temperature of 60 - 70°, turn the regulator lever to the red sector position.
- We check the air temperature, it should correspond to degrees. Otherwise, the damper drive is faulty.
- If necessary, repeat the procedure by moving the regulator to the blue sector position.
Additional Tips
However, it also happens that the problem with heating the interior consists only of some small mistakes. Therefore, before you start disturbing the service center workers, check whether all the dampers on the stove are set in the required position. It wouldn’t hurt to tug the hot air damper a little.
According to reviews of many car owners, the Lada Kalina car is recognized as one of the warmest cars of domestic production. It is very warm in the car in winter, the interior is evenly heated and the rear passengers in the car are comfortable, since the hot air from the stove is supplied to the feet of the rear passengers in full and is not “lost” in the air tunnels of the ventilation system as in cars 2109 and 2110.
If one day it became cool inside the Lada Kalina car, and instead of the usual hot air, cold air began to blow from the stove, then there was a problem in the car’s engine cooling system. Malfunction of the cooling system can cause the engine to overheat to critical temperatures and lead to serious engine damage. An air lock can cause many problems in the cooling system of a Lada Kalina car. Before removing the plug, it is first recommended to check the entire car engine cooling system (SOD), since the cause of ineffective operation of the SOD and a cold stove can be not only an air lock in the system, but also a breakdown or deformation of the pump impeller, kinks in the pipes, or incomplete opening of the thermostat . Only after checking the entire cooling system should you begin to remove the air lock.
Signs of an air lock in the engine cooling system
An air lock creates an obstacle in the cooling system, due to which antifreeze or antifreeze cannot circulate and evenly cool a running engine.
Reasons for the appearance of an air lock in the engine cooling system:
— Air may enter the system when replacing or adding coolant.
— In the engine cooling system, there is a leak in external air due to weak compression of plastic fittings, loose clamps, a leaking radiator, a leak in the pump and a faulty expansion tank cap valve. One of the signs of a plug in the ODS is the gurgling of coolant under the instrument panel when the engine warms up.
To remove the plug, you need to loosen the clamp and remove tube 3 or 22 from the heating of the throttle assembly— The cylinder head gasket (cylinder head) was blown. As a result of the breakdown, a coolant leak is visible from under the cylinder head. Exhaust gases escape from under the cylinder head, you can see the bubbling of antifreeze, the formation of an emulsion in the expansion tank, and white steam in the car exhaust.
An air lock in the SOD can form in both the small and large circulation circles. The disadvantage of Kalina's SOD is the location of the expansion tank in a large circle. As a result, until the thermostat opens completely, it is difficult to remove the airlock. Therefore, in the cold season, “gasification” helps, as a result of which the car warms up faster, and when the engine reaches a temperature of 101-105 degrees. The thermostat opens a large circulation circle and the air exits into the expansion tank.
Climate system "Lada Granta"
The climate system of the Lada Granta includes a forced ventilation system and a cabin heating system. Air is supplied to the system by a turbine-type centrifugal fan driven by an electric motor through an air intake installed under the windshield frame. To purify the air, a filter element made of non-woven material is used. The exhaust is carried out through open windows, and when they are closed, through exhaust reflectors built into the rear of the body under the bumper.
To switch from the ventilation mode to the heating mode, a rotary switch is used, which, using a cable, moves the damper to redirect the flow of air taken from the street through the radiator of the Lada Granta stove, or bypass it.
Malfunctions of the Lada Granta climate system are noticeable mainly when operating in heating mode. They can be expressed in the absence or weak air supply, the supply of cold air to the heated place and vice versa, the fan not operating in all modes or its malfunction. Weak air supply is possible due to a clogged filter element or a fan malfunction, which leads to
Preventing glass fogging
When the air humidity is high (during heavy rain), the car windows may fog up. To prevent the windshield and front door windows from fogging up, do the following:
- Turn regulator handle 2 to the middle position.
- Place the regulator handle 4 opposite the pictogram.
- Move switch 1 of the electric fan operating modes to position “2”.
- To prevent the rear window from fogging up, press the button in the 3-button switch block.
Heating system of Lada Grants with and without air conditioning - differences
The design does not have the specified additional equipment
| Availability of air conditioning | Absence |
| Separate duct | |
| Evaporator | |
| Heater block | |
| Heater housing |
Typical malfunctions of the Lada Granta heating system
| Malfunction | Diagnostics | Remedy |
| The stove operates at one speed mode | Checking the board with resistors | Replacing the board with resistors |
| The dampers are stationary | Drive cable diagnostics | Cable lubrication, additional tension |
| The gauge on the dashboard shows different temperatures | Checking the sensor resistance on the contacts | Replacing the sensor |
| The heater does not activate when the lever is pressed | Checking the power supply circuit | Replacement of electrical wiring, fuse |
| The fan operation is accompanied by a creaking or metallic grinding sound. | Diagnostics of the stove heater unit | Bearing lubrication, replacement |
| Cold air flies out of the deflectors | Checking the integrity of the air pipes | Seal the connection with sealant |
| There is no coolant supply to the heater | Check the stove pipe supply diagram | Replacing pipes |
Car repair
The most voluminous section, which sets out the basic information necessary when carrying out repairs. There is an opinion that this section is largely intended for specialists from service centers that carry out repairs and maintenance of Lada Granta cars. The section contains chapters divided by vehicle components and assemblies.
First, a general diagram and fundamental description of the serviced unit or unit is given. The following provides information that allows you to independently, if you have the appropriate tools and skills, disassemble, replace, and subsequently assemble and adjust. A separate material is devoted to diagnostic issues. Studying this section can be very useful when deciding on repair methods, helping to make a preliminary estimate of costs, getting an idea of the parts to be replaced, the necessary adjustments and the equipment required for this.
Features of operation of the Lada Granta stove
The Lada Granta has sensors on the dashboard that are responsible for the function of the stove, regulating power indicators, air temperature, and also has a regulator. The latter determines the priority direction of air flows:
- to the salon;
- on your feet;
- simultaneously into the interior and onto the glass.
There is also a horizontal range of motion handle that determines the source of air supply (from the cabin or from the street).
In a situation where a car is stuck in a traffic jam, and in front of it is a car with garbage, the “from the salon” variation is just a godsend for passengers and the driver. The same option is relevant in the case of accelerating the warming up of the car.
The glass recirculation mode can lead to fogging of the windows, so this mode is turned on together with the air conditioner. For example, in foreign cars these two modes start in pairs.
A little below the handle there is a button responsible for heating the rear windows.
Quick heating of the interior
To do this, do the following:
- Turn control knob 2 to maximum heat.
- Place the regulator handle 4 opposite the pictogram -
- Switch the operating mode switch 1 of the electric heater fan to position “3”.
- Open the side and center vents on the instrument panel.
- Set lever 5 to the extreme right position - no outside air enters the cabin (recirculation mode).
WARNING
[td]It is not recommended to turn on the recirculation mode for a long time while the car is moving, as this usually leads to fogging of the windows.
Reviews
| № | Positive |
| 1. | Vladimir: Six months have passed since we bought the car, and there have been no breakdowns in such a short time. The fan refused to start several times, the reason turned out to be a bad fuse contact. |
| 2. | Vasily: I have been actively using the machine for two years, there are no particular complaints, all units are working as normal. Breakdowns happen, like everyone else, but they are minor and can be easily fixed on your own. |
| 3. | Gennady: after two months of the machine being idle, the stove heater began to supply little air. I disassembled it myself, cleaned it, works properly. My recommendations to car enthusiasts: don’t be afraid to repair them yourself. |
| 4. | Kirill: I think that Granta is put together with high quality, the price is affordable for a family with an average income. Provided timely maintenance, no problems arise. |
| 5. | Ivan: after buying the car, I immediately drained the factory antifreeze and bought good imported antifreeze. Now I don’t know any grief, the stove works like a charm. |
| 6. | Dmitry: there were minor defects, I fixed them myself, but they were insignificant and did not affect the performance of the machine. |
| 7. | Igor: I’m happy with the car, there are no major comments, as for domestic transport it’s very good. |
| Negative | |
| 1. | Victor: Over the two years of active use of the car, I contacted the service station several times under warranty. The fan malfunctioned, then the stove heater. Decided to renovate and sell. Renault Logan is several times better than its domestic counterpart. |
| 2. | Vladlen: I’m dissatisfied with Grant’s purchase, I’ve already regretted wasting money several times. The car is not worth the investment. |
| 3. | Gennady: a year and a half since purchasing the car, constant investments, purchase of consumables, repairs at service stations. |
If the stove blows cold
In this situation, several options are possible. Air lock - antifreeze does not flow into the heater radiator. You need to touch the radiator, this can be done from the passenger seat. Just be careful, if the radiator is leaking, you can get burned.
The radiator is located under the center console to the left of the front passenger. In the gallery above there is an arrow with the location of both the radiator and the heater valve.
Judging by the reviews, many who have not yet purchased have realized that the Lada Granta has a wonderful stove. It is wonderful because it heats quickly and efficiently. The need for a stove, especially in our country with cold winters, is acute, and here VAZ engineers made the right decision.
Engine Features
Due to the design of the car's cooling system, the engine does not warm up above 80 degrees. The management of AvtoVAZ does not see anything wrong with this; they have an official information letter on this matter. You can read it in the material: What is the operating temperature of an 8 valve engine.
The engine design is as simple as an axe. There are no hydraulic compensators, no sores were noticed. Mostly problems can arise due to malfunctions in the engine management system.
Video of acceleration to 100 km per hour
I haven’t shot my video yet, it’s winter, so we’ll wait for the weather to warm up. That's when I'll post it on our YouTube channel. In the meantime, here's a video from Grantovodov.
Here's another interesting video. It is interesting because the measurement is made using an application with a navigator, which means that the speedometer readings are more accurate if the navigator is well calibrated. Everyone knows that the higher the speed, the more the car’s speedometer lies.
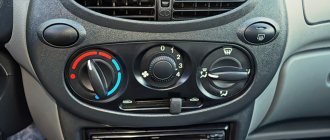
Stove control
Heating control on Grant is made simple and clear. If on the same “nine” you had to determine at random which regulator regulates what, then everything is clear.
On the switch there are inscriptions with what power to blow hot (or cold) air, next to them there are air temperature regulators, and a regulator indicating what we will heat:
- Windshield
- through the nozzles - into the cabin
- at your feet
- into the interior and onto the glass at the same time
Controlling the stove on Lada Granta
Below the three switches is a handle that moves left and right. With its help, you can determine where the stove gets air from - from the interior or from the outside. You should take it from the interior when there is an unpleasant smell outside, or you need to warm up the car faster.
To defrost the rear windows of the Lada Granta, as on previous VAZ models, there is heating. It is turned on by a button located below the handle.
Let's sum it up
Having an electrical diagram of a Lada Granta car at hand will not be superfluous for any owner. Such information potential can provide invaluable assistance in the event of a malfunction, which is especially important for cases on the road.
The heating system of the Lada Granta car serves to perform several functions: interior ventilation, heating and cooling.
All details of the Granta stove:
- radiator;
- several air ducts: to the glass blower grilles, to the right, central and left deflectors;
- Control block;
- radiator cap;
- air duct;
- seal;
- stove body;
- a hole connecting the air duct to the rear passengers;
- fan;
- fan housing;
- damper drafts: recirculation, temperature controller, air flow distribution;
- Fan resistor is optional.
Control unit for heating and ventilation system Lada Granta
The heating, air conditioning and ventilation system of the Lada Granta is a single complex that provides the most comfortable conditions inside the car, regardless of weather conditions and driving conditions.
control unit panel is installed on the instrument panel console.
Heating and ventilation system control unit:
1 – air temperature regulator;
2 – fan operating mode switch;
3 – air flow distribution regulator;
4 – air recirculation control lever;
5 – rear window heating switch.
Outside air can enter the car interior through the central and side deflectors of the heating and ventilation system, into the area where the feet and head are located and onto the windshield.
The intensity of air supply into the cabin is regulated by turning the handle of the fan operating mode switch. This turns on one of four fan speeds. Turn the switch handle clockwise to increase the fan speed.
The position of the flow distribution control handle sets the following directions of air flow in the cabin
1. The air flow enters the lower part of the cabin, into the driver's and passengers' foot areas, as well as through the air nozzles to the windshield and front door windows of the car;
2. The air flow through the blower nozzles flows to the windshield and glass of the front doors of the car;
3. The air flow through the side and central deflectors enters the upper part of the car interior to blow air over the driver and passengers.
4. The air flow enters the lower part of the cabin, to the driver and passenger footwells.
Air temperature regulator
By turning the air temperature control knob, change the temperature of the air entering the cabin.
To increase the air temperature, turn the control knob to the left, to the red sector of the scale, and to decrease the air temperature, turn to the right, to the blue sector. With its help, you can determine where the stove gets air from - from the interior or outside. You need to take it from the interior when there is an unpleasant smell outside, or you need to warm up the car faster.
Recirculation system control lever
To turn on the recirculation mode, move the lever to the extreme right position. When the recirculation mode is turned on, outside air does not enter the cabin, and the air blower fan circulates air inside the cabin. This mode is used to quickly warm up the interior in the cold season, as well as when the surrounding air is dusty and gassy.
To allow outside air to enter the cabin, move the lever to the extreme left position.
The directions and intensity of air flows through the side and central deflectors of the ventilation and heating system are regulated by correspondingly rotating the guide vanes until they are completely open and rotating the deflector body.
It is not recommended to turn on the recirculation mode for a long time while the car is moving, as this usually leads to fogging of the windows.
Heated rear window switch
The heated rear window is turned on and off by pressing the button when the ignition is on. It is turned on by a button located below the handle.
Cooling
To cool the interior air, do the following:
- Switch switch 1 (see Fig. 2) of the electric fan operating modes to one of the positions “1”, “2”, “3” or “4”.
- Place the regulator handle 4 opposite the pictogram.
- In the 3 pushbutton switch block, press the air conditioner switch key. The indicator located on the switch button will light green all the time the air conditioner is operating.
When the air passing through the evaporator cools, the water vapor contained in it condenses. The condensate is drained through a drain pipe under the bottom of the car. If the ambient air humidity is high, a puddle of water may form under the car, which is an indirect sign that the air conditioning system is working properly.
Turning on the air conditioner while the engine is running under difficult conditions (long climbs, heavy city traffic, etc.) can lead to engine overheating. Monitor the coolant temperature gauge: if the temperature exceeds the permissible value, turn off the air conditioner. During long trips in city traffic, the efficiency of the air conditioner may decrease due to the intense thermal conditions of the engine. This is not a sign of malfunction; the air conditioner will operate effectively when driving under normal road conditions.
- climate block grants
- air duct grants
- air conditioning grants
- stove grants
Lada Granta is one of the most popular cars in Russia in 2022, along with KIA Rio, VW Polo, Lada Vesta, Hyundai Solaris and Hyundai Creta. This popularity of the car is explained, first of all, by the optimal combination of price and quality: Granta owners note good visibility, an acceptable power unit, ease of maintenance, low cost of spare parts, a spacious trunk, high ground clearance, which is extremely important for Russian realities. Among the components that are indispensable in the cold season is a heater, the main component of which is the radiator. If a situation arises when it is necessary to replace the stove radiator, then in most cases this can be done without outside help. What should the owner of a Lada Granta remember who has decided to replace the heater radiator on his own?
Lada Granta stove repair
Although there is no dispute about the quality of the supplied stove, according to laws that do not depend (or depend) on us, the stove may break. The reason for breakdowns of the Lada Granta stove may be as follows:
- clogged radiator
- faulty pump
- loose contacts and staples
- airlock
When the cause of the stove's inoperability is a pump malfunction, then you should be wary. Because this can lead to overheating of the engine and ultimately “jamming”; engine repair will be very expensive. It is better to contact specialists to solve such a problem.
Loose terminals and brackets should be tightened, this is done as follows:
1) Disconnect the battery terminals for your safety and to prevent short circuits when working with electrical wiring
2) Remove the instrument panel. we take out the radio (if you installed it), air supply or temperature regulators.
3) Disconnect the wiring harness connectors for the rear window heating switches, hazard warning lights, etc.
4) We install the relaxed staples in their place
5) Putting everything back together in reverse order
Airing, or an air lock, can also cause poor operation of the stove. To solve this problem, first drain the antifreeze by first removing the throttle body hose and opening the expansion tank cap. We remove the hose supplying air from the radiator to the stove from the radiator side and blow it through. This way we eliminate the antifreeze in the stove, which was the cause of the blockage.
Why is it cold in Grant
Introduction
Lada Granta is a domestic car produced to this day. Granta is one of the affordable cars on the market and meets all the requirements for ensuring comfort for passengers and the driver. This car is equipped with air conditioning and climate control, although not full, but with a hint of it. With the onset of cold weather, it happens that the stove in Grant begins to blow cold air, and in order to find and eliminate the cause, you can spend a lot of effort without knowing the essence of the design and the causes of this breakdown.
This article will talk about the reasons why the stove in Grant blows cold air. After reading the article, you can easily find the cause of the breakdown and fix it.
Possible causes of failure
There are several similar reasons why the interior heater suddenly or after summer begins to work ineffectively. Below is a list of reasons:
- The antifreeze level has dropped;
- Cabin filter clogged;
- Heater radiator clogged;
- The expansion tank cap is faulty;
- Thermostat jammed;
- Damper jamming;
To understand each possible reason, it must be considered individually.
Antifreeze level drop
The amount of antifreeze directly affects the operation of the heater. If the level in the expansion tank drops, the cooling system may catch an air lock during circulation, which will lead to insufficient heating of the heater radiator and, consequently, to insufficient heating of the interior in cold weather.
It is necessary to check the antifreeze in the engine compartment of the car; to do this, you need to look at the expansion tank and the liquid in it should be between the MIN and MAX marks. If the level is insufficient, the coolant must be added, observing the color of the antifreeze.
Cabin filter
The cabin filter is responsible for the frequency of the air ducts, protecting the fans and radiator from contamination. Often, many car owners remove the cabin filter to create a more powerful air flow from the air ducts, which soon leads to contamination of both the air ducts and the radiator with fan.
If there is a weak air flow from the heater, then most likely the cabin filter or heater radiator is dirty.
Heater radiator
The radiator is the heart of the stove in a car, it is it that gives off heat to heat the interior; the hotter the radiator heats up, the warmer it will be in the cabin. When the radiator becomes clogged, heat is transferred much worse due to poor fluid circulation through the system.
Radiator clog can be of two types: internal and external.
Blockage outside
Such blockage most often occurs due to the absence of a cabin filter or due to its long use without replacement. This problem can be resolved by removing and washing the radiator.
Blockage from inside
The blockage that forms from the inside is due to the accumulation of oxides formed due to the oxidation of aluminum. Also, if the antifreeze is not changed for a long time, it can deteriorate and precipitate, which will soon clog the radiator.
Check the radiator for clogging from the inside, you can assess the reliability of fluid circulation through it. To do this, you need to touch the hoses that go to the radiator; they should both be hot. If any of them are cold, the radiator is clogged and needs to be washed.
Extender cap
The expander cap is a reliable element, but it can also fail and impede the circulation of fluid through the system by creating a vacuum. The lid is a valve that opens and closes as necessary to supply the expander with air, which helps prevent vacuum from forming in the system. If the valve jams, a vacuum will be created in the system, which will lead to poor fluid circulation and insufficient heating of the interior.
Thermostat
One of the most important elements of the SOD is the thermostat. It is he who is responsible for the temperature of the coolant. A working thermostat heats the coolant to a temperature of 85°C. If it is jammed in the open position, the coolant will constantly circulate through the cooling radiator, preventing the car from warming up, which will lead to a low coolant temperature and, consequently, insufficient heating of the interior in cold weather.
The damper in modern cars is controlled both by actuator and mechanically. It happens that the damper gets stuck in the open position and directs the air flow past the radiator, which produces cold air at the outlet of the air ducts.