Adjusting the valve clearances of the VAZ engine - 11183
To compensate for thermal expansion of the valve stem, clearance is required between the camshaft cam and the valve tappet.
For intake valves, the clearance should be 0.15-0.25 mm, and for exhaust valves - 0.30-0.40 mm.
The gap is set by selecting the thickness of the adjusting washers.
The washers are installed in a niche located on the top of the pushers.
To make it more convenient to remove the washers, grooves are made on the upper edges of the pushers.
Checking and adjusting the clearances is carried out on a cold engine (at a temperature of +20°)
The size of the washer is marked on its non-working surface.
1. We prepare the car for work.
2. Remove the cylinder head cover.
3. Remove the front timing belt cover4.
Use a medical syringe or a rubber bulb to remove any remaining oil around the valve lifters.
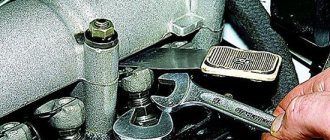
5. Install the device for adjusting the valves on the studs of the cylinder head and secure it with the nuts that secured the cylinder head cover.
There are several ways to adjust the gaps. They differ in the procedure for measuring valve clearances.
In any case, the clearances are checked only with the valves closed (their tappets are not pressed by the camshaft cams).
If it is difficult to determine the position of the valves, you should follow the method below.
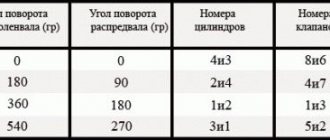
6. Rotating the crankshaft clockwise, set the piston of the first cylinder to the TDC position of the compression stroke.
The crankshaft can be rotated with a 17 mm spanner by the bolt securing its pulley or with a large slotted screwdriver by the flywheel teeth.
To do this, remove the lower clutch housing cover.
7. Having turned the shaft from the TDC position to an angle of 40-50′ (by 3 teeth of the camshaft pulley), using feeler gauges of appropriate thickness we determine the gaps in the drive of valves 1 and 3 (counting in order from the camshaft pulley).
A feeler gauge of nominal thickness should be lightly pinched in the gap between the camshaft lobe and the pushrod shim.
8. If the gap does not meet the standard, turn the pusher with the groove towards you.
Using the device, we recess the valve, holding the pusher from rotating with a screwdriver inserted into the groove.
Use the fixture lock to lock the pusher in the lower position.
9. Use tweezers to remove the adjusting washer
10. Based on the markings on the washer, determine its thickness. If the inscription is erased, use a micrometer to measure the thickness of the washer
11. Calculate the gap of the new adjusting washer using the formula:
a) for intake valves
b) for exhaust valves
where Z is the calculated thickness of the new adjusting washer, Y is the thickness of the removed washer; X - gap determined by the feeler gauge
12. We select a new washer whose thickness is close to the design one (± 0.05 mm).
13. Install a new washer into the pusher (marked down).
14. Press the pusher with a device and remove the lock.
15. Following the sequence indicated in the table, we check and adjust the clearances in the drive of other valves.
Process Features
Lada Kalina of the first and second generations differ not only in appearance, but also in the engine. The adjustment is also, albeit slightly, different. It is only needed on an engine with 8 valves, the design of which has not changed, so there is no difference in the procedure for installing thermal clearances on the first and second generations. On engines with 16 valves, this process does not make sense, since from the factory the design includes hydraulic compensators that maintain the optimal clearance without additional intervention.
The procedure is to change the values of the intervals. Work is carried out with the engine stopped by rotating the crankshaft manually clockwise. This process will require special washers, which are installed in the niches of the pushers. All you need to do is select the right size washer.
Adjusting thermal clearances in the valve drive of the gas distribution mechanism
We adjust the thermal clearances in the valve drive of the engine gas distribution mechanism in accordance with the maintenance regulations every 30 thousand km. We carry out operations on a cold engine.
Use a Phillips screwdriver to loosen the clamp securing the crankcase gas supply hose to the cylinder head cover...
...and remove the hose from the cover pipe.
Use a Phillips screwdriver to loosen the hose clamp (the main circuit of the crankcase ventilation system)…
...and remove the hose from the cylinder head cover pipe. Similarly, loosen the tightening of the hose clamp (the idle circuit of the crankcase ventilation system)…
...and remove the hose from the cylinder head cover pipe.
Using a 10mm socket, unscrew the three nuts securing the receiver bracket...
...and remove the bracket.
Two studs securing the bracket to the receiver are screwed into cage nuts installed in the grooves of the receiver.
Using a 10mm socket, unscrew the two cap nuts securing the cylinder head cover.
Remove the metal washer from the stud...
...and a rubber bushing. Similarly, remove the cover fastening parts from the other stud.
Remove the cylinder head cover. Remove the front upper timing belt cover (see “Checking the condition and replacing the timing belt”). The procedure for checking and adjusting the clearances in the valve drive mechanism is as follows. We turn the crankshaft by the bolt securing the generator drive pulley clockwise until the installation marks on the camshaft pulley and the rear timing belt cover align (see “Checking the condition and replacing the timing belt”). Then turn the crankshaft clockwise another 40–50° (2.5–3 teeth on the camshaft pulley). In this position of the shafts, we use a set of feeler gauges to check the gaps (between the adjusting washers of the pushers and the cams) at the first...
...and the third camshaft cam. The clearance between the camshaft cams and shims should be 0.20 mm for intake valves and 0.35 mm for exhaust valves. The clearance tolerance for all jaws is ±0.05 mm. The gap is equal to the thickness of the feeler gauge, which fits between the cams and the washer with a slight pinch. If the gap is different from the norm...
...then we install a device for adjusting the valves on the studs of the camshaft bearing housings.
We rotate the pusher so that the slot in its upper part faces forward (along the direction of the car). We insert the “fang” of the device between the cam and the washer (see figure below).
Recessing the valve pusher when replacing the adjusting washer
: 1 – device; 2 – pusher
By pressing down on the lever of the device, we recess the pusher with the “fang”...
...and install a clamp between the edge of the pusher and the camshaft, which holds the pusher in the lower position.
Fixing the valve tappet when replacing the adjusting washer
: 1 – retainer; 2 – adjusting washer Move the device lever to the upper position.
Use tweezers to pry the adjusting washer through the slot and remove it. If you do not have a device for adjusting the valves, you can use two screwdrivers. Using a powerful screwdriver, leaning on the cam, press the pusher down. By inserting the edge of another screwdriver (with a blade width of at least 10 mm) between the edge of the pusher and the camshaft, fix the pusher and remove the adjusting washer with tweezers. We adjust the gap by selecting an adjusting washer with the required thickness.
Design Features
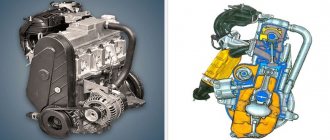
After modernizing the 21114 engine taken as a standard, the 11183 engine has the following design nuances:
- “high” cylinder block – height increased by 2.3 mm compared to 2110;
- fasteners - the holes are threaded with M12 standard pitch;
- crankshaft – original, steel, forged, crank radius increased by 2.3 mm;
- cylinder head gasket – thickness 1.2 mm, regular;
- combustion chamber – increased to 26 cm 3 due to two-stage milling;
- catcollector - short tubes, round block shape.
To reduce manufacturing costs, a connecting rod-piston group, a pulley and a crankshaft flywheel from the 2110 engine are installed in the engine. The volumes of the combustion chambers are increased for the engine with the sole purpose of ensuring a compression ratio of 9.6 - 10.0.
The manufacturer does not provide hydraulic compensators in this internal combustion engine, therefore, on the one hand, the use of lower quality oil is allowed. On the other hand, the savings in the operating budget when using cheap lubricants are “eaten up” by the costs of periodically adjusting the valves in a service station, since the manufacturer recommends doing it more often.
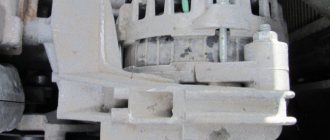
The main attachments are driven by their own belts. The design of tensioners (for example, a generator) leaves much to be desired. But the internal combustion engine allows you to increase power in the following ways. Moreover, a reasonable boost does not require major repairs to be carried out more often than the established deadline.
Even without improving the performance, the engine is high-torque and torquey, and produces 200% of the service life declared by the manufacturer. The available repair dimensions of the piston group make it possible to increase the service life, taking into account several overhauls, up to a million kilometers.
Lada Granta › Logbook › Adjusting the thermal valve clearances (21190, 2108)
Throughout the entire operation of the car, I regulate the valves myself. For this we will need: 1 - A measuring probe (sold everywhere), make sure that you can measure such gaps as 0.2 0.25mm 0.30 0.35 0.40 0.45 0.50, etc., up to 1mm. 2 - Washers (2108) 3 - Device for recessing valves 4 - Something sharp - pry up the washer and use tweezers to get it out. I personally use a knife and some kind of crap to support the washer) 5 - Syringe, pump out oil from the wells, it gets in the way when we recess the valves and take out the washers. 6 — Valve cover gasket (it’s better to buy a new one each time) 7 — Sealant, coat the joints in the corners, it usually leaks there, the gasket does not press well And also the temperature outside is 20-30 degrees. Colder? — warm up the engine to 35 degrees, disassemble it and start working. Since I have an 11186 engine, the manufacturer’s recommended thermal clearances are as follows: Intake (2,3,6,7 valves)
0.25mm +-0.05 mm Exhaust (1, 4, 5, 8 valves) 0.4mm +- 0.05mm
I left the average at 0.25 and 0.4, today I switched it to 0.45 for an experiment, they say you can increase the final output to the maximum using HBO. Let’s take a ride and see. We check valves every 15,000 km. If we ride on gas - strictly every 10,000! I have HBOT, and the gaps are slowly going away. This time the 2 intake valves were slightly tightened, by about 0.02mm. The washer was 382, we need 380 accordingly. I checked it for the second time on gas, at first the exhausts were tightened, now they are up, the intakes are moving.
For washers: they are sold in almost all stores, but in steps of 0.05, that is, the washers numbers are 300, 305, 310, etc. I prefer steps 300, 302, 305, 307, etc., these are only available in markets or by order. That's how we do it! I found it at the market. When I did it the first time, I just took out all the washers, rewrote them, and around these sizes I got 20 pieces. For example, my minimum washer was 350, maximum 385, I took from 345 to 390. At the moment the gaps are going away, I took more from 330+.
The process is simple: when everything is prepared, we point the camshaft cams on the valve being measured towards ourselves and insert a feeler gauge with the size we need to measure the gap. This is done with a key set to 17, using the camshaft pulley, in neutral, first unscrewing the spark plugs, or hanging out the wheel and turning it at 5th speed. For example, we need 0.25 for the inlet - it won’t fit, but 0.2 will pass, which means we need to get a washer and place a thinner one (with a lower number). We get it, there is 385, then we need 382 (if there are such) or 380. I just love it when everything is down to the mulimeter)). But many people don’t care, they only use steps of 0.05. The dipstick should pass with little effort, not hang around like clockwork, that’s why steps of 0.02-0.03 are needed. A word of caution, the sizes of the washers do not always correspond to what is written on them, this is checked with a micrometer, if you have one, I don’t have one, so I collected more washers and slipped them in and checked. One with number 350 does not fit, the other may fit. This is not without it. There is no ideal! But this is very rare!
Why valves are adjusted - to maintain a thermal gap between the camshaft cam and the washer. When the valves go away, the gap becomes small and they simply stop closing completely at one moment, with all that follows, loss of power and burnout of the valves. Often the engine shakes because the intake or exhaust have different clearances. This is one of the first reasons why an 8-valve engine starts to wobble.
The asking price of the puck is 30-40 rubles, you can find it on the Internet much cheaper. Device RUR 200-250 Nozzle, I don’t remember, but not expensive Syringe RUR 10 Gasket RUR 60 Sealant is also inexpensive
Consider for yourself what is more profitable for you. Contact the service, where from 400 rubles to infinity, they say, and up to 2000 rubles, they will adjust the valves for you or you will spend a lot, but do it yourself. Again, who skates how much? There are those who drive 15,000 km for 2 years and then hand over the car - why do they need that? )) My mileage is very high, I check it once every 2 months! The Internet is also full of information about this. Murzilka and ingenuity helped me here and there)) The process takes about 20 minutes for a cold one. Whoever spends an hour and a half for the first time, of course) Good luck, don’t be afraid, everything is easy and simple. __________________ The valves are adjusted at engine temperature +18. This does not mean that the outside temperature will be the same. Yes, if it is more, for example, summer +30 in the sun, there will of course be a deviation, but no more than 0.02, the error is small, there will be no catastrophe. But if the frost is not severe, naturally you don’t want to climb into -10, but 0 degrees is fine. I warmed up the engine to 40 degrees. So far this and that, here you are, she is close to 18 +-. It is natural to keep spare washers and the dipstick in a warm place, for example in a pocket. And of course, do everything quickly; whoever does it on their own for the first and second time will not succeed quickly, the engine will cool down greatly, with all the consequences. That's all. Everything is very simple!
Lada Granta .:*
*:. › Logbook › DIY valve clearance adjustment
The last time adjustment of the valves was made 20 thousand km ago, in the service station of the city, and the mileage already forced to re-look under the valve cover. And the desire was to do it yourself. I want to thank VoV02, his article prompted me to adjust the valves myself :)).
I did the first time, I rummaged through a bunch of information, I will try to describe the process in detail. If something is wrong, correct;))
On the 11186 116 engine, the recommended clearances are as follows: Intake (2, 3, 6, 7 valves)
0.25mm + -0.05mm
Outlet (1, 4, 5, 8 valves)
0.40mm + -0.05mm
1) Remove the valve cover;
2) Remove the timing cover;
3) Unscrew the candles;
4) Jack up the front right wheel so that it is suspended
(it's more convenient to turn the crankshaft);
5) Include 5th gear; 6) Use a syringe to collect excess oil around the valve tappets; 7) Install a device for embedding valves;  Check clearances:
To check the clearances, it is necessary that the camshaft cams on the measured valve face up (up to the left, up to the right - it does not matter! The main thing is that up). For convenience, you can use this one here (drew it yourself, peep somewhere on the Internet):
Now we take the probe with the gap we need and push it into the desired valve (between the camshaft cam and the washer) to measure the gap. The gauge should pass with little effort. We use the principle of a checkpoint not a checkpoint. Those. if, for example, a probe of 0.20 passes, and 0.25 does not, then, accordingly, the gap will be 0.20 mm with an error of about 0.02 mm. Example. At the inlet, we need 0.25. Sui probe — it does not climb, and 0.20 passes, then we need to get the puck and put it thinner (with a smaller number). We take out the puck, on it is number 385, then we need to buy a puck with the number 380 and so on.
9) Take out the shim:
To get the adjusting washer you need, with the help of a device, drown the pusher down and insert the retainer between the camshaft and the glass.
Then, with the help of tweezers, we take out the adjusting washer (in the pushers, for this, there are special rectangular holes, thanks to which, you can pick up the washer)
10) Having found the desired washer (see point
we put it into the pusher. 11) Using the tool, press the pusher and remove the retainer. 12) Again, we check the gap measurement with probes. If the gap keeps within the norm, then go to the next valve. 13) After all the valves are adjusted, we put a new gasket, pre-apply sealant at the corners of the cylinder head, there may leak oil.
At this adjustment is complete.
PS My measurements: 1 — 0.30 — release 2 — 0.20 — intake 3 — 0.25 — inlet 4 — 0.30 — release 5 — 0.35 — release 6 — 0.23 — inlet 7 — 0.24 — inlet 8 — 0 .35 - release
Intake: everything is in tolerances and almost everywhere is the middle, did not touch Graduation: two in tolerances, and the other two are not (all clamped). Pick up washers to all four, made a middle 0.40mm. As a result, the motor whispers :))
On this, I have everything for now! ;)) Put huskies, ask, subscribe! ;)))
Do-it-yourself valve adjustment on the Lada Grant. Expert advice
The Lada Granta Sedan/Liftback is equipped with two engine modifications: 8 and 16 valves. The difference between one and the other is obvious: the number of valves, power, acceleration dynamics.
At the same time, only 16-valve units are equipped with hydraulic compensators. They are designed to automatically adjust the gap between the camshaft cam and the foot.
In 8-valve engines, there is no automatic valve adjustment on the Grant. The owner must periodically visit a service station for preventive maintenance and replacement of worn elements of the timing mechanism.
Pros and cons of power units of different models of the family
Each Lada Kalina engine has its own immediate advantages and disadvantages. Positive aspects of model 11183:
- a time-tested engine (problems can be fixed at any car service center, spare parts are widely available);
- excellent traction, even when climbing uphill;
- A broken timing belt does not threaten the need to replace pistons and valves.
Negative aspects of model 11183:
- valve adjustment must be carried out with enviable regularity;
- the factory does not install air conditioners on this model;
- noise and vibration (hum, like from a diesel unit).
Motor with serial number 11194
Motor with serial number 11194. Pros:
- silent operation;
- the most economical gasoline consumption;
- there is no need to adjust valves, change oil and filters on schedule;
- good dynamics indicators.
Disadvantages of series 11194 motors:
- after 50,000 km the oil begins to be consumed;
- replacement of valves and pistons when the timing belt breaks (the piston system is quite scarce).
And finally, the last contender. Power unit number 21126. Advantages:
- silent operation;
- the best dynamics, the most powerful engine;
- There is no need to adjust the valves, only routine maintenance.
There is only one drawback: repair of valves and pistons in the event of a broken timing belt. Rarely is there continuity from the 11194 series in excessive oil consumption after 3-4 years of service.
When is valve adjustment necessary on an 8-valve Lada Granta?
- light metallic clatter in the engine when starting “cold”. As it heats up, the sound is barely audible and disappears;
- a metallic clatter is heard on a warmed-up power unit. Indicates excessive wear and wear of parts of the timing mechanism (gas distribution);
- unstable operation at idle;
- difficulty starting the engine;
- detonation of the power unit;
- decreased acceleration dynamics;
- the accelerator pedal is uninformative;
- power drop;
- increased fuel consumption;
- periodic popping sounds in the exhaust system.
The above symptoms do not guarantee a 100% timing fault, since similar factors are inherent in other breakdowns.
Preparatory stage before adjusting the valves on the eight-valve Lada Granta
Required tools and materials:
- a set of washers for adjusting the gap. Thickness from 3.0 to 4.5 mm in increments of 0.5 mm;
- a metal feeler gauge for adjusting the gap, which is purchased at a car store or car market;
- device for adjusting valves of Lada Grants . Not supplied as standard, must be purchased separately;
- medical tweezers;
- surgical clamp;
- set of automotive tools, set of heads.
Necessary tool
In the case of an 8-valve power unit, it may be necessary to carry out adjustment work every twenty-five thousand kilometers. But to do this you will need to have a certain set of tools available.
- First of all, we are talking about a set of shims. As a rule, such washers are supplied in thicknesses from 3 to 4.5 millimeters with an interval of 0.05 millimeters.
- In addition, you should have a dipstick at hand at a similar interval.
- And, of course, do not forget about adjustment devices. Its main feature can be considered that such a device will greatly facilitate the majority of work on replacing washers in the cylinder head.
It’s possible without a special device, but it’s much easier with it
Sequence of work on an 8-valve engine
Before starting work, you need to completely cool the engine.
Some specialists do not begin adjustments until the car engine has been idle for a day.
This needs to be unscrewed
- It is desirable that its temperature be between 20 and 30 degrees Celsius. For this purpose, you can use a standard fan, for which it will be enough to disconnect the connector from the temperature sensor, which is located near the thermostat, and turn on the ignition.
- After this, remove the spark plugs. This must be done in order not to damage the timing belt while the camshaft is moving.
- You will also need to unscrew the timing belt cover to completely remove it. Carefully disconnect all the pipes from the valve cover, removing them from the car.
- If there is oil around the valves (and most likely there is), then it needs to be removed from there using a regular syringe or a rubber bulb. For the most part, the oil is located in close proximity to the valve lifters.
Pump out the oil near the valves
We remove the washer in this way using special tools
Checking the coincidence of the mark with the timing belt position (the casing is removed)
The arrow marks the groove for tweezers
How to correctly set the piston on the compression stroke?
Setting the piston of the first cylinder to the TDC position - top dead center - is necessary when carrying out work related to the timing belt. Violation of the valve timing is unacceptable, since the power unit will not start.
TDC is set according to the timing mark on the Lada Granta. There are 8 valves on the pulley of the first and fourth cylinders. To control accuracy, check the alignment of the marks on the flywheel and crankshaft toothed pulley. If the indicated marks do not match, then the valve timing is disrupted. Rotate the crankshaft pulley until the marks match exactly.
- We activate first gear in the car.
- We hang the wheel and turn it until the mark matches.
- Disconnect the terminals from the battery.
- Unscrew the three screws of the timing cover. Remove the plastic casing.
- We turn the crankshaft until the marks on the camshaft and the drive belt cover coincide.
- We remove the rubber plug from the clutch housing and check that the mark on the flywheel matches.
- If the timing belt marks do not match, then remove the engine protection (described below).
- Remove the timing cover and turn the crankshaft until the marks match.
What can surprise a “two-piece”
What engines are installed on the Lada Kalina 2? Also with very, very good performance. The standard package includes a 1.6 liter engine with a power of 87 hp. With. In this basic configuration, the car is offered with both automatic and manual transmission. Among other things, the manufacturer offers two sixteen-valve engines producing 98 and 106 “horses,” respectively.
The Lada Kalina 2 with an automatic transmission is equipped with a 98-horsepower engine.
The last of the presented engines of the AvtoVAZ “two-piece” is made on the basis of the Priorov engine with modernized electronics and an updated cooling system.
The transmission of the Lada Kalina 2 can be called an innovation. The expected front-wheel drive is complemented by a specially designed cable-driven gearbox. Moreover, the drive is the work of Japanese specialists, and the switching mechanism is the work of craftsmen from a well-known German company.
Adjusting valves without leaving marks
In addition to the classic method of adjustment with setting TDC, there is the following practice:
- Jack up the right side of the car and hang the wheel.
- Remove the valve cover and install the retainer in the rocker arm.
- Rotate the wheel until the piston is at top dead center.
- We measure the valve clearance and determine the size of the metal washer that needs to be installed.
- We press the cam (device) on the surface of the valve, remove the worn washer, and install a new one.
- By analogy, we repair the remaining cylinders.
This adjustment method is good on the road when there are no service stations nearby.
Reviews
| № | Positive |
| 1. | Victor: adjusted the timing belt independently, without outside help. First time tuning at 65,000 km. Before this, systematic prevention at the service station according to the instructions. |
| 2. | Vasily: the valve knocked at 50,000 km. I visited the service station and ordered preventive maintenance. The guys set everything up very quickly. |
| 3. | Sergey: I have driven over 70,000 km, there are no complaints about the timing belt. The engine runs quietly and smoothly. |
| 4. | Vladlen: at 45,000 km the first valve knocked, I opened it myself and adjusted it. I didn’t change the metal washer, I limited myself to tightening it. |
| 5. | Vladimir: the engine began to knock when cold, I thought the valve was on, but it turned out that the fuel was of poor quality. |
| Negative | |
| 1. | Vyacheslav: My third piston has already flown at 30,000 km. I visited the workshop and replaced all the others. The service life of 30,000 km is very short. |
| 2. | Gennady: I don’t recommend buying the 8-valve Lada Granta. Better add some money and get a 16 valve. |
| 3. | Ivan: the quality of workmanship and assembly is low, already at 40,000 km I replaced the second and third valves. |
Conclusion
The timing mechanism on the 8-valve Lada Grant is a weak point. However, with systematic maintenance of the technical equipment and a non-aggressive driving style, the service life of the timing belt is extended by 5 - 10 thousand km.
High-quality fuel and motor oil with a viscosity index of at least 10W-40 will increase the service life by several thousand more. The timing interval is adjusted every 15,000 km.
Premature valve failures are most often caused by violation of operating conditions by the owners of technical equipment.
The procedure for selecting and installing new washers
At this stage, valve adjustment on the Lada Granta moves to the stage of replacing washers that have worn out during operation. Measurements of parts must be carried out using a micrometer.
So, the calculation system is quite simple: the thickness of the worn washer is added to the difference between the measured and normal gaps (subtracted in that order). The result will indicate the thickness of the new washer to be installed.
After the Lada Granta valve clearances have been set according to the standards, the engine is assembled.
You can first check the gaps again to finally make sure they meet the standards. After this, the lid is returned to its place (always with a new rubber band), and the pipes are connected.
The timing belt and its casing are installed, then the spark plugs are installed. Now the adjustment can be considered completely completed.
In order for the non-professional adjustment of the Lada Granta valves to the norm, which is based on the above measurements, to be successful, you need to carefully study the instructions. At the same time, the tuning kit and replacement washers are quite cheap. Therefore, the motorist will be able to save both on the cost of repairs and on setup time. You can purchase all the necessary tools and parts at any auto store.
Self-adjustment of valves on a Grant seems difficult at first glance. But the procedure is quite easy, it only requires the concentration of the performer and the premature preparation of the tools necessary for the work.
Using improvised items is highly discouraged. They will not only complicate the adjustment process, but can also cause damage to the valve system.