The belt tension is determined by its length, so there is no tensioner. Accordingly, when operating the car, tension adjustment is not required. If, due to wear or oiling, the belt begins to slip on the pulleys (this causes a whistling sound), it must be replaced.
To perform the work, you need a special tool for installing the belt 67.7834-9703.
As a last resort, the belt can be carefully installed without a tool, being careful not to damage it.
An inspection ditch or overpass will be required to complete the work.
As operating experience has shown, this method, namely without the presence of a tensioning device, did not justify itself. And therefore we have to install a bracket and a tensioning device from a Lada Kalina car.
For installation, we buy a bracket with a tensioning device from a Lada Kalina car.
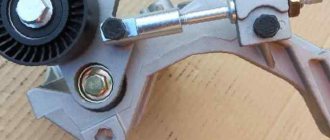
| 1. Install the bracket | 3. To tension the belt, put an “8” spanner on the hexagon of the tensioner adjusting pin. |
| 5. Using a 8-mm head, rotate the adjusting pin counterclockwise. In this case, the tension roller will press harder on the upper branch of the belt, tightening it. | |
| 6. Having tensioned the belt, tighten the lock nut of the stud. |
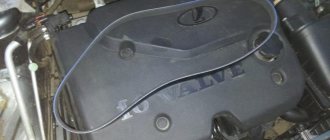
Marking of the generator drive belt is 6K 882 (the belt profile has six V-protrusions, circumference 882 mm).
You need to remember that after installing a new belt after a short period of use, you need to tighten the belt.
Technical regulations Lada Granta
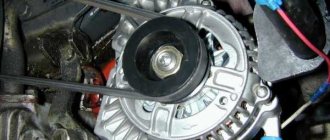
The alternator belt is located under the alternator itself
If you rely on the manufacturer’s technical regulations, then the belt should be checked at least once every 15,000 km. And every thirty thousand kilometers, this belt needs to be replaced.
That is, it turns out to be a cycle with an interval of fifteen thousand kilometers, in which the alternator belt is alternately checked and replaced.
And, given that the tensioner, as such, is not used, the belt is focused solely on one-time stretching during installation.
There are options for reusing the belt, but this practice is highly discouraged.
conclusions
This technical “mistake” did not happen by accident. The fact is that the Lada Granta was developed with a low retail price in mind. And, given the depreciation of the ruble, this car managed to enter the top ten cheapest cars in the world. At the same time, the equipment of the Lada Grant is much higher than that of its competitors on the list.
And some problems, like the alternator belt tensioner, can be solved yourself. Only consider warranty issues that may be violated during installation.
How to change the alternator belt on a Lada Grant with your own hands
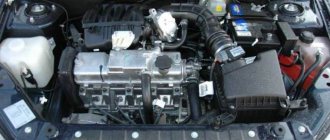
Lada Granta cars, like other vehicles, are equipped with a generator designed to power electrical equipment components while driving. If there are malfunctions in the operation of this device, first of all the driver pays attention to the condition of the belt. Below we will talk about how to replace the alternator belt on a Lada Granta car with air conditioning.
Procedure for replacing the Lada Granta alternator belt yourself
Required tools and materials:
- set of car keys, sockets, ratchet;
- new strap;
- rags, liquid WD – 40;
- wooden stop;
- mechanical/hydraulic jack;
- screwdriver with a flat, Phillips-shaped bit.
Tension check
There are two approaches: visual assessment and physical.
Visual assessment of condition:
- the car is on a flat surface, the gear is in neutral, the handbrake is off, the hood is open;
- We don’t start the car - we put it in 5th gear;
- We opened the hood and found a generator: we push the car back, resting against the bumper;
- We inspect the required part along its entire length: are there any breaks or cracks? It needs to be changed.
Poor quality will lead to unexpected problems on the way.
Physical assessment:
- if you have a tool that measures pressure force: press the belt with a force of 10 kg*s - the deflection should be no more than 10 mm;
- there is no special tool: we try to turn it across - it should turn no more than 90 degrees.
How to tighten the alternator belt on a Grant
This section applies only to machines with a tensioner. No - change the part or see above how to install it.
Subsequence:
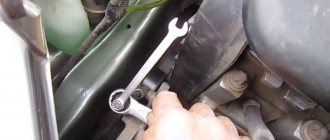
- we use ring wrenches 8, 19;
- Throw key 19 onto the lead screw;
- wrench 8 for locknut;
- we touch;
- Now you can turn the lead screw: clockwise to loosen, counterclockwise to tighten;
- got the desired result - tighten the locknut.
It is better to take ring wrenches, since a head with a ratchet or a wrench will not work.
When to change: technical regulations for replacing a VAZ 2190 belt
AvtoVAZ requires checking the condition of this part every 15,000 kilometers.
Replacement is required every 30,000 kilometers, regardless of condition.
How to remove a generator on a Grant
It needs to be removed for repairs, replacement of bearings or rollers.
The step-by-step process involves:
- remove the negative terminal from the battery;
- working with the generator: disconnect the wiring harness from it;
- remove the cover of the power wire nut, remove the nut and remove the wire from the bolt;
- unscrew and pull out the upper and lower fastening bolts - to work with the lower one, you may need to climb into a hole, throw off the tin protection of the internal combustion engine and dismantle it from below;
- move the part to the right mudguard, remove the belt, and remove it.
You can do without a hole. Example:
Most modern cars have a tensioner on the alternator belt, which requires some special features during repair work or when replacing the belt itself. But in Lada Granta models that use an eight-valve engine, the manufacturer does not provide a belt tensioner. So replacing the alternator belt needs to be done a little differently.
If the belt breaks on the way
When a break in the alternator belt still catches the driver in the middle of the journey, it is possible to temporarily correct the situation. If you are aware of such a problem with your car, it would be wise to carry a spare belt with you. When replacing a belt at a service station, special devices are used. But, of course, an ordinary driver cannot have these on the road. Therefore, the procedure must be carried out carefully and carefully.
We need to wait for the car to cool down. Next, remove the right side of the mudguard. Then the belt scraps are removed. After this, put on a new belt in stages, first on the crankshaft pulley, then put the other part of the belt behind the pulley, pressing it against it, and begin rotating the crankshaft clockwise. But if you don’t have a spare timing belt at hand, you can replace it with improvised materials.
Nylon women's tights are perfect. As a rule, they are sold in almost any store, even grocery stores. The advantage of this wardrobe detail is that the tights have a tension limit; you won’t be able to overtighten them. They are tied in a tight, reliable knot. After the structure is fitted, the excess is cut off as close to the knot as possible so that nothing catches anywhere.
In cases where tights don’t work out, elements from a men’s wardrobe are perfect. Leather belt of trousers or bags or a tie. In this case, the length of the future product is measured in proportion to the worn-out belt. This approach is due to the fact that leather and fabric products can be overtightened, which can cause damage to the mechanism. In this case, repairs will be much more serious than just replacing the alternator belt.
If you study the reviews on the model, it is clear that stories with the Lada tensioner are quite common. Grant's warranty period is not at all comparable to its Korean counterparts. It is only 24 months. The frequency of operation of the machine decides a lot. Taking these factors into account, everyone will be able to individually decide how to deal with the annoying nuisance: wait two years or sacrifice the node guarantee by resorting to radical actions.
We check the condition of the alternator belt ourselves
To make sure that the belt is in good condition, you need to perform simple steps. Initially, fifth gear is engaged. On it, leaning on the front bumper, we try to push the car back. At the same time, we are trying to conduct a visual inspection of the belt along its entire length.
All the grooves have been cut off, the belt is on the verge of breaking
There, according to the general rule, there should be no cracks, even the smallest ones, as well as ruptures and peelings that occur due to long-term use of rubber products.
This belt is no longer any good.
If such problems are found, the belt must be replaced. The timing belt is checked in the same way.
It is also a good idea to check the external condition of the generator itself, since its quality raises questions. Don't forget to inspect the generator roller.
The belt is already bad, but the generator pulley is still good
Alternator belt replacement process
To carry out the replacement work, we will need the alternator belt itself, which can be purchased from official dealer representatives at a price of approximately 800 rubles.
Standard article number for alternator belt: 1118-1041020-07
- The length of this belt is 823 millimeters.
- You can find it in the catalog by name or by your own unique number 1118-1041020-07.
- The marking on the box will indicate the index 6РК 823.
In addition, prepare in advance a sufficiently long screwdriver, as well as a “13” key. You may also need a knife to remove the old belt.
- To begin with, we remove the old belt, or what is left of it. As we have already said, this needs to be done every thirty thousand kilometers, even if the condition of the belt appears to be completely satisfactory. The belt can be removed with a simple knife.
We remove the belt by simply cutting it off, most conveniently with a stationery knife
After this, all that remains is to take care of tightening the lower bolt and the nut of the upper generator mounting bolt. This will be enough to set everything in place.
Alternative options
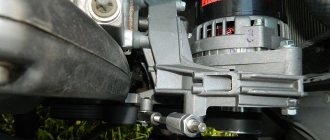
Of course, many car enthusiasts are well aware of the consequences of not having a belt tensioner. The fact is that the belt, quite often, is overtightened, which leads to too rapid wear of the generator bearing. You can recognize this problem by a characteristic sound reminiscent of a howl. This design flaw can be eliminated by installing a generator belt tensioner. The most common option is to install a tensioner from the Lada Kalina.
Installing the alternator belt tensioner
The reason for abandoning the tensioner is simple. The manufacturer tried to save additional money by making the car one of the most affordable in the world. And this is typical only for the cheapest trim levels (standard and norm), which are supplied with eight-valve power units.
Snapshot53252323
To improve visual inspection, remove the plastic engine cover. To check the condition of the belt, engage the manual transmission in fifth gear, push the car (or turn a suspended wheel) and inspect the entire length of the belt. On a car with an automatic transmission, remove the right fender from the engine compartment and, turning the crankshaft using the accessory drive pulley bolt, check the condition of the belt.
With any of the gearboxes, the following method is also possible: mark sections of the belt with chalk and, briefly turning on the starter, turn the crankshaft at small angles. We inspect the tape along its entire length, checking the areas covered with marks.
The belt should not have cracks, tears or detachments of rubber from the base fabric. A faulty belt must be replaced. To do this, from the engine compartment side...
We replace the belt tensioner with our own hands
The procedure for replacing the alternator belt tensioner is not difficult to carry out yourself. The only thing you need to have is a high-quality tool for installing the tensioner. The Grant generator belt tensioner is changed in the following order:
— disconnect the contacts on the battery terminals;
— then we weaken the tension force of the roller and remove the generator belt;
— unscrew the bracket nuts and remove the bracket itself;
— install a new bracket with a roller installed on it;
— We install the generator belt and tension it.
In order to prevent breakdowns in the future, it is extremely important for a car enthusiast to follow only two rules. The first rule is that when replacing the belt, it is important to check that the crankshaft pulleys, alternator and tensioner pulley are in line, and according to the second rule, it is important not to allow the belt tension to be too high.
Car with air conditioning: the differences are not only in the presence of a tensioner
Owners of cars with air conditioning will need to stock up on WD-40 or similar lubricant, a 10" wrench, and also a balloon, since the right front wheel will need to be removed.
We do not change the procedure, otherwise the lubricant will not have time to act.
- Moisten the bolts holding the pad and bracket.
- We support the front part of the car on the right with a jack.
- We remove the wheel.
- Lowering the car, unscrew the tensioner pulley.
We work carefully because only a small engine overhang is needed.
Please note that to work you need to lower the car without the wheel.
An attempt to reduce the cost of low-cost bag configurations resulted in the absence of a tensioner on the alternator belt, which could result in the alternator belt being over-tightened and resulting in failure.
Problems with the generator are typical for Granta: whistling under load or in the rain, bearings break due to narrowing. If there is no tensioner, problems are inevitable. Let's look at how to replace the Grant generator belt.
Replacing the alternator belt on the Lada Grant 8 valve
- We place the car on a flat platform (platform) and open the hood.
We begin work after the engine has cooled down, the temperature is safe, which eliminates burns and injuries.
- For convenience, we remove the expansion tank of the cooling system and move it to the side.
- Using a key set to “13” we release the upper and lower fastenings of the generator, but do not twist the nuts.
- Move the generator housing forward towards the wall of the cylinder block until it stops.
- We reset the old RPM.
Removing the old belt
- We carry out troubleshooting of the generator splines and crankshaft shaft. If there are no comments or deformations of the grooves, we install a new RPM.
- Using a pry bar, move the body to its original position, screw in the nut of the lower and upper fastenings.
- We complete the assembly.
We fix the nuts 1 - lower, 2 - upper
Replacing the alternator belt without tensioner on the Lada Grant is completed.
Note to the driver!!!
Setting the exact tension of the RPM at home is quite difficult, because... This requires special equipment. Use a regular tester (multimeter), every second motorist has the device.
We set the tension in the following way:
- After putting on the belt, start the engine.
- We put two terminals of the multimeter on the battery.
- We look at the voltage at the “output”, its value should be close to 14.00 V. If it is less, then we increase the tension, if it is more, we release it.
The belt deflection in the area between the engine pulleys and the air conditioning compressor with an applied force of 100 N (10 kgf) should be within 6–7 mm. The belt deflection in the area between the engine pulleys and the air conditioning compressor with an applied force of 100 N (10 kgf) should be within within 6–7 mm.
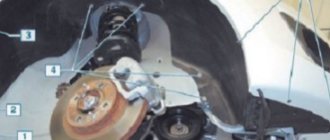
Mounting points for the mudguard and fender liner: 1 — screw with a Torx T-27 key for general fastening of the mudguard and fender liner to the wheel arch;
2 — two Torx T-20 screws for general fastening of the mudguard and fender liner to the wheel arch and fender; 3 - Torx T-20 key screw for fastening the fender liner to the wing; 4 — four self-tapping screws “8” for fastening the fender liner to the wheel arch; 5 - four Torx T-20 key screws for fastening the fender liner to the front bumper. Mounting places for the mudguard and fender liner: 1 - Torx T-27 key screw for the general fastening of the mudguard and fender liner to the wheel arch; 2 — two Torx T-20 screws for general fastening of the mudguard and fender liner to the wheel arch and fender; 3 - Torx T-20 key screw for fastening the fender liner to the wing; 4 — four self-tapping screws “8” for fastening the fender liner to the wheel arch; 5 - four Torx T-20 screws for fastening the fender liner to the front bumper. We install a height-adjustable stop under the engine oil pan so that it takes on the weight of the engine.
Right power unit support.Right power unit support.
So, we have loosened the tension on the accessory drive belt and now we can...
Signs of wear on the RPM
Before you start replacing the RPM, conduct your own diagnostics and evaluate the actual condition of the parts and mechanisms. Perhaps the cause of the malfunction is in another unit adjacent to the generator.
- We open the hood, the engine must cool down so as not to damage the skin of the hand and fingers.
- We put the gear in neutral and turn the alternator belt. Rotation occurs quite easily, by hand, without special equipment.
- We inspect each area one by one.
Signs of wear on the RPM
The following will indicate the need to replace the RPM:
- fraying, side abrasions;
- peeling of rubber, thread fiber;
- other mechanical damage;
- teeth tears;
- the presence of oily traces and streaks on the surface of the belt.
If there are no comments on the RPM, we proceed to inspect the tensioner roller. Often the reason for the appearance of third-party noise is precisely this, worn-out roller bearings. We loosen the structure with our hands and check that it is working properly.
It is important to know!!!
If the belt breaks on the way, it is allowed to travel on the battery's reserve energy, but not more than one hour. In practice, experts recommend no more than half an hour of free movement.
Signs that replacement is needed
When conducting an inspection, we must pay attention to the presence of the following signs:
Some stripes on the belt are already worn out
- abrasions;
- cracks;
- rubber lags behind the base;
- ruptures.
If there is any of them, the belt needs to be changed.
With him
Using the E-14 head, unscrew the two screws securing the support to the engine cylinder block bracket. Using the “17” head, we unscrew the two nuts and the bolt securing the support to the body spar (shown by arrows). Using the E-14 head, we unscrew the two screws securing the support to the engine cylinder block bracket. Using a 17mm socket, unscrew the two nuts and the bolt securing the support to the body side member (shown by arrows).
Instructions on how to assemble a tensioner on a grant
Any Grant has space for installing a tensioner. To assemble this you will need:
- generator bracket from Kalina;
- tension roller and its bracket;
- screw tensioner;
- new belt from Kalina;
- bushings and bolts.
Assembly diagram, full list of parts with article numbers, see below:
The tensioner is not installed from the factory in order to save money. SCHEME: Lada.online
The assembly process is shown in detail here:
Sequence of actions when modifying the generator bracket with your own hands on the Lada Grant
- We grind 2 - 3 cm on each side of the generator mount. It is better to do this in a stationary vice using drilling equipment. Due to the lack of equipment, we use a grinding machine, which is known as a “grinder”.
Sew 2-3cm on each side
- Using a drill with a metal drill (at “8”), we drill out the standard hole on the mount, making the stroke length for the bolt 1.5 - 2.0 cm.
Drill out the standard ring
- Using a grinder, we partially grind down the stiffening rib on the mount so that it does not interfere with the free movement of the converter.
- We cut out a corner of metal 40 mm long and 30 - 40 mm thick, and bend the edge. It turned out to be something like the letter “G”. One end is attached to the bracket, on the other we weld a nut to “10”.
Corner letter G
- We assemble the structural elements, screw in the bolt to tension the generator drive belt.
- We install the converter and the bracket without tensioner in its original place.
- We move the rocker to the third gear position, put on the drive belt, and turn the crankshaft pulley by hand.
- Check the degree of belt tension.
Belt tension level
At home, we check the tension level of the generator drive belt as follows. Using your finger, press on the section of the belt between the crankshaft pulley and the tensioner. The belt bends by 10 - 12 mm, no more. Tighten the fastening (tension) as necessary.
Finally, we start the engine and check the functionality of the system.
Belt sizes
Several types of alternator belts are installed on the Grant, but this does not mean that they are all interchangeable. The difference lies in their length. You can learn more about belt size in the article below.
Without air conditioner and tensioner
This design does not require additional equipment, and the belt is tensioned directly by the generator. In this modification, the shortest belt measuring 823mm will be used.
The most successful company recommends purchasing such a belt. Belts from this company have proven themselves well in the market. Belt article size 883mm from: 6PK823.
With tensioner, but without air conditioning
This design has a tensioner with a roller with which the belt is tensioned. The belt in this design is slightly larger and measures 882 mm.
Such a belt can be found under article number 6PK882 from or from the BRT company with article number BRT882.
With air conditioning and tensioner
Due to the presence of an air conditioner and tensioner, this belt is the longest and measures 1018 mm
This belt can be purchased from GATES with article number 6PK1018.
How to replace the Grant alternator belt
The replacement process is not simple and depends on the equipment of the car: whether there is a tensioner, air conditioning. In the latter case, you cannot do without a lift and dismantling the engine mount due to the air conditioning compressor clutch pulley.
For a Granta with air conditioning, for installation you will need to hang the wheel and remove one engine mount.
How to change a belt on a Grant 8 and 16 valve without air conditioning and tensioner
What you will need for work:
- a knife, if you just need to cut off an old part;
- crank or ratchet with head 13;
- long strong wire;
- flat screwdriver;
- partner – you can replace it yourself, but it’s easier with an assistant.
Step 1. Dismantling
The car is on a flat surface, neutral is engaged without the handbrake. Battery is disconnected.
If the old belt is not needed, we cut it in an accessible place and take it out.
If you need to save the old one, do everything up to step 3.
A replacement is needed with a length of 8223mm, six-wedge. Called 6RK 823. PHOTO: www.zr.ru
Step 2. Remove the generator mount
We approach the generator mount with head 13:
- we remove the lower bolt by 2-3 turns;
- Use it to completely unscrew the top bolt.
In this situation, we proceed to installation. PHOTO: www.zr.ru
Step 3. Raise the part
Scroll the generator up. The top mount becomes higher than the bracket to which it is screwed.
We press the part to the engine. We fix it with strong wire. For example, we hang it from the cylinder head bolt.
In this situation, we proceed to installation. PHOTO: www.zr.ruAt this stage, you can remove the old part if you did not cut it. We engage fifth gear and push the car back, squeezing the belt with a screwdriver from the generator drive pulley.
Step 4. Install a new one
We pull the new one onto the pulleys.
The installation takes place in the position of the generator when it is pressed against the engine. PHOTO: www.zr.ru
We engage fifth gear, push the car back, pressing the belt against pulley 1 in the picture. This is where a helper will come in handy.
As soon as we put it on, we work in reverse order:
- unplug the generator;
- press it into working position;
- return the upper mounting bolt and tighten the lower one.
Replacing the alternator belt on a Grant with air conditioning
It's more difficult here. Step by step:
- we drive the car onto a lift or overpass;
- remove the tensioner;
- take off the front right wheel;
- we support the internal combustion engine and dismantle the pillow;
- change the required part.
The whole problem is in points 5 (air conditioning compressor clutch) and 7 (right engine mount) - our belt passes through them (number 6). The rest: 1-drive of auxiliary devices, 2/3-tensioner, 4-generator. PHOTO: www.zr.ru
What you need
- new belt marked 6РК 995;
- spanners 8, 19;
- socket wrenches 8, 10;
- Torx keys T20, T27;
- ratchet with extension and heads E14, 17.
Step 1. Tensioner
The car is on a lift or overpass.
The front right wheel studs are loose.
Open the hood. Remove the terminals from the battery.
We find the tensioner, take out the spanners 19 and 8:
- 19 we put on the lead screw;
- 8 hold the locknut;
- we touch;
- Turn the lead screw clockwise to loosen the tension.
We remove the lock nut and loosen the tension. PHOTO taken from: www.zr.ru
We need keys 8, 10. Remove:
- central shield (numbers 1, 5, 7);
- right shield (number 2).
Step 3. Wheel
Remove the front right wheel. Using keys 8, Torx t20, t27, we dismantle the fender liner according to the diagram.
To work with the fender liner you need three different keys. Having removed it, we gain access to the engine support. PHOTO: www.zr.ru
Step 4: Engine Mount
Getting ready to remove the engine mount.
We securely support the engine under the crankcase - the support should take the weight of the internal combustion engine.
Using a wrench or ratchet with an E14 head, unscrew the screws securing the support to the engine.
Use head 17 to unscrew the screws securing the support to the body.
We remove the support. Make sure the weight of the engine is securely supported in the crankcase!!! PHOTO: www.zr.ru
Do-it-yourself step-by-step replacement of the Grant generator belt
Despite the external similarity of the Lada Granta models with 8 and 16 valves, the method of replacing the alternator belt is different. 8-valve modifications: “Norma”, “Standard” are not equipped with an air conditioning system. The gas distribution design does not have a mechanical belt tensioner.
The Lada Granta “Lux” version with a 16-valve mechanism and pre-installed air conditioning has a built-in drive belt tensioner.
In order to provide methodological assistance to inexperienced Lada Granta owners, we will consider two ways to replace the alternator belt.
The upper screw securing the support to the bracket is shorter than the lower one - do not confuse it during assembly. The upper screw securing the support to the bracket is shorter than the lower one - do not confuse it during assembly. Lada Granta and Kalina: checking and replacing the auxiliary drive belt
Let's summarize
To work with the generator and replace the belt you must:
- set of Torx keys t20 and 27, ratchet with head or handle, knife;
- if there is no tensioner, it can be assembled and delivered;
- if there is no air conditioner, replacement is the easiest;
- is there air conditioning? Work requires a pit or lift with disassembly of the engine mount;
- consumables are changed every 30 thousand runs according to regulations.
Write comments, share your experience.
In accordance with the maintenance regulations for Lada Granta and Lada Kalina cars, we check the condition of the auxiliary drive belt every 15 thousand kilometers, and replace it every 90 thousand km, regardless of the condition of the belt.
LADA > Granta
LADA > Kalina
It is more convenient to work on an inspection ditch or overpass.
Timing for prevention of replacement of the alternator belt on the Lada Granta (8, 16) valves
The manufacturer in the operating instructions indicates a maintenance interval of 15,000 km. The strap is replaced as necessary, but no later than 30,000 km.
Violation of the interval can lead to undesirable consequences, including bending of valves, a hole in the wall of the cylinder block at speeds over 60 km/h.
Ultimately, a major overhaul of the power unit will be required, which is very costly, both in time and money.
We install the new belt in the reverse order, ensuring the required belt tension by rotating the tensioner lead screw.
Holding the nut, rotate the lead screw clockwise, loosening the belt tension.Holding the nut, rotate the lead screw clockwise, loosening the belt tension.
So far, we have shown operations that will allow, if necessary, to change the tension of the accessory drive belt. But to replace the belt, we have to dismantle the right support of the power unit, since it passes through the belt.
From the bottom of the car, remove the middle and right mudguards of the engine compartment. You can see how to do this in the article “Replacing Lada Granta coolant”. Next, we should remove the fender liner of the right front wheel or, having freed all the fastenings of the fender liner in the front and middle parts, bend the fender liner by the brake disc of the wheel.
We hang and remove the right front wheel and release the fender liner fastenings according to the diagram.
Replacing the alternator belt on a Lada Granta 16 valves (Lada Granta with air conditioning)
- Jack up the right side of the car and remove the wheel.
- Unscrew the five screws in the wheel arch and remove the lower part of the “protection”. This is necessary to ensure unobstructed access to the engine mount; it must be removed.
- Unscrew the 8 bolts around the perimeter of the oil pan protection and remove it.
Mounting points for the mudguard and fender liner: 1 — screw with a Torx T-27 key for general fastening of the mudguard and fender liner to the wheel arch; 2 — two Torx T-20 screws for general fastening of the mudguard and fender liner to the wheel arch and fender; 3 - Torx T-20 key screw for fastening the fender liner to the wing; 4 — four self-tapping screws “8” for fastening the fender liner to the wheel arch; 5 - four Torx T-20 screws for fastening the fender liner to the front bumper.
- We install a wooden block in the center of the oil pan and lower the car onto the block.
- We unscrew the engine mount; it is secured with two bolts and one nut (at “17”).
Loosen the adjusting screw
- We remove the RPM.
- We carry out troubleshooting of the splines, and if there is no deformation, we install a new belt. We check that it lies exactly in the grooves of the shafts.
The belt is already bad, but the generator pulley is still suitable
- We engage fifth gear and turn the wheel until the belt rests completely on the shafts.
- We jack up the car and assemble the structure in the reverse order.
Next, we go to the engine compartment to adjust the RPM.
DIY replacement instructions
A Lada Granta 8-valve car requires replacement of the alternator belt in the same way as a 16-valve car after identifying defects or according to the regulations. The procedure can be performed by a driver who does not have much experience in repair work. It is enough to have the necessary tools and basic knowledge of where the components that require replacement are located.
Tools and materials
Before replacing, you need to purchase a new alternator belt. In order not to make a mistake with your choice, you should look at the catalog number in the operating instructions. It should be 1118-1041020-07. The size should be 823 mm.
You should buy originals so as not to buy a fake or low-quality product. The packaging should be marked 6РК 823. You should not save money by buying a cheaper product. A low-quality belt will not last long, and the consumables will have to be changed earlier than required by regulations. High-quality belts are produced by Bosch and Gates.
You should also buy a tensioner pulley if you decide to change it too.
In addition to consumables, you need to prepare the following tools:
- a set of keys;
- TORX E-14 head;
- long screwdriver;
- jack;
- emphasis
Stages
The installation procedure on a Lada Granta with air conditioning is complicated by the fact that the strap passes through the support of the power unit. Therefore, before putting on a new strap, it will have to be dismantled.
Replacement consists of the following steps:
- First, using a “19” wrench, you need to loosen the lock nut of the strap tensioner lead screw. While unscrewing the locknut, hold the screw with the head at “8”.
- To loosen the belt tension, rotate the lead screw in the direction of movement clockwise. By following these steps, you can adjust the tension of the accessory drive belt.
- To replace the strap, you need to remove the right engine mount.
- Having moved under the car, you need to dismantle the right and middle protective shields of the engine compartment.
- Then unscrew the fastenings in the middle and front part of the right front wheel arch liner. Next, bend the fender liner behind the wheel brake disc.
- Using a jack, we hang the right front wheel and dismantle it. The fender liner fastenings can now be released.
- At the next stage, we place a stop under the oil pan of the power unit so that it holds the weight of the engine.
- Using a TORX E-14 head, unscrew the screws that secure the support to the cylinder block bracket of the power unit. Using the “17” socket, unscrew the two nuts and the support bolt that secures it to the body side member.
- We dismantle the engine mount with the cushion.
- Now, through the resulting opening, you can remove the strap from the pulleys of the auxiliary units and pull it out of the engine compartment.
- We install a new consumable in place of the worn-out product. In this case, its tension should be adjusted using the tensioner screw. The deflection of the belt in the gap between the air conditioner compressor and the power unit pulley with a force of 10 kilograms should be within 7-8 mm.
- We perform assembly in the reverse order of removal.
This completes the replacement. Now you know how to replace and tighten the generator set belt on a Lada Granta.
Sources
- https://l2rv.ru/sovety/remen-generatora-2190-s-kondicionerom-razmer.html
- https://kupe2000.ru/remen-generatora-granta-sport-16-klapannaya-s-konditsionerom-razmer/
- https://AVSU-pitanie.ru/info/remen-generatora-lada-granta-s-kondicionerom/
- https://olvi-group.ru/drugoe/ustanovka-remnya-generatora-granta.html
- https://www.zr.ru/content/articles/833513-lada-granta-proverka-i-zamena-remnya-privoda-vspomogatelnyx-agregatov/
- https://ventlife.ru/remen-generatora-granta-16-klapannaya-s-konditsionerom-razmer-markirovka/
- https://remont-avtovaz.ru/zamena-remnya-generatora-na-lada-granta/
[collapse]