Even a novice among car enthusiasts, while driving a car, will find the oil level sensor light on the dashboard without any problems. But not everyone is able to adequately respond to a situation when this light is on and does not want to go out.
As soon as the oil level sensor on a VAZ 2110 stops working, many car owners try to get to the nearest service station as quickly as possible to fix the breakdown. But is it worth doing? If you have at least basic knowledge in the field of repair, and also have an instruction manual at hand, it is quite possible to solve the issue yourself. At the same time, the financial costs will be incomparable compared to what you will pay at a car service center.
Check frequency
Every car owner knows about the importance of changing engine oil. When determining the frequency, the manufacturer’s recommendations and personal experience are taken into account. Some drivers change the lubricant every 5,000 km, while others wait until the last minute and carry out the work every 20,000 km.
The average is 8,000 - 10,000 km or once a year. This option is optimal in terms of the price of motor oil and its ability to perform its functions.
You need to check the oil level in the engine crankcase:
- Immediately after replacing it.
- At least 2 times a month (by the time the sensors notify you of the problem, it will be too late).
- After a certain mileage, depending on the make of the car and the engine installed on it, on average every 1000 km.
- When signs of malfunctions appear: black, bluish, white smoke from the exhaust pipe, loss of power, leaks from under seals and gaskets, etc.
Many people check the oil level every day before leaving, and this is also correct, especially if the car has high mileage.
Replacement
The entire oil change process can be divided into three main stages:
- Draining old lubricating fluid;
- Washing;
- Filling with new lubricant.
We will go through each stage in more detail in order to understand all the nuances of the procedure.
Removing the plug
Drain
In order for the new lubricant to show its best side, the car owner’s first priority is to drain the old oil. For this:
- Unscrew the oil filler plug. This will get rid of a possible vacuum, the liquid will be able to drain better from the crankcase;
- Do not forget the above recommendations regarding a warm engine. Heated oil has a lower viscosity and therefore flows out more efficiently and in larger volumes;
- Place an empty container with a volume of at least 5 liters under the drain hole;
- Remove the plug from the drain hole;
- Allow the oil to drain into the prepared container for some time;
- This usually takes about 10 minutes;
- Do not try to keep the plug in your hand when unscrewing at the cost of exposing your skin to the stream of oil. It is hot, so you can easily get burned. If the stopper falls into the container when the liquid has cooled, you can easily remove it and clean it;
- When the grease completely stops draining, the draining can be considered complete.
Drain the grease
Flushing
Whatever one may say, even the most thorough draining of the lubricating fluid will not allow you to fully clean the system. Therefore, we recommend flushing before filling.
- Screw the plug from the drain hole.
- Pour a special flushing solution into the oil filling hole to the minimum mark.
- Turn on the engine and let it run for about 15 minutes.
- Stop the engine and drain the fluid through the drain hole, as when removing old oil.
- Remove the oil filter and wait until the remaining lubricant is completely drained. Then install a new filter in its place.
- Be sure to fill the filter with about 100 ml of fresh new oil.
Filling the filter
Fill
Now we have reached the last step - adding new oil to your car's engine. The procedure for the VAZ 2110 looks like this:
- The oil filter installation area is thoroughly wiped with a rag;
- A little oil is poured into the new filter. We have already told you about its quantity;
- Using the same lubricant, treat the o-ring. It must be new. Never use the sealant from an old filter;
- Screw in the drain hole using a plug;
- Install the oil filter in its rightful place. Do this manually, without using tools. Otherwise, the filter may be damaged;
- Gradually pour new fluid through the filler hole. This should not be done quickly, since the oil must have time to distribute throughout the system;
- If the canister turns out to be inconvenient with a wide neck, use a simple household funnel;
- Fill in about 3 liters of lubricant, then check the level with a dipstick;
- You will most likely need to add a little more liquid;
- Ideally, the dipstick should show a level between the minimum and maximum indicators;
- Tighten the filler hole with a plug;
- Reinstall the dipstick;
- Start the engine and let it run for a while;
- As soon as the oil level light on the dashboard stops lighting, the engine can be turned off;
- We take the dipstick again and check how much oil is in the system at the moment. If necessary, add lubricant;
- Be sure to wipe off any surfaces that may have oil on them. This is especially true for the engine. Do not allow any traces of grease to remain on it. When the engine heats up, this is fraught with consequences.
Checking the lubricant level
If you strictly follow the instructions and also correctly select the lubricant for your VAZ 2110, the replacement procedure will become an easy task for you, which you will cope with on your own in literally an hour.
So that you understand, the cost of such a procedure, not counting washing, at a service station will cost you at least 500 rubles. So the ability to change the lubricant in the engine with your own hands is also a great way to save your budget. Considering that replacement is carried out approximately once every 8 thousand kilometers, you can save a lot of money over the entire period of ownership of your VAZ 2110.
- Why do you need oil in the gearbox?
- Types of oils and their choice
- Substitution rules
- Replacement procedure
In order for the car to work properly, it is necessary to periodically perform certain preventive maintenance, scheduled repairs, replacement of consumables, and so on. Moreover, the frequency is indicated in the repair and operating manual for your car. A procedure such as changing the oil in a VAZ 2110 gearbox does not take much time and effort. This will take you about an hour, but you won’t have to hire specialists or pay them money for it.
How do you currently check the engine oil level?
Despite the fact that cars produced nowadays are stuffed with modern electronics, the oil level in their engine is still checked using a conventional dipstick.
The latter is located in a sealed hole in the cylinder block and there is always easy access to it.
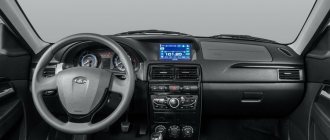
Of course, someday the situation will change and data on the amount of oil in the engine crankcase will be displayed in front of the driver on the display.
Such cars are already appearing on the market, but they are mostly premium, for example Mercedes w211 or Volvo XC60, and they do not have direct access to information about the amount of lubricating fluid in the engine; for this you need to activate the electronic dipstick function, but more on that below.
In any case, it is important to know how to properly check the oil level and why it is needed.
Preparation for replacement and necessary tools
Preparation for replacing the oil filter in a VAZ 2110 includes:
- selecting a new filtering element;
- choosing a new motor lubricant;
- selection of the necessary tool;
- studying safety precautions.
Tip: When working with motor lubricant, it is important to remember that the liquid is drained hot, and repairs must be performed with special gloves. What is needed for repair:
What is needed for repair:
- set of wrenches: wrench and socket;
- clean rags;
- container for waste liquid;
- new consumables;
- filter puller;
- special gaskets for the pallet and plugs.
Repair procedure:
- Draining old motor fluid;
- Replacement of the filter unit;
- Filling with new lubricant;
- Rolling system.
Tip: To improve the drainage of fluid from the engine crankcase, it is necessary to drive several kilometers or take a short trip before the procedure.
When working with engine oil and filter, all precautions should be taken into account:
- do not smoke near the lubricant;
- do not touch the motor;
- Do not pour the liquid onto the ground, because its composition is considered a toxic product.
The process of changing the filtration element
The procedure for replacing the oil filter on a VAZ 2110 is as follows:
- We warm up the car to the operating temperature of the engine and then turn it off.
- We place the car on an overpass or pit. There is a drain hole located at the bottom near the engine crankcase.
- Use a key to loosen the bolt and place a pre-prepared container. Tip: All repairs must be done carefully so that the hot grease does not burn your hands. It is also better to use wrenches with long handles when working to avoid contact with parts.
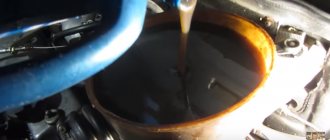
- We turn out the drain plug completely and let the oil drain into the container.
- We assess the condition of the drained lubricant: after a certain mileage it will look darker and thicker.
- We clean the drain plug from any remaining oil and change the gasket.
- We screw the plug into place.
- There is a filter to the left of the drain hole - you need to pull it out. This can be done using a puller.
- We replace the old cassette with a new one. After 15 thousand kilometers the device will look black and clogged.
- We wet the filter in new engine fluid and fill the housing halfway with lubricant.
- Lubricate the O-ring with engine oil and begin to screw the unit into place by hand.
- When the surface of the housing touches the cylinder block, it is necessary to tighten the unit another half turn. Tip: Changing the filtration is accompanied by changing the engine oil, so after installing a new filter device, new lubricant should be added.
- Above the drain plug there is an oil filler plug through which new engine oil is poured.
- Fill the liquid up to the beginning of the edge of the neck and check the level with a dipstick. Tip: To prevent the liquid being poured from overflowing from the engine, it is worth pouring it slowly through a funnel or hose.
- Next, start the engine and let it idle for a few minutes.
- Stop the engine and check the lubricant level. Top up if necessary.
The above procedure will allow you to quickly and correctly replace the filter unit on the VAZ 2110.
Replacing the oil filter on a VAZ 2112 is carried out in a similar manner, but has some differences:
- To prevent the formation of a vacuum in the motor, the filler and drain caps are unscrewed, and then the liquid flows out faster;
- After removing the filter unit, it is necessary to allow the oil to flow out of the fitting;
- There is no need to install a new gasket on the drain plug.
The key to successful repairs for changing the oil filter and engine fluid is following the manufacturer’s instructions, following a clear procedure and selecting high-quality new consumables
At the same time, it is important to observe the frequency of shifts performed in order to extend the life of the VAZ 2110 engine.
Consequences of incorrect oil level
There is an opinion among inexperienced drivers that the more oil is poured into the engine, the better, since there is no need to check it often.
But it is important to understand that if the lubricating fluid is above the upper mark of the dipstick, then its excess will enter the crankcase ventilation system, and this is dangerous for the catalyst.
This can also lead to an increase in pressure in the lubrication system, and this, in turn, can adversely affect the condition of the gaskets and seals and subsequently lead to their extrusion.
Due to the low level of working fluid, air is sucked into the oil pump, i.e. some engine parts will run dry, and this will reduce the interval until the unit is overhauled.
Also, during the measurement, you can check the condition of the lubricant and replace it in time, and this is also important.
How the dipstick works
There is no point in considering the design of the probe itself, everything is clear here, let's talk about the marks, because you need to navigate by them when taking measurements.
Most car brands follow one principle: the lower mark L is the minimum level, the upper mark F is the maximum. The designations “MIN” and “MAX” may also be found.
Also on some dipsticks there are marks for measuring the oil level at cold and hot.
But that’s not all; in order to measure readings correctly, you need to adhere to certain rules and conditions, which we will talk about below.
Features of checking the oil level on a cold and hot engine
There are so-called two castes of drivers, some claim that it is best to check the oil level on a cold engine, others, on the contrary, on a hot one. But the truth, as often happens, is in the middle.
IMPORTANT: The situation described below is when the dipstick does not have the “cold” and “hot” check marks.
As we know from physics and chemistry, any substance contracts in the cold and expands at high temperatures. This also applies to motor oil.
Let's imagine a situation where measurements are carried out on a cold engine at a temperature of minus 100C. The oil is compressed and its level on the dipstick has moved down. They topped it up as stated in the car's operating manual and warmed up the engine.
As a result, the working fluid warmed up, expanded and occupied a larger volume. Those. the level has become elevated (the consequences of this are described above).
If you take level measurements immediately after stopping the engine, the oil will not have time to drain into the crankcase and the readings will be incorrect. You need to wait a few minutes until the still heated and not very viscous liquid drains into the crankcase.
At the same time, it will cool down a little, but this will not greatly affect the accuracy of the measurement results. And what’s important is that this method can be safely used both in winter and summer.
Also keep in mind that non-original (fake) oils “behave” differently - they can harden like jelly even in hot summer weather.
Getting ready for replacement
Before changing the oil, carefully read several recommendations that all masters adhere to.
- The lubricant should be drained after a short trip, when the power unit has not yet cooled down, because warm oil has better fluidity, which means it can be drained more.
- If the engine is cold, it is necessary to warm it up to 80C.
- It is advisable to fill in the same oil that was poured into the engine before.
Engine VAZ 2110
How much oil should I pour?
Before changing motor lubricant, many drivers have a question about how much oil should be poured into the VAZ 2110 engine. Here opinions differ a little, because some of the oil remains in the system, and some drivers prefer to pour oil up to the MAX mark, while others prefer to pour a little less. There are also power units with 8 valves, and others with 16. But on average, this figure ranges from 3.2 to 3.5 liters. Therefore, you need to buy a four-liter canister - this amount will definitely be enough.
Which motor oil to choose?
When changing the oil, you can immediately replace the oil filter. Therefore, when buying oil in a store, do not forget to purchase an oil filter of the same type that is installed in your car.
Oils are divided into 3 types:
- synthetics;
- semi-synthetic;
- mineral water
It is very important to determine exactly what kind of oil your engine needs:
- If the power unit of your car is in excellent condition, does not consume oil, and has stable pressure, you can use synthetic all year round and change it according to the regulations.
- If the engine is in poor condition, seasonal lubricants are recommended: synthetic, semi-synthetic or mineral. Once you decide on the type of lubricant, decide on the brand.
Today, there are various brands of high-quality motor lubricating mixtures on the market, and this is the greatest difficulty. Try to decide for yourself the best ratio of quality and price. The viscosity is not lower than 10W-40 (otherwise it is possible that it will begin to leak through the seals).
The most suitable brand of oil, according to many, is Shell Helix.
If you have already decided on your brand a long time ago, then buy it and beware of counterfeits - in today's market, counterfeit products account for approximately 40% of the total volume.
When purchasing oil in special stores, for which the main thing is their reputation, you will probably pay more, but it will be a justified overpayment, which is compensated by excellent engine performance.
Requirements for carrying out repair and maintenance work on VAG series vehicles
Many car owners do not bother checking their engine oil. As noted above, the machine is placed on a flat surface, and after a few minutes of standing, the dipstick is taken out and the level is checked.
Information on this subject is provided on the Internet based on the experience of car owners. It is difficult to find official data on this issue.
As an example, you can take information from ELSA - documentation that sets out the requirements for carrying out repair and maintenance work on VAG series vehicles.
Level check
At the first stage, you need to find out where the oil is located, and here everything depends on the part of the scale:
- A - no refilling is needed.
- B - it is permissible to add a little lubricant.
- C - topping up is required.
Conditions
An important point is the conditions that must be observed when performing work.
General instructions, except for V6 diesel and V8 gasoline engines:
- oil temperature - not less than 60 degrees Celsius;
- the waiting time after turning off the motor is several minutes, which is enough for the lubricant to drain into the pan;
- horizontal position of the car.
For V6 diesel engines the following requirements apply:
- oil temperature 90 degrees Celsius (warming up to this level is required);
- wait 2 minutes for the oil to drain into the pan;
- horizontal position of transport.
V8 gasoline engines are tested taking into account the following requirements:
- lubricant temperature - 90 degrees Celsius;
- Idle for 60 seconds;
- turn off the engine and pause for 5 minutes to allow the oil to drain (the process is slower);
- level control for 60 seconds;
- the car is horizontal.
Verification algorithm
Now let's look at the inspection instructions on VAG series cars.
Do the following:
- Remove the dipstick and wipe it with a clean cloth.
- Insert it into place until it stops and remove it again.
- Look at the oil level on the scale.
- Assess the situation and decide whether refilling is necessary.
The approach discussed above, as a rule, corresponds to the generally accepted algorithm. At the same time, experienced drivers recommend keeping the level between the Min and Max marks, and checking it in the morning before starting the engine.
VAG experts recommend a slightly different approach, focused on checking with heated oil.
What is the difference between the original and the analogue?
When buying a VAZ 2110-2112 dipstick (with 16-valve engine), it is important to choose a manufacturer, since all parts can be divided into originals and analogues. Original spare parts are produced by a plant with which a supply contract has been signed for the production line of a car plant. The list of original manufacturers may change from time to time, depending on contractual relations, but in any case, strict selection conditions and unified approved technologies apply. Original spare parts are branded with brand markings, packed in the brand's original packaging indicating the catalog number, which coincides with what is indicated in the official catalog of the car plant. For repairs or maintenance at a service center, when using original spare parts, a warranty is provided from the manufacturer.
Original spare parts ensure full compatibility with all vehicle systems, this promises maximum safety. If you need to carry out complex repairs on a unit that affects many neighboring systems, it is better to buy original spare parts. In order not to void the vehicle warranty, only original parts are used during repairs or maintenance. Non-original spare parts, hereinafter analogues, are produced by third-party factories using personal production technologies. Analogues are completely legal, have a quality certificate and are sold under the manufacturer’s trademark. The price of an analogue is usually half the price of original spare parts, this is due to the lack of advertising and other marketing costs. Analogues are not used during assembly at the car factory, they are also not sold in official service centers, you can only buy them in online stores. A large number of factories producing analogues produce high-class goods, so the correct choice of a similar part is accompanied by a long service life, no less than the period specified by the manufacturer of the original spare parts.
How our system works
Using a pre-known or defined catalog number of a product, for example, 21121009045 from the manufacturer VAZ, the system will generate a list of offers from our suppliers who currently have the required product in stock: Dipstick VAZ 2110-2112 (with 16-valve engine). Information about product offers is current from warehouses around the world. If necessary, click on the “Show all offers” link. To buy the item you are interested in, select the best offer, since each supplier has a certain set of parameters for delivery time, price and shipment statistics. When purchasing 21121009045 Dipstick VAZ 2110-2112 (with 16-valve engine), you can take into account the following criteria: • quality of the supplier; • cost of goods; • quantity of positions available; • delivery times to our central warehouse; • choice between the original manufacturer and its analogue. The relevance of information for each item 21121009045 VAZ 2110-2112 dipstick (with 16-valve engine) is updated in real time so that our customers rely only on current data. If you need further clarification, please use the contacts provided. More information about the VAZ manufacturer can be obtained by clicking on the link with its name. In the process of cooperation with our suppliers, customers are provided with special discounts. Each supplier who places product offers is checked against documents to exclude the fact of selling counterfeits. If next to the warehouse number there is the inscription “OD” (official dealer), you can make a purchase with confidence. Manufacturers' warehouses and official dealers from manufacturers are marked with this mark. When placing an order from the warehouses of official dealers, you are guaranteed 100% quality of the product.
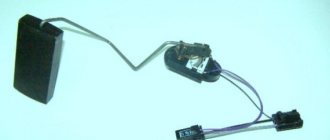
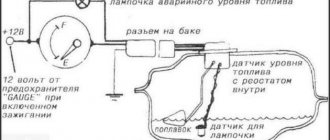
More or less experienced drivers can determine that it is the sensor that is causing confusion in the car’s operation, since there are no noticeable signs of oil leakage. Therefore, the first priority is to check the condition of the device that monitors the lubricant level.
The check is performed as follows:
- The car is placed on an overpass or inspection hole;
- The motor protection is removed. It can be put aside for a while;
- Now find the oil level sensor in the underbody space;
- Turn on the car's ignition. This way you can supply power to a device that may have failed;
- Disconnect the wires going to the sensor;
- Using a voltmeter, connect the probes to ground and the connecting block;
- If the voltmeter shows 12 volts, then the sensor is working normally.
But in the absence of tension, we can talk about one of three reasons for such a situation:
- The display unit is broken;
- There are defects on the contacts;
- There is a break in the wiring in the sensor circuit.
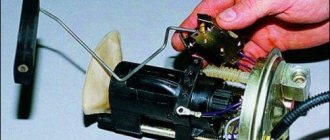
Therefore, if the wiring is in good condition and the contacts are clean, then further actions will consist of replacing the fuel level sensor on your VAZ 2110.
- 07/06/2019
The full range of LIQUI MOLY products is in stock in Yekaterinburg.
more details 06/17/2019
New catalogs for selecting spare parts on the PlentyCar.ru website.
more details 06/11/2019
Congratulations on the holiday June 12, 2022 and office work schedule. more details
In the Plenty Car online store you can buy auto parts for Japanese cars (Toyota, Mazda, Honda, Isuzu, Lexus, Mitsubishi, Nissan, Subaru, Suzuki), European cars (Ford, BMW, Citroen, Peugeot, Alpha, Lancia, Fiat, Land Rover, Mercedes, Opel, Renault, Rover, Volkswagen, Audi, Skoda, Seat, Volvo, Saab, Jaguar), American cars (Chevrolet, GM, Chrysler, Cadillac, Hummer, Infiniti, Jeep, Pontiac) and Korean cars (Daewoo, Hyundai, Kia, SsangYong). If you were unable to find spare parts for your car yourself, contact our specialists. All information on the site is for reference only and is not a public offer as defined by Article 437 of the Civil Code of the Russian Federation.
Pay for goods by credit card, using QIWI, Yandex.Money or WebMoney and save on your purchase from 4%, avoiding postal and bank commissions
This product was chosen by 1 customer
The original oil dipstick seal for VAZ 2110, 2111, 2112 is intended to replace a failed standard one.
Weight, kg: 0.05 Dimensions, cm: 2 x 2 x 2 Volume, m3: 0.00001
Checking the oil level in the Lada Granta engine
The algorithm of actions is the same (see above). But when measuring the oil level in a Lada Granta, there is one feature that many people do not know about.
The crankcase pan is structurally equipped with an antifoam plate, which is located parallel to the bottom of the pan.
It serves to calm and prevent foaming of the liquid and for normal operation of the oil pump.
This plate has two holes, the main one for the oil intake and the second for the dipstick.
In the Lada Granta, this hole is slightly offset, so when measuring the oil level, the dipstick rests against the edge of this hole and does not go in completely.
Those who know about this get used to it and no problems arise, but those who don’t know how to bend the feeler gauge.
But this is not the only problem. When removing the probe, it touches the edge of the hole in the defoamer plate, which is at the level of the top mark when the probe is inserted.
As a result, the oil film moves smoothly along the dipstick from mark F to L, which misleads the driver. Therefore, here you need to adhere to the rule - the level is checked not at the edge of the oil on the dipstick, but in a dry place. The probe needs to be rotated, viewed and analyzed.
Other VAZ cars
Let's look at how to check the oil level on VAZ series cars using the example of the VAZ 2112 and Lada Priora 16 valves.
Level measurements on these vehicles are carried out only on a warm engine. The probes here have a special appearance - a corrugated area with marks along the edges without letters.
Therefore, if the engine is cold, you will have to start it and warm it up until the fan turns on.
Then turn off the engine, wait 3-5 minutes until the oil drains into the crankcase and take measurements, see the algorithm above.
Since the dipstick itself between the marks has a corrugated shape, this causes a problem for many drivers.
Everything is simple here - the working fluid must be in the grooved zone, then the level is considered normal. But where this place should be, opinions differ.
Experienced drivers recommend proceeding from the operating conditions of the vehicle.
If the VAZ 2112 and Lada Priora are operated under normal conditions on flat terrain, then it is considered normal if the oil level is in the middle in the corrugated zone.
If cars are driven on moderately rough terrain, then the normal level may be 2/3 from the bottom mark in the corrugated zone, and if in mountainous terrain, then 3/4.
Also, many experienced car owners rely on the number of engine revolutions.
If during driving the number of crankshaft revolutions does not exceed 3000 rpm, then the oil level can be kept in the middle, if more than 4000 - at 3/4 of the lower mark. Filling 1 liter means raising the level from the lower to the upper marks.
Replacement instructions
Before replacing the lubricant mixture, it is necessary to warm up the engine properly. It is advisable that all work be carried out on an overpass or pit. If it is possible to use a lift, then this would be the best option.
How to drain old oil?
- We unscrew the plug of the oil filling hole in order to prevent the formation of a vacuum in the engine and for better drainage of oil.
Removing the plug
- We place pre-prepared dishes under the drain hole.
- Unscrew the drain plug.
Unscrew the plug
- Drain the old engine oil.
- This must be done very carefully, as there is a risk of getting burned. It doesn’t matter if the plug falls into the waste container, getting it out later won’t be a problem.
- The oil drains for about ten minutes. Be sure to wait until it drains completely.
Engine flushing
- Screw in the drain plug.
- Fill the filler hole with flushing compound to the minimum mark.
- Start the car and let the engine run for 10-15 minutes.
- Drain the flushing fluid.
- Unscrew it using a special filter wrench.
Unscrew the old filter with a wrench
- Wait until the oil drains completely
How to upload a new one?
- Wipe the place where the filter is screwed in thoroughly with a rag.
- Fill the new filter element approximately halfway with fresh oil.
- We wipe the new o-ring with grease.
Lubricate the ring and pour fresh grease into the filter
- Use a wrench to tighten the drain plug.
- We put the filter in place, but you must tighten it carefully and under no circumstances use a wrench.
- Slowly fill in new oil; if the shape of the canister is inconvenient, then use a funnel.
- Check the level of the lubricant mixture: it should be between the minimum and maximum marks on the dipstick.
- Tighten the filler cap.
- We put the dipstick in place.
- Let's start the engine.
- We are waiting for the light on the dashboard to go out.
- We turn off the engine.
- We check the level again and top up if necessary.
- When changing your oil, pay a little attention to environmental issues. Since oil is a product of petroleum refining, its release into the ground will negatively affect living organisms and plants.
- This completes the replacement, and, as you can see, everything was quite simple. If you still have questions or you still haven’t figured out how to change the oil or how much to pour, then watch the video.
Toyota RAV 4, Corolla, Camry
The oil level in Toyota RAV 4, Corolla and Camry cars is checked using the algorithm described above.
Since these models do not have o and “hot” on the probes, the engine warms up, waits 5 minutes and measurements are taken. You need to focus on all the same indicators - 0.5 (middle of the probe), 2/3 and 3/4.
On Toyota RAV 4, depending on the engine model, the dipstick may be corrugated on one side or smooth on all sides. There may also be different designations - Max and Min or F and L.
The Toyota Corolla dipstick is smooth without any letter designations, there are only lower and upper marks. Measurements are carried out the same way.
On a Toyota Camry, depending on the engine model, the dipsticks can also be different, one may have the letters F and L, the other may simply have marks.
But this does not change anything; the oil level on the Toyota Camry is checked in the same way as indicated above.
How much oil is required for VAZ-2112
Let's pay attention to the filling volumes of engine oil for VAZ-2112 engines
Generation 1 (1999-2009)
- For engine 1.5 72 l. With. (gasoline, manual) the required oil volume is 3.5 liters.
- For engine 1.5 94 l. With. (gasoline, manual) the required oil volume is 3.5 liters.
- For engine 1.5 78 l. With. (gasoline, manual) the required oil volume is 3.5 liters.
- For engine 1.5 92 l. With. (gasoline, manual) the required oil volume is 3.5 liters.
- For engine 1.6 81 l. With. (gasoline, manual) the required oil volume is 3.5 liters.
- For engine 1.6 90 l. With. (gasoline, manual) the required oil volume is 3.5 liters.
- For engine 1.8 98 l. With. (gasoline, manual) the required oil volume is 4.0 liters.
Mercedes w211
The peculiarity of checking the oil level in a Mercedes w211 car is that you won’t find a dipstick there, it simply isn’t there, so don’t waste your time searching.
The w211 only provides an electronic probe, which is located in the form of a float in the engine crankcase. By the way, the w210 e280 has a probe and electronics, which is much more convenient.
In order to measure the amount of mass in the crankcase, you need to activate the electronic probe. The data will be displayed on the instrument panel.
The car must be on a horizontal platform. Insert the key into the ignition and turn it to the right once. Go to the menu and find the speed.
Press the reset button 3 times.
The battery voltage will be displayed.
Now, to find the electronic probe, press the arrow button shown in the photo 1 time.
A menu will appear.
Turn on the ignition by turning the key to the right one more step. After a few seconds, the display will show the engine oil level in liters. In our case it is 6.1 liter, which is the norm.
The following indication may appear on the display:
Oil pressure sensor VAZ 2110 – check, replacement, duplication
Most owners of a VAZ 2110 car sooner or later have to face a situation when, at the most inopportune moment, an emergency light begins to shine, indicating a dangerous decrease in pressure in the oil system. Fortunately, quite often the cause of such an extremely unpleasant alarm is not a real oil leak that can lead to complete engine failure, but simply a failure of the corresponding sensor or its main circuits.
In other words, if such a problem occurs, after you have made sure that the oil level in the system is within normal limits and before performing the rather labor-intensive procedure of monitoring the actual pressure and checking the serviceability of the oil pump, it is recommended to perform more accessible actions to determine the cause of the problem .
When the limit value is reached, the contacts of the VAZ 2110 membrane oil pressure sensor open (which means the light comes on), from which it becomes clear that to check the integrity of the circuit, it is enough to disconnect the signal wire from the sensor and touch it to the nearest “ground”. If the lamp goes out in this position, the specified wire is in perfect order.
Certain information can also be obtained by direct inspection of the sensor: its oiliness, the presence of significant contamination and oxidation of the housing, damage and oxidation of the contact - all this may indicate that the cause of the malfunction lies in the sensor itself and in the event of such manifestations it must be replaced.
If we talk directly about the technological operation of replacing the sensor, then to perform it it is enough to have a key on hand for “21”
Attention is drawn to the need to have a spare o-ring in stock, without replacing which it will most likely not be possible to achieve the required tightness of the new sensor. Don't forget to also check the integrity of the dust cover.
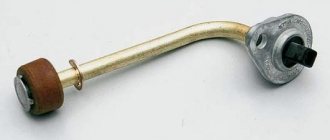
As for the question of where the oil pressure sensor is located, in this case it all depends on the specific car model. So on the VAZ 2110 and VAZ 2111, equipped with an eight-valve engine, the indicated indicator can be found on the right side of the engine block, below the level of the valve cover and in the immediate vicinity of the shield.
In turn, on a VAZ 2112 with a 16-valve engine, this sensor is located on the left side of the camshaft bearing housing. However, regardless of the car model, the same sensors are installed and the process of replacing them is practically no different.
Installation of actual oil pressure meter
Of course, everything is simpler when a problem with an oil pressure alarm on a VAZ 2110 occurs in an urban environment and nothing prevents you from quickly getting to the garage and without hassle completing the entire list of work necessary to eliminate the failure. But what to do if a problem happened on a remote route and even the new sensor in the stash does not guarantee a complete solution to the problem (there are too many defects among these elements and it is recommended to have several of them in stock)? In such a situation, the presence of an additional indicator of real oil pressure in the cabin can provide invaluable assistance, based on the readings of which you can accurately determine whether it is worth “ringing the bells” or not.
Meanwhile, installing such a pointer on a VAZ 2110 is quite simple and for this you will need to purchase:
- An adapter in the form of a tee from a VAZ 2106, which allows you to apply oil pressure to both an additional sensor and a signaling device;
- Additional pressure sensor;
- A pressure indicator (again from a VAZ 2106) that will be fixed in the cabin.
To install the auxiliary measuring circuit, remove the minimum oil pressure indicator and, together with the additional sensor, fix it on the adapter/tee, not forgetting to install two sealing gaskets (usually included with the adapter). Next, we screw the resulting assembly assembly into the socket on the engine, previously intended for the signaling device.
The connector of a standard pressure sensor has four contacts and to connect it we lay the following wires:
- +12V - from the power supply of the size lamps (Ш2-8);
- General minus “-” from the nearest body point;
- Signal wire - we stretch it into the cabin, to the location of the indicator;
- Plus for the illumination of the indicator - we also extend it to the driver’s seat.
Some versions of the indicators have their own emergency pressure indicator and, if desired, you can get a duplicate warning alarm.
Ford Focus 2
The car is also placed on a flat surface, the engine is turned off and wait 5 - 10 minutes until the oil drains into the crankcase.
The measurement algorithm is no different from that described above. Everything is also checked the second time.
The Ford Focus 2 dipstick has only risks, there are no letter designations. There are also no indicators for “cold” and “hot”, so we take measurements only on a warm engine.
Allowed oil level readings are 0.5 (the middle between the marks), 2/3 and 3/4 of the distance from the bottom mark.
Above the top line, drain off the excess; below the bottom line, add more.
Oil selection table by season (winter, summer)
| Year | Viscosity SAE all season from +25 to -25 °C | winter from -35 to 0 °C | summer from 0 to +35 °C |
| 5W-20 5W-30 10W-40 | 20W-30 20W-20 20W-40 25W-20 |
| 5W-20 5W-30 10W-30 10W-40 | 20W-30 20W-20 20W-40 25W-30 25W-20 |
| 5W-20 5W-30 10W-30 10W-40 | 20W-30 20W-20 20W-40 25W-30 |
| 5W-20 5W-30 10W-30 | 20W-30 20W-20 25W-30 |
| 5W-20 5W-30 10W-30 | 20W-30 20W-20 25W-30 |
| 5W-20 5W-30 10W-30 | 20W-30 20W-20 25W-20 25W-30 |
| 5W-20 5W-30 10W-30 | 20W-30 25W-20 25W-30 |
| 5W-30 10W-40 10W-30 | 20W-30 25W-20 25W-30 |
| 5W-30 10W-40 10W-30 | 20W-30 25W-20 25W-30 |
| 5W-30 5W-40 10W-40 | 20W-30 20W-40 25W-20 25W-30 |
| 5W-30 5W-40 10W-40 | 20W-30 20W-40 25W-30 |
| 5W-30 10W-30 | 20W-30 25W-30 |
| 5W-30 10W-30 | 20W-30 25W-30 25W-20 |
| 5W-20 5W-30 10W-30 10W-40 | 20W-30 25W-30 |
| 5W-30 | 20W-30 25W-30 |
| 5W-30 5W-40 | 20W-40 20W-30 25W-30 |
| 5W-30 5W-40 | 20W-40 20W-30 25W-30 |
| 5W-20 5W-30 5W-40 | 20W-40 20W-30 25W-30 25W-40 |
| 5W-20 5W-30 5W-40 | 20W-40 20W-30 25W-30 25W-40 |
| 5W-20 5W-30 5W-40 | 20W-40 20W-30 25W-30 25W-40 |
| 5W-30 5W-40 0W-30 | 20W-40 20W-30 25W-30 25W-40 |
Volkswagen Polo sedan
The dipstick for measuring the oil level in the Volkswagen Polo sedan engine has two marks, lower and upper, in the grooved area. Do not confuse with marks further down and up the dipstick.
Measuring the level is no different from the previous ones, just place the car on a flat surface, turn off the engine and wait 5 - 10 minutes.
The check is also carried out the second time. The oil level should be midway between the marks in the grooved area or 2/3 and 3/4 of the distance from the bottom mark.
What oil is recommended for VAZ-2112
Let's consider the characteristics of the oil suitable for VAZ-2112 engines.
Generation 1 (1999-2009)
- SAE classification for 1.5 72 hp engine. With. (gasoline, manual) – 10W-40, 5W-40.
- SAE classification for 1.5 94 hp engine. With. (gasoline, manual) – 10W-40, 5W-40.
- SAE classification for 1.5 78 hp engine. With. (gasoline, manual) – 10W-40, 5W-40.
- SAE classification for 1.5 92 hp engine. With. (gasoline, manual) – 10W-40, 5W-40.
- SAE classification for 1.6 81 liter engine. With. (gasoline, manual) – 10W-40, 5W-40.
- SAE classification for 1.6 90 liter engine. With. (gasoline, manual) – 10W-40, 5W-40.
- SAE classification for 1.8 98 liter engine. With. (gasoline, manual) – 10W-40, 5W-40.
Recommended manufacturers of motor oils for VAZ-2112: Shell Helix Ultra, Mobil Ultra, Eneos superGasoline, Total Quartz, Mobil Super.
Volvo XC60
Volvo XC60 cars are equipped with D3, D4, D5 engines, which can be equipped with either two types of probes at the same time, electronic and conventional, or only electronic.
For example, on the Volvo XC60 D5 205 and 2.4D 175 there are two types of dipsticks, but the usual dipstick is very small and is located at the very bottom of the engine and is difficult to reach. You need to either lift the car or drive it into a pit.
Therefore, they mainly check the oil level on the Volvo XC60 electronically and for this:
- Get into the car and close the door;
- Insert the key into the ignition;
- Press and hold the START-STOP button for a few seconds;
- The on-board computer will go into “ON” mode;
- We look under the steering switch until the oil gauge appears;
- We activate the mode and see the computer readings;
- This completes the check.
Audi Q5
On the AUDI Q5, the oil level is also checked with an electronic dipstick, but here the manufacturer has gone overboard with this matter. Why? You will understand further.
Algorithm of actions:
- Turn on the ignition;
- Simultaneously activate and hold the “SETUP” and “CAR” buttons;
- Release the buttons when the hidden menu appears;
- Go to “CAR” - “Carextdevicelist” - “Oil level gauge” and activate the latter;
- Next, go to “Carmenuoperation” - “Oil level” and set the value to “5”;
- Press and hold the "Return" and "CAR" buttons to close the hidden menu;
- To reboot the system, click the buttons shown below;
- After reboot, go to “Oil level”;
- If the oil level is normal, the message “Engine oil level OK” will be displayed. It will also be visible where the level is between the MIN and MAX marks.