The VAZ-2115 fuel level sensor is a device that allows the driver to have no doubt about the amount of gasoline in the tank. Thanks to it, the driver always knows how many liters are currently present in the car and can calculate his route to the nearest gas station.
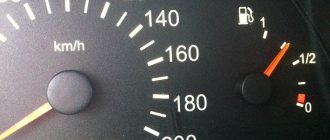
To ensure accurate readings, the fuel level sensor is located in the gas tank. Thanks to a float that constantly moves depending on the amount of fuel. The readings are displayed on the dashboard, and the driver always knows the amount of gasoline in the gas tank. When there is less than 6 liters of gasoline left, the float moves to an additional contact group, which allows you to light a light on the dashboard to notify you of the need to refuel soon.
Fuel level sensor for VAZ 2115
The VAZ-2115 fuel level sensor is a device that allows the driver to have no doubt about the amount of gasoline in the tank. Thanks to it, the driver always knows how many liters are currently present in the car and can calculate his route to the nearest gas station.
To ensure accurate readings, the fuel level sensor is located in the gas tank. Thanks to a float that constantly moves depending on the amount of fuel. The readings are displayed on the dashboard, and the driver always knows the amount of gasoline in the gas tank. When there is less than 6 liters of gasoline left, the float moves to an additional contact group, which allows you to light a light on the dashboard to notify you of the need to refuel soon.
General information about the sensor
First, let's look at the main features of the FLS:
- In the first year or several years, the device works normally and can perform all the functions assigned to it. But since the VAZ 2115 fuel level controller itself has a rather fragile body, regular temperature changes, especially in winter, help reduce its service life.
- The car owner must periodically diagnose the regulator, since over time its tightness begins to deteriorate. Accordingly, at a minimum, it is necessary to clean the contacts from oxidation from time to time. If the contacts begin to fray, you can simply replace them.
- The choice of a new fuel level regulator for a VAZ is carried out taking into account the markings marked on the body.
- Original devices have an analog output to the control panel. Compared to digital devices, such options are less advanced.
- If the fuel consumption regulator fails, the on-board computer will signal this to the driver.
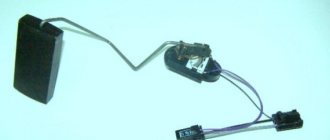
Four-cylinder fuel pump with built-in FLS
Where is?
If you are reading this article, you will probably be wondering where the controller is located. In VAZ 2114 cars, the device is located in the same module with the fuel pump. So if the device is lying and you want to replace it, you will have to dismantle the entire module.
Design and principle of operation
As you might guess, the purpose of the gasoline level controller is to determine the fuel level in the gas tank and then transmit this data to the control panel.
The design of the device consists of:
- resistor element;
- float with lever;
- a special sliding contact for turning off and turning on the diode indicator of the fuel level status on the dashboard.
As for the principle of operation, the fuel regulator on the VAZ 2114 functions as a result of the float moving as the volume of fuel in the gas tank is measured:
- The resistance value on the variable resistor element changes, as a result of which the resistance parameter in the circuit as a whole changes.
- As a result of one or another level of resistance, the parameters for the volume of gasoline on the control panel are determined.
It should also be noted that domestic vehicles are equipped with BM-150 devices - this information will be useful to you if you decide to replace the device yourself (the author of the video is Sergey L).
Common faults
There can be several options for a regulator malfunction:
- The device readings are jumping. As a rule, this is due to wear on the contact tracks on the circuit, which occurs as a result of the constant impact of the design runner. To get rid of such a malfunction, you can try to bend the slider so that it is slightly higher than the place erased on the diagram. But if a large area is worn out, then most likely the regulator will need to be replaced completely.
- The device can lie if it is not adjusted, that is, the problem can be solved by normal adjustment.
- Sometimes it happens that the device freezes at “0”. In this case, you will have to dismantle the instrument control panel and find the indicator itself; in particular, you will need the contacts. The nuts on which they are fixed will need to be unscrewed, and the contacts themselves will need to be cleaned. In addition, attention should be paid to the contacts on the ground, that is, on the body. In some cases, the reason lies in the fact that the controller is simply jammed, but it may also be that it has failed.
Fuel level sensor does not work
FLS is an unreliable device that will not serve for decades. Therefore, the car owner should always be prepared to replace it. According to the degree of unsuitability, the FLS can be divided into 3 parameters:
- Jumping incorrect values;
- When the tank is half full, an empty gas tank is displayed;
- The arrow is always at the zero level.
In the first two cases, everything is extremely simple. If the fuel indicators on the VAZ-2115 are incorrect, you can try to repair the injector and fuel injection system. To do this, you need to test the float movement yourself. If the spoke moves smoothly and does not stop, then the float is working properly. If the spoke stops or gets stuck in some positions, then it is necessary to eliminate the reasons for the interruption of smooth movement. After this, it is worth checking the contact group on the panel from the rear side. If necessary, tighten the fasteners to ensure good contact.
If the arrow displays incorrect data precisely in the final stages (full tank or zero tank), then depending on the final stage, it is necessary to bend the tabs. After bending the adjusting tab, the spoke will be able to move a little more than the extreme position.
If the indicators are always at zero, then it is necessary to replace the device.
Where is the MAF located?
The sensor is located under the hood on the air filter pipe.
If you think your sensor is faulty, an easy way to check is to simply unplug it. Namely:
- Open the hood and disconnect the sensor.
- We start the car.
- We look at the tachometer or on-board computer: the idle speed should be more than 1500 rpm.
- If, after removing the sensor, while driving, you feel that the car has begun to gain speed faster, then the mass air flow sensor should be replaced with a new one.
- After the sensor is turned off, the Controller begins to prepare the mixture based on the throttle position.
- For a more detailed and accurate check, read the article: How to check the mass air flow sensor on a VAZ?
- Before throwing away the sensor, try cleaning it, maybe this will help you: How to clean the mass air flow sensor on a VAZ?
- To find out how to remove and replace the sensor, use the article How to replace the mass air flow sensor?
Replacement process
In order to replace the FLS, you will need a 7 key and a 17 socket. Before starting work, you should make sure that there is practically no fuel left in the tank. Relieve the fuel system pressure and turn off the power to the fuel pump. After that we start the car. The engine should idle until the fuel runs out and the car stalls on its own. When the fuel runs out, you can start disassembling it and be sure that it will not get into the car interior.
We use a Phillips screwdriver and unscrew the hatch cover in the car. The wires must be disconnected from the pump. Using a key set to “17”, unscrew the fuel line tube and put it away. It is necessary to check the ring that is located on the fitting; if it is damaged, replace it. Similarly, disconnect the drain tube.
We use a 7 socket to unscrew the bolts that secure the pump using a clamping ring. We disconnect the pump and inspect the rubber ring; if it is damaged, replace it. Afterwards we unfasten the screws and turn off the sensor. We install a new parting in the reverse order.
Throttle position sensor. Timing sensor
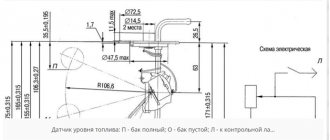
The device is set to a measurement threshold of 2 V, the positive probe is connected to the rightmost wire, especially the yellow one, the negative probe to the green wire, one contact from the positive one. Sensor Location Oil pressure On 8 valve engines it is located at the bottom of the valve cover in the cylinder head, and on 16 valve engines on the left at the end of the camshaft bearing housing. Coolant temperature sensor. Engine temperature sensor. Look for it near the coolant jacket pipe of the cylinder head. Coolant level. Located directly on the tank. inside which the coolant is antifreeze or antifreeze.
| Sensor | Causes of breakdowns | Symptoms of malfunction | Examination |
| Mass air flow sensor - mass air flow sensor | Contamination, torn film due to sucked-in dust. | If the readings are greater than 1.07V, then the sensor must be replaced. | We check the parameters of the channels of the analog-to-digital converter or measure the voltage between 3 (mass of the mass air flow sensor) and 5 (signal) contacts using a multimeter. |
| DC - oxygen sensor or Lambda Probe | Poor quality fuel, mechanical damage to the sensor, faulty injectors. | Increased exhaust toxicity, increased fuel consumption and Check Engine activation. | The causes of breakdowns can only be determined by computer diagnostics of the car. |
| DTOZH – coolant temperature sensor | Lack of contact with the sensor, broken contact. | Turning on the fan unnecessarily, increasing gasoline consumption, a warm engine refuses to work | |
| TPS – throttle position sensor | Oxidation of contacts, wear of sensor substrates. | High idle speed, significant reduction in engine power. | Smoothly squeezing the gas pedal, monitor the readings of the percentage opening of the damper; the voltage should also change smoothly without drops; if the voltage on the multimeter fluctuates, the sensor must be replaced. |
| DPKV – crankshaft position sensor | Broken wires, dirt getting between the sensor and the gear disk. | A sharp decrease in the car’s power, which can be determined even without special instruments, involves an arbitrary decrease or increase in engine speed; | Measure the resistance of the sensor winding; if there are deviations from the norm of 550-750 Ohms, the sensor must be replaced. |
| DS – vehicle speed sensor | Open circuit in contacts, corrosion and dirt on contacts. | Problems with idle speed | Computer diagnostics only. You can independently monitor the proper operation of the sensor using the BC and the standard speedometer. |
| DF – phase sensor | Metal particles and dirt on the sensor | Instead of starting the engine immediately, the system waits for the DPKV counter readings and the Check Engine signal turns on, gasoline consumption increases, and engine dynamics decrease. | Carried out using an oscilloscope |
Replacing the VAZ 2115 fuel sensor yourself
FLS (fuel level sensor) is used to monitor the level of gasoline in the car tank so that the driver knows whether he can get to his destination or whether it’s time to refuel urgently. It is important to monitor its readings, otherwise you may find yourself with an empty tank a hundred kilometers from the nearest gas station, which will create a bunch of unnecessary problems for you. It is also important to monitor the readings of the device in order to promptly detect deviations in its readings and avoid troubles. The first signs that you need to replace the fuel sensor on a VAZ 2115 are the readings of an empty tank when you start the engine, and after you start driving, the fuel begins to splash and the readings change. You refuel, but the device does not respond, it still shows a low level. In the evening the tank is full, but in the morning it shows half or empty. Questions arise: is it worth going to a service station or doing the replacement yourself, replacing it, or is it still possible to repair the controller and move on? Our article will give you the answers.
Electronic Engine Control Unit (ECU) Timing Sensor
Smoothly squeezing the gas pedal, monitor the readings of the percentage opening of the damper; the voltage should also change smoothly without drops; if the voltage on the multimeter fluctuates, the sensor must be replaced. Thus, VAZ 2115 sensors, their purposes and malfunctions in most cases are easily identified and give clear instructions regarding the urgency of measures taken.
| Sensor | Location |
| Oil pressure | On 8 valve engines it is located at the bottom of the valve cover in the cylinder head, and on 16 valve engines it is located on the left end of the camshaft bearing housing |
| Coolant temperature (engine temperature sensor) | Look for it near the tasty cylinder head cooling jacket pipe |
| Coolant level | It is located directly on the tank, inside of which there is coolant (antifreeze or antifreeze). Looks like a simple plastic cover that connects to an electrical connector |
| Brake fluid level | This is a float device located inside the brake fluid reservoir. |
| Idle speed (IAC) | Look near the throttle valve on the throttle body |
| Mass air flow | You will find it near the large intake pipe, directly on the air filter housing |
| Throttle Positions | Located on the throttle body |
| Crankshaft position (timing sensor) | Its location is near the electric generator drive pulley |
| Camshaft position (phase sensor) | Near the cylinder head cover, viewed from the air filter side |
| Oxygen (lambda probe) | Installed in front of the resonator in the intake manifold of the exhaust system |
| Detonation | Located between cylinders 2 and 3 near the fan |
| Fuel level | It should be looked for inside the intake chamber of the fuel tank |
| Speeds | Located directly on the gearbox |
| Bumps in the road | Look near the cup on the side of the right mudguard. You can get there through the engine compartment |
| Ambient temperatures | It is installed directly behind the front bumper, exactly in the middle |
Causes of FLS malfunction
There are several most common reasons:
- The float has leaked, it fills with fuel and sinks, as a result it does not show a full tank at all
- The second cause of the problem is erased contact tracks located on the FLS board
- They are erased from the friction of the runner
- Sometimes tucking the runner so that it can move above or below the worn parts of the tracks can temporarily help.
- However, the measure is temporary, and if the abrasions are large (deep), it definitely needs to be replaced
Removing the FLS
The tool you need is a Phillips screwdriver, a “17” wrench and a “7” head with a ratchet. The sensor is attached to the fuel pump body, so replacing the VAZ 2115 fuel level sensor begins with removing the fuel pump:
Attention: Before starting work, make sure that your car's tank is at least half full of fuel or less.
- Relieve pressure in the fuel system
- Disconnect the VAZ fuel pump power connector
- Start the engine
- Wait until it stalls on its own due to lack of gasoline in the system
Now you can remove the pump without the risk of being splashed with fuel from head to toe, and fuel will not splash the interior:
- Then use a Phillips screwdriver to unscrew the screws (there are two of them) and remove the hatch cover located above the tank (photo below)
Remove the hatch cover above the tank
- Disconnect the connector with wires from the pump
- Using the “17” wrench, unscrew the fitting of the fuel supply pipe, then move it to the side so that it does not interfere
Unscrew the fuel supply fitting with the key “17”
- There is a rubber o-ring on the tube, check its condition, replace a torn, cracked, soggy ring
- Now unscrew the drain tube fitting in the same way and move it to the side so that it does not interfere
- Using a 7″ socket, unscrew the nuts securing the pressure ring (there are eight in total) and remove it
Unscrew the clamping ring using a “7” head with a ratchet
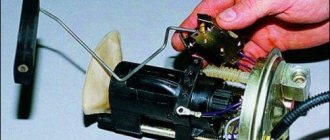
- Carefully lift the pump assembly, tilt it slightly, bringing the float out through the hole in the tank, remove the electric fuel pump assembly with the FLS
Lift the pump assembly and tilt it to remove the float
- Under the flange of the electric fuel pump there is a rubber O-ring
- Inspect its condition; replace any cracked, torn or crushed ring
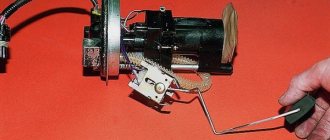
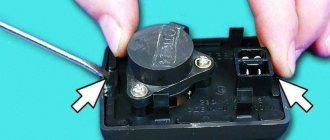
- Using a Phillips screwdriver, unscrew the two screws securing the fuel level indicator and remove it
Unscrew the two screws and remove the fuel level controller
Not everything is as complicated as it seemed, is it worth going to a service station, where the price of work is usually overpriced, and they have never even heard of neatness?
Trouble-shooting
If the arrow on the front panel showed an incorrect gasoline level, we will determine the possible causes of this ailment and provide ways to solve them. When the fuel level is too high or too low, adjusting the controller itself can help:
- Move the float spoke from one extreme position (full tank) to the other (empty tank)
- In this case, the arrow on the front panel should also move from zero (tank empty) to mark “1” (tank full)
- If in any of the extreme positions of the float the arrow on the front panel shows an incorrect fuel level, then you need to slightly bend the left or right adjusting tabs so that the float spoke can move a little to the left or a little to the right of the extreme position
- Turn off the ignition, disassemble the dashboard
- Remove the pointer arrow from its pin
- Then we connect all the wiring going to the instrument cluster
- Turn on the ignition and wait for a while, about five to ten minutes
- Then we move the spoke of the fuel level controller to the extreme position corresponding to a full tank
- Set the indicator arrow on the instrument panel so that it points exactly at “1” (full tank) and fix it
If the instrument panel indicator indicates an empty tank (complete lack of fuel), but in fact there is still half a tank of fuel:
- Check the contacts on the back of the panel
- Remove the instrument panel and tighten the nuts on the back of the panel that are attached to the indicators to create contacts
- Check all ground wires, especially those located under the handbrake.
- There may be a breakdown in the instrument panel itself, and it needs to be repaired or replaced.
- If the fuel gauge needle is off, press the daily mileage button and turn on the ignition
- Perhaps the float is stuck (wedged) in the tank.
- Or the problem is solved by replacing the FLS
Replacing the fuel level sensor on a VAZ 2113, VAZ 2114, VAZ 2115
Welcome! Fuel level sensor - thanks to it you can always find out how much fuel is left in the tank, on all cars this sensor is located in the gas tank, and it consists of a float, a float rod and a so-called potentiometer (A potentiometer is an electronic part of the sensor, which, depending on depending on how much the float is raised, it changes its resistance), over time the electrical contacts of the potentiometer oxidize, which is why the sensor begins to lie very much or stops working altogether, or in some cases when the tank is deformed (And the tank on front-wheel drive cars is located very low ) the rod at the fuel level sensor is also deformed, due to which the fuel level indicator will begin to lie and incorrectly show the car’s gasoline, and finally, about the float, let’s say that over time it will develop holes due to poor-quality gasoline and a gap will form through it, it can also be formed if the float is touched with something sharp or if it is deformed during installation, due to this gap that can form in the float, the float will simply sink and it will no longer adhere to the surface of the gasoline and therefore, the readings given by the gasoline indicator will be constantly at zero (no gasoline).
Note! To replace this sensor, you will need: A screwdriver, a set of keys and, just in case, stock up on pliers, because they can also come in handy!
Summary:
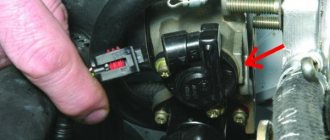
Where is the fuel level sensor located? In old cars (we're talking about classics), the sensor was located directly in the gas tank, but on new injectors, the sensor is also located in the gas tank, but only in this case, it is combined with such a part as the gas pump, so to replace this sensor, first the gas pump you will need to pull it out and only then start replacing it (For information on how to remove this pump, read the article: “Replacing the fuel pump on a car”), in the photo below, by the way, this pump has already been removed and this sensor, which is located on it, is indicated by an arrow.
When do you need to change the fuel level sensor? At the beginning of the article, we already described all the problems that may occur with it, but we did not describe how it can be checked for serviceability (You need to check for serviceability only if the fuel level indicator does not show gasoline at all, but if it shows but with an error, then most likely the rod on your sensor is either bent, or it itself has become unusable and gives much less resistance, which is very unlikely), in the beginning you will, of course, need to remove the fuel pump (read how to remove it below), after removing it, connect block of wires to the pump, if you previously disconnected it, as soon as this is done, turn on the ignition and move the float up and down, while the arrow of the fuel level indicator should also move if you connect another ohmmeter to all this and check what resistance is given by the sensor, then the test will be even more successful, it is connected to the wire terminals in the place where the wire block needs to be inserted, after connecting the device, move the float all the way up and the readings it should give is 7–25 Ohms, then move the float approximately to the middle, the readings that the device should give are 100–135 Ohms, and finally, lower the float to the very bottom, in this case the device should give readings of 285–385 Ohms, if everything is so, then the sensor is working and does not require replacement , for more details on how to check it, see the video below:
How to understand whether the temperature sensor is working or not
It happens that one component of the temperature recording system malfunctions, and the driver immediately blames the sensor; in fact, it may be quite serviceable. Therefore, do not rush to throw away the old sample, first check it for serviceability:
- Place the seized coolant in the container where the drained coolant is located.
- Carefully and gradually heat the antifreeze, note that the container must be resistant to high temperatures, otherwise it will simply melt.
- Armed with a thermometer and a multimeter set to ohmmeter mode, monitor the readings on these 2 devices simultaneously.
For convenience, we have presented what readings a working VAZ-2115 antifreeze temperature sensor should give in tabular form.
| Temperature on the thermometer, degrees | Resistance, Ohm |
| 20 | 3520 |
| 40 | 1459 |
| 60 | 667 |
| 80 | 332 |
| 100 | 177 |
If the readings you took from the sensor differ from the data in this table, it means that the device really needs to be replaced; it is not working correctly. Some car enthusiasts are trying in every way to repair the device, but experts are skeptical about such experiments, stating that the sensor that records the heating temperature of the antifreeze cannot be repaired, but only completely replaced with a new product.