The process of replacing the steering wheel is simple, but requires attention on the part of the repairman. A car enthusiast without basic skills in servicing a technical device is better off turning to service station specialists for help.
Sequence of actions when removing the steering wheel on a Lada Vesta:
- Remove the block - airbag module.
- Unscrew the central bolt - clamp.
- Remove the steering wheel.
- After maintenance, install the steering wheel again.
Stages of self-installation of the steering wheel
Required tools:
- ratchet;
- extension;
- Torx head T50;
- two-fingered puller;
- rags, gloves;
- additional lighting as needed;
- torque wrench.
Algorithm of actions for withdrawal:
- We place the car on a flat platform, provide safety measures, fix the rear wheels, and squeeze the parking brake.
- Open the hood.
- Remove both terminals from the battery.
- Open the driver's door.
- We set the steering wheel to the position of linear movement of the technical device.
- We move the metal latches on the steering wheel.
- We remove the airbag module.
- Disconnect the connectors with wires from the airbag and the transport fuse.
- Unscrew the steering wheel retaining bolt.
- We remove the steering wheel from the splines.
Then we carry out preventive maintenance and replacement as necessary. We install the steering wheel (hereinafter referred to as the steering wheel) again. Tightening torque 3.8-5.0 kgf/m (38-50 Nm) with a torque wrench.
Note to the driver! After removing the steering wheel, do not violate the angle of rotation of the wheels or rotate the column shaft. With such actions, you run the risk of disrupting the wheel alignment angle; another diagnostic will be required at a stand at a service station.
Preparing the steering wheel for painting
Before painting the steering wheel, it must be carefully prepared. Its appearance will depend on this, and it must be impeccable. Preparatory operations are performed in the following order:
- Peeling and worn areas of the steering wheel with old paint need to be sanded with sandpaper (P-400 or P-500);
- Remove the gloss (so that the paint sticks well) with gray Scotch Brite or sandpaper (P-1500);
- Steering wheel degreasing;
- Applying a leather cleanser (sold in cans);
- Degreasing and wiping with microfiber.
If the old coating becomes difficult to sand and severe unevenness remains, you can putty the steering wheel with a special paste to eliminate cracks, scratches and abrasions, which is available in any car shop. Typically, this paste dries for 30 minutes and is cleaned using the same sandpaper or Scotch Brite. The paint can be selected from a special catalog in the store.
Connecting steering wheel buttons to the MMC radio
- After connecting the cruise control circuit, we connect the block with wires to the multimedia device (blue).
- If a freelance MMC is installed, you will need an adapter for this brand of radio.
- We insert the plastic cover and assemble the RC again.
Getting to know the car.
First there are general sections where the owner can familiarize himself with the car, instruments and their purpose, remote control and locking, opening and closing doors, pedal area, headlight and windshield wiper controls, how to start the engine, and also start driving. As you study, the manual provides deeper knowledge of how the Lada Vesta works and what features the car has.
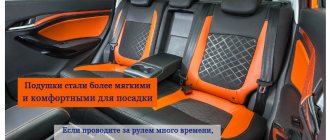
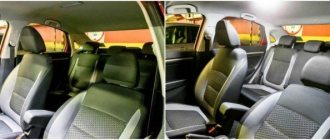
After general descriptions of the car, the Lada Vesta operating instructions give an idea of each component. It describes in detail the front and rear seats with headrests, as well as their features.
Car safety
The manual gives a complete picture of the passive safety of the Lada. Why use seat belts and why airbags are needed. The manual describes the use of child seats, specifically noting the use of a restraint system in the front seat when the airbag is deployed.
Review of Manufacturer Prices
The size of the steering wheel in the original version is 37-39 cm in internal and external diameters, respectively.
| Name/article | Price in rubles |
| Original steering wheel 8450009837 (18 years old) | From 5000 |
| Plastic cover with function keys 8450006832 | From 2500 – 3000 |
| Airbag module 8450149058 | From 4500 |
| Steering wheel complete with airbag 8450006832 | From 8500 |
*prices are as of March 29, 2019.
Replacing power steering oil and hoses
Changing power steering oil by replacing the fluid
- We pump out the fluid from the power steering reservoir;
- We remove the return hose from the tank and turn it off, for example, with another hose with a pinched end;
- We put another hose on the return line and lead it under the car into a previously prepared container;
- Fill the reservoir with liquid to the maximum level, the assistant starts the engine;
- As soon as the liquid is gone, the assistant turns off the engine at your signal;
- Fill the liquid again to about 0 and repeat the procedure until clean liquid flows into the prepared container;
- We put the return hose back on and add power steering fluid to the required level.
How to remove the steering wheel cover on a Lada Vesta
- Carefully pry up the sides with a plastic spatula or something similar.
- Remove the latches from the grooves.
- After carrying out the preventive maintenance, guide the latches into the grooves and press them moderately.
Related link:
Recommendations from experts for self-installation of front mudguards on Lada Vesta
Conclusion
Removing the steering wheel on your own is not difficult if you strictly follow the given algorithm. If difficulties arise, contact service station specialists for help. As for installing a plastic cover on the steering wheel or buying a new original assembly, it is a personal matter for each car enthusiast. Based on the availability of funds, the size of the budget allocated for maintenance, and upgrading the machine. When purchasing, give preference to original products.
Brakes: TRW brand, made in the Czech Republic, Poland, Italy, France, Turkey
In order for the Lada Vesta to stop properly, manufacturers from almost half of Europe had to work hard. In total, we counted five countries producing the braking system, including French SNR bearings pressed into the rear brake drums (integrated with the hub) of the German ATE brand, but of Italian production. When it is necessary to replace the bearing, it will be extremely difficult to remove it separately - most likely, you will have to change the entire assembly. Although the name of the SNR brand, which is premium by the standards of the world of auto components, inspires hope for durability.
So, the brake master cylinder and vacuum booster came from Poland, the front calipers and pads came from the Czech Republic. Some of the brake hoses turned out to be made in Turkey by Teklas. One of the features is that there is one brake system reservoir for two with a clutch drive.
The only question regarding the brakes arose when considering the front pads, on which there was a working mark of the cylinder - a quarter of the pressing surface extends beyond the pads. It is difficult to say whether this somehow affects the braking efficiency. While driving, we had no complaints about the braking system.
You will also have to tinker with the suspension elements during repairs. According to “foreign” patterns, the ball (produced by the BelMag Magnitogorsk plant) comes assembled with a lever. Moreover, replacing a component will require a lot of additional actions to free up space around it. By the way, according to servicemen, play of ball joints and knocking of stabilizer struts are the most frequent complaints from the first owners of Vesta.
Shock absorbers are one of the few Vesta components on which we did not see the “Aglitsky language”. The racks were produced at the Skopinsky Automotive Assembly Plant in the Ryazan region. By the way, in terms of the balance of suspension characteristics, we recognize Vesta as one of the best in the class.
Reviews
| № | Positive |
| 1. | Dmitry Vasilyevich , 43 years old (drive2.ru): Lada Vesta has basic equipment, steering wheel without functional buttons. I’m used to it, I’m not going to change it, and it’s expensive when buying a new original one. |
| 2. | Sasha , 48 years old (prom.ua): in the third year of operation of the car, I decided to replace the RK. I bought the original one with the factory part number, the price is 5600 rubles without the airbag module. |
| 3. | Ivan , 39 years old (autotoday.com): bought a plastic cover with buttons for 2,500 rubles. Although not original, it fit perfectly. I connected it myself, I didn’t contact the service. |
| 4. | Gennady Mikhailovich , 45 years old (rozetka.ua): on the advice of his comrades, he installed an overlay on the RK with buttons. I ordered the service at a service station. Satisfied with the quality of work, functionality, affordable price. |
| 5. | Nikolai Petrovich , 43 years old, (avtoflit.com): I bought the car second-hand, got it from the previous owner in good technical condition. The standard steering wheel has a plastic cover with buttons for adjusting speed and radio volume. |
| 6. | Semyon Vasilievich , 46 years old, (autotoday.com): I am satisfied with the quality and functionality of the remote control with buttons, it was not in vain that I paid over 6,000 rubles. I installed it myself, I didn’t go to a workshop. |
| 7. | Gennady Vasilyevich , 43 years old, (drive2.ru): two years after buying the car, he replaced the standard steering wheel with a new one with mechanical buttons. Now I’m less distracted by activating modes, switching, and watching the road situation more. |
| Negative | |
| 8. | Sergey Nikiforovich , 50 years old (prom.ua): installing a plastic cover on the steering wheel was not successful for me. The speed increase button in cruise control mode is inactive. I will contact the service station for diagnostics. Garage mates suggested that there was a defect in the mechanical key. |
| 9. | Georgy Semenovich , 47 years old, (avtoflit.com): I do not recommend buying plastic steering wheel covers for the Lada Vesta. It's better to pay more and buy a factory part. |
| 10. | Zhorik , 34 years old, (drive2.ru): twice contacted auto electricians at service stations to diagnose mechanical keys on the overlay. There are always some problems with non-original accessories. |
| 11. | Vasilyevich , 49 years old, (autotoday.com): The plastic cover served me for two years, after which the mechanical buttons began to fall out. The quality is very, very primitive. |
Related link:
License plate illumination on a Lada Vesta car.
Reasons for tuning
Two carburetors instead of one is a fairly effective tuning that has sound reasons. It’s even surprising why engineers didn’t think of this before at the stage of development of the VAZ 2109 model. One of the main reasons that contributed to the emergence of such a modernization is a design error in the power unit, as a result of which the manifold pipes have different lengths. This opinion is shared by many tuner experts. This difference has led to the fact that the largest amount of fuel falls on the first and fourth cylinders, while the rest do not receive enough fuel.
An alternative to installing two Solex carburetors is to polish the manifolds and internal surfaces of the chambers. This will help correct a significant shortcoming of the designers of the VAZ 2109, since as a result of these procedures, a larger amount of combustible mixture will enter the chambers and, as a result, the flow resistance will decrease and the operation of the drive will generally improve.
Be that as it may, replacing one carburetor with two is an ideal option, and it looks more attractive.
Instructions for luxury equipment, which has gray wires
Sequencing:
- There are holes on both sides of the Lada Vesta steering wheel. Insert the rods into them and press.
- The base of the airbag rises. You need to carefully remove it.
- Carefully separate the wires.
- Unscrew the central locking screw and pull the control wheel towards you without any effort. The wires should exit through the hub opening.
- If it is necessary to install the steering wheel, carry out all the steps in reverse order.
The steering wheel in the car is locked tightly. Therefore, when removing it, do not make any effort, gently swing it.
If you connect the gray wires to the steering connector, you can access the cruise control controls. To control the multimedia system, you need to connect five wires to the block using bls terminals. On the reverse side of the bundle of wires, a mini ISO connector is installed, which connects to the audio system.
Test the correct connection. All keys must function as intended. If the backlighting of the cruise control keys does not function, then a flashing is required. After checking, the airbag is installed.
Speaker installation
All Lada Vesta configurations have audio preparation, which simplifies the task of installing equipment, because there is no need to run the necessary cables and wires. The required minimum is present in all Vesta configurations, which allows you to effortlessly install both the head unit and dynamic heads with your own hands.
Installation of speakers does not require additional tools, so the work can be carried out without special training.
Before installing the speakers, you must carefully remove the insulation material in the places where the acoustics will be located.
Also, to seal the fasteners, you will need gaskets made of felt or similar material, which you can cut out yourself.
The installation area is equipped with only three fasteners, so to fix it with 4 fasteners you will need to install special stands. These stands can be made independently or purchased in advance at an automotive equipment store.
Then unscrew the screws at the bottom of the casing, bend the linings and push the spacers into this space. There is no need to secure them additionally; they will sit tightly in the prepared niche.
The installation area must be soundproofed. It is possible to improve the sound quality when playing audio.
The wires for the audio system are already in the cabin, but their connectors may not be standard. Therefore, it is better to purchase adapters in advance so as not to cut off the standard connectors, because this may affect the vehicle's warranty service.
This sequence of simple steps will allow you to install good-sounding speakers quickly and without the cost of installation by outside specialists
You need to act carefully, slowly, so as not to damage the trim and plastic in the cabin.
Location of the switch terminals on the steering column
A - ignition and starter switch
- 1 - terminal 15
- 2 - terminal X
- 3 - terminal 50
- 4 - terminal 30
- 5 - SU terminal
- 6 - terminal P
B - plug connector, 5-pin
- 1 - wiper switch, terminal 53b
- 2 - wiper switch, terminal 53a
- 3 - wiper switch, terminal 53
- 4 - windshield wiper switch, terminal 53e
- 5 - wiper switch, terminal J
C - plug connector, 5-pin
- 1 - hazard warning light switch, terminal 49
- 2 - manual switch for low beam and intermittent light signal, terminal 56b
- 3 - manual switch for low beam and intermittent light signal, terminal 56
- 4 - manual switch for low beam and intermittent light signal, terminal 56a
- 5 - manual switch for low beam and intermittent light signal, terminal 30
D - male connector, 4-pin
- 1 - wiper switch, terminal L
- 2 - wiper switch, terminal T
- 3 - wiper switch, terminal 31
- 4 - hazard warning light switch, terminal 15
E - plug connector, 7-pin
- 1 - horn drive, terminal 71
- 2 - hazard warning light switch, terminal 49a
- 3 - turn signal switch, terminal L
- 4 - parking light switch, terminal PL
- 5 - parking light switch, terminal P
- 6 - parking light switch, PR terminal
- 7 - turn signal switch, terminal R
Replacing the electric steering lock (ELV) WITHOUT replacing the steering column
Electric steering column lock control unit (hereinafter referred to as 'ELV'):
can't block, unblock
or in MFA indication 'ELV faulty'
or the car starts poorly, and then stalls again
or the car doesn't start well
or the car won't start.
Most often in combination with the appearance of an entry in the event recorder 'Electric steering column lock - malfunction'.
Due to contamination of the contacts in the ELV, the vehicle may
It is worse to start or the car stalls after starting.
The ELV control unit can now be replaced and adapted separately. Replacing the steering column assembly is no longer required.
Replacing the ELV control unit (electric steering column lock):
The steering column is removed in accordance with the Repair Manual
Chassis, axles, steering;
48 Steering;
Design description: Steering column;
Steering column, removal and installation.
Carefully clamp the steering column -1- in a vice using protective jaws. Carefully tilt universal joint -2- downwards
Carefully tilt universal joint -2- downwards
Loosen the bottom
ELV control unit breakaway bolt using socket
T10424
and use a brush to remove shavings - otherwise they may
cause damage.
Device T10424
Release the steering column from the vice and carefully turn it 180°. When clamping, make sure that the universal joint -2- is carefully tilted downwards.
When clamping, make sure that the universal joint -2- is carefully tilted downwards.
A 180° rotation is necessary so that when releasing the breakaway bolt, chips do not
got inside the steering column.
Release the bottom
bolt -arrow- ELV and remove chips with a brush.
Carefully remove ELV control unit -J764- -1-
Secure ELV control unit -J764- -1- with new breakaway bolts (N 910 238 02) -arrows-.
Tighten pull-off bolts -arrows- evenly until the heads come off.
Install the steering column.
Condition for ELV adaptation: availability of a basic Volkswagen disk of version no lower than V.15.00.00 and a branded Volkswagen disk V.15.95.00.
The quiescent voltage on the car must be at least 12.5 V. Connect the car battery to an external power source. For more information on this subject, see 'Inspection service and care'.
Connect the tester -VAS 5051-, 5051B- or VAS 5052 with the ability to connect to the network to the diagnostic connector of the car and turn on the ignition, flashing the headlights for a test.
Connect the tester to the service center network, select the 'Guided Fault Finding'
and identify the car.
Screen display (example):
Select 'Go - Select vehicle component' and the following menu items:
Select vehicle system or function,
01 — Systems with self-diagnosis capabilities
25 — Immobilizer 4D.
Electric steering column lock, adaptation
Basic adjustment of steering angle sender -G85- using tester -VAS 5051-.
Volkswagen models: 357, 3C
Spare parts must be ordered based on your needs!
Source
Fuse box and its housing: Renault brand, made in Romania
The fuse box comes entirely from the Logan model, as evidenced by the Renault logos on the body and the Romanian manufacturer Capirom. True, AvtoVAZ reported that in the near future the company will change its supplier to a local one - from the Samara region.
We didn’t have any questions regarding the unit itself, but during a scrupulous study by the electricians, a very interesting point emerged
Attention was drawn to two fuses that were not indicated either on the diagram or in the instructions. A study of the electrical circuit revealed that during a sudden voltage surge (for example, when lighting a Vesta with the engine running), these fuses may burn out, which will stop charging the battery
And what’s most insidious is that the driver of a discharged car will not know about it - no electrical “paths” to the dashboard (indicator lamps) could be found. Whether the reason will be revealed when connecting the standard diagnostic system in the absence of an error that pops up is also a question.
Touch panel of the Vesta multimedia system
This technology combines many options and has an mms screen of almost 18 cm diagonally. Matches with vehicle panel. Multimedia in Lada Vesta includes all the parameters of standard equipment. Such panels are used in foreign cars and VAZ models. The display is designed on a resistive basis. The mms screen does not pay attention to changes in temperature in the cabin. Switching options in mms, updating and controlling is carried out even in severe frost without removing gloves.
In addition, a special multimedia Lada Vesta is installed on the steering wheel, which allows you to control the radio without being distracted from the road. Using special keys on the steering wheel, you can answer a call, end a call, turn up the music or, conversely, make it quieter. Moreover, you can press the keys even with gloves on!
What other functions are typical for this system? This:
- a radio system that allows you to memorize several radio stations at once;
- the ability to listen to audio, and this can be either using USB flash drives or playing from a phone, or from an external HDD via a USB channel;
- The multimedia also has a phone mode that allows you to talk hands-free via Bluetooth;
- you can install a navigation application on the radio and use it for Russian roads;
- If you connect a flash drive or SD card, you can not only listen to audio, but also watch videos with small pictures.
Disassembly of parts
The sliders, mechanism and casing are not needed yet; you need to move on to removing the signal button. It is secured with two locks. To remove it, you will need a thin object (for example, a scalpel or knife) that should be inserted into the groove. Having done this, you need to release one of the locks and remove the button from the groove.
Now you can proceed to removing the first slider (this element is responsible for turning on the low beam). It is recommended to place the lever in your left hand, and take the slider with your right hand and pull. This Renault element should come out with a slight crunch.
Important: when pulling out the slider it is easy to damage it, so you need to act carefully during repairs
After this, the contact pin along with the wires are removed. It is from this that the wires must be desoldered during repairs. Instead of bad steel wires from Renault Logan, which flew into the trash after soldering, it is best to use 0.5 mm2 copper wires.
During repairs, the wires need to be threaded through the hole and soldered to the contacts. At the end of the process, it is necessary to check for a short circuit with a tester, since molten tin can easily damage the plastic insulation of the contacts.
After the soldering process, everything is assembled in reverse order.
Important: when putting an element such as a light switch on a contact pin, you must act with extreme caution, since there is a high risk of breaking the lever that controls the contact slider. We recommend: Replacing the rear struts of Renault Duster - we study thoroughly
We recommend: Replacing the rear struts of Renault Duster - we study thoroughly
As for the wires, it is recommended to solder them when the Logan steering column element is fully assembled. This will allow you to accurately determine the size of the wires.
By following these recommendations, the car enthusiast will be able to solve the problem with the steering column mechanism on Logan.
Then the base of the part must be turned over and the terminal part to which the Renault Logan wires are connected from the lever is removed. There are five castles there.
Inside the element there are two small sliders that turn on the turn signals and headlights. There are several wires coming out of the switch.
We need black and red. Because they most often fail. For example, my black wire broke off right at the switch pin. And it was not possible to solder it right away.
Therefore, we had to completely disassemble everything. In the photo, the wires are already soldered instead of the factory ones - the arrow indicates the location of the breakage. Where the wire broke off. This is what the factory wires look like. We begin to disassemble the switch. Unscrew the two T10 screws (red arrows) and carefully unclip the plastic latches (yellow arrows).
We see the following picture. Carefully pull out the switch along with the mechanism. The mechanism is attached to the lever using two grooves and a small spring pin, indicated by arrows in the photo. This pin rotates when switching lights and dimensions.
And the wires are breaking. Moreover, they are really rigid and not flexible.
Switch Pin To remove the switch pin, you must first disassemble its housing. The figure below shows what needs to be unscrewed and which latches to unfasten: Switch body Then you need to remove the horn button. It needs to be pryed off with something thin and flat, for example, a small flat screwdriver. Carefully insert a screwdriver into the gap between the button and the lever, lift the cap and remove it. Place of removal of the button For clarity, I provide an illustration that shows the removed button.
Repair of the steering column switch RENAULT DASTER
To make it more clear to you how to extract it. Removed button Then you need to remove the end switch, which is secured with latches on the pin. Therefore, it must be pulled off the pin with a strong but gentle movement.
We recommend: Renault Sandero Stepway trunk volume in liters
For clarity, we will show the latches: Also on the element itself there is a terminal, by clamping it, it will be possible to pull the element out of its normal place. To determine a fault in Logan, it is advisable to use a tester and check the electrical wiring.
Also, to check for mechanical damage, you need to disassemble the plastic housing of the part; for this you need to: After this, carefully disconnect the plastic latches located on the sides of the housing.