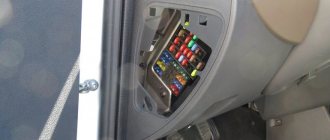
You have to remove the relay and fuse box on Lada Kalina and Grant cars if it is replaced with a new one, or to gain access to other parts, for example, the central locking control unit. Removing the mounting block with your own hands is not difficult if you know the location of all the fastening screws.
Required
: small ratchet with a cross bit.
- Remove the steering column cover (lower the steering column clamp downwards and remove the fastening screws).
- Remove the cover of the mounting block (snap off the cover in the sequence: 1, 2, 3, 6, 4 and 5).
- Remove the right mounting block screw using a small ratchet with a Phillips bit.
The process of removing the fuse box is also shown in the video:
Let us remind you that you can find the design of the relay and fuse box here (for Lada Kalina and Lada Granta).
In a Lada Granta car, the block where the fuses are located is a very important element that ensures the safety of the on-board electrical network. Without this unit, any pantograph can be damaged if a short circuit occurs in electrical lines. Among the likely consequences of such unpleasant phenomena as a short circuit, fire of wiring is present in the foreground. In view of this, the process of installing the fuse box is of particular importance. The driver must know where the fuses are in his car.
Additional VR starter
On modern cars, an additional VR starter is a priori provided.
On older cars, the relay is installed and connected independently. The advantages of installing an additional VR are obvious:
- Protects the starter device from burnout of contacts in the lock, which occurs for various reasons (long start-up, banal wear, etc.);
- It has a positive effect on the loading of contacts of the same ignition switch, as a result of which the contacts remain operational longer;
- Protection of the starter from a situation where, due to a “glitch” of the key in the ignition switch (the engine has started, but the starter continues to spin).
You can check whether the additional VR is installed on the car like this:
- Look in the “black box” (fuse box);
- Turn on the starter device in the engine purging mode - if the additional relay is on, then the starter must turn off on its own after a few seconds.
Connection of additional VR
Here's how to connect:
- Fix the relay in any convenient place (you can on the stud of the glass cleaning fluid reservoir);
- Connect the cable to the starter;
- Remove the red wire from the flat terminal of the main relay, and in its place insert the wire from the additional VR;
- Connect the other wire of the new BP with an 8 mm tip to the positive of the starter;
- Place contact 30 of the additional VR onto the released contact of the main VR;
- Screw the short wire numbered 85 to the body (ground).
Additional relays can be purchased in stores. They are sold as a kit, where everything is provided for proper self-installation.
- Absolutely legal (Article 12.2);
- Hides from photo and video recording;
- Suitable for all cars;
- Works through the cigarette lighter connector;
- Does not cause interference to radios and cell phones.
Replacing the "six" light relay
Russian car enthusiasts driving Zhiguli “classics” ask the question of how to connect a light relay to a VAZ 2106 so that it can function without problems in the future. Similar work is carried out when replacing the “six” light relay.
The work is carried out in the following sequence:
- We unscrew the fasteners and dismantle the headlight relay for subsequent replacement;
- We remember the frequency of connecting electrical wiring or mark them with a marker. Remove the wiring from the device connectors;
- We install the updated device in the reverse order.
Useful post?
Yes
No
What you need to know about fuses
Chevrolet Niva mounting block with description
Fuses are designed to protect electrical equipment from overvoltage and short circuit.
New fusible protective devices are smaller in size. The following Grant models are equipped with them:
The difference between the schemes in the Standard, Norm or Lux trim levels is insignificant, and is primarily due to the installation of additional equipment.
A total of 32 fuses are installed in the mounting block, which is slightly more than in older versions. Those of them that are located in the cabin are responsible for the operation of various circuits with relatively low power.
The power ones, as previously noted, are placed in the engine compartment. This was done to ensure a greater level of safety and ease of maintenance of the vehicle.
The manufacturer expressly prohibits the use of protective devices during replacement that do not correspond to the nominal ratings of those indicated in the diagram. In particular, exceeding the maximum values leads to overload of the circuit and subsequent failure of the equipment powered by it. All this most often leads to fire.
It is important to remember that if a fuse blows, you should not change it immediately. First of all, you need to find out what exactly led to this
Otherwise, there is a risk of the insert melting on the new one.
If you do not have the knowledge to test electrical systems, you should seek the help of professionals.
Source
labavto.com
If you are the owner of a Lada Granta car and you have problems with electrical equipment, then first of all you will need to check the fuses. In most cases, replacing one of the elements is enough.
If the fuse is intact, then it is likely that you will need to contact the services of a service station. Or, in order to save money and time, troubleshoot the problem yourself. Remember - the main thing in such situations is to slowly figure out what the problem is.
An electrical fuse or relay is a small device that is designed to protect the specific electrical circuit in which it is installed. In fact, all consumers of the Lada Grant are protected by fuses, not counting the battery charging circuit, generator and starter.
Car Lada Granta
Any Lada Granta circuit that is protected by a fuse is designed for the maximum current flowing through it. Taking this indicator into account, a safety element is installed. If a situation arises when one of the elements of the circuit fails and the current exceeds the design norm for this circuit, the conductive part in the fuse will burn out and the system will be de-energized. This is what guarantees the safety of the car's electrical wiring and prevents fire.
New fuse block diagram for Grant Standard and Grant Norma
Wiring diagram for starting the Lada Granta engine
Cars VAZ 2190, VAZ 2191 - 2011, 2012, 2013, 2014, 2015. Cars Lada Granta Liftback, Granta Luxury, Granta Standard, Granta Norma were also considered. Interpretation of fuses and relays in the mounting block of the Lada Granta. New diagram of the Grant Standard fuse block.
Location of the fuse box under the hood
Interpretation of fuses located in the engine compartment.
For the LUX version, the location and purpose of the fuses under the hood are slightly different.
Types of fuse blocks installed in Lada Granta.
Electrical circuits protected by fuses located in the fuse box and car interior relays of standard/luxury versions
* A set of fuses is indicated for the maximum configuration of the “luxury” version (depending on the set of options, individual fuses from this set may not be used in other configurations).
** Fuses, the rating of which may vary in different vehicle configurations depending on the set of options.
Electrical circuits protected by fuses located in the fuse box and the standard car interior relay
Relays located in the fuse box and car interior relays of the “standard” and “luxury” versions
Relays located in the fuse box and car interior relays of the “standard” version
In the engine compartment
To access the fuses located in the engine compartment block, lift the cover and remove it from the mounting block.
| Purpose of fuses of the mounting block in the engine compartment | ||
| № | Protected circuit | Current, A |
| STANDARD | ||
| F1 | Main relay, circuits protected by fuses F1 and F21 of the unit in the passenger compartment | 30 |
| F2 | Generator power circuit | 60 |
| F3 | 60 | |
| F4 | cooling fan | 30 |
| F5 | electric power steering | 50 |
| F6 | Spare | — |
| LUX | ||
| F1 | Heated windshield | 50 |
| F2 | Generator power circuit | 60 |
| F3 | 60 | |
| F4 | Electric radiator cooling fans * - included without air conditioning system | 40/30* |
| F5 | Power steering | 50 |
| F6 | ABS system | 40 |
Video - Replacing the Lada Granta fuse
Lada Priora comfort block
If the starter does not work when the ignition key is turned to position “II,” there may be a malfunction of both the starter itself and its activation circuit.
To check, turn off the ignition and disconnect the wire block from the terminal of the starter traction relay windings.
Using a screwdriver, we bridge the terminal of the traction relay windings and the tip of the wire connected to the positive terminal of the battery.
Care must be taken when performing this operation, as
sparking is possible in the area where the terminals close. Do not connect the screwdriver to ground while closing the terminals!
If the crankshaft rotates, then the starter is working, and the cause of the malfunction is a violation in its activation circuit.
Otherwise, the starter or its traction relay is faulty.
If it is not possible to eliminate the malfunction in the activation circuit of a working starter, then, if necessary, in this way (by turning on the ignition and closing the terminals), you can start the engine and drive to the repair site.
A malfunction in the starter switching circuit can be caused by damage to: the starter relay, the power circuit or the ignition switch relay control circuit, to find a fault in the starter switching circuit.
Remove the starter relay from the mounting block.
To check the starter relay, install a known-good relay type 902.3747-11 in its place. To do this, you can use the adjacent power window relay.
If the starter turns on with the newly installed relay, then the starter relay has failed and must be replaced.
If not, check the power circuit and starter relay control circuit.
To check the power circuit, remove the starter relay from the mounting block.
We insert a jumper (piece of wire) into the sockets of the power contacts of the relay “30” and “87”.
We turn the key in the ignition switch to position “II” - “starter”.
If the starter turns on, the power circuit is working, if not, then use the tester
We check whether “+12 V” is supplied to socket “30” of the starter relay when the key is in the ignition switch in position “II”.
In this case, the second (“negative”) probe of the tester can be connected to the bolt securing the door opening limiter.
If voltage is supplied to socket “30”, use a tester to check the integrity of the circuit from socket “87” of the starter relay to the tip of the starter traction relay control wire.
If voltage is not supplied to socket “30”, check the circuit from terminal “50” of the ignition switch to socket “30” of the relay.
If the circuit is in good condition, it is necessary to replace the ignition switch contact group.
If the starter power circuit is working properly, we check the starter relay control circuit - to do this, insert the tester probe into socket “86” of the starter relay, connect the second tester probe to ground.
With the ignition on, check whether “+12 V” is supplied from the main relay of the engine management system to socket “86” of the starter relay.
Then we insert the tester probes into sockets “86” and “85” and check whether there is ground in socket “85” of the relay connected to pin “50” of the controller
Otherwise, we check the integrity of the starter relay control circuits from the main relay of the control system and output “50” of the controller - respectively to sockets “86” and “85” of the starter relay.
Replacing the cigarette lighter with a USB socket
Due to the design features of the liftback, some difficulties arise with the cigarette lighter.
The short body does not provide reliable fixation, which is why connected devices may turn off. Therefore, many owners install a 12-volt socket instead of a car cigarette lighter. For this procedure, standard AvtoVAZ sockets for Gazelle, Vesta or XRay are suitable. Part number 118.3725 SOATE. The price of the device is 150 – 200 rubles.
- We de-energize the car by removing the negative terminal from the battery or pulling out the corresponding fuse.
- We take out the metal cartridge.
- We bend the fixing antennae.
- We dismantle the internal part of the car cigarette lighter.
- Disconnect the wire block.
- We connect the plug to the socket socket.
- We mount it in the cigarette lighter hole.
The disadvantage of this procedure is that the device will stop working as intended. The socket will not be illuminated due to the removal of the filter. However, all connected devices are securely fixed in the socket. You can learn more about the installation procedure from the video.
Fuse diagram
All fusible devices have the same marking “F” and serial number. In particular, F1 (15 amperes) is responsible for:
- safety of the relay that turns on the fan cooling the motor;
- ECU;
- ignition coil;
- Short circuit 2×2;
- operation of the injectors.
- F2 (30 amperes), in charge of power windows;
- F3 (15) – alarm;
- F4 (20) – wipers and airbag;
- F5 (7.5) – ignition switch;
- F6 (7.5) – reverse signal.
F7, rated at 7.5 amps, controls the circuit:
- adsorber valve;
- oxygen sensor;
- DMRV;
- speed sensor
- F8 (30) – rear view mirror heating;
- F9 (5) – right clearance;
- F10 (5) – left side signal;
- F11 (5) – rear fog lights;
- F12 and 13 (7.5) – are responsible for the low beam (right and left, respectively);
- F14 and 15 (10) for distant, in the same order;
- F16 and 17 (10) for front fog lights;
- F18 (15) – heated rear seats;
- F19 (10) – ABS;
F20 (15) protects:
- horn;
- luggage compartment locking mechanism;
- checkpoint;
- cigarette lighter;
- diagnostic connector.
- F21 (15) – fuel pump;
- F22 (15) – central locking;
- F23 (10) – daytime running signals;
- F24 (7.5) – air conditioning system;
- F25 (10) – interior lights and brake lights;
- F26 (25) – anti-lock brake.
From 27 to 30 – backup fuses.
The F31 is rated at 50 amps and protects the heated windshield system. In turn, F32 is responsible for the heater and electric power steering.
In the engine compartment mounting block the location of the fuses is as follows:
- F1 – power steering (50 amperes);
- F2 – heater fan (30);
- F3 and 4 – generator (60);
- F5 – low beam (30).
The location and purpose of protective devices may differ slightly depending on the configuration, so you should be guided by the diagram located, as noted earlier, on the protective cover of the unit.
https://youtube.com/watch?v=eSW_JQyzuuc
Block under the hood
It is located next to the battery.
Photo - diagram
Description
Option 1
- 30A Low beam headlights or main relay, circuits protected by fuses F1 and F21 of the mounting block in the passenger compartment 50A Windshield heater
- 60A Generator
- 60A Generator
- 30/40A Heater fan (heater fuse grants)
- 50A Electromechanical power steering
- 60A ABS block
Option 2
- 60A Generator
- 60A Generator
- 30/40A Electric radiator cooling fan
- 40A ABS/ESP
- 25A ABS/ESP
- 50A Electric Power Steering Controller
Useful tips
If the fuse constantly blows, then this is a reason to think about the correct operation of this circuit. We also do not recommend making changes to the design unless absolutely necessary.
Thank you, your article helped me a lot, for a long time I couldn’t figure out which fuse was from what, an eternal problem, thanks to your diagram I can easily find the breakdown.
YOU HAVE AN ADVERTISING ON THIS PAGE “there was a swear word”, BE SURE TO CHECK.. I WATCH ONE ADVERTISEMENT AND ANOTHER ADVERTISING……
Good afternoon. Advertising is shown by Yandex and Google depending on the user’s interests and the article itself. We are not able to influence advertising from these systems, but we constantly try to “block” bad ads.
What type of terminals other than Lear are used in the new type of blocks?
Who could tell me. What is the rated current in all RELAYS of the new Lada-Granta liftback model, because in case of replacement with analogues, I would not want to make a mistake.
Hello! I have a 2022 Lada Granta Liftback, the cigarette lighter stopped working, I opened the fuse box, and number f27 doesn’t have a fuse at all. Who knows where to look before. from the cigarette lighter?
Hi all! Maybe it will be useful for someone, the Lada has a liftback 2022 before. The cigarette lighter is number F25 and is called the cartridge for connecting additional. consumers in the salon)
Good afternoon everyone. Granta liftback 2016. The EUR is glitchy, in the morning after a long period of inactivity it works for about 5 minutes, then turns off again. Sometimes 3-4 works. During the factory, the battery sensor lights up, after pressing the gas pedal it goes away. The generator is 80a, not original. Electricians say it's not the generator. And if they can’t figure it out, they suggest changing the EUR. The diagnosis of the EUR does not work, as if it does not exist at all. It’s too expensive to replace with a new one, maybe someone has encountered this and can tell me. Thank you in advance
Someone on the drive wrote that it was a bad contact or speed sensor.
The speed sensor needs to be replaced, it's in the box
Good afternoon. Lada Granta Lux with AMT. The fuse block does not match any of the above diagrams. In particular, I cannot find the fuse for the windshield washer motor.
F29 at 20A is responsible for 3 circuits. Center. body electrical unit. Windshield cleaner and WASHER. According to the LADA GRANTA operating manual (December 2016)
On my 2013 Grant Luxury, the diagram on the cover does not correspond to the actual location of the relay, because... There is no relay for turns, windshield wipers and some others. These functions are controlled through the “brains”. According to the old Zhiguli tradition, the lids are made identical. This is a known fact and it is strange that the authors of the article do not know about it. It’s very easy to find out how your fuse box is arranged. Swing the turn signal lever, swing the windshield wiper lever....
If the turn signal blinks three times and the windshield wiper makes one pass, then you do not have a relay.
Relay to 14 clicks when accelerating, what should I do? I installed the same thing.
The ABS and handbrake lights up when the lights are turned on! Does anyone know where the fuses are?
Help, who knows the 2022 comfort grant, it stopped showing on the right seat (the seat belt is not fastened)
Well, thank God. You don’t see that your seat belt is fastened
Hello! Which fuse is responsible for Era-GLONASS?
Tell. Electric trunk opening button on the outside of the trunk lid. What is the electrical circuit for controlling the trunk release lock?
Good evening. I have a Granta liftback. The outlet stopped working. I read the comments above and indeed, the fuse is located at position F27. Why do they just make a diagram on the inside of the lid?
Lada Granta 16 year old, 16 cl, the cigarette lighter turned out to be f27, although it was stated to be f20
How to remove the grant relay
Another modification of AVTOVAZ products, intended for those who have switched from foreign cars. I had a trick on my Volkswagen - depending on the interval between turning on/off the first position of the windshield wiper, the pause between sweeps of the wiper blades was adjusted. I didn’t have enough of this feature on the grant during the rain, so I decided to buy a 12v relay (fortunately, it’s not expensive at all). The relay arrived in the winter, but at this time of year, windshield wipers are not very popular here, and there is no desire to tinker with the mounting block in the cold. Therefore, the house relay sat on the shelf until spring.
It is supposed to remove the relay from the mounting block using a puller like this.
Interesting, I thought, I’ve never seen anything like this even in foreign cars. And then I realized why. It’s simply not realistic to pull out the relukha without two smoke breaks and four-story curse words. I had to take the advice of comrades who had already carried out this procedure - remove the neighboring relays. The right relay (small) was very easily removed using a puller
The left one is a little more complicated, but it has also left its rightful place. But it took about 15 minutes to pull out the original windshield wiper relay. I tried both a screwdriver and a puller - it was no use. As a result, I swayed and somehow took it off.
Well, installing a new one and returning the neighboring old ones to their places is a matter of one minute
Before replacing a blown fuse, you need to find out why the fuse blew.
A blown fuse indicates an overload or short circuit in some circuit
We act in the salon
- The fuse box is located on the left side of the instrument panel. Remove the cover with the outdoor lighting mode switch integrated into it. If the work is carried out on the LADA Granta “Lux” and “Norma” modifications, then do not forget about the need to disable the button used to unlock the trunk lock.
- Armed with the diagram, we determine whether the cigarette lighter fuse or the fuel pump fuse has become unusable, and so on. We look at the integrity of the thread and draw the appropriate conclusion. If the element is unfit, then we replace it with a new analogue by fixing it in the mounting socket. We repeat this action with the entire list of blown fuses.
- We connect the “minus” back to the battery and check the functioning of the electrical unit in which the fuse was replaced.
The process of replacing the specified elements, which contain the fuse block, of the engine compartment of the Lada Granta is implemented in a similar way. The cover on the safety module is removed using a simple action - just pull it up and quietly replace the marked elements.
Recommendations for shutdown rules
Disabling the immobilizer is not a difficult task, but consistency is important in this matter. To deactivate the device, we proceed according to the diagram supplied by the manufacturer. We detect the device where it is located and try to disconnect it from the power module.
We stock up on tools:
- rubber hammer;
- a Phillips screwdriver;
- figured bat;
- cardan type hinge with a corresponding extension.
Let's act!
- We remove the battery.
- Remove the dashboard protection.
- The immobilizer looks like a small black box and is located behind the interior heating control module. Here the difficulty will arise with the approach to the bolts that secure the device.
- You will first need to de-energize the APS. To do this, pull out the plug while holding its plastic retainer with your hand.
- Sometimes owners of LADA Kalina forget about the need to restore the diagnostic connection (line) after dismantling the anti-theft module. For this purpose, a jumper is required, through which the exchange of impulses between the diagnostic block and the ECU itself is restored. If there is no need for such an option, then we proceed more simply - we connect the appropriate cables to provide the “K-line” functionality.
Having completed the removal procedure, we configure “APS” again. You will need to erase the entire list of data stored by the immobilizer in the volatile memory of the engine control module.
This process looks like this:
- Do not forget to remove the connector with wires from the device socket in advance.
- Now we resort to connecting the contacts labeled “18” and “9.1”.
- We open the controller housing, where it is located, as can be seen in the diagram, and insert the chip with the cleaning utility instead of the standard wiring chip. We are trying to start the engine. It will start if all the specified actions are performed correctly.
- If you cannot remove the designated chip, you can find the Combiset software product, which is also capable of clearing the memory. When this method does not bring results, then you will need to re-solder the circuit socket itself.
Owners of LADA Kalina with an ECU in the “January 5.1” version were luckier. The module allows you to easily install the Eeprom program. It is capable of overwriting data with new firmware, which can be obtained from an untrained anti-theft device by reading from the on-board controller. These actions ensure that the ECU can independently generate the required password, after which the engine will be allowed to start.
Sometimes there are cases when it is not possible to completely eliminate data, for example, from Eeprom. There is an exit! Let's try to edit the dump file. Here the bytes from “2” to “7” are replaced by the letters “FF”.
Power fuses
The power fuse box is located under the hood and is located between the battery, strut support and coolant reservoir. Looks like a vertically mounted box. By removing the top cover, access to the power fuses appears.
F1 (50 A) - electric power steering. If the steering wheel turns hard, also check fuse F32.
F2 (30 A) - heater fan
F3 (60 A) - generator. If the battery discharges quickly or the discharge lamp is on, check this fuse, as well as the operation of the generator itself and its brush.
F4 (60 A) - generator
F5 (30 A) - low beam headlights. Also check relay K9 and fuses F12, F13.
When troubleshooting any electrical problems, use caution. Replace fuses and relays only with the engine off and the ignition off.
If your fleet contains not only Grants, you can also read about Kalina fuses and relays.
The Lada Granta has a new type of mounting block installed, therefore the location of both relays and fuses in it is somewhat different than in other products of the Volzhsky Automobile Plant. In addition, it is divided into two separate ones installed in different locations.
The main one is still located in the instrument panel, to the left of the steering wheel. The second one is located directly in the engine compartment.
In this article we will tell you how the circuit of the new type of fuses on the Lada Granta (with an engine with both 8 and 16 valves) differs.
Removal and replacement instructions
All car mechanics, without exception, recommend disconnecting the “-” terminal of the battery when working with the vehicle’s electrical equipment.
Preparation
Work on replacing electrical fuses or relays can be carried out anywhere. The main thing is that the place should be well lit. Before starting work, be sure to turn off the car.
Video about replacing the fuel pump fuse on a Lada Granta - to help you.
The work of replacing fuses in the cabin and engine compartment is almost identical. With minor differences.
Cover removal diagram
- Let's start with the first one. To gain access to the fuses and relays located to the left of the driver's feet, you need to remove the cover.
- This must be done according to a certain scheme. First you need to pull the cover by the lower left corner, it is designated as number 1 in the diagram. Next, release the left locking point. Then the middle one at number 2. Next are points 3 and 6. Now all that remains is to free the top points 4 and 5. The entire cover has been removed.
- Visually inspect the block. There should be no burning or melting in it. There should also be no burning smell.
- In the decoding we find the consumer we need and according to the diagram we find its location.
- Using tweezers located in the block, remove the problematic element. We inspect it visually or check it using a device.
- If it is burnt out, then we put a new one in its place.
- The cover of the interior unit is installed in the following order: first of all, you need to snap the right part, then the bottom, and finally the top. It is necessary to ensure that the fastening parts of the cover and the latches match exactly.
The request returned an empty result.
- If the element we need is located in the engine compartment, then we proceed somewhat differently, namely, we open the hood itself.
- Find where the block is located.
- Slide the cover up and remove. We determine the burnt out element, just like in the cabin unit.
- We put the cover in place.
- Connect the “-” terminal of the battery.
- Turn the ignition key.
- If the consumer earns money, then everything is in order.
The request returned an empty result.
If the fuse blows again, the problem may be more serious and you will need to call a professional to help.
What does each fuse do?
Controllers are responsible for certain functions in vehicle control.
The fuse diagram of the Granta Liftback is as follows:
| Numbering | Maximum value of I in a section of the circuit, in Amperes | Functional |
| F1 | 15 | -electrical unit that controls the internal combustion engine; -temperature sensor; -correct operation of the injector; - spark ignition unit; |
| F2 | 30 | Electric windows; |
| F3 | 15 | Emergency notification operation; |
| F4 | 20 | -airbag; - supply of windshield cleaning fluid; |
| F5 | 7,5 | Operation of the ignition unit; |
| F6 | 7,5 | Turning on reverse signals; |
| F7 | 7,5 | Speed controller, heater motor and adsorbent element valve; |
| F8 | 30 | Heated rear glass; |
| F9 | 5 | Signal lights R |
| F10 | 5 | Signal lights L |
| F11 | 5 | Turning on PTF (rear); |
| F12 | 7,5 | Operation of the BS R lamp |
| F13 | 7,5 | Operation of lamp BS L |
| F14 | 10 | Operation of the DS R lamp |
| F15 | 10 | Operation of lamp DS L |
| F16 | 10 | Turning on PTF R |
| F17 | 10 | Turning on PTF L |
| F18 | 15 | Heating system for driver and passenger seats; |
| F19 | 10 | Wheel anti-lock; |
| F20 | 15 | - socket for cigarette lighter; -KP; -sound signal; -electric lock in the trunk; |
| F21 | 15 | Fuel supply system; |
| F22 | 15 | CZ; |
| F23 | 10 | turning on daytime lights; |
| F24 | 7,5 | Air conditioning; |
| F25 | 10 | Interior light, braking (light); |
| F26 | 25 | Wheel anti-lock; |
| F27 | — | Auxiliary; |
| F28 | — | Auxiliary; |
| F29 | — | Auxiliary; |
| F30 | — | Auxiliary; |
| F31 | 50 | Heated sight glass; |
| F32 | 30 | Electric power steering and heater. |
Main symptoms of a malfunction
If you find a blown fuse, there is no need to rush and change it as soon as possible; try to find the reason that led to the burnout. Each of the fuses is responsible for one specific circuit, therefore, by calculating this circuit, you can accurately determine the faulty element. If a repeated breakdown occurs after replacing the burnt-out device, it is recommended to immediately seek help from an electrician.
Thus, if you identify any breakdown associated with the electrical equipment of the car, you must immediately check the condition of the fuses and relays, replace them if they burn out, but before that, be sure to find out the cause of the malfunction.
If you independently determine the faulty circuit, you will need to remove the cover of the mounting block. On its inside you will see a correct and current diagram for installing fuses, based on which you can calculate the faulty circuit. Grant's electronics circuit looks like this:
| Fuse | Current strength, A | Protected circuit |
| F1 | 15 | — Relay for turning on the engine cooling fan — Short circuit 2x2 — Controller (engine control unit) — Injectors — Ignition coil |
| F2 | 30 | Electric windows |
| F3 | 15 | Alarm |
| F4 | 20 | — Windshield wiper — Airbag |
| F5 | 7,5 | Ignition switch terminal 15 |
| F6 | 7,5 | Reversing light |
| F7 | 7,5 | — Canister valve — Mass air flow sensor — Oxygen sensor 1/2 — Speed sensor |
| F8 | 30 | Rear window defroster circuit |
| F9 | 5 | Side lights on starboard side |
| F10 | 5 | Side lights on the left side |
| F11 | 5 | Rear fog lights |
| F12 | 7,5 | Low beam on starboard side |
| F13 | 7,5 | Low beam on the left side |
| F14 | 10 | High beam on starboard side |
| F15 | 10 | High beam on the left side |
| F16 | 10 | Front fog lamp on starboard side |
| F17 | 10 | Front fog lamp on the left side |
| F18 | 15 | Heated front seats |
| F19 | 10 | ABS (Anti-lock Braking System) |
| F20 | 15 | — Horn — Trunk lock — Transmission — Cigarette lighter — Diagnostic connector |
| F21 | 15 | Electric fuel pump |
| F22 | 15 | central locking |
| F23 | 10 | Daytime Running Lights |
| F24 | 7,5 | Air conditioner |
| F25 | 10 | — Interior lighting — Brake light |
| F26 | 25 | Anti-lock braking system |
| F27 | — | Spare |
| F28 | — | Spare |
| F29 | — | Spare |
| F30 | — | Spare |
| F31 | 50 | Heated windshield |
| F32 | 30 | — Heater — Electric power steering |
| Relay | Description |
| K1 | Heater fan relay. |
| K2 | Power window relay |
| K3 | Starter relay |
| K4 | Ignition switch terminal 15 relay |
| K5 | Turn signal and hazard warning relay |
| K6 | Wiper relay |
| K7 | High beam relay |
| K8 | Horn relay |
| K9 | Low beam relay |
| K10 | Heated rear window relay |
| K11 | Controller relay (engine control unit) |
| K12 | Electric fuel pump relay |
Lada Granta mounting block under the hood:
| F1, 50A | Electric power steering; |
| F2, 30A | Heater fan |
| F3, 60A | Generator |
| F4, 60A | Generator |
| F5, 30A | Dipped headlights. |
New family
(from September 2022):
Before removing a burnt-out device, be sure to turn off the power to the car by disconnecting the wire connected to the “negative” terminal from the battery. When replacing a fuse, it is recommended to use pliers or special pliers and tweezers. Once you open the lid, you will quickly recognize a blown element - it will clearly stand out against the background of working fuses. Remove it using tweezers, and then insert the new part into its proper place.
If a fuse frequently blows, you should think about the correct functioning of the entire circuit, and perhaps seek help from specialists. It is not recommended to make independent changes to the scheme.
Remember to be careful when dealing with any breakdowns related to electrical equipment and appliances. So, you can change fuses only with the engine off and the ignition off.
The process of connecting them also requires care, since carelessness in such an important matter can lead to the machine catching fire
Features of the fuse system of the Lada Granta Liftback
The electrical components responsible for starting the engine, battery and generator circuit do not have their own fuses. Therefore, when dismantling this electrical equipment, be sure to disconnect the battery (remove the “-” terminal) so that the circuit does not close.
If the cigarette lighter fuse of the Lada Granta Liftback fails, you will not be able to start the car, since in old-style units one controller (F20) is responsible for several functions, including the immobilizer. Until the immobilizer works, the circuit is not closed and the car will not start.
https://www.youtube.com/watch?v=eSW_JQyzuuc
The fuse box of the Lada Granta Liftback consists of two modules. One of them is in the cabin, and the other is located in the engine compartment, where you can find the fuel pump fuse. If any of the fuses often blows, think about the correct operation of the circuit, seek help from specialists. It is not recommended to make changes to the scheme yourself.
Useful advice on what you can temporarily replace the starter relay with
If your starter relay breaks during a trip, you can replace it with a “rear window heating relay.” They are identical. Number “rear window heating relay” K10.
If you bought Granta
and you start having electrical problems, perhaps you are faced with a manufacturing defect. But don’t be alarmed ahead of time, the first thing you need to do is check the fuses and relays in the Lada Granta and find out the cause of the malfunction. If you're lucky, you'll get away with simply replacing the fuse.
If not, you may have to go to a car service center or troubleshoot the electronics yourself. Remember - the main thing in such cases is to fully understand the problem, do not waste time on this, because any car owner should know as much as possible about his car (especially a domestic one).
Types of fuse blocks installed in Lada Granta (until 2016)
Electrical circuits protected by fuses located in the fuse box and car interior relays of standard/luxury versions
| № | Denomination | Protected Circuits |
| F1 | 15A | Ignition coils |
| Injectors | ||
| Engine Control System Controller | ||
| F2 | 25A | Central body electronics unit |
| Driver door module | ||
| F3 | 15A | Automatic transmission control controller |
| Automatic gearbox control drive | ||
| F4 | 15A | Airbag system controller |
| F5 | 7.5A | Terminal 15 devices |
| F6 | 7.5A | Reversing light |
| Automatic transmission control controller | ||
| Safe parking system control unit | ||
| F7 | 7.5A | Canister purge valve |
| Mass air flow sensor/pressure sensor | ||
| Phase sensor | ||
| Oxygen concentration sensors | ||
| F8 | 25A | Rear window defroster |
| Heated exterior mirrors | ||
| F9 | 5A | Side lights on the starboard side |
| F10 | 5A | Left side marker lights |
| Illumination of instruments and keys | ||
| License plate lights | ||
| Trunk light | ||
| Glove box light | ||
| F11 | 5A | Rear fog lights |
| F12 | 10A | Low beam, right headlight |
| Electrical corrector for right headlight | ||
| F13 | 10A | Low beam, left headlight |
| Left headlight electric corrector | ||
| F14 | 10A | High beam, right headlight |
| F15 | 10A | High beam, left headlight |
| F16 | 10A | Right fog lamp |
| F17 | 10A | Left fog lamp |
| F18 | 20A | Front seat heaters |
| Cigarette lighter | ||
| F18** | 10A | Cigarette lighter |
| F19 | 5A | Anti-lock brake control unit |
| F20 | 15A | Sound signal |
| F21 | 10A | Fuel pump |
| F22 | 25A | Windshield washer |
| Central body electronics unit | ||
| Rear window washer | ||
| Rear window wiper | ||
| F23 | 5A | Instrument cluster |
| Diagnostic connector | ||
| F24 | 7.5A | A/C compressor clutch |
| Automatic climate control system controller | ||
| F25 | 7.5A | Brake lights |
| F26 | 10A | Central body electronics unit |
| F31 | 25A | (for the front function unit AVAR) / F27 (for the front function block Delphi) Anti-lock brake system control unit |
| F32 | 30A | (for the front unit AVAR) / F28 (for the front unit Delphi) Electric heater fan |
| Automatic climate control system controller |
* A set of fuses is indicated for the maximum configuration of the “luxury” version (depending on the set of options, individual fuses from this set may not be used in other configurations).
** Fuses, the rating of which may vary in different vehicle configurations depending on the set of options.
Electrical circuits protected by fuses located in the fuse box and the standard car interior relay
| № | Denomination | Protected Circuits |
| F1 | 15A | Ignition coils |
| Injectors | ||
| Engine Control System Controller | ||
| F2 | 5A | Daytime Running Lights |
| F3 | 10A | Alarm |
| F4 | 15A | Airbag system controller |
| F5 | 7.5A | Terminal 15 devices |
| F6 | 7.5A | Reversing light |
| Direction indicators | ||
| F7 | 7.5A | Canister purge valve |
| Mass air flow sensor/pressure sensor | ||
| F7 | 7.5A | Phase sensor |
| Oxygen concentration sensors | ||
| F8 | 25A | Rear window defroster |
| F9 | 5A | Side lights on the starboard side |
| F10 | 5A | Left side marker lights |
| Illumination of instruments and keys | ||
| License plate lights | ||
| Trunk light | ||
| Glove box light | ||
| F11 | 5A | Rear fog lights |
| F12 | 10A | Low beam, right headlight |
| Electrical corrector for right headlight | ||
| F13 | 10A | Low beam, left headlight |
| Left headlight electric corrector | ||
| F14 | 10A | High beam, right headlight |
| F15 | 10A | High beam, left headlight |
| F16 | ||
| F17 | ||
| F18 | 15A | Cigarette lighter |
| F19 | 20A | Door locking motors |
| F20 | 15A | Sound signal |
| F21 | 10A | Fuel pump |
| F22 | 15A | Windshield washer |
| Windshield wiper | ||
| Rear window washer | ||
| Rear window wiper | ||
| F23 | 5A | Instrument cluster |
| Diagnostic connector | ||
| F24 | ||
| F25 | 7.5A | Brake lights |
| Interior lighting | ||
| F26 | ||
| F31 | 30A | (for the front unit AVAR) / F27 (for the front unit Delphi) Power windows for front doors |
| F32 | 30A | (for the front unit AVAR) / F28 (for the front unit Delphi) Electric heater fan |
List of contact relays
If we open the main fuse box of Kalina 2, we will see a set of electrical relay housings. There are no other blocks containing relays in the car. We list the elements used in the “Lux” package (21927/21947):
- K1: radiator fan relay;
- K2: relay switching on door locks;
- K3: additional starter relay;
- K4: additional relay (switches current 50A);
- K6: wiper relay;
- K7: relay that turns on the high beam;
- K8: signal relay;
- K9: relay that turns on the low beam;
- K10: rear window heater relay;
- K11: main ignition relay;
- K12: relay turning on the fuel pump;
- K13: additional relay;
- K14: radiator fan relay 3;
- K15: windshield heater relay 1;
- K16: windshield heater relay 2;
- K17: relay that turns on the air conditioning compressor.
You can compare the layout of elements in “Lux” and in “Norm/Standard”:
This is how the relays are located in different configurations, 21927 and 21925
Let's consider the data relevant for the “Normal/Standard” configurations:
- K1-K12: as above;
- K13: radiator fan relay 3;
- K14: windshield heater relay 1;
- K15: windshield heater relay 2;
- K16: air conditioning compressor relay.
The last list is also relevant for Kalina Cross Norma. And in more expensive trim levels of the crossover, the “Lux” scheme will probably be used.
Probable Causes
When the starter does not turn when trying to activate the engine, this often indicates problems with the battery. Insufficient charge of the latter interferes with the functioning of the device in question, because it consumes a lot of energy.
Also, the Lada does not start due to damage to the starter electrical circuit or individual elements included in it. Inspect all wires leading to the device. Also check the fuse and relay if not already done.
The next obvious problem: oxidation of the battery terminals. Over time, a film of high resistance forms on them, which prevents the supply of current of the required strength. Clean them with fine sandpaper and tighten them with a wrench so that the wires do not dangle.
The ignition switch often prevents the Grant from starting. It is easy to make sure that it is faulty - just short-circuit the wiring leading to it. After this, the power plant should start.
When none of the above helped, and the Grant still does not start, it is permissible to assume the worst - a malfunction of the starter itself. Here, in particular, the following may fail:
- the electric motor itself (armature or winding);
- traction relay;
- flywheel;
- drive unit.
As practice shows, the most common reason why the engine refuses to start and the starter does not turn is a weak battery charge, poor contact in the terminals or a breakdown of the Lada ignition switch. Other malfunctions occur much less frequently. Next we will tell you how to check.
Why might the wipers not work?
The most basic reasons why wipers on a Lada Granta may not work.
- The steering column switch for the wiper operation mode is faulty.
- The contact relay is faulty.
- The fuse is faulty.
- The wiper mechanism (motor, ramp) is faulty.
- Circuit break.
Let's consider each of these reasons separately.
Fuse blown
The most common situation is a blown fuse. Diagnostics should begin with it; to do this, replace the fuse with another one from the mounting block. The number of the windshield wiper fuse in the mounting block is F4. Detailed diagram of the mounting block is here.
The windshield wiper fuse is indicated by an arrow.
The wiper relay has “decided to live for a long time”
If, after replacing the fuse with a known good one, the wipers still do not work, then check the contact relay. The check is the same, it is replaced with a known good one.
The windshield wiper relay is indicated by an arrow.
Incorrect operation of the steering column switch
The car's wipers only work when the ignition is on. Therefore, if you try to turn on the windshield wiper with the ignition off and nothing happens, then this is not a breakdown!
Steering column switch for car wiper operation modes
If any of the modes does not work, then most likely the steering column switch has failed.
We remove the wiper mode switch for visual diagnostics
If there is voltage at the fuse connector, then the steering column switch is working.
Damage to the wiper mechanism
Often the nut 13 is unscrewed
The inspection begins with a visual inspection of the mechanism and checking the tightness of the threaded connections. It is not a rare situation when the nut on the output shaft of the wiper mechanism gearbox, which holds the trapezoid drive crank, is not tightened. Next, they try to apply voltage to the motor directly from the battery, this will help to find out whether the wiper motor is working properly.
No voltage on the motor
If after checking the relay, fuses and switch the wipers still do not work, then check the voltage at the motor terminals. If it is missing, then there is a break in the circuit somewhere.
The standard windshield wiper relay (526.3747-03) for Lada Granta, Kalina or Priora cars provides for 4 sweeps of the wipers after washing the windshield. For high-quality cleaning, two strokes are enough, and the next two strokes pass through dry glass with a squeak. The problem can be solved by modifying the wiper relay, which will reduce the number of strokes of the windshield wiper blades.
Options for the location of the cigarette lighter fuse and radio
There are cases when, if the car player and cigarette lighter fail to work, after checking the fuse box located inside the passenger compartment (to the left of the steering column), the required device (F4) turns out to be working. In this case, you should look for the damaged part in the engine compartment. It is there, in the area of the battery, that the second (first?) block (relay block) with a faulty safety device is located.
Having found the relay unit, open its cover and study the fuse layout printed on its back side. If you have any questions, look for the necessary information in the vehicle maintenance instructions or on our website on the Internet. We replace the burnt part.
Expert advice
Do not replace fuses with similar parts of higher or lower power. This can lead to much more serious emergency problems. And never, under any circumstances, use improvised means, so-called bugs. This lottery with the car's energy system may result in its fire. Do you need it?
When replacing parts, disconnect the battery in order (a mandatory action when performing any auto repair work), otherwise the number of fuses that need to be replaced, or even the wiring itself, will increase significantly. Of course, after you recover from the electric shock. Despite the apparent ease of the operation, treat replacing the car cigarette lighter and radio fuse with all due care and responsibility.
This is the last fuse I blew. I went to the service center, they replaced it, and now everything is fine. Now again, three months after that time, it burned down. Is it my radio that's broken? Will it also have to be changed along with the fuse?
Frequent problems with fuses were observed in the first generations of models; later engineers eliminated the defects.
Where is the power supply located: in the Lada Granta, as in previous VAZs, the mounting block is installed to the left of the steering column. The additional block is to the right of the battery, there are power fuses (hereinafter referred to as modules). The back side of the cover with a description of the pinout of each module (see photo).
ATTENTION! A completely simple way to reduce fuel consumption has been found! Don't believe me? An auto mechanic with 15 years of experience also didn’t believe it until he tried it. And now he saves 35,000 rubles a year on gasoline! Read more"
In case of failure, it is not difficult to replace faulty modules with new ones, but be careful not to violate the installation technology. Otherwise, you risk damaging the equipment.
Step-by-step replacement instructions
Russian car enthusiasts driving Zhiguli “classics” ask the question of how to connect or replace the light relay on a VAZ 2106 so that it functions without problems in the future. Similar work is carried out when replacing the “six” light relay.
Replacing the VAZ 2106 light relay is carried out in the following sequence:
- Disconnect the wire from the negative terminal of the battery
- Using a Phillips screwdriver, unscrew the two screws and remove the relay.
- Installation of all removed parts is carried out in reverse order. We secure the side panel upholstery with new holders.
The “six” light acquires special importance when a motorist has to drive in conditions of poor visibility, in difficult weather conditions and at night. However, any driver must remember that defects in the vehicle’s electrical equipment system, one way or another, affect the functionality of the power plant. And this is despite the fact that the main electrical circuits are protected by relay elements, just as the lighting of the “six” is protected, the safety devices of which are routed to the vehicle’s fuse box.
On the VAZ 2106, the headlight relays, along with other main electrical equipment of this vehicle with high current consumption and high voltage, are connected via relay elements. The main purpose of the VAZ 2106 light relays, whose price is low, is to protect the switch contacts from energy overload.
Car enthusiasts often ask where the high and low beam relays are located on the “six” and what they look like. Let us explain that almost all relay devices, as well as the relay - voltage regulator, are located in the power plant compartment. The exception is the turn signal and hazard warning relays, which are located under the instrument cluster in the car interior, covered by a front panel. Both relays are identical in appearance (they can be easily found on the mudguard on the right as the car moves) and are located next to the battery charging indicator relay.
The electrical diagram of the light relay is located below:
On the general diagram of the electrical equipment of the “six” you can see at number 5 the VAZ 2106 low beam relay, and at number 6 the VAZ 2106 high beam relay, which are interchangeable elements. Also here you can see the integration of the main electronic devices of the vehicle into the general electrical supply circuit of the vehicle of this modification.
Mounting block in the cabin
This mounting block is located to the left of the steering wheel, at the driver’s foot, not far from the light switch. Grants are equipped with a list of fusible, disposable fuses with the same marking with the letter “F” and their own serial numbering (from 1 to 32), the relay is designated with the letter “K”.
https://youtube.com/watch?v=eSW_JQyzuuc
https://youtube.com/watch?v=eSW_JQyzuuc
To remove the cover and gain access to the relays and fuses, you need to pull the left side of the bottom of the cover toward you, releasing the locking point on the left from the latches. Next, you will need to release the locking point located in the middle, then 2 more points located on the right. Once the top points are released, the cover can be removed without any problems.
Install the fuse box cover like this: first you need to snap its right edge, then it snaps in from the bottom, and, last but not least, from the top. When installing it, you must constantly ensure that the latches match exactly with the cover fastening elements.
We offer the following instructions:
1) By pulling, remove the cover of the mounting block, simultaneously overcoming the resistance of the latches. There are five of them here;
2) Disconnect the wire block from the trunk drive switch (trunk lock);
3) As in the engine compartment, on the inside of the cover there is a diagram showing the purpose of the fuses and their location;
4) Using small tweezers, remove the fuse;
5) We take out the burnt fuse and insert a new one to replace it.
For the Grant model range, the mounting block provides only standard fuses that are designed for the appropriate current value; the use of others is strictly prohibited!