Where is the oil pump located on the VAZ 2108/2109, what is it responsible for
The oil pump in the engine design of every car is an important and integral mechanism, which is designed to create a certain pressure in the engine lubrication system. The design of the unit comes in various forms and can be driven by a camshaft or crankshaft.
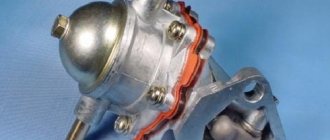
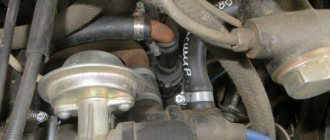
On such common models as the VAZ 2108/2109, the device for circulating oil in the system is located behind the crankshaft pulley. Looking under the hood, you won’t be able to examine it so easily: this can only be done after removing the crankshaft pulley from the engine.
The pump is fastened to the cylinder block using six bolted connections, which ensures reliable fixation of the entire structure.
The oil pump on the VAZ 2108/2109 is located behind the crankshaft pulley, so it is not so easy to examine this element
How to remove the timing belt?
Approximately every 60 thousand kilometers, the timing belt on VAZ 2108-21099 vehicles needs to be replaced. The pump is dismantled every 90 thousand, but it is better to change everything at once. Of course, you can travel more if you carry a spare set in the trunk. But is it worth carrying out repairs in the field if you can do it in the garage, without haste and the risk of bending the valves?
After all, not all engines are protected from the impacts that valves receive when the timing belt breaks. The whole point is that, after accelerating the car, you keep the engine speed high. When the belt breaks suddenly, the camshaft is set to a position in which all the valves fall down, that is, they open. But the crankshaft continues to rotate by inertia, moving the pistons.
And he moves them towards the lowered valves. The result is a severe blow, which at best will lead to bending of the valves. It may also happen that the piston bursts and cracks appear along the cylinder head. Because of this, repairs immediately become several times more expensive. To replace the timing belt on a VAZ 2108, you will need to prepare the car.
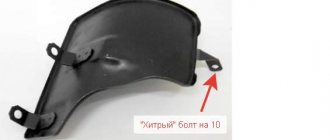
First of all, install it on a flat surface so that it can be easily approached from all sides. The right wheel will need to be removed and a good and reliable support placed under the car. It will not be difficult for you to get rid of the casing that covers the compartment with the gas distribution mechanism. It is secured with three bolts to the engine block. Underneath you will find a belt running along the crankshaft pulleys, pump pulley, camshaft pulley and tension pulley.
To dismantle the belt, you will need to unscrew the roller fastening nut with a 17 wrench. Using the same wrench, unscrew the generator mounting nut. Move it towards the engine, thereby weakening the generator drive. Next, unscrew the bolts securing the protection to the car body, remove the drive pulley for the VAZ 2108 generator belt. The rubber timing belt is easily removed from all pulleys and the tension roller.
Symptoms of a faulty oil pump
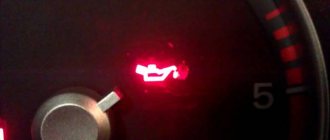
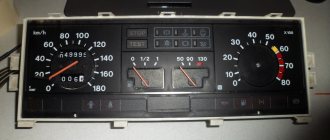
The first thing that will indicate problems with the oil pump is the oil pressure light coming on. In this case, the element indicates that there is a problem with the engine lubrication system. How serious they are remains to be determined by the car owner. In addition to checking the pressure, attention should be paid to oil consumption. If the pressure in the lubrication system of the power unit decreases, the vehicle should not be operated until the cause is determined and repairs are made. The main symptoms of problems in the system are a light coming on or a knocking sound in the engine.
Actions to be taken in the event of a breakdown:
- stop and turn off the engine;
- wait a while for the oil to drain into the engine crankcase, then check its level using a dipstick. If the level is minimal, you need to top it up to normal;
- start the engine;
- If the oil pressure lamp continues to light and extraneous noise is still heard from the engine, this may indicate a possible problem with the oil pump.
One of the reasons why the oil pressure light comes on may be a low level of lubricant in the engine.
How to check the oil pump
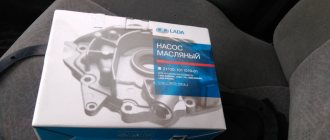
To test the mechanism, it is not necessary to dismantle it. For diagnostic purposes, it is necessary to measure the pressure in the lubrication system and compare it with the readings that correspond to the norm for a particular car. Based on the results obtained, we can draw conclusions: is there any cause for concern or not. If it is necessary to replace the oil pump on a VAZ 2108/2109, it is recommended to use only original parts. This is explained by the fact that many people today produce components for cars in the domestic automobile industry. However, their quality leaves much to be desired.
When replacing the oil pump, it is recommended to purchase an original part to avoid problems due to poor workmanship
Checking the oil pump on the stand
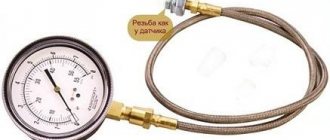
If possible, you can check the performance of the oil pump on a special stand. The essence of such a test is to evaluate the performance and pressure generated by the device, as well as the pressure at which the pressure relief valve operates. When testing the pump using a stand, special oil with a temperature of +20 ˚С is used. For an oil pump for a VAZ 2108/2109 engine, the flow rate should be within 34 l/min, the back pressure should be 5 kg/cm². The pressure relief valve should open at a pressure of 5.5–7.5 kg/cm². If the valve is checked on the engine using a pressure gauge, which is installed instead of an oil pressure sensor, the valve must operate at a pressure of at least 4.5 kg/cm².
Disassembly and repair
After completing the dismantling work, you can proceed in two ways:
- Replace the old pump with a new one;
- Repair the old oil pump.
Repair allows you to identify worn elements and replace them with new ones, which will restore functionality. If the breakdown is more serious than simple wear and tear of consumables, the optimal solution would be to completely replace the oil pump.
Where does withdrawal begin?
To disassemble the pump, follow the instructions.
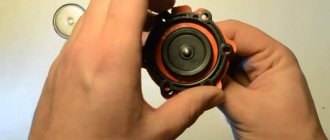
- Divide the pump into two parts. To do this, we have already unscrewed 6 bolts securing the cover to the body and used a screwdriver to pry off this cover. It came out of the pins on the body. So we remove the element and put it aside.
- Inside the pump housing there are driven and drive gears, which need to be removed and placed aside for now. Then we will check their condition.
- Next, the pressure reducing valve is removed. To do this, first unscrew the valve plug and remove the spring from the hole, and then the valve.
- In some cases, problems may arise with removing the valve. If you encounter this situation, gently tap the oil pump body against a piece of wood or use a wooden cone-shaped pin. It is inserted into the valve hole, the valve is hooked and removed.
- After disassembling your oil pump on the VAZ 2109, thoroughly wash all its components using clean kerosene. Don't forget to wipe the parts dry afterwards.
- Check the condition of the cover and body of your pump for mechanical defects, chips, cracks.
- Pay special attention to the landing spots of the gears, where there should be no signs of wear or other mechanical defects. If they are, the pump will have to be replaced.
Condition assessment
In many ways, the performance and maintainability of the old oil pump depends on the results of checking the characteristics of the cover and body of the device. It is necessary to take measurements of the gaps.
| Check location | Requirements |
| Driven gear seat diameter | The diameter may increase as the pump operates and friction occurs. The normal diameter of this place for the VAZ 2109 is 75.1 millimeters. If there is a deviation in the direction of increasing diameter, the pump must be replaced. |
| Thickness of the mating wall | Under normal conditions, this parameter is 3.4 millimeters. If the gap is less than specified, the pump is replaced completely |
| Drive gear thickness | The normal value is 7.42 millimeters. When the size is reduced, the pump goes to a landfill, and a new one is installed in its place. |
| Driven gear thickness | For her, the normal parameter is a thickness of 7.35 millimeters. As with the drive gear, deviation from the norm means replacement |
| Drive gear axial clearance | To measure, take a metal ruler and feelers of 0.12 and 0.15 millimeters. The gap is checked as follows: a gear is placed in the pump housing and a ruler is placed on top with its end. The gap between the end of the ruler and the plane of the feeler gauge is measured. For the drive gear, the gap is 0.12 millimeters |
| Axial clearance of driven gear | The method for checking the gap is exactly the same. Only for the driven one the normal indicator is 0.15 millimeters |
| Condition of the pressure reducing valve and socket | Assessing these parameters is very important. If you find mechanical damage on the surface, the element cannot be used further. |
| Spring | If the spring is bent or stretched more than normal, then replace the element. There is no need to completely change the entire pump. |
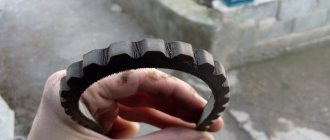
Determining which gear is which is not difficult. The leading one has an external tooth, and the driven one has an internal one, that is, the element is smooth on the outside.
driven gear
Causes of malfunction of VAZ 2108/2109 oil pumps
Before deciding to repair or replace the oil pump, it is worth understanding the reasons that may indicate problems. By the way, problems are possible not only with the mechanism itself, but also with other elements of the lubrication system:
- decrease in pressure in the crankcase;
- problems with pressure sensors;
- use of low quality motor oil;
- using oil that is not suitable for this vehicle;
- problems with the lubrication or safety valve;
- oil filter clogged;
- contamination of the oil receiver or pump housing.
Contamination of the oil receiver leads to a decrease in pressure in the system and the light comes on.
The blockage may occur due to contamination of the engine crankcase itself. The problem is solved by removing and cleaning the pan. The operation of the oil pump can be disrupted by other problems that are identified during the diagnostic process. These include:
- gasket damage;
- unreliable filter fastening;
- high wear of mechanism parts;
- reduction valve failure.
The oil pump is a fairly reliable component with a long service life. Breakdowns usually occur due to improper repairs or poor quality lubricants.
Preparing to replace your pump
The design of a liquid pump is very similar to that of an oil pump, as it consists of similar elements. Initially, components manufactured by Pekar are installed. But if it is not possible to replace it with the same part, you can find analogues. However, not all of them will have the same characteristics as standard components.
Some have a shorter service life, others may have slightly different sizes, you will have to work with a file to install them in the seat. Try to select the analogue that will be as similar as possible to the standard one produced. The same requirements can be presented to other nodes. The fuel pump from the same manufacturer serves without fail for a long time.
Before replacing the pump, prepare wrenches for 10. You will need all types: cap, end and open-end. Some bolts are difficult to reach, so having different types of wrenches will help. Drain all liquid from the engine cooling system, allowing it to cool beforehand. Do not carry out such repairs immediately after turning off the engine. This risks boiling water getting on the skin and causing burns.
It's better to stock up on a small amount of automotive chemicals. These include sealant and thread locker. With their help, you will get rid of accidental leakage of the liquid pump of the VAZ 2108 car. When you remove the belt, you will have the opportunity to dismantle the pump.
To do this, use 10mm wrenches. With their help, you need to unscrew the three bolts that secure the Pekar pump housing to the engine block. It is not always possible to unscrew these bolts with ease. Sometimes dust mixed with antifreeze or oil accumulates near them. Therefore, before unscrewing, take five minutes to clear the repair area of any dirt.
Engine tuning
- direct-flow exhaust system - spider circuit 4/2/1 and resonator with banks;
- sports camshaft – gas distribution modes change.
Tuning 2108
Tuning is usually used to add about 10 hp of power. With. by replacing the carburetor with an injector or a direct-flow muffler. There is a time-consuming option to replace the crankshaft with the following crank diameter. The piston stroke increases by 2 mm, but a KShG kit, precise calculation and adjustment of the mechanism are required.
Thus, the 2108 engine uses advanced technologies from the German automobile industry. The weight and dimensions of the engine have been reduced for transverse placement under the hood of a front-wheel drive car. In two versions, 1.1 l and 1.5 l, the modernization was carried out by employees of the manufacturer's plant.
Dismantling
Removing the pump yourself is easy. Well, you are completely capable of doing your own repairs.
- De-energize the car by removing the negative terminal from the battery.
- Loosen the generator mounting bolts and remove the belt.
- Prepare a clean container by draining the oil from the crankcase into it. Next you will need to remove the engine protection and the oil pan.
- Remove the camshaft drive timing belt.
- Now that the belt is removed, do not, under any circumstances, turn the crankshaft and camshaft. The role of the oil pump in the design of the VAZ 2109 is difficult to overestimate. Replacing the engine oil and oil filter on a VAZ 2110. If it fails, the operation of the vehicle must stop completely. Otherwise, you will damage the valves by hitting them with the pistons.
- Remove the crankshaft pulley by using 2 flathead screwdrivers and pulling it off the shaft. If the key does not hold well in its seat, it is better to remove it too.
- Next in line for dismantling is the oil receiver. To remove it, you need to unscrew two fastening bolts located on the main bearing , as well as one fastening bolt connecting the oil receiver to the pump (oil).
- Remove the pump, held in place by 6 bolts.
- After unscrewing all the bolts, carefully move the oil pump away from the main bearing , then, with a measured soul, remove the oil pump.
Read:
Dismantling the device
What to do if a breakdown occurs?
If such a malfunction occurs to you, then you need to perform the following manipulations:
Stop and turn off the engine. Wait until all the oil that is poured into the engine flows back into the sump. Check the level. If it is below normal, then you need to top it up. Start the engine. Pay attention to the control lamp - if it still lights up and extraneous noise appears, then this is clearly a breakdown of the oil pump.
In some cases, the oil receiver mesh may become clogged. To be fair, it is worth noting that the pump is a mechanism in which there is nothing to break - it is the body and two steel gears. They will be able to “survive” even a tenfold increase in loads and long-term operation without lubrication. But the oil receiver often gets clogged, and lubricant simply does not flow into the pump.
Formation of soot on the surface of SZ electrodes
Car enthusiasts often ask the question: “Why are there black deposits on the spark plugs and soot of a different shade forms?” It's simple - spark plugs are used under conditions of aggressive thermal and chemical influences. In particular, when burned, the working mixture forms a grayish coating on the electrodes and this is a sign of the correct operation of all systems. And black spark plugs, as well as white or red soot, are not only a warning about urgent replacement of spark plugs, but also about the advisability of promptly diagnosing the engine for failures and breakdowns.
The nature of the deposit will tell you about the causes of malfunctions
The shade of soot on the electrodes of the elements is a clear signal of what kind of failures in the power unit could lead to this. This is often due to the fact that sparking does not occur correctly, the composition of the fuel used or the temperature inside the combustion chamber does not meet the requirements. We will tell you why the candles turn black later.
Checking the condition of the power unit by carbon deposits
Automotive ignition elements remain a good diagnostic indicator if you need to identify problems with the ignition cycle of the fuel mixture. But you should not make an unambiguous conclusion about the condition of the power unit by inspecting the SZ after 25 or more than 1000 km of run. Diagnostics should be carried out exclusively on new products, after a short run-in (150-200 km).
Checking the SZ for the presence of black soot
To check for malfunctions in the power unit based on the soot formed, you need to:
- Supply new elements in accordance with technical specifications.
Travel 200 kilometers with them.
Remove the SZ and look at the shade of soot that appears on them.
Removing the engine
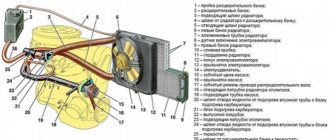
The engine on a VAZ can be removed if you have the necessary tools. In addition, you need to have a special lifting device available that will help remove the engine from the compartment. You can, of course, do without it, but then you need additional workers. So, let's start:
- remove the hood;
- cover the front fenders of the car with soft blankets so as not to damage the paint when removing the engine;
- drain the radiator;
- disconnect all electrical wires from the distributor, as well as from the oil and temperature sensor and carburetor;
- remove the fuel supply hose;
- unscrew the exhaust manifold pipe (muffler);
- disconnect the battery terminals;
- remove the starter;
- the air filter housing is removed;
- disconnect the generator wires;
- unscrew the engine from the gearbox;
- use a screwdriver to loosen the clamps of the heater radiator pipes;
- remove the accelerator pedal linkage;
- remove the carburetor choke cable.
After carrying out the above work, you need to go down into the inspection hole or under the overpass:
- remove the clutch master cylinder;
- unscrew the gearbox;
- remove the protective casing;
- unscrew the engine bolts;
- We hook the engine with belts and lift it up.
At this stage, engine removal is complete. Let's move on to its analysis.