Malfunctions of the pump and the system as a whole
As you know, nothing lasts forever in this world and everything has to be repaired over time.
The oil system of the Shtil ms 180 is no exception, and has its own specific malfunctions. Let's take a closer look at them. Signs of a malfunctioning lubrication system are as follows:
- the chainsaw chain is absolutely dry and does not shine;
- oil does not leave the oil tank;
- the chain stretches quickly and this happens constantly;
- the saw bar moves to the side when sawing;
- The tire also heats up in the area of the drive sprocket and the paint melts.
All these signs directly or indirectly indicate problems in the chainsaw chain lubrication system.
The first thing to do after you suspect that chain lubricating oil is not being supplied is to check its supply. There are two ways to do this. The first is described in detail in the instructions for the tool and consists in the fact that you need to start the chainsaw, increase the gas as much as possible and point it towards any obstacle.
If the lubrication system is working properly, the oil will fly off from the tip of the tire and a strip of oily drops will appear on the surface towards which the tire is pointed. If there are still violations in the system, the surface will remain clean.
The second way is to remove the tire from the chainsaw and start it. When the engine speed increases, oil will flow from the oil channel at the tire shank installation site; if this does not happen, it is necessary to look for the cause of the malfunction.
Diagnostics
Diagnostics should begin with inspecting and checking the oil receiver (filter) of the Stihl 180 saw. As a rule, if the filter is very dirty, the oil supply may stop.
Next, you need to remove the drum sprocket and check the condition of the drive gear. The thread on it must be clearly defined, not licked or have any other defects; also, when the gear is removed, it is necessary to check the wire lever. It must press the gear tightly and not turn, otherwise the gear stands still and does not transmit force to the pump, as a result of which the oil supply stops.
If all of the above methods to detect and eliminate faults do not produce results, it is necessary to use extreme measures, i.e. dismantle the pump.
How to remove the pump
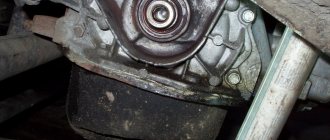
The oil pump is installed on the right side of the bottom of the housing, in the same place an oil line coming from the chainsaw tank is connected to it. To remove the pump, you will first need to release the saw from the handle; to do this, unscrew the rear handle of the unit and disconnect the throttle control rod. At the next stage, you need to remove the handle shock absorber plugs and, using a powerful slotted screwdriver, squeeze them out of their seats on the handle.
After the handle is removed, the chainsaw body is turned upside down. The hose leading from the oil tank to the pump will be immediately visible. It must be removed from its seat.
To better understand the process of removing the pump, you can watch the video below. In the video, the service center master shows in detail how to remove the oil pump from a chainsaw, and also describes the main malfunctions of the supply system.
After the pump is removed, it must be cleaned and purged. As a rule, the main failure of the oil pump is its blockage. Having eliminated it, you can install the pump in place.
Replacing the pump is only required if it is not possible to remove the blockage.
How to replace an oil pump yourself
Having determined that the oil pump needs replacement or repair, it is necessary to remove the mechanism from the engine.
Tools for work
In order to dismantle the unit, you will need a standard motorist kit, consisting of the following list:
- keys to “10” and “13”;
- socket heads;
- extension cord;
- cardan joints.
How to remove the oil pump
If the work is carried out on an injection engine rather than a carburetor engine, then the crankshaft position sensor will need to be removed from the engine. Otherwise, dismantling the mechanism is performed in the same sequence:
- We de-energize the vehicle's on-board network by removing the “—” wire from the battery.
- Loosen the generator fasteners and remove the belt.
One of the first procedures for dismantling the oil pump is to remove the alternator belt.
After draining the oil, dismantle the engine protection and sump
To remove the crankshaft pulley, you will need to remove the timing belt.
One of the steps to dismantle the oil pump is to remove the crankshaft pulley
The oil receiver is attached to the main bearing cap with two bolts and one bolt to the oil pump
The pump is secured with six bolts, unscrew them
Having unscrewed all the fasteners, move the pump away from the main bearing cap and remove it from the engine.
Video: dismantling the oil pump on a VAZ 2108/2109
Pump installation
To perform reassembly, follow these step-by-step instructions:
- Before installing the assembly, the drive gear is installed accordingly.
Before installing the oil pump in place, the drive gear must be set in a certain position
The drive gear must align with the flats on the crankshaft
Before installing the pump, coat the working edge of the oil seal with engine oil.
After lubricating the oil seal with engine oil and installing it in its seat, install the pump
Pump diagnostics
But you still need to test the unit so as not to remove it in vain. The first step is to check the pressure in the system. Install any suitable pressure gauge and record the pressure. If it is low, then the unit will need to be repaired. The second step is to check the condition of the oil intake screen. To do this, you need to place the car on an inspection hole, completely drain the oil and remove the pan. To dismantle it, you will have to unscrew all the bolts using a “10” key. When installing, it is recommended to use a new rubber gasket.
Symptoms of a faulty oil pump
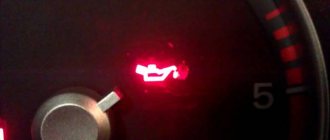
The main signs of problems in the lubrication system are sounds uncharacteristic of engine operation and the oil pressure light coming on. In this situation, you should stop, turn off the car and after a while check the oil level in the engine with a dipstick (you need to wait a little until the oil drains into the sump). If the level is below the minimum, add oil and check the level again (it should be between the min and max marks). If the light goes out when starting the engine, the reason it came on was precisely the low oil level.
A burning oil pressure light indicates a problem with the lubrication system.
If, after adding oil, the extraneous sounds do not disappear and the light continues to light, you should not continue driving. Most likely, there is a problem with the oil pump and will require replacement or repair. You can get to the garage or car service using a tow truck or tow. However, the light may also be on due to a failure of the oil pressure sensor. Therefore, until an accurate diagnosis is made, you should not rush to repair the oil pump and start disassembling the engine.
Checking the pressure sensor
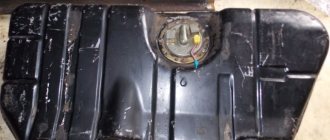
Oil pump cover VAZ 2109
If there is no unusual noise coming from the engine and the oil level is normal, the warning light may still sound indicating low oil pressure. Then, most likely, the problem will be with the oil pressure sensor. This sensor is usually located on the motor block. Inside the device there is a spring-loaded diaphragm, as well as an automatic switch diaphragm, which is highly sensitive to pressure. This switch is designed to close the low pressure warning lamp circuit when it drops below a certain level. Reasons for sensor failure:
- if the diaphragm stops moving;
- when the switch is jammed;
- if the hole through which oil gets inside the sensor is clogged;
- in case of unsatisfactory connection, which may be caused by corrosion, connector or wiring failure.
Attention! If the car is equipped with an electronic pressure gauge, a small rheostat will be placed inside the sensor, which, when this diaphragm moves, sends a variable voltage signal.
Oil pumps for internal combustion engines of cars
Since different cars are equipped with different types of engines with different operating parameters, the design of oil pumps can also be different. All modifications of these devices are divided into adjustable and unregulated.
With adjustable models, it is possible to change the performance in order to achieve optimal system pressure under different conditions. In the case of unregulated devices, the parameters are adjusted using special pressure reducing valves.
In car engines, gear and rotary type oil pumps are most often installed. In this case, the movement of oil through the system and the creation of pressure is carried out thanks to rotor blades.
In gear type pumps, these same functions are performed due to the movement of gears. They can be made in two modifications - with an external type of gearing or with an internal one. An external gear pump has two gears located next to each other, while an internal gear pump has one inside the other. With the same performance, the overall dimensions of gear pumps differ according to the type of gearing.
Design
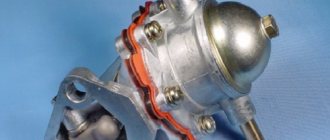
Oil pump VAZ 2109
Today there are three types of pumps:
- 2-gear pumps, in which one gear is connected to a shaft, which starts working from the intermediate or camshaft of the VAZ. This pump is installed inside a sump located in the lower area of the cylinder block. Typically, the rotation speed of the element is ½ the rotation speed of the motor.
- A gerotor pump has a rotating small gear inside an outer gear. This pump is located in the lower area of the motor in the sump.
Old style oil pump
- The internal pump is often installed on the front cover of the engine. It begins to function from the crankshaft. Structurally, such a mechanism is similar to a gerotor mechanism, but in this situation it replaces the front damper of the engine. As a result, it is possible to generate higher oil flow with higher pressure.
Why us?
Tiptronic car service is an experienced team of craftsmen with all the necessary equipment and tools. Reviews from satisfied customers and an impeccable reputation in the automotive service market speak for us. We will repair the automatic transmission pump or install a new one. Our specialists will cope with tasks of any level of complexity. Our advantages include free diagnostics when ordering repair work, the best price in the capital, a large selection of consumables and spare parts, and an individual approach to customer needs.
Contact us to agree on all the details of cooperation.
Do-it-yourself KAMAZ oil pump replacement
The entire process of replacing the oil pump on a KAMAZ vehicle can be divided into three stages:
- Preparatory.
- Removing the old pump.
- Installing a new one.
Each stage consists of several actions that must be performed in strict sequence.
It is important to prepare the work area, tools and a new oil pump in advance
Tools for work
To quickly and easily remove and install a new oil pump, you will need:
- standard set of open-end wrenches;
- special puller for gears;
- screwdriver with a flat thin blade;
- screwdriver with a Phillips blade.
Usually in the garage every driver of a car or truck has such a suitcase with a set of all the necessary tools for self-repairing the car
And you also need to stock up on rags and a container for draining the oil in advance.
Preparatory stage
After all the necessary tools have been collected, you will need to perform a number of actions on which the safety and convenience of the operation depends:
- Drive the KAMAZ into the pit.
- Remove the wire from the negative terminal on the battery.
- Make sure the car is completely cool.
- Drain the oil from the crankcase (pull out the plug and place a basin under the drain).
- Unscrew the bolts securing the engine crankcase - only by removing the protection itself will you be able to get to the pump.
- Remove the crankcase and set it aside.
- It is recommended to immediately clean the protective housing from dirt.
The inspection hole is needed for general convenience of work, since you will have to crawl under the car when replacing the pump
The procedure for removing the pump from KAMAZ
The first thing the driver will see after removing the crankcase is access to the pump suction tube.
Together with it, a flange, mounting bracket and cup are connected to the pump. However, it will not be possible to dismantle the pump with bare hands:
- Take a special gear puller.
- Use it to remove the oil pump gear: first screw the gear all the way in so that the main screw rests against the end of the shaft. Then start rotating the puller handle to unscrew the gear.
- Next, remove the bolts securing the radiator and discharge sections. These are the top and bottom parts of the pump.
- Disconnect all lines from the oil pump. There may be slight oil leakage from under the hoses, so it is best to immediately block the holes in them with a rag.
- Unscrew the three pump fixing bolts.
- Remove the pump.
- Remove gasket residues from the landing site.
Video: dismantling procedure
New pump installation process
Before installing a new oil pump, drivers usually thoroughly clean the mounting area of dirt.
And it doesn’t hurt to wipe the hose joints with a clean cloth, since it is at the joints of the hose and fitting that the largest amount of dust mixed with oil usually accumulates.
Due to dirt, problems may arise in the near future, since the fluid in the lubrication system must always be clean.
Video: oil pump installation procedure
Therefore, after cleaning the seat on the bottom plane of the cylinder block, you can proceed with a “light heart” to install a new oil pump:
- Pour a small amount of the oil used into the pump housing.
- Rotate the gear so that the lubricant can immediately penetrate to all parts of the pump - this way the device will start working faster.
- Install the adjusting shim in place.
- Next, install the valve mechanism tube gasket.
- Install the pump onto the cylinder block with three bolts, but do not tighten it yet.
- Install the valve tube with two bolts.
- Attach the suction pipe bracket to the cylinder block with one bolt.
- After this, it is allowed to tighten all bolted connections until they stop.
- Be sure to check the gear clearance. Ideally, the gap should be between 0.15 and 0.35 mm. If it is not there, you will have to unscrew the pump and place another gasket under it.
- Connect all fuel lines to the pump.
- Pour oil into the engine.
- Screw the crankcase into place.
- Connect the wire to the negative terminal of the battery.
Where is the oil pump installed on Priora
As on most cars, on the Priora the oil pump is located at the bottom of the engine on the timing side. The mechanism is attached to the cylinder block. The drive or internal gear of the device is mounted on the front end of the crankshaft. The photo below shows a view of the location of the oil pump on the Priora (view from the right wheel arch).
This location of the oil pump on the car is not accidental. After all, it sucks engine oil from the crankcase and supplies it to the top of the engine. Due to this placement of the device, the process of dismantling it is quite labor-intensive. However, if there is any suspicion of a product malfunction, it must be dismantled and a detailed analysis carried out to determine its suitability for further use.
Diagram of some important engine parts
Name and article numbers of the Priora oil pump (1 part)
Name and article numbers of the Priora oil pump (part 2)
Above is a diagram of the location of the oil pump in the engine structure with the designation of its component elements.
Engine oil pump repair
The pump, removed from the engine being repaired, is subjected to in-place diagnostics after cleaning. In the absence of external defects, the technical condition of the pumps is assessed by the end gap between the housing and the discharge gears and by the gap in the bearings of the drive roller. An increase in the end clearance leads to a decrease in pump performance. The end gap is determined by an indicator device based on the amount of axial movement of the pump drive shaft. For SMD-60, A-41, A-01M engines, the permissible gap without repair is 0.30 mm, and for other diesel engines - 0.25 mm. The bearing clearance is assessed by the radial movement of the drive roller neck.
If the gaps are within acceptable values, then the pump is tested on a stand and its volumetric flow is determined for diesel engines, and for carburetor engines, the supply pressure when pumped through a nozzle of a certain cross-section. In case of unacceptably large movements of the roller, the pump is disassembled and repaired.
Step-by-step instructions for repairing and inspecting oil pump parts:
1. For a detailed inspection, it is necessary to remove the oil pump.
2. First, you need to unscrew the bolt (1) and remove the crankshaft position sensor (2), which is only available on engines with a fuel injection mechanism.
3. When disassembling the pump, you need to unscrew the six bolts and remove the pump cover.
4. Using two screwdrivers, you need to lift the pump housing so that the pins on the housing can come out of the holes located in the cover of the VAZ 2110 oil pump. Now remove the housing itself by disconnecting it from the cover.
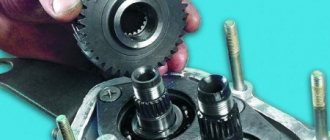
5. We take the gears out of the cover: first the driving one, and then the driven one.
6. Now you need to unscrew the pressure reducing valve plug. An O-ring must be installed under this plug. Inspect the ring - if it is too compressed, it needs to be replaced.
7. Having unscrewed the plug, we take out the spring of the pressure reducing valve.
8. Now we take out the valve itself, gently tapping the body on a clean wooden stand. If the valve does not come out, it must be removed using a thin pointed object, preferably also wooden, so as not to damage the surface.
9. Now you need to carefully inspect the aluminum cover for visible signs of wear, mechanical damage, deep scratches in the contact areas of the gears. If found, the cover must be replaced with a new one.
10. Next, repairing the oil pump involves inspecting its housing. In the same way, visible signs of wear are not allowed on working surfaces - mechanical damage, scuffing. If we find any of the above, we replace the housing.11. The maximum permissible diameter of the driven gear socket is 75.1 mm, so we measure the diameter, and if it exceeds the permissible value, we will also have to replace the housing.
12. Now you need to measure the width of the body segment in the middle part. If the measured value is less than 3.4 mm, the VAZ 2110 pump housing must be replaced.
13. Check the gears. The thickness of the drive should not be less than 7.42 mm. We measure: if it is less, we replace the gear.
14. The same applies to the slave. If the thickness is less than 7.35 mm, the gear must be replaced.
15. Then we check the axial clearances of the gears. It is necessary to install the drive gear back into the housing, after which we apply a steel ruler to the housing and use a feeler gauge to measure the gap between the gear and the ruler.
16. In the same way, measure the axial clearance between the attached ruler and the driven gear. For the drive and driven gears, the maximum permissible axial clearance is 0.12 mm and 0.15 mm, respectively. In cases where these values are exceeded, the gears must be replaced with new ones.
17. Through calculation, more accurate values of axial clearances can be obtained. To do this, a micrometer is used to measure the thickness of the oil pump housing along the outer surfaces, as well as the thickness in the area of the sockets for the drive and driven gears along milled surfaces in several places. The axial clearance is calculated based on the difference between the arithmetic mean of the socket depth and the measured thickness of the gears.
18. The next stage of repair is to inspect the pressure reducing valve seat to detect rough scratches and other deep mechanical damage on the inner surface. If found, the cover must be replaced.
19. If burrs and deep mechanical scratches are detected on the pressure reducing valve itself, it must also be replaced with a new one.
20. We also replace a bent, broken/broken or cracked pressure relief valve spring. The height of the spring in its free state is normally 44.72 mm; the same parameter under a load of 4±0.24 kgf is 31.7 mm. If there is a discrepancy, the spring must be replaced.
21. Assembling the oil pump. We install the driven gear with the chamfers on the teeth towards the housing.
22. Then install the drive gear in the same way - with the chamfers on the teeth facing the body. The gears must be lubricated with engine oil before installation.
23. Now you need to install the cover on the body and tighten the fastening bolts.
24. Before installing the pressure reducing valve into the seat with the bottom down, it must be lubricated with engine oil. Then you need to install the spring and tighten the plug with the aluminum O-ring of the oil receiver tube, also pre-lubricated.
25. It is necessary to pour engine oil into the pump through the oil receiver tube.
26. At the end of the repair and complete assembly of the car’s oil pump, turn the gears several turns so that the working surfaces of the gears are well lubricated.
Video
VAZ
Attention!
Before installing the VAZ 2110 oil pump, you need to lubricate the pressure relief valve and gear. In addition, along with replacing the pump, it is worth replacing the oil seal.
- After the pump is installed, you need to put the timing belt on the tension rollers and align it to the marks.
- Put the plastic protection back in place and put the wheel back in place.
- Install the oil pickup onto the oil pump.
- Degrease the crankcase, after which sealant is applied.
- Install a new gasket on the crankcase and apply sealant again. Degrease the block and put the crankcase in place (to make the task easier, first fasten 3-4 bolts at different points, then tighten the remaining ones).
- Place the flywheel guard (also, if equipped, the crankcase guard).
- Fill with oil, start the engine.
Causes of oil pump failure
The first and most common cause of oil pump failure is a clogged oil receiver, as a result of a clogged crankcase. In case of malfunctions of this kind, it is recommended to drain the oil, dismantle the pan, and then wash it together with the oil receiver. Since the oil filter is located after the pump, unfiltered lubricant passes through the oil receiver and some other parts, which increases the likelihood of oil contamination and wear on parts.
Another common failure of the oil pump is damage or breakage of the unit body or its gears. The result of such damage is an increase in the gap between these parts. Theoretically, it is possible to replace the oil pump housing or make weld deposits with further adjustment, but this process is expensive and quite labor-intensive. Therefore, often at the first symptoms of an oil pump malfunction, worn parts are immediately replaced.
Causes of oil pump failure:
1. The oil level in the crankcase is constantly low. 2. Breakdown of devices that are responsible for controlling pressure. 3. Use of low-quality oil with inappropriate viscosity. 4. Oil and coolant are mixed. 5. Oil pump intake is dirty. 6. Contamination of oil filter components. 7. Failure of safety or lubrication valves.
How to determine if an oil pump is faulty
There are two types of pump testing - without dismantling it and with dismantling it. Without removing the pump, you can verify its malfunction only when it is already in a “dying” state, so it is better to remove it to perform detailed diagnostics.
How to check the oil pump without removing it
Before directly testing the pump, it makes sense to check the oil pressure in the system using a pressure gauge. This way you can make sure that the oil pressure light is working correctly and did not light up in vain. To do this, a pressure gauge is screwed in instead of the emergency lamp pressure sensor.
Please note that the pressure value often drops precisely “when it’s hot,” that is, when the engine is warm. Therefore, the test must be carried out on a warm engine and at idle speed.
The minimum and maximum pressure values will differ for different machines. For example, for a VAZ “classic” (VAZ 2101-2107) the minimum emergency pressure value is 0.35...0.45 kgf/cm². It is under such conditions that the emergency lamp on the instrument panel is activated. The normal pressure value is 3.5…4.5 kgf/cm² at a rotation speed of 5600 rpm.
Reasons for the drop in oil pressure in VAZ cars
Instrument panel and oil pressure warning lamp
If the pressure drops, then, as mentioned above, a special light on the instrument panel begins to signal a problem. To begin with, it is recommended to check the entire circuit that is transmitted from the sensor to the warning lamp:
- take the wire from the sensor and lean it against the engine ground (if the circuit is in good order, the lamp will definitely go out);
- if everything is fine in the circuit, you need to remove the oil pressure sensor (if it is dry, then there is a problem, which you need to look for below).
And quite often it is the oil pump that causes the malfunction. The oil filter valve or some other element may be stuck in this part. By replacing a low-quality oil filter with a high-quality option, you can solve the problem. But if the pressure drops again, then you need to open the pan and check the oil receiver, and then the rubber sealing ring. If this does not help, you need to remove and disassemble the oil pump itself.
Causes of oil pump failure
The reason why the oil pump has failed can be determined by diagnostics. There are at least 8 main oil pump faults. These include:
- Clogged oil pickup strainer. It is located at the inlet of the pump, and its function is to coarsely filter the engine oil. Like the system’s oil filter, it gradually becomes clogged with small debris and slag (often such slag is formed as a result of flushing the engine with various means).
- Malfunction of the oil pump pressure reducing valve. Usually the piston and spring included in its design fail.
- Wear of the inner surface of the pump housing, the so-called “mirror”. Occurs for natural reasons during engine operation.
- Wear of the working surfaces (blades, splines, axles) of the oil pump gears. It happens both over time of long operation and due to rare changes of (very thick) oil.
- Using dirty or unsuitable engine oil. The presence of debris in the oil can be for various reasons - careless installation of a pump or filter, use of low-quality lubricating fluid.
- Careless pump assembly. In particular, various debris was allowed to get into the oil or the pump was not assembled correctly.
- Drop in oil level in the engine crankcase. Under such conditions, the pump operates at excessive capacity, which causes it to overheat and may fail prematurely.
- Dirty oil filter. When the filter is very clogged, the pump has to make significant efforts to pump the oil. This leads to its wear and partial or complete failure.
Regardless of the reason that caused the partial failure of the oil pump, it is necessary to carry out a detailed check of it and, if necessary, make repairs or complete replacement.
Checking the oil receiver
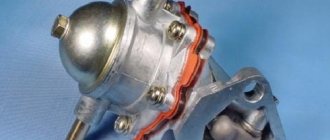
Oil pump VAZ 2109
As a rule, the oil receiver tube is equipped with a screen, at the end of which there is a mesh to prevent the penetration of large debris. Through this element, oil is sucked into the pump from the crankcase. Pump wear can occur due to carbon, contaminants, or other microscopic particles. To check the oil pickup:
- remove the oil pan from the engine;
- The element is replaced when it becomes clogged or broken;
- It is quite difficult to clean the oil receiver, since small debris may not be noticed.
How to Change the Oil Pump on a VAZ 2106
Replacing the oil pump on a VAZ 2101-VAZ 2107
Welcome! Oil pump. Usually called the "oil pump", it performs a very important function when the engine is running, namely, it supplies oil located in the oil pan, the crankshaft bearings and then through the air duct, distribution oil and the camshaft bearings, in most cases lubricating them.
Therefore, the oil pump plays a very large and important role in a car engine, and if it is damaged, then the lubrication system should not have the pressure it should have. (For more information about what will happen if the pressure in the lubrication system disappears, see the article “Useful information about oil pressure on a VAZ”).
The note! To replace the oil pump with a new one, you will need to stock up on: a basic set of wrenches, which will include a "10" and "13" wrench, and you will need to take the end sockets and extension cord to match the same heads, if possible, and pack your pockets with you!
Where is the oil pump located? It is located inside the engine so just by looking at the engine you won't see it, but to look at it you will first need to remove the crankcase, then you will need to remove the pan and only then will you see the oil pump with your own eyes.
READ Renault Logan Heater Fan Doesn't Work
When should I replace my oil pump? It can be replaced with:
1. Pressure drop in the vehicle's lubrication system at engine idle temperature, as shown by the oil pressure indicator.
2. As well as failure of the pump itself or its transmission, which, by the way, can be replaced individually without completely replacing the oil pump, see Article: “Oil pump repair.”
The note!
Sorry for the quality of lighting, this video shows the method of replacing the oil pump of you 2106
No.
Diagnostics and replacement of VAZ classic oil pump (LADA 2101-07)
Oil pump
the main part of any engine. And how much the engine depends on its condition. If you notice a drop in oil pressure after a hard blow to a bump that causes the crankcase to deform, it is likely that the oil pump, namely its intake pipe, is to blame for the drop in oil pressure! 3. And if your car's oil pressure is too high and outside the normal range, then most likely the culprit is a clogged relief valve, which can also be removed and replaced with a new one. (See How to remove this in the same pump repair article)
READ What is the fuel consumption of the Nissan Almera?
The note! What pressure in the lubrication system can you determine using a special indicator that shows the oil pressure in the system!
Features of disassembling the oil pump for inspection and repair
The photo below shows instructions on how to disassemble and reassemble the Priora oil pump. This process will be needed if it is necessary to check the parts of the device and replace them.
More details on how to disassemble the Priora oil pump, check it for suitability, as well as assemble and upgrade it will be described in detail in another material. You can find it on our website using the search or site map.
In conclusion, it should be noted that you should not put off checking, repairing or replacing the oil pump on a Priora. This material examined the signs of a device malfunction (both direct and indirect), its design features, purpose, and most importantly, how removal and replacement are performed. Using the instructions, you can perform the dismantling procedure yourself without the need to visit a car service center.