How to disable Kalina immobilizer: what you need to know
Let's start with the fact that an immobilizer today is actually a mandatory device in any modern car.
Many AvtoVAZ models are also no exception, including the popular Lada Kalina, which is equipped with an immobilizer. At the same time, unlike foreign cars, the immo on a VAZ may not work properly. In turn, Kalina immobilizer errors do not allow the car to be operated normally, which is a big problem for the owner. In such a situation, you may need to disable IMMO on Kalina. Next, we will look at how the immobilizer is disabled on Kalina, as well as what you should pay attention to.
Improve contact
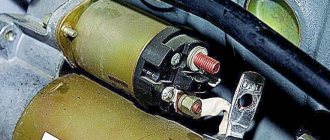
If the wiring from the generator to the battery is damaged, it is necessary to inspect it and, if necessary, replace the wire with a new one. In parallel with this, it is imperative to clean all contacts, both on the generator and on the battery (terminals). It is necessary to clean the contacts of the diode bridge on the generator and its positive output contact.
If the contact areas of the generator brushes are oxidized, then you need to clean them at the same time.
At the same time, pay attention to ensure that the graphite does not spread from the brushes to other elements of the generator. If the brushes are worn out, they need to be replaced with new ones.
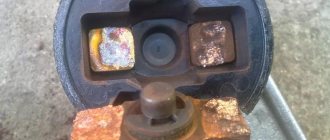
Sometimes it is enough to improve the “chocolate” contact.
The immobilizer does not work: reasons
If we consider the Lada Kalina model, the immobilizer can fail for various reasons. The most common ones can be identified:
- the control unit is not activated;
- the key is not recognized;
- mechanical and other damage to the block;
- damage to the power supply circuit of the unit;
If there is no power, then we cannot rule out the failure of the power supply fuse (fuse 10A on Kalina 1 and 15A on Kalina 2). This fuse is located in the mounting block under the dashboard. In cases where replacing the fuse does not solve the problem or the fuses burn after installation, diagnostics are necessary.
In any case, before visiting the service, you can try to normalize the operation of the immo in a regular garage. In other words, you should disable and enable the Kalina immobilizer, check the condition of the device itself, etc. Let's figure it out.
Activation and deactivation of the Kalina immobilizer
First of all, Kalina has two ignition keys (black and red master key). The red key is required to activate the immo. To enable Kalina's immobilizer, you will need to get into the car, close the door, then insert the red key into the lock and turn on the ignition.
When the buzzer beeps three times, turn off the ignition and then remove the key. Next, you need to insert the black key into the lock within 5 seconds and turn on the ignition. Next, the buzzer will emit three signals, then two more after a short period of time (for a total of 5). After 5 beeps, the ignition can be turned off and the key should be removed from the lock.
Then, within 5 seconds, you need to insert the red key, placing it in the ignition on position. Then you need to wait until the buzzer beeps 5 times, then turn off the ignition. Please note that the key should not be removed from the lock.
Next, the buzzer will emit 1 signal, after which you need to turn on the ignition within 5 seconds. Now you need to wait 5 seconds, during which time the emergency lights will blink and the sound signal will sound (the horn will sound a beep).
- Now you should proceed to setting a special immobilizer code. First you need to turn the red key and turn on the ignition, then wait until the immobilizer light on the instrument panel goes out.
Next, you will need to enter the numbers of the six-digit code (from 1 to 9). Input is carried out by quickly pressing the gas pedal (you need to press the pedal all the way). When you press the pedal, the immobilizer icon will light up, but if you release the pedal, the lamp will go out.
After entering the numbers, press and hold the gas pedal until the immobilizer icon goes out. This takes about 5 seconds. Then you can enter the second digit, etc. If an error is made when entering and saving, the immobilizer icon will not go out, but will blink. In this case, you will have to start the whole procedure all over again, activate the immo, and only then enter the code.
- The next step is to disable the immobilizer. If you need to disable the Kalina immobilizer, you need to know the code previously written into the memory of the control unit. By the way, in some cases, turning off and then activating the immo allows you to get rid of failures and errors (for example, if for some unknown reason the immobilizer on a Kalina is on, the engine has stalled and the Kalina’s engine will not start, etc.).
To disable the immobilizer using a code, you will need to do the following:
- Turn on the ignition. By the way, if a key with a damaged chip is used or the chip is not recognized, the starter may work, but the engine will not start, since the fuel supply circuit and ignition are still turned off.
- Next, the immobilizer icon will be activated on the instrument panel and start blinking. Next, you should wait about 60 seconds until the immo light goes out. Then you should enter the code by pressing the gas pedal. To separate the numbers when entering, you need to pause for about 6 seconds after each number, pressing the pedal all the way and keeping the pedal pressed all the way.
After the last digit is entered, the fuel pump circuit is activated and the immobilizer icon will light up on the instrument panel. If the code is entered incorrectly by mistake, the icon will blink. In such a situation, the code must be entered again, starting from the very first number.
Messages 19
1 Topic by YUliya.Veldyaksova 2015-05-25 00:40:31
- Yuliya.Veldyaksova
- New member
- Inactive
- Registration: 2015-05-25
- Messages: 6 Thanks : 2
Topic: Resolved: no response after turning the key
Tell me what could be happening: I came home, put the car on the alarm, after three hours I go out, remove the alarm, the anti-theft alarm, pump up the fuel pump, turn the key - completely zero. The car does not react at all, there is not even a click from the starter, as if the key had not been turned at all. I checked the terminals, they were oxidized, I think I cleaned them, still the same crap. What could it be? Car 2112 8 cl.
2 Reply from Anton 2015-05-25 05:26:57
- Anton
- Local
- Inactive
- Registration: 2014-02-20
- Messages: 2,207 Thanks : 255
Re: Solved: no reaction after turning the key
Does the ignition even turn on? if it turns on but the starter does not turn, look towards the starter, but it is possible that the signaling system is acting up
Tell me what could be happening: I came home, put the car on the alarm, after three hours I go out, remove the alarm, the anti-theft alarm, pump up the fuel pump, turn the key - completely zero. The car does not react at all, there is not even a click from the starter, as if the key had not been turned at all. I checked the terminals, they were oxidized, I think I cleaned them, still the same crap. What could it be? Car 2112 8 cl.
3 Reply from Serg 2015-05-25 10:51:52
- Serg
- Lada2111.rf fan
- Inactive
- Registration: 2013-07-29
- Messages: 830 Thanks : 363
- Car: 2111 dwg 2114 year 2008
Re: Solved: no reaction after turning the key
4 Reply from iliaBkmz 2015-05-25 11:01:59
- iliaBkmz
- Forum legend
- Inactive
- Registration: 2012-11-12
- Messages: 2,035 Thanks : 583
- Car: outlander and 2104
Re: Solved: no reaction after turning the key
+1 Not enough information. The castle itself or its contact group could well have died. Does the ignition turn on? If it doesn’t turn on, I would look towards the sigi or the main power wire that goes from the battery to the fuse block. If it turns on, it's the starter.
5 Reply from sergo9531 2015-05-25 17:43:34 (2015-05-25 17:44:59 edited by sergo9531)
- sergo9531
- Local
- Inactive
- From: Domodedovo
- Registration: 2014-01-12
- Messages: 578 Thanks : 208
- Auto: 21114
Re: Solved: no reaction after turning the key
YUliya.Veldyaksova , check if the “+” control comes to the starter. (you can use a voltmeter, a test lamp, or apply “+” with a screwdriver from the power “+” starter (very carefully! sparking is possible (if the starter works, the problem is in the control circuit).
6 Reply from YUliya.Veldyaksova 2015-05-25 19:34:14
- Yuliya.Veldyaksova
- New member
- Inactive
- Registration: 2015-05-25
- Messages: 6 Thanks : 2
Re: Solved: no reaction after turning the key
Not enough information? How can you remove the anti-theft if the ignition does not turn on? Maybe there’s simply nothing to be smart about someone else’s car and everything else, or read more carefully. And if you don’t understand it, there’s no point in writing at all. You think that if a girl writes, then you can be smart! Yes, judging by what you write, they are. You don’t understand, you just pretend. Special thanks to sergo9531. I tried to close it directly from the starter, no reaction. It looks like the anti-theft device is blocked, there is a strange crackling noise under the hood when I turn the ignition all the way.
Added: 2015-05-25 19:34:14
Maybe some relay is acting up or the contact has oxidized. There are no special skills, but I think that somewhere there is a break in the chain.
7 Reply from Serg 2015-05-25 20:20:12
- Serg
- Lada2111.rf fan
- Inactive
- Registration: 2013-07-29
- Messages: 830 Thanks : 363
- Car: 2111 dwg 2114 year 2008
Re: Solved: no reaction after turning the key
Not enough information? How can you remove the anti-theft if the ignition does not turn on? Maybe there’s simply nothing to be smart about someone else’s car and everything else, or read more carefully. And if you don’t understand it, there’s no point in writing at all. You think that if a girl writes, then you can be smart! Yes, judging by what you write, they are. You don’t understand, you just pretend. Special thanks to sergo9531. I tried to close it directly from the starter, no reaction. It looks like the anti-theft device is blocked, there is a strange crackling noise under the hood when I turn the ignition all the way.
Added: 2015-05-25 19:34:14
Maybe some relay is acting up or the contact has oxidized. There are no special skills, but I think that somewhere there is a break in the chain.
You can be offended as much as you like, it won’t help the matter, and if it’s not a problem, you shouldn’t go there or read more carefully. And if you don’t understand it, there’s no point in writing at all. You think that if a girl writes, then you can be smart! Yes, judging by what you write, they are. you don’t understand, but pretend
if you want to check, read the answers, I think you will find a lot of useful things for yourself
I tried to close it directly from the starter, no reaction. It looks like the anti-theft has been blocked, - This is the conclusion of an amateur who has no idea how this is done - either two M10 copper pins are closed (and preferably the car can start from gear) or the top pin and the retractor control contact, both of these operations bypass any whitefish and forcefully control the starter here one output three errors and how you are going to launch your pepelats.
Sorry for the ulcer, there is one like this
Added: 2015-05-25 21:20:12
Isn't the car a viburnum?
8 Reply from Aleksandr.21124 2015-05-26 10:53:17
- Aleksandr.21124
- Brother-in-law
- Inactive
- Registration: 2014-08-11
- Messages: 392 Thanks : 169
- Car: VAZ 21124
Lada Kalina model: immobilizer, removal and disabling of the IMMO function
First of all, if we consider the emergency shutdown of the immobilizer, you need to know where the immobilizer is located on Kalina, as well as how to disable the immobilizer with your own hands. In short, the immobilizer control unit on the Lada Kalina is located under the instrument panel (in the area of the central air duct of the interior ventilation and heating system).
There is also an antenna installed in the ignition switch for reading the signal (it has the shape of a ring). The transponder chip is installed in the head of the key. The key tag is read automatically when the driver inserts the key into the ignition.
For example, when disassembling Kalina 1 without air conditioning:
- First you need to disconnect the battery, open the ashtray, unscrew the 4 screws securing the case, and remove it from the special socket.
- Next, remove the 2 plugs located on the side of the emergency light button. Then you need to unscrew the 2 fastening screws under the plugs.
- Then the temperature and airflow direction switches are removed. Now you can pull the central cladding towards you by carefully removing its latches.
- Afterwards, you need to disconnect the electrical connectors connected to the elements on the cladding.
- Remove the standard unit, secured with two screws in a plastic case under the central air duct;
- Next, you need to press the latch and disconnect the connector from the unit.
This information may be useful if problems arise with the unit, as well as when installing additional equipment, the need to integrate an immobilizer crawler, etc.
- Let us add that there are also other methods of disabling, which depend on the type of control unit (ECU) on a particular car. For example, a Bosch M7.4 unit can be flashed so that the engine starts without problems; a key with a mark is not needed. In this case, the immobilizer icon will light up and then go out after the engine starts.
In turn, the Bosch 7.9.7 unit will require resoldering of the resistor, after which the firmware is carried out. However, if the block is January 5.1 or January 7.2, removing the immobilizer function from the block is somewhat more difficult. In short, you need to unsolder and reflash the EEPROM flash memory, integrate separate circuits, etc.
Of course, in such cases it is better to entrust the Lada Kalina immobilizer to experienced specialists who have certain skills and knowledge, as well as experience in performing such work. Otherwise, there is a risk of damaging electronic devices with all the ensuing consequences.
What's the result?
Taking into account the above information, it becomes clear that the immobilizer on the Lada Kalina, in case of malfunctions in its operation, should be turned off and turned on again. Such a “reboot” in some cases allows you to start the engine and continue to operate the car without problems.
If it is necessary to completely remove the immobilizer, then certain manipulations with the unit will be required, which are not recommended to be performed independently. In this case, you need to contact experienced specialists who specialize in repairing such devices.
Finally, we note that in addition to the standard immo, starting the engine can also be blocked by a car alarm. In this case, it is necessary to accurately determine the source of the problem, and then select the most appropriate methods to eliminate any failures or malfunctions of the alarm system, immobilizer (both standard and third-party) or the entire security system in the car.
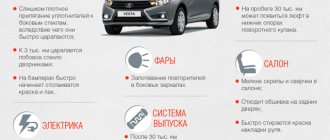
What malfunctions can there be and how to fix them?
When operating a VAZ Kalina, the following problems arise related to the operation of the immobilizer:
- The engine starter turns the crankshaft, but there is no spark in the cylinders. The immobilizer indicator on the instrument cluster lights up. Symptoms indicate desynchronization of the control unit and key. For repairs, the keys must be retrained. If the problem does not go away, then you should look for a fault in the electronic circuits of the controller or keys.
- “Floating” malfunctions during immobilizer operation. One of the common causes is liquid filling the connector pad. For repairs, you need to remove the unit and dry the electronic circuits. A faulty controller must be replaced.
- The power supply to the control unit does not work due to the failure of the fuse located in the mounting block (in the passenger compartment). On Kalina-1 cars, an insert with a rating of 10 A is used; on the later Kalina-2, the part was changed to 15 A. If the fuse fails repeatedly, it is recommended to conduct a detailed analysis of the car’s electronics.
timing belt
A terrible problem that occurs with viburnum is a broken timing belt. It is impossible not to notice this problem. It doesn’t happen that you start the car in the morning and the belt is broken.
No, the belt breaks while moving and nothing good can happen here. The valves meet the pistons and bend them, and the entire piston can often break apart, which can lead to expensive repairs.
These are all 16 valve engines; eight valve engines do not have such consequences, because the pistons have recesses for the valves, and it is these recesses that help avoid collisions between the valves and the pistons.
No one is safe from a belt rupture, just check it more often, then you can notice the threat of a rupture and replace the belt that threatens to break in time. There is also an option to install pistons with grooves in a 16-valve engine, this will also help avoid serious consequences if the belt breaks.
Another problem - the pulley turned. Occasionally it happens that it turns over two or three teeth, because of this the sensor shows the wrong phase and the engine does not start. You need to remove the belt and check whether the mark on the pulley and the rear cover of the timing belt matches.
If not, then you need to turn the pulley (in rotation) until the marks match. The work is troublesome, you need to disassemble a lot of things to get where you need to, you also need to keep track of the marks on the camshaft and crankshaft, in general there is a lot of fuss.
Where is the immo in Lada Kalina?
The anti-theft agent is installed inside the dashboard, behind the central trim containing deflectors for air supply to the cabin. Access to the controller is possible by disassembling part of the panel. The antenna, which serves to communicate between the key and the unit, is located on the steering column around the ignition switch.
The arrow indicates the immobilizer unit, the panel trim and air ducts have been removed
The location of the immobilizer on the Lada Kalina is rather unfortunate, since the connector block is filled with liquids that have entered the air ducts of the air conditioner. The problem often occurs when flushing the air conditioner radiator.
How to activate the immobilizer?
Often, a VAZ Kalina car reaches its owner with an inactivated immobilizer. To carry out the independent activation procedure, you need both car keys (with a red mark and a regular one). A prerequisite is that the doors are closed (until the limit switch is activated).
To ensure the correctness of the immo activation procedure on Kalina, it is recommended to refuel the car, since the low fuel level signal is identical to the sound during programming.
Activation on Kalina-1
The training procedure on Kalina-1 is as follows:
- Take the training key with the red mark and insert it into the ignition switch.
- Turn the key to the ignition switch point. Since the immobilizer is not active, after six seconds the control indicator on the instrument cluster should turn on. If this does not happen, the system is in an active state and further steps are not performed.
- Turn off the ignition, and the immobilizer indicator will switch to rapid flash mode. The flashing mode lasts six seconds, which are allocated to the owner to install a regular key in the ignition switch.
- Turn the lock cylinder to the activation position. The correctness of the procedure is confirmed by the alarm buzzer sounding three times. The absence of a sound indication indicates that the time interval allocated for installing the key has been exceeded, or that the immobilizer is faulty. The option of “training” the standard key to work with a device from another car cannot be ruled out.
- Wait 5-6 seconds, the buzzer should sound two more times. Then you need to turn off the ignition and remove the key from the lock.
- After this, the owner has six seconds at his disposal, during which he must turn on the ignition with the key with a red mark. During this time, the immobilizer indicator light flashes on the instrument cluster.
- After turning on the ignition, the buzzer should sound three times. Wait a few seconds until the second series of beeps sounds (two separate beeps).
- Turn off the ignition, leaving the key in the lock. After some time, a single signal will be sent by the buzzer, and the warning lamp on the instrument panel will begin to flash with increased frequency. Up to 15 seconds pass between turning off the ignition circuits and the indicator switching to the accelerated flashing mode. The time interval depends on the model of the immobilizer control unit installed on the car.
- After this, within 10 seconds you need to turn on the ignition briefly (for 3 seconds).
- Turn off the ignition. The alarm should sound three times. This confirms the successful completion of programming.
- Wait until the indicator on the instrument cluster stops blinking. Then you should remove the red key, programming the devices is completed.
Activation on Kalina-2
On Kalina-2 the procedure is different:
- When you turn on the ignition with the key with a red mark, three short beeps will follow from the buzzer. After the third signal passes, the ignition is turned off and the key is removed from the lock. Important - if the car was operated with a red key, the immobilizer will not make sounds. In this case, you need to wait a few seconds and move on to the next step.
- Within 5-6 seconds, insert a regular key and activate the ignition circuits again. Three beeps will sound, followed by a pause followed by two more beeps.
- Change the keys in the lock (within 6 seconds). After turning on the ignition with the red key, three signals will be given, then two more.
- Turn off the ignition, leaving the key in the lock. A buzzer will sound, after which the key will be turned to the ignition switch position. The car's standard horn will sound, indicating that the regular key has been stored in memory.
- Turn off the ignition. The indicator on the instrument cluster will go off. Otherwise, we are talking about device failure or programming error.
The procedure for activating the immobilizer on the VAZ Kalina, as well as Priora and Grant is shown in a video from the channel “avtodopka. ru".
How to disable the immobilizer on Kalina?
The immobilizer is disabled if problems arise in the operation or use of the alarm system with remote start. In the second case, a more competent solution would be to install a bypass device.
If the owner intends to block the immobilizer on Kalina, then he needs to know the type of ECU (engine control controller) that is installed on his car.
When using crawlers, two schemes are possible:
- using a device with a key or chip inside;
- use of a keyless crawler equipped with a chip signal emulator.
What will you need?
Depending on the type of ECU you will need:
- K-Line adapter;
- a laptop with pre-installed software, for example, ChipLoader 1.97.7 or analogues;
- soldering iron or soldering station;
- additional wires and elements (in accordance with the diagram);
- additional 12 V power supply;
- Firmware may be required for a unit with the immobilizer function disabled.
DIY shutdown instructions
The work is carried out with the removal of parts from the car, so the owner must have the skills to disassemble and assemble components. Otherwise, it is better to contact a car service.
Bosch M 7-4 controller
Sequence of steps to deactivate Bosch M 7.4:
- Turn off the on-board power supply. The unit is equipped with two plugs; for further work you need to remove the large one, the small one can be left in place.
- Install the wires required to supply additional positive voltage into pins A4 and B2 on the wiring harness. The conductors are connected to the battery through a switch.
- Carefully place the block in place and fasten the fasteners.
- Install the adapter into the diagnostic connector and connect to the computer. For correct operation, a data exchange rate of no higher than 38400 bps is recommended.
- Run the software and then turn on the power on the auxiliary wiring.
- Turn on the ignition, after which communication with the unit will be established.
- Read EEPROM data and save it.
- Load new firmware into memory with the immobilizer disabled.
- After the firmware is completed, close the software and then turn off the ignition.
- Remove the plug and disconnect any additional wiring.
- Check the ability to start the engine with a key without a chip. At the same time, the immobilizer indicator on the instrument cluster will turn on and off.
Location of pins in the plug
Bosch 7-9-7 controller
The modification of the Bosch 7.9.7 block consists of removing one resistance. Since the dimensions of the parts are small, it is recommended to carry out the work in a specialized service center. Without soldering skills and without additional equipment, the unit can be damaged.
Controller January 7-2
In order to disable the immobilizer on Kalina with ECU January 7.2 yourself, you must:
- Turn off the on-board power supply and remove the unit from the vehicle.
- Connect the controller connector in accordance with the diagram.
- Install the adapter on your computer.
- Apply voltage using the switch, simulating the operation of the ignition.
- Launch the software on the computer and establish communication with the programmable unit.
- Read the firmware and save it on your hard drive.
- Read the EEPROM data and delete it programmatically (using the “delete IMMO” button). If the deletion is successful, a corresponding message will be displayed.
- Turn off the program, “turn off” the ignition switch.
- Gain access to the immobilizer unit installed on the vehicle and remove the harness from the connector. It is necessary to connect pins 9 and 18 in the plug, which will ensure the normal functioning of the car’s electronics.
The photo below shows some steps to remove immo January from memory.
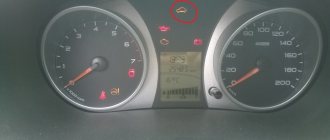
The battery charging light is on
When you start the engine, many different lights come on on the dashboard, one of them is the battery charging light. Ideally, it lights up as soon as you start the engine and goes out after a while. This indicates that the generator and all its circuits are fully operational and the battery receives a charge of 13.7-14.3 Volts, that is, it is charging. However, various breakdowns often occur due to which the light bulb continues to glow, glows dimly, or does not light at all. To deal with such malfunctions, you need to understand a little about the design of the generator and the principle of its interaction with the battery.
A little theory
On our website Vodi.su we have already described in detail the design of a car generator. Let's just say that electricity is generated in it by the rotation of the crankshaft. As the speed increases, the voltage also increases, but it must be within the limits indicated above, otherwise the battery will be overcharged, which threatens the electrolyte boiling and sulfation of the plates.
To prevent this from happening, a relay regulator is installed in the rotor excitation circuit, thanks to which a stable voltage is supplied to the battery.
The signal from the generator to the warning lamp is transmitted through a fuse, which is also located in the generator itself. Accordingly, the light stays on until the generator starts working and transmits voltage to the battery.
The charge from the generator passes through:
- diode;
- regulator;
- generator brush;
- slip rings;
- winding and wiring.
Thus, if at least one of these elements does not work correctly or fails, the readings of the light bulb cannot be trusted, although charging may be supplied to the battery.
Why is the battery charging light on?
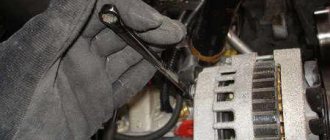
There can be a lot of reasons. So, if after starting the engine the warning light continues to burn at full intensity, most likely the alternator belt has stretched and needs to be replaced. At the same time, you can hear characteristic sounds from the engine. On Vodi.su we have also already told you how to tighten or change a belt.
The second common cause is poor contact at the battery terminals or at the terminals from the generator. Contacts oxidize over time and need to be cleaned.
Failures in the mechanical part of the rotor: the bearing fell apart, the bushings flew off. You will have to completely remove the generator, disassemble it and replace broken parts. Fortunately, you can always find a repair kit of three bushings for a VAZ-2107 or other domestic cars on sale.
Failure of the diode bridge, relay regulator. In this case, you need to check them with a multimeter, or contact a specialist. Repairs often cost more than purchasing a new generator.
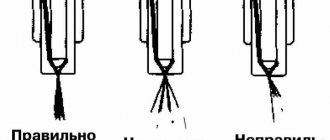
Over time, graphite brushes also wear out and need to be replaced regularly. When they are worn out, the charge is not transferred to the winding, and accordingly the light bulb begins to glow dimly, although the charge is transferred, but very weakly. Use a voltmeter as a guide. If the brushes are not changed in time, the battery will constantly be undercharged, which can lead to gradual shedding of the plates.
Generator diagnostics
First of all, the voltage is measured at the battery terminals. If it is lower than required, you need to check the entire circuit step by step:
- belt tension level;
- measure the voltage at each of the generator terminals - at each terminal it should be half as low as at the battery;
- check fuses, relays, diodes;
- check the resistance in the dashboard, the quality of soldering of wires.
If it turns out that the breakdown lies in the generator itself, it will have to be removed and also checked. In particular, they first check the relay regulator, then measure the resistance of the rotor field winding using an ohmmeter. It should not be lower than 4.5 ohms. Also, using the tester, you can determine whether the winding circuit is open.
It is clear that such malfunctions cannot be avoided. However, there are simple tips to help extend the life of the generator:
- first of all, regularly check the quality of its fastening - constant vibrations lead to mechanical damage;
- Clean external surfaces from time to time;
- check the belt tension, tighten if necessary;
- quality of the rotor bearing - remove the belt and spin the rotor, it should rotate smoothly, without play or clicks.
You also need to monitor the quality of the connection of the wires to the generator and voltage regulator.
Thus, a lit battery charging light while the engine is running is a serious reason to carry out diagnostics.
Please note that it can also light up if you have installed a lot of additional equipment - subwoofers, lights, lights
Where is the immobilizer located on Kalina?
The immobilizer control unit on the Lada Kalina is located deep in the instrument panel in the area of the central air duct of the microclimate system. The ring-shaped signal reader antenna is located in the ignition switch. The chip itself is mounted in the head of the key and is read automatically when the key is inserted into the lock.
Device access
To access the block you will need the following tools:
- Phillips screwdriver;
- plastic screwdriver for removing decorative elements on the panel;
- extension with universal joint and head for Phillips screws (for removing the block).
The sequence of disassembling the panel on a basic Kalina 1 without air conditioning:
- Disconnect the battery from the on-board network.
- Open the ashtray and unscrew the four screws securing the housing, remove it from the socket.
- Remove the two plugs located on the sides of the alarm button.
- Unscrew two more fastening screws that are located under the plugs.
- Remove the rotary switches for temperature and air flow direction.
- Pull the central trim towards you and remove it from the latches.
- Disconnect electrical connectors to trim-mounted components.
- Remove the standard unit, secured in a plastic case under the central air duct, using two screws.
- Disconnect the wiring plug from the unit by pressing the latch.
The photo shows the main stages of removing the immobilizer unit on a VAZ Kalina.
Removing the immobilizer control unit
1. Remove the negative terminal of the battery.
2. Remove the instrument panel trim.
3. Using a Phillips screwdriver, unscrew the two screws securing the unit to the instrument panel, holding the screw nuts with a 10 mm wrench.
4. Remove the block from the instrument panel and disconnect the harness block
Removing the remote control unit
Raise the rear seat cushion. Loosen the screws securing the carpet in the rear left door opening.
3. Having folded back the edge of the carpet and the sound insulation, disconnect the wiring block from the remote control unit.
4. Using a 10 mm socket wrench, unscrew the two nuts securing the block to the body.
5. Remove the remote control unit.
How to activate the immobilizer?
Kalina 1 and 2 cars are equipped with two ignition keys - black and red. The second is used to activate the immobilizer and is sometimes called the master key.
Before activation, the car owner should make sure that there are at least 10 liters of gasoline in the car’s tank. This is necessary so that the warning buzzer about the emergency fuel level does not interfere with the immobilizer settings.
- Sit behind the wheel and close the door.
- Insert the red key into the lock and activate the ignition.
- After three beeps, turn off the ignition and remove the key.
- Within 5 seconds, insert the black key and activate the ignition.
- After five (three and after a while two more) buzzer signals, turn off the ignition and remove the key.
- Within 5 seconds, install the red key and place it in the ignition switch position.
- Wait for the buzzer to sound five times and deactivate the ignition. The key must remain in the lock.
- A single buzzer will sound, after which you must turn on the ignition within 5 seconds.
- Wait another 5 seconds, after which the hazard warning lights should flash and the horn sound briefly.
- Turn off the ignition and, holding the key in the lock, wait for the immobilizer symbol on the instrument cluster to disappear.
On some vehicles, visual rather than audible indication is possible by flashing the immobilizer warning light on the instrument cluster.
The video from the avtohelpII channel shows the activation of the immobilizer on the Kalina 2 car.
Poor quality fuel
Spark plugs can also flood due to bad gasoline. This is another reason why the engine does not start. Very often, condensation forms in winter and clogs the coarse filter. To avoid this, periodically add pure alcohol to the tank in winter.
It smokes, sneezes, smokes like a snake Gorynych, this often happens in our time, but, as a rule, people have some remnants of conscience and they try not to reduce gasoline to a non-flammable state.
The car can even run on this kind of gasoline, the only problem is that it is absolutely not useful for the engine. To avoid this, refuel at large chain gas stations.
They, as a rule, monitor their reputation and do not allow this to happen, but if it turns out that you have filled in burnt gasoline, and even so much that the car does not want to start, you can drain the gasoline and fill in another, road gas, or if there is not much left , you can fill in more good 95 gasoline and its mixture with palenka will be more or less normal.
Of course, there are severe cases when filters and injectors become clogged and they have to be washed out for a long time and tediously (or whatever is easier to change), but this happens mainly when buying gasoline from some garage “oil workers”.
It’s quite easy to protect yourself from them - just refuel at trusted places and under no circumstances buy gasoline from any garage gas dealers. In principle, they are not such a common occurrence now, but they still occur, and people buy gasoline from them because it is cheaper, but it is better not to do this, the stingy pays twice - an immutable truth.
And if you really had to buy such a piece of water, at least filter it, there is no need to clog the filter with nozzles.
Emergency immobilizer shutdown
To disable the immobilizer, a digital code is used, which must first be written into the memory of the control unit.
To do this, you need to go through the activation procedure described above, and then follow the steps:
- Turn the red key to the ignition on position and wait until the immobilizer warning light on the instrument cluster goes out.
- Dial the numbers of the future six-digit code. For this, any numbers from 1 to 9 are allowed. The dialing is performed by quickly pressing the gas pedal all the way. When pressed, the immobilizer lamp will light up, and when released, it will go out. After dialing the number, press the gas pedal and hold it until the immobilizer indicator goes out (about 5-6 seconds). Then you can dial the second number and so on. If you make a mistake when typing and saving, the immobilizer indicator will not go out, but will start flashing. In this case, the entire procedure is carried out again, starting with activation.
- After dialing and recording the last digit, the immobilizer indicator will not go off. You need to hold the gas pedal for another 10 seconds and release.
- Turn off the ignition and remove the red key from the lock.
In case of problems with starting, you need to disable the immobilizer using the previously recorded code, for this you will need:
- Turn on the ignition system. If you use a key with a damaged or unrecognized chip, the starter may briefly engage, which will not lead to starting, since the fuel supply and ignition circuits are disconnected. The immobilizer indicator on the instrument cluster will activate and flash.
- Wait about a minute until the icon goes out.
- Enter the code by pressing the gas pedal. To enter a number, quickly press the pedal all the way. The number of presses corresponds to the code number. To separate between numbers, use a long press on the pedal (about 6 seconds). The input procedure essentially repeats the process of programming the code.
- After entering the sixth digit, the fuel pump circuit will turn on, and the immobilizer indicator will also light up. If you enter a number incorrectly, the icon will flash. In this case, the code entry procedure is repeated from the first digit.
How to disable the immobilizer with your own hands?
There is an option to temporarily disable the immobilizer, which may be required when installing an alarm system with auto start.
To install the bypass system, use:
- A control unit with a key or tag embedded in it. A key or chip is inserted into a device located deep in the dashboard. When autostart is activated, the alarm relay activates the unit and the engine starts, bypassing the main circuit.
- Blockless immobilizer bypass unit. A separate control device is installed that emulates an ignition key with a chip.
Another way to disable the immobilizer on Kalina depends on the type of ECM (control unit).
Bosch M7 4 block
Before you begin performing an operation on a car with a Bosch M7.4 unit, you must prepare:
- a computer or laptop with Winflashecu v.1.14 preinstalled (the distribution is available for free download);
- adapter and cord K-Line, for example, VAG-COM 409.1;
- pre-downloaded software for the unit with disabled immobilizer support;
- several wires with different lengths.
To disable the immobilizer on Kalina, you need to perform the following steps:
- Remove the wires from the battery terminals and disconnect the wiring harness connectors from the ECM installed under the hood of the vehicle. To disconnect, you need to remove the protective top cover and pull out the flat connector lock. All work is carried out on a large block. The small block can not be disconnected from the block.
- Insert the wire into contacts A4 and B2 from the harness side. These cables will be used to supply additional 12 V positive voltage. To do this, they are connected to the battery terminal through an intermediate switch.
- Reinstall the connector and fasten the fastener.
- Connect the adapter to the diagnostic connector located in the passenger compartment. The connector is located under a plastic cover installed on the center console.
- Set the data transfer rate to 38400 bps in your computer settings.
- Launch the Winflashecu application and select the port number, speed (38400 bps) and block type M7.4 in the dialog box. In the lower right corner of the window there will be a message “No connection”.
- Apply additional power to pins A4 and B2.
- Turn on the ignition. The “No communication” notification should change to “Communication with the ECU” and the buttons for starting operations will become active.
- Read the EEPROM (unit software) data and save it to the computer's hard drive.
- Select new software and load it into the unit’s memory using the “Write EEPROM” button.
- Wait for confirmation that the download was successful.
- Close the program and turn off the ignition.
- Remove the auxiliary power wires.
- Check whether the car can be started with a key without a chip. The immobilizer symbol will light up in the instrument cluster when starting and go out after a few seconds.
Bosch block 7 9 7
When installing the Bosch 7.9.7 control unit (Euro 2 standards), it must be modified by resoldering one resistor. It is best to entrust this task to a person who has experience with soldering small electronic components. After this, the block is “reflashed” according to the procedure described above.
Block January 7 2
In the case of using ECM type January 7.2, the procedure has a completely different look.
Before starting work you need to prepare:
- K-Line adapter, for example, VM9213;
- computer or laptop with ChipLoader 1.97.7 installed;
- soldering iron with a power of 25-40 W;
- solder and rosin;
- wires and switch;
- resistor with a resistance of 3.6 to 5 kOhm;
- plugs for connecting wires to the control unit;
- 12 V battery (standard or from an uninterruptible power supply);
In order to remove the immobilizer function from the unit, you should:
- Disconnect power from the vehicle's on-board network and remove the ECU.
- Wrap the block body with insulator.
- Assemble the diagram in accordance with the photo.
- Connect the adapter to the computer.
- Using the toggle switch, simulate turning on the ignition.
- Launch the application and establish a connection with the block.
- Read the factory data of the unit and save it to the hard drive.
- Read the EEPROM and click the “Delete IMMO” button. Wait for the confirmation window to appear with the text “Immobilizer successfully removed.”
- Close the application.
- Turn off the ignition with the toggle switch.
- Before installing the control unit on the car, you must turn off the signal from the immobilizer device. If the block is removed from the IMMO block, then it is necessary to close the contacts numbered 9 and 18.
Block January 5 1
To disable the immobilizer in the January 5.1 block, it is necessary to unsolder and reprogram the EEPROM flash memory. It is not recommended to perform this operation yourself, but rather to perform it in a workshop, since in the process of performing the task you will need a programmer and a hot air gun for soldering.
Why is the battery charging light on?
There are several situations that lead to incorrect operation of the battery-generator connection:
– malfunction of the relay regulator – poor tension, wear or slippage of the generator belt – wear of the generator bearing – blown fuse – poor contact at the battery terminals, at the generator terminal or ground wire – wear of the generator brushes or brush holders – wear of the ignition switch.
To find out what exactly caused the battery light to light up, you will need to carry out diagnostics - check the voltage at the battery terminals with the engine running. The multimeter should receive a voltage of 13.5-14.3V; a value below the specified values will indicate that there is no charging.
- If the battery lamp does not light up, and the multimeter shows a voltage of 12V, and the battery itself is discharged, you need to clean the terminals and high-voltage wires, and then measure again. If this method does not correct the situation, connect one multimedia electrode to the “30” battery terminal and the other to ground. If the voltage is higher than on the battery, strip the “30” terminal. It would also be a good idea to replace the wire from the generator to the battery.
- If the lamp indicates that the battery is charging, the voltage is kept in the optimal range, but the battery is discharged, and under load the voltage rushes to the far left position on the multimeter - the reason may be a weak alternator belt tension or a faulty bearing. We also recommend checking the diodes with a multimeter for breakdown. It would be a good idea to make sure that the length of the generator brushes is at least 5 mm.
- If the lamp does not light, but the battery does not charge, the fuse is most likely blown and needs to be replaced.
- If the lamp does not light and the charge does not flow, but all devices are functioning, the reason may be in the excitation winding of the generator. Remove the wire from terminal “61” of the generator, connect it to the negative side - a lit lamp will confirm the problem in the winding. We also recommend cleaning the connector. The reason may also be the burnt-out lamp itself.
- If the battery light is on and does not go out after starting the engine, and charging is either intermittent or absent at all, the reason is poor contact of the wire with the connector on the dashboard. We also recommend checking the relay-regulator by applying voltage to its contacts - the best option is when the voltage on the brushes is 12V, but if not, the relay needs to be replaced.
You can buy all the necessary spare parts to troubleshoot the battery charging lamp in the IXORA store. Qualified managers will definitely help you make the right choice and answer all your questions. Contact us, it’s profitable and convenient.
| Manufacturer | Detail number | Name | Applicability* |
| CARGO | 131828 | Bearing spacer for CHEVROLET Metro 1.0 | CHEVROLET Metro 1.0 |
| CARGO | 135237 | Bearing spacer for MERCEDES BENZ | MERCEDES-BENZ |
| CARGO | 139929 | Bearing sleeve for BELL B 40 | BELL B 40 |
| CARGO | 140084 | Bearing for MAZDA 323 | MAZDA 323 |
| CARGO | 140120 | Bearing for LAND ROVER Range Rover 3.5 | Land Rover Range Rover 3.5 |
| CARGO | 140495 | Centering bearing for VOLVO VNL DD 60 | VOLVO VNL DD 60 |
| CARGO | 142001 | Bearing for PORSCHE CAYENNE | PORSCHE CAYENNE |
| CARGO | 250187 | Bearing for MAZDA 2 1.4 16V | MAZDA 2 1.4 16V |
| CARGO | 250187 | Bearing for SKODA Felicia 1.3 | SKODA Felicia 1.3 |
| CARGO | 250998 | Bearing for FORD Fiesta 1.6 TDCi | FORD Fiesta 1.6 TDCi |
| OPTIBELT | 10X1250 | V-belt for FORD Fiesta | FORD Fiesta |
| OPTIBELT | 10X950 | V-belt for VW Corrado | VW Corrado |
| OPTIBELT | AVX13X750 | V-belt with open side edges for Hyundai Porter | Hyundai Porter |
| OPTIBELT | 3PK1000 | Poly V-belt for Hyundai ix45 | Hyundai ix45 |
| OPTIBELT | 3PK668 | Poly V-belt for Fiat Bravo | Fiat Bravo |
| OPTIBELT | 3PK715 | Poly V-belt for Honda CRX II | Honda CRX II |
| OPTIBELT | 3PK815 | Poly V-belt for Honda CRX II | Honda CRX II |
| OPTIBELT | 3PK890 | Poly V-belt for Renault Safrane I | Renault Safrane I |
| OPTIBELT | 3PK913 | Poly V-belt for Fiat Bravo | Fiat Bravo; Palio |
| OPTIBELT | 4PK1015 | Poly V-belt for Suzuki Baleno | Suzuki Baleno |
* Please check the applicability of parts specifically for your car with our managers by phone (calls within Russia are free).
You can get professional advice when selecting a product and detailed information on all your questions by calling (calls within Russia are free).
Why does the immobilizer not work and how to fix it?
The main reasons for immobilizer failure are:
- Inactivated control unit and desynchronization of key and vehicle. To correct these faults, a reactivation procedure is usually sufficient.
- Liquid getting into the inside of the block. In this case, the device will have to be removed from the machine and dried. If after this the system functionality is not restored, the unit must be replaced.
- Failure of the power supply fuse. The immobilizer is powered by a 10-amp (on Kalina 1) or 15-amp (Kalina 2) fuse installed in the mounting block in the instrument panel. If after replacing the fuse the device does not work or the fuse link fails again, the car should be towed for a thorough diagnosis to a service center.
conclusions
To summarize, it must be said that in Kalina it is better to repair all the above faults at a car service center, since these are serious breakdowns and require the intervention of specialists.
The car is equipped with two keys: a working key with a remote control and a training key with a red insert at the end.
After activating the immobilizer, the training key becomes “their own” for the control units; in addition, you can encode a second working key. The diagnostic equipment remote control only works after the immobilizer is activated.
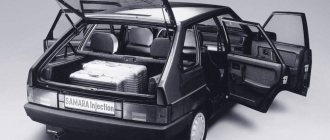
The car is equipped with an electric door lock (central locking).
The drives are built into the side door locks. The electric tailgate lock is installed only on some vehicles.
When the security alarm is turned on, all doors are automatically locked. The car is armed by pressing button 1 once
When you press button 2, the security alarm is turned off and the driver's door lock is disabled.
To disable the passenger door locks, press button 2 again.